Integrating PKCS#11-based High Security Modules
On this page
As of version 2.3.0, Curity supports the use of Hardware Security Modules (HSM) for storing keys. An HSM is basically a small computer -- a computer that does nothing but cryptography. They can sign messages, decrypt cyphertext, and so forth. This purpose-build computer can connect to a full-featured computer like the one used to run Curity using USB, PCI, etc.; some even support communication over a network using some sort of TCP protocol. To manage all these different topologies and interfaces, a standard called PKCS#11 was created to provide HSM clients (like Curity) with a normalized API for communication. YubiHSM v. 2 supports PKCS#11, so it can be used with Curity to sign tokens, encrypt SSL communication and perform other sensitive operations. In this tutorials, we'll explain how to configure it and use it with Curity. The process to do so with other types of HSMs that support PKCS#11 is very similar. To make this tutorials more practical though, only the exact steps necessary to setup the YubiHSM will be described.
The following high-level component diagram shows how YubiHSM and Curity relate:

In this diagram, there are two run-time nodes, but there could be any number of them. Each of these connects to the YubiHSM via the yubihsm-connector; this component is a sort of "USB multiplexer", allowing synchronized concurrent access to the YubiHSM over a network. Each Curity run-time node is configured to use an HSM and a certain PKCS#11 shared library is loaded into each. In the YubiHSM case, this library communicates with the yubihsm-connector to perform cryptographic operations. The administrative connection to the run-time nodes is the same as it is when no HSM is used, and the admin node has no connection to the HSM. Also, client app communication is unchanged in this kind of deployment, and they continue to use OAuth and OpenID Connect without regard to how the keys are stored.
Installing YubiHSM
Once you have the YubiHSM hardware, you'll need a bit of software. You can get the SDK from Yubico's website. Once you have it, unpack it, and you'll find lib directory containing the modules mentioned above. To simplify later steps, copy those to /usr/local/lib. Whenever you want to use the YubiHSM, you'll need to start the yubihsm-connector. This is located in the bin directory and can be run from there by issuing the command $YUBIHSM_SDK_DIR/bin/yubihsm-connector from a shell (where $YUBIHSM_SDK_DIR is the location where you unpacked the SDK). You will need a configuration file on each run-time node saying where the yubihsm-connector is located; this can't be configured in Curity, unfortunately. This file can be located anywhere, can have any name, and needs to contain only one setting: connector = http://127.0.0.1:12345 (or whatever host the connector is on if it is different from the Curity run-time nodes). This can be created from a shell with this simple command:
$ echo 'connector = http://127.0.0.1:12345' > /etc/yubihsm_pkcs11.conf
For the dynamic library that will be loaded into Curity to be able to find this, you need to export an environment variable from the shell with the path to the file1, like this:
$ export YUBIHSM_PKCS11_CONF=/etc/yubihsm_pkcs11.conf
Any time you interact with the YubiHSM, the yubihsm-connector needs to be running. This is the case even when working on the same machine as the HSM is plugged into. It is this way because all communication to the USB-based device is funneled through this connector -- only the connector can talk to the YubiHSM. Start it by invoking it directly using a shell, and open another shell where you'll perform the subsequent steps2.
Lastly, you need to install the latest release of OpenSC. This will provide you with some command line tools that can be helpful for managing keys in the HSM. YubiHSM provides a shell that can do the same, but that will not be described in this tutorials.
Once these preparations are done, the necessary software is installed and ready to use. The first thing you need to use it for is to create some new keys!
Creating a New Key in the YubiHSM
With the yubihsm-connector runing and OpenSC installed, you can list the keys on the YubiHSM with this command:
$ pkcs11-tool --module /usr/local/lib/yubihsm_pkcs11.dylib -l --pin 0001password -O
This command uses pkcs11-tool which is a general purpose PKCS#11 client and not specific to YubiHSM; you can use this same tool and a similar command when using it with other HSMs. The --module parameter points out where the Yubico PKCS#11 library is. This was included with the YubiHSM SDK and it was recommended to copy it to /usr/local/lib; if you installed it somewhere else, you'll need to use the applicable path. The -l flag means that the client should login to the HSM before performing the specified operation; this is usually done interactively, but for convenience of testing it can be provided on the command line using --pin and the PIN. YubiHSM ships with a factory default PIN of password in the first session. So, the PIN that should be used if the factory defaults have not changed is 0001password. The -O flag to pkcs11-tool instructs the client app to use PKCS#11 to list all objects on the HSM. Anticlimatically, this will not produce any interresting output at this point:
Using slot 0 with a present token (0x0)
If this fails, see the troubleshooting tips at the end of this tutorials.
To create a new key in the YubiHSM, issue a command like this one:
$ pkcs11-tool --module /usr/local/lib/yubihsm_pkcs11.dylib -l --pin 0001password \--keypairgen \--key-type rsa:2048 \--usage-sign \--usage-decrypt \--label "Demo_1"
This creates a new RSA key that is 2,048 bytes long. It can be used for signing and encryption3. A label of Demo_1 is also applied to the new key to help identify it. The output should be something like this:
Using slot 0 with a present token (0x0)Key pair generated:Private Key Object; RSAlabel: Demo_1ID: c06aUsage: decrypt, signPublic Key Object; RSA 2048 bitslabel: Demo_1ID: c06aUsage: encrypt, verify
The ID of the key will be used in a few of the subsequent commands, so note that down. For convenience, you can define a shell variable by doing KID=c06a (or whatever KID the YubiHSM used in your case).
Sign the New Key
In order for Curity to access any key on the HSM, it must be signed. It can be self-signed, but any unsigned key will be ignored. Self-signing the key is easy to do using a recent version of OpenSSL and the following four steps.
If you are on a Mac and OpenSSL crashes or doesn't work as expected, install the newest version using Homebrew and try that instead.
-
Start by invoking
opensslwithout any parameters. This will open an interactive shell. -
In OpenSSL's shell, type
engine -t dynamic -pre SO_PATH:/usr/local/lib/engines/engine_pkcs11.so -pre ID:pkcs11 -pre LIST_ADD:1 -pre LOAD -pre MODULE_PATH:/usr/local/lib/yubihsm_pkcs11.dyliband click Enter. The output should be something like this:12345678(dynamic) Dynamic engine loading support[Success]: SO_PATH:/usr/local/lib/engines/engine_pkcs11.so[Success]: ID:pkcs11[Success]: LIST_ADD:1[Success]: LOAD[Success]: MODULE_PATH:/usr/local/lib/yubihsm_pkcs11.dylibLoaded: (pkcs11) pkcs11 engine[ available ] -
Then, type
req -engine pkcs11 -new -key 0:c06a -keyform engine -out /tmp/Demo_1_cert.pem -text -x509 -days 3640 -subj "/CN=Demo_1/"(using yourKIDinstead ofc06aand -- for non-testing purposes a more appropriate expiration period and DN). This will prompt you to login to the HSM. Use the session ID pre-pended to the PIN (e.g.,0001password). -
Exit the OpenSSL shell, and install the cert into the YubiHSM with this command:
$ pkcs11-tool --module /usr/local/lib/yubihsm_pkcs11.dylib -l --pin 0001password \--write-object /tmp/Demo_1_cert.pem \--type cert \--id $KID \--label "Demo_1"
You can check that it was installed by listing the objects on the HSM, like this:
$ pkcs11-tool --module /usr/local/lib/yubihsm_pkcs11.dylib -l --pin 0001password -OUsing slot 0 with a present token (0x0)Private Key Object; RSAlabel: Demo_1ID: c06aUsage: decrypt, signPublic Key Object; RSA 2048 bitslabel: Demo_1ID: c06aUsage: encrypt, verifyCertificate Object; type = X.509 certlabel: Demo_1ID: c06a
Note how a third object is now shown -- the self-signed X.509 certificate associated with the key.
Now that we have a key and an associated certificate in the YubiHSM, it can be used from Curity.
Logging into the HSM from Curity
Each run-time node will be configured to communicate with the HSM. This requires a PIN or password. This can be provided interactively on the command line during startup, directly on the command line as an argument, or in the environment variable IDSVR_HSM_PIN. If this PIN isn't provided to each run-time node, they will not be able to login to the YubiHSM and use keys that reside on the device. So it is very important to start the nodes with this credential. The command line argument that should be used is -i. It can also be helpful to provide --debug-hsm in non-production environments to get extra HSM-realted debug log messages in the server log. In this case, a node might be started like this:
$ idsvr --debug-hsm -i 0001password
Enabling the Use of an HSM in Curity
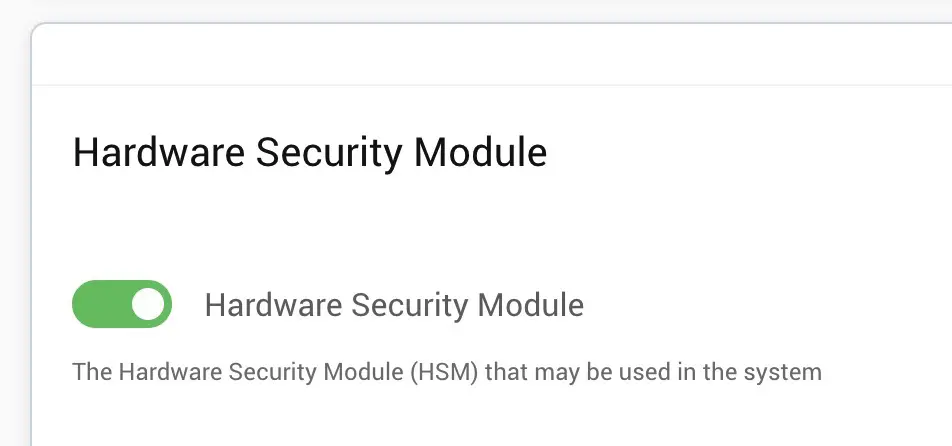 To begin using the HSM, login to the Curity admin UI4, and click on the
 System tab. Scroll down to the Hardware Security Module section and toggle on the HSM. Once this is toggle on, you can enter various information about how the run-time nodes will connect to the HSM. For instance, the PKCS#11 dynamic library that should be used must be entered. The slot ID or index can also be entered. If certain mechanisms should be included or excluded (e.g., to limit the functionality of the HSM), these can also be entered. For YubiHSM, the following screenshot shows how the HSM should be setup:

For more details about the meaning of these configuration settings, how to obtain the slot ID or index, how to configure the HSM using the REST API or CLI, please refer to the product documentation.
Using YubiHSM for SSL
Even without committing the changes, configuring the HSM will allow keys to be configured as ones that reside in the HSM. To see this, Click Facilities in the top-right corner of the UI. Then navigate to Keys and Cryptography → TLS, click + next to Server SSL Keys. Here you have three options, including Use from HSM. This option is not possible until an HSM is configured. Now that it has been, we can enter the name of the key created earlier, Demo_1 into the Name text field. Then, select the Use from HSM option and click Next.

On the subsequent screen, select rsa from the Type drop-down list and then enter the key size that was used when the key was made in the HSM, namely 2048. Finally, click OK.

At this point, the key can assigned to a run-time node. To do this, click on the System tab, and then on Deployments from the sidebar. Click the name of one of the nodes you have configured to open the Update Server dialog box. If the node is using the https protocol, the SSL Server KeyStore drop-down should be visible. From this list, select the key that was just defined. Then, click Close.
Finally, commit the changes by selecting Commit from the Changes menu and clicking OK in the Deploy Changes dialog box. If things worked and you are logging at the DEBUG level, you should see log messages like these in the run-time nodes' logs:
name = IDSVR_HSMlibrary = /usr/local/lib/yubihsm_pkcs11.dylibattributes = compatibilityslotListIndex = 0showInfo = truesunpkcs11: Initializing PKCS#11 library /usr/local/lib/yubihsm_pkcs11.dylibsunpkcs11: login succeededpkcs11keystore: engineGetEntry found private key entryAliases in HSM: [Demo_1]HSM is loaded
From this, you can see that the configured library was loaded, what slot list index was used, that login with the PIN worked and that the HSM has one key with the alias Demo_1. It also means that SSL is now being performed using a key from the HSM! To test this, open a connection to the node with a browser or openssl, like this:
$ echo | \openssl s_client -connect localhost:8443 -showcerts | \openssl x509 -inform pem -noout -text
This should output info about the self-signed cert that was imported onto the YubiHSM, include a line like this: depth=0 CN = Demo_1.
Using the YubiHSM to Sign Tokens
Signing tokens in hardware is just cool! It's easy to setup as well; the process of configuring it is very similar to using the keys on the YubiHSM for performing SSL, described previously. To do this, start by adding a new signing key to the configuration. This can be done by:
- Clicking Facilities in the top-right corner of the UI.
- Navigate to Keys and Cryptography → Signing, click + next to Signing Keys.
- A dialog box very similar to the one shown when configuring the new SSL key will be displayed. Enter a name that matches the key on the YubiHSM --
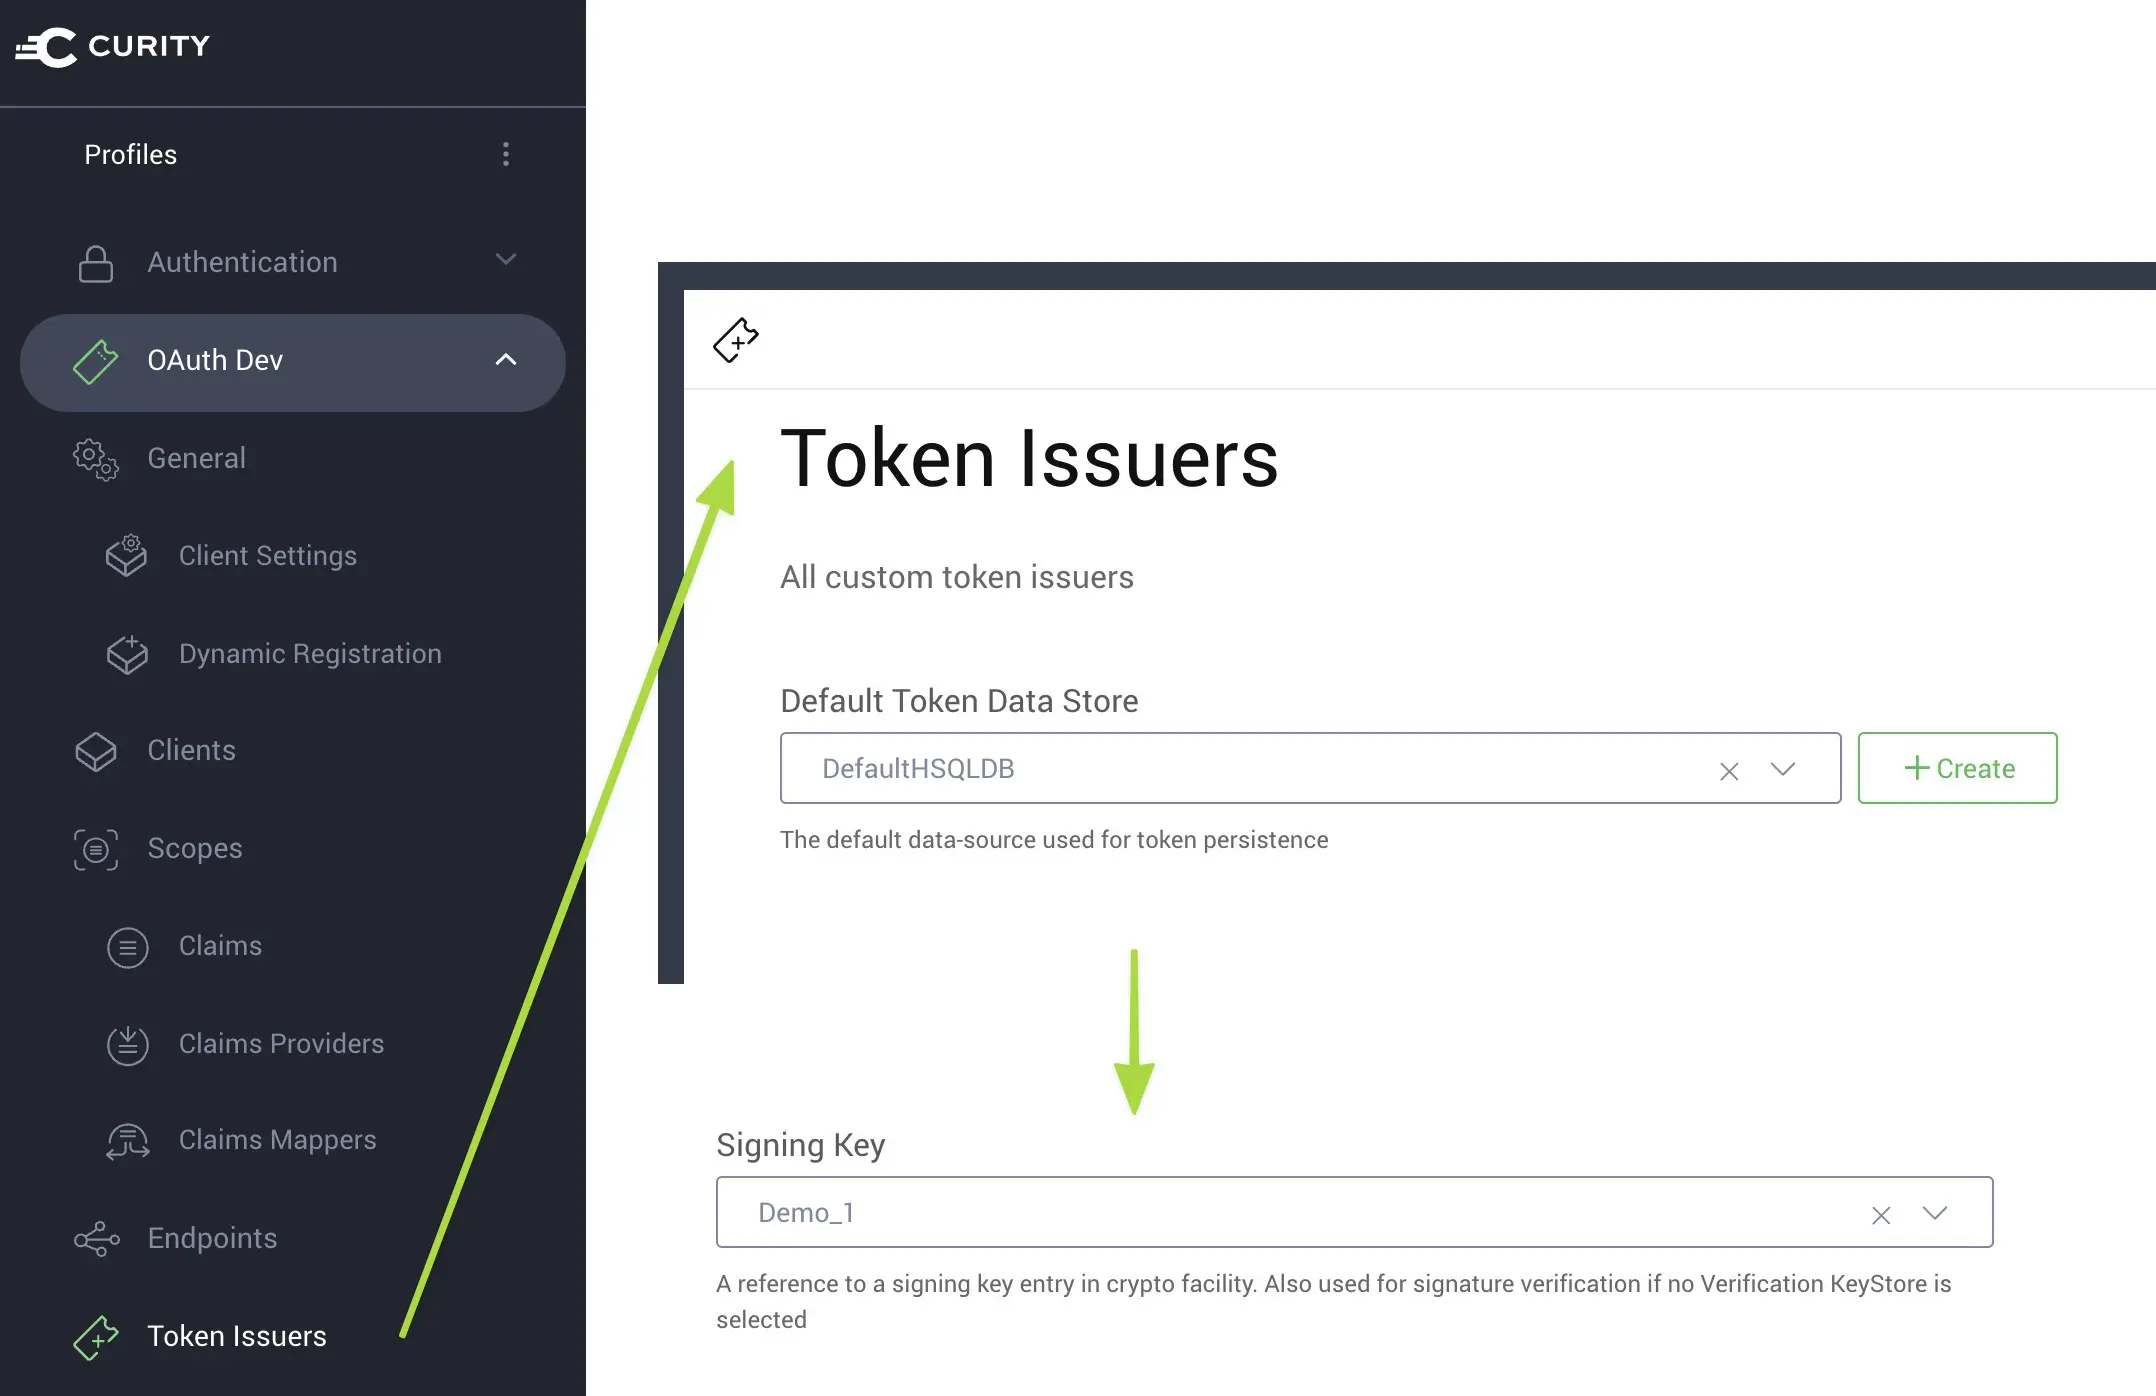
Demo_1. Then selectUse from HSMand click Next. - For type, select
rsafrom the Type drop-down list and use2048as the key size. Then, click OK. - In an OAuth profile, click Token Issuers from the sidebar navigation.
- In the Signing Key drop-down, select the new signing key.
- Commit the changes by selecting Commit from the Changes menu and clicking OK in the Deploy Changes dialog box.
Now, if you perform some action that results in a JWT being issued for a client in the same OAuth profile, you can verify that the signing key was used by signing the payload of that JWT with the cert created previously using OpenSSL and uploaded into the YubiHSM. The details of how to do this are left as an exercise for the reader.
Troubleshooting
If the output of pkcs11-tool is an error similar to that shown in the following listing, then make sure that the YUBIHSM_PKCS11_CONF environment variable has been set and exported:
yubihsm_pkcs11: Error opening configuration file '(null)'error: PKCS11 function C_Initialize failed: rv = CKR_FUNCTION_FAILED (0x6)Aborting.
If the output is something like the following, then make sure the environment variable refers to a configuration file that actually exists:
yubihsm_pkcs11: Error opening configuration file '/non-existent/yubihsm_pkcs11.conf'error: PKCS11 function C_Initialize failed: rv = CKR_FUNCTION_FAILED (0x6)Aborting.
If you get output such as the following, ensure that the configuration file contains a line with the text connector = http://127.0.0.1:12345; if it does, ensure that the host and port are correct and that the yubihsm-connector is listening at that location.
error: PKCS11 function C_Initialize failed: rv = CKR_FUNCTION_FAILED (0x6)Aborting.
You can also check the status of the yubihsm-connector by requesting the URI /connector/status at the host where it is running (e.g., http://127.0.0.1:12345/connector/status. The output should be something like this:
status=OKserial=*version=1.0.0pid=10465address=127.0.0.1port=12345
If things still don't work, try starting the yubihsm-shell command, which is included in the YubiHSM SDK's bin directory. With this running, type connect and then start a new authenticated session by issuing the command session open 1 password (where password is the default one from the factory -- literally password without the session ID 0001 used by pkcs11-tool). With this session established, the various commands that require authentication (like list keys) can be performed:
yubihsm> list objects 1Invalid argument 2: 1 (e:session)
(This looks like a failure, but it means that there are no keys in session 1, which pkcs11-tool reported with silence.)
If the PKCS#11 library can't be loaded into Curity, the two most common problems are:
- Starting the node without exporting the
YUBIHSM_PKCS11_CONFenvironment variable. - Not starting the node with the PIN required to login to the HSM.
In either of these cases, the node will be an unrecoverable configuration state, so it will shutdown. Fix the issue and restart the node.
If all else fails, check the YubiHSM on-line documentations or contact us or Yubico for help.
Conclusion
In this short tutorials, you hopefully gained an overview of how the YubiHSM can be integrated with the Curity Identity Server. From the steps outlined above, you hopefully saw that the configuration and combined use of these two products is very simple; with a few changes, SSL and signing keys can be configured to reside in the YubiHSM. This duo provides an excellent level of security without dramatically increasing the operational overhead of managing the system. It also provides a clear distinction between key management and identity management. This kind of deployment also increase the Separation of Duties (SoD), helping to avoid insider attacks.
1. This has to be done before the Curity run-time node is started. [↩]
2. You can also start the yubihsm-connector and disregard all its output like this: yubihsm-connector >/dev/null 2>&1 &. This allows you to keep using the same shell, but hides any output from the connector (which isn't usually needed). [↩]
3. For non-test scenarios, you would use two different keys for these two different purposes. [↩]
4. All other management interfaces (CLI, REST API, XML files) can also be used to configure the HSM; those aren't described in this tutorials, however. [↩]
Customer Stories
Learn how organizations run identity and API security at scale.
Read customer storiesWas this helpful?