Database Client Management with GraphQL
On this page
This tutorial shows how to administer OAuth clients stored in a database, using GraphQL. Database clients can be useful in some cases, in order to reduce the size of large configurations, or when clients vary considerably between stages of the deployment pipeline.
When managing database clients, the Curity Identity Server acts as a Web API, so you must present an access token and use scopes and claims for authorization. In order to provide a secure and flexible solution, there are a few layers, which are explained in the following sections.
Prerequisites
First, ensure that you have an enterprise (or trial) license file, that allows access to GraphQL endpoints for database client administration. GraphQL in the Curity Identity Server is supported for different types of data sources, but there might be some limitations. See the documentation to understand them.
Expose a GraphQL Client Endpoint
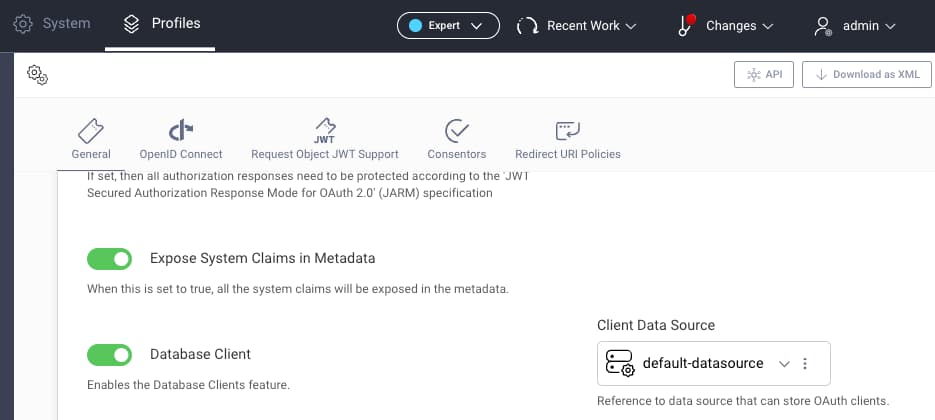
The Database Client Management Guide provides full details on administering clients, and the process starts by activating database clients. To do so, navigate to Profiles → Token Service → General, enable the option and specify the data source in which to store clients:
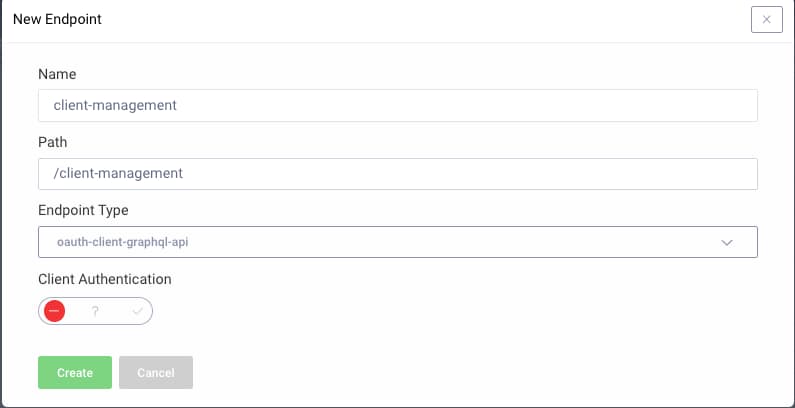
Next, navigate to Profiles → Token Service → Endpoints and expose a GraphQL endpoint for client management:
Configure a Client Application
A GraphQL client application must be used to administer database clients. The DevOps dashboard is a built-in GraphQL client, which can be useful to compare against when developing your own app. See the Running the DevOps Dashboard tutorial for a fast working setup.
Configure Access Tokens
Next, you must configure the GraphQL client to use access tokens that will be accepted at the GraphQL client management endpoint. Doing so requires an authorization manager to be configured, and you can choose from one of the following methods:
| Type | Behavior |
|---|---|
| Scope Authorization Manager | The client only needs to configure a scope. All users of the client get the same access to database clients. This has only limited usefulness, such as for a fast development setup. |
| Groups Authorization Manager | The client configures a scope and also a groups claim. Different users can be assigned different coarse-grained privileges. This option is usually used in the DevOps dashboard to enable different teams to access the Curity Identity Server. |
| Attribute Authorization Manager | The client configures a scope and also a groups claim. Different users can be assigned different fine-grained privileges. This is recommended when an organization uses GraphQL in its own applications. |
When using a GraphQL client other than the DevOps dashboard, also ensure that the authorization manager is configured under Profiles → Token Service → General, so that the authorization manager comes into effect when database clients are administered.
GraphQL Database Client Operations
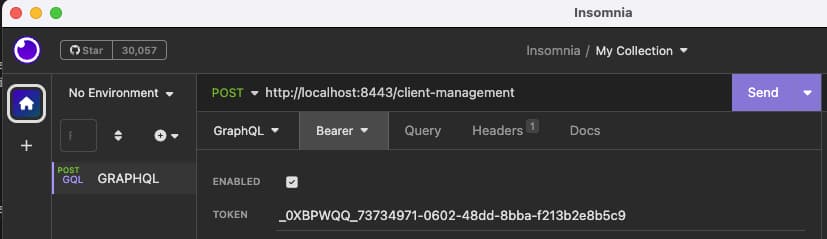
When getting started, a GraphQL client utility, such as the Insomnia tool, can be used to send requests. The DevOps dashboard example deployment exposes a database client management endpoint at the following URL:
http://localhost:8443/client-management
For a fast local development setup, one option is to run the DevOps dashboard, then use browser tools to view network requests. This enables you to quickly get a working access token to paste into the tool:
The request data in the following subsections can be pasted into Insomnia's GraphQL pane and sent to the client management endpoint. After pasting each payload into the tool, click Prettify GraphQL before sending each request, to verify the syntax and ensure that a correct request is sent.
Once the requests and responses are understood, you can begin GraphQL coding against user accounts in your own apps. There are many client libraries available to choose from, in all the main technology stacks. These provide similar features to the Insomnia tool, to enable productive development.
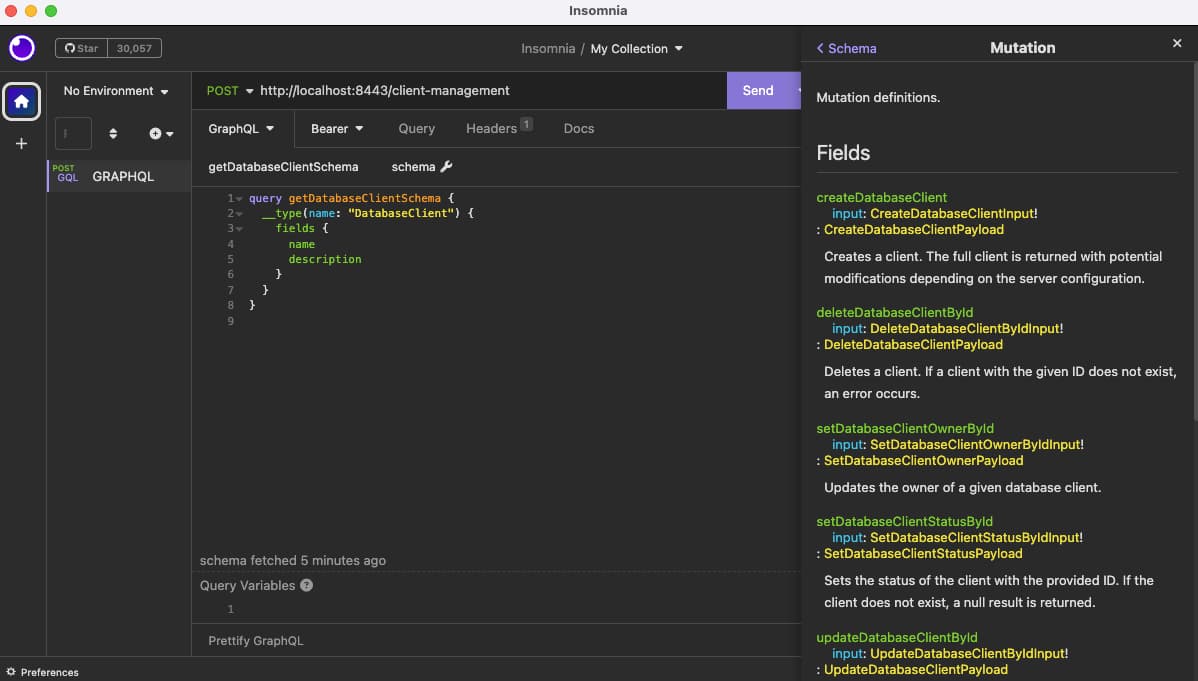
Get the Database Client Schema
You can retrieve the fields available on the main DatabaseClient object with this GraphQL introspection command, then click the send button:
query getDatabaseClientSchema {__type(name: "DatabaseClient") {fields {namedescription}}}
The schema can then be browsed to understand the GraphQL queries, mutations, request fields and response fields. These values are also available via intellisense.
Create a Client
Start by running a mutation to create a new database client. When storing only a subset of clients in the database, a recommended approach is to adopt a convention, such as using a db- prefix for all clients that use database storage. An example request payload is sent here, along with fields to return in the response:
mutation createDatabaseClient {createDatabaseClient(input: {fields: {client_id: "db-web-client",capabilities: {code: {type: CODE},},client_authentication: {primary: {secret: {secret: "Password1"}}},redirect_uris: ["https://www.example.com"],scopes: ["openid"]}}) {client {client_idcapabilities {code {type}}redirect_uris}}}
In the event of the input payload failing validation, such as when required fields are omitted, validation errors are returned. Otherwise, the client is created and the response fields requested are returned:
{"data": {"createDatabaseClient": {"client": {"client_id": "db-web-client","capabilities": {"code": {"type": "CODE"}},"redirect_uris": ["https://www.example.com"]}}}}
Get Clients
The following type of query can be issued to get clients without any filter criteria:
query getDatabaseClients {databaseClients(first: 10) {edges {node {client_idcapabilities {code {type}}scopesredirect_uris}}}}
Alternatively an item can be found by its client_id field:
query databaseClientById {databaseClientById(id: "db-web-client") {client_idcapabilities {code {type}}scopesredirect_uris}}
Either query will return a payload with the fields requested:
{"data": {"databaseClients": {"edges": [{"node": {"client_id": "db-web-client","capabilities": {"code": {"type": "CODE"}},"scopes": ["openid"],"redirect_uris": ["https://www.example.com"]}}]}}}
Update a Client
To change an item, send a mutation with the fields to update. Array fields are entirely replaced with any values sent:
mutation updateDatabaseClientById {updateDatabaseClientById(input: {client_id: "db-web-client",fields: {access_token_ttl: 900,scopes: ["openid","profile"]}}) {client {client_idaccess_token_ttlscopes}}}
This again returns the requested fields in a JSON response:
{"data": {"updateDatabaseClientById": {"client": {"client_id": "db-web-client","access_token_ttl": 900,"scopes": ["openid","profile"]}}}}
Delete a Client
To delete a client, simply specify its client_id, and request a deleted flag in the response if required:
mutation deleteDatabaseClientById {deleteDatabaseClientById(input: {client_id: "db-web-client"}) {deleted}}
A successful operation indicates that the resource was deleted as expected. If the resource has already been deleted, then subsequent requests will return deleted: false.
{"data": {"deleteDatabaseClientById": {"deleted": true}}}
Migrating Clients
Starting with the Curity Identity Server version 8.4. you can store clients in a database, separately to the main configuration. You can programmatically migrate clients with the help of the RESTCONF and GraphQL APIs. Use the former to read existing client settings and the latter to save the clients to the database. The following code shows the main algorithm, and the code can be adapted, if for example you only want to migrate a subset of clients.
const oauthProfileIds = await restconfClient.getProfileIds();for (const profileId of oauthProfileIds) {const configClients = await restconfClient.getClientsForProfile(profileId);for (const configClient of configClients) {const databaseClient = mapper.convertToDatabaseClient(configClient);await graphqlClient.saveClient(databaseClient);}}
At the top of this tutorial, there is a link to a GitHub repository with an example migration script, implemented in TypeScript. The repo shows how to generate TypeScript types for the database clients GraphQL schema. It then shows how to transform configuration clients to database clients. Finally, it sends a GraphQL mutation to save each client.
Conclusion
OAuth clients in the Curity Identity Server can be easily managed from the DevOps dashboard or other GraphQL clients. To do so, a client management endpoint must be activated, which can then be called using GraphQL API requests. This provides a friendly API with modern tooling for developers.
Customer Stories
Learn how organizations run identity and API security at scale.
Read customer storiesWas this helpful?