Verifiable Credentials Issuance with Pre-authorized Code
On this page
The Curity Identity Server supports issuing digital credentials as defined by the OpenID for Verifiable Credentials Issuance (OpenID4VCI) draft specification. In order to get credentials from an issuer, the wallet must obtain an access token that will allow it to ask for the credentials. The access token can be obtained in two ways:
- through a regular OAuth code flow,
- using the pre-authorized code flow (which is a new OAuth flow).
This tutorial shows how to use the latter to obtain a verifiable credential. If you are new to the concept of verifiable credentials, have a look at verifiable credentials in action, showcasing real-world scenarios and benefits.
Experimental Support for Verifiable Credentials
Note that the issuance of verifiable credentials is an experimental feature of the Curity Identity Server, which means it should be used with caution in production environments. The supported standards, technologies and configuration options might change in future releases in a compatibility-breaking manner. Feel free to try out these feature to get a hang of how things work. We also welcome any feedback from early adopters.
The pre-authorized code flow was added in version 8.3.0 of the Curity Identity Server. Make sure to use at least this version when following this tutorial.
The support for Verifiable Credentials Issuance must be enabled manually in the Curity Identity Server.
Enable Verifiable Credential Issuance
You have to update the JVM options for the corresponding service role and set se.curity.verifiable-credentials.enable to true. Use one of the options below for that purpose.
In the Admin UI, ensure you use the Expert mode.
- In the System tab navigate to Deployment.
- Select an appropriate service role, e.g.
Default. - Select the Other tab.
- In JVM Options add the system property
-Dse.curity.verifiable-credentials.enable=true. - Commit the changes.
- Restart the server for the changes to take effect.
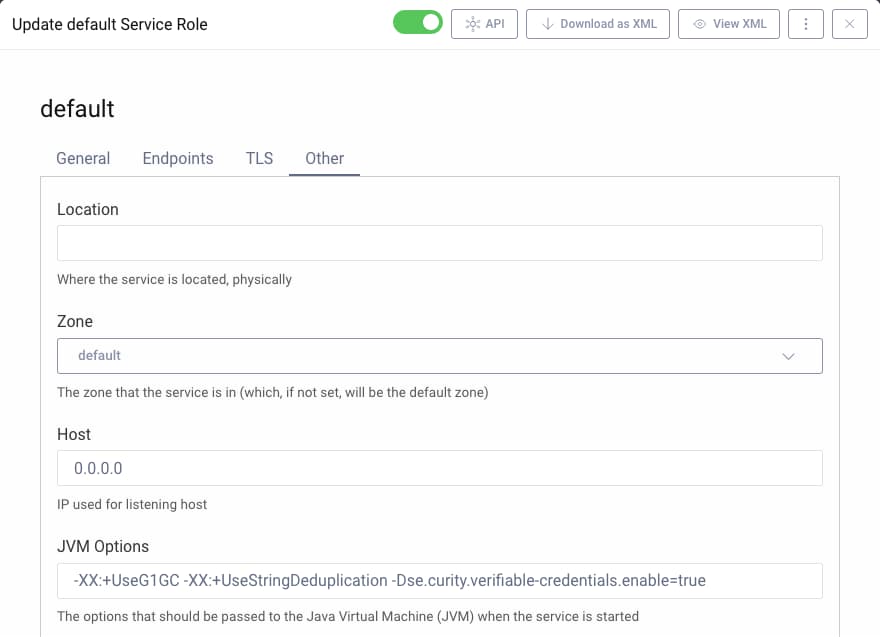
You may copy the system property from the code snippet.
-Dse.curity.verifiable-credentials.enable=true
The Use Case
In order to understand how to use the new flow, imagine the following scenario. There is a university that has a website that allows its alumni to get information about their diploma in the form of a verifiable credential. In order to be able to obtain those credentials and put them in her wallet, the user needs to log in to the university website in the same manner she used to when studying there. It might be something as simple as a username and password or more sophisticated, like verifying the authentication with additional factors or using hardware security keys. It's the website's responsibility to verify the user's identity at this point. Once the user is logged in she can click on a button "get my diploma". Clicking this button presents a QR code. The user now takes her device with the wallet and scans the QR code. This allows the wallet to perform a verifiable credentials issuance flow with the university's server that issues the diploma credentials. Once the flow is finished, the user has a verifiable credential representing her diploma in her wallet.

Note that in this flow, the wallet does not need to make the usual authorization code flow in order to get an access token that allows it to obtain verifiable credentials.
To makes things simpler to follow, the above example use case is used in this tutorial.
Server-Side Configuration
To configure the Curity Identity Server for pre-authorized code VC issuance the server needs to be able to issue verifiable credentials, which requires a few configuration options to be set properly. There is a convenient configuration file in the repository linked from this tutorial that will take care of all the basic configurations. Download the file idsvr/basic-vci-configuration.xml and merge it with your existing configuration. The configuration assumes that the Curity Identity Server was configured with the basic configuration wizard and that the default names are used for profiles. If you prefer to configure the server manually, follow this tutorial that shows how to set up the Curity Identity Server for verifiable credentials issuance. Note that you will have to adjust two things:
- use
UniversityDegreeas the credential type, - name the scope that contains the credential's claims
university_degree.
Refresh the Signing Certificate
When merging configuration from the provided XML file, you might have to refresh the certificate used to sign the issued credentials. Have a look at this section of the VCI tutorial to learn how to do it.
Once you've completed the basic setup follow these steps to enable the pre-authorized code flow. If you're only interested in running the flow straight away, then see the linked repository's readme file for options.
In order to use the pre-authorized flow, the wallet must obtain the pre-authorized code and (optionally) a PIN. The OpenID4VCI specification does not specify how the code is obtained and leaves the decision to implementers. In the Curity Identity Server the pre-authorized code and PIN can be issued as a result of calling a server endpoint during some flows. A token procedure is applied to the endpoint to add the code and PIN to the response. Currently, the following flows can be used to issue the pre-authorized code and PIN:
- at the token endpoint, the code grant and token exchange,
- at the introspection endpoint, the token introspection flow.
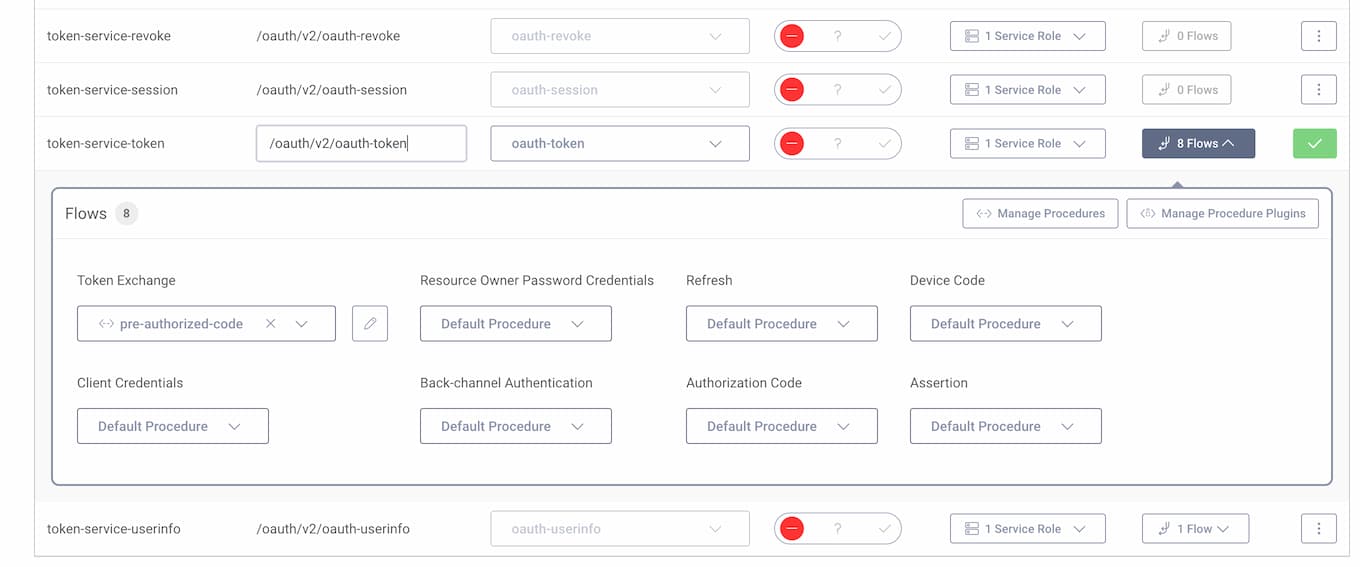
This tutorial adds a procedure to the token exchange flow. To add the procedure:
- Go to Profiles -> Token Service -> Endpoints.
- Expand the flows next to the token endpoint.
- Under the Token Exchange flow, expand the dropdown and select + New procedure.
- Give the procedure a name, e.g.
pre-authorized-codeand click Save.
- The browser will open a popup window with a token procedure editor. Paste the following code to the editor and click Update. You can then close the editor window.
/*** @param {se.curity.identityserver.procedures.context.TokenExchangeProcedureContext} context*/function result(context) {// Get the default data to be associated to the pre-authorized codevar preAuthorizeCodeData = context.getDefaultPreAuthorizedCodeData()preAuthorizeCodeData.scope = "university_degree openid_credential"// Change its expiration to be 10 minutespreAuthorizeCodeData.expires = preAuthorizeCodeData.created + 600// Issue both the pre-authorized code and the user PINvar preAuthorizedCodeIssueResult = context.preAuthorizedCodeIssuer.issue(preAuthorizeCodeData);// Response will contain the following fieldsreturn {"pre-authorized_code_expires_in": secondsUntil(preAuthorizeCodeData.expires),"pre-authorized_code": preAuthorizedCodeIssueResult.preAuthorizedCode,"user_pin": preAuthorizedCodeIssueResult.userPin};}
Note line 7, where the proper scope is set on the pre-authorized code. The access token must contain the proper scope so that the wallet is authorized to retrieve the correct credentials.
Next, create a new client that will be used by the university website application.
- Go to Profiles -> Token Service -> Clients.
- Click on + New Client.
- Name the client
university-website. - Give the client two capabilities:
Code FlowandToken Exchange. - Add the OAuth Tools redirect URIs.
- Select
secretas the authentication method with the valuePassword1. - This client does not need any scopes enabled.
Commit the changes made to the configuration.
Testing the Flow
Several requests need to be made in order to complete the flow, and this tutorial uses OAuth Tools to fulfill them. These are the requests listed in order:
- Obtain an access token for the university-website client.
- Exchange the token for a pre-authorized code and PIN.
- Make a pre-authorized code flow request to obtain an access token for the wallet.
- Make a VCI flow call to obtain verifiable credentials.
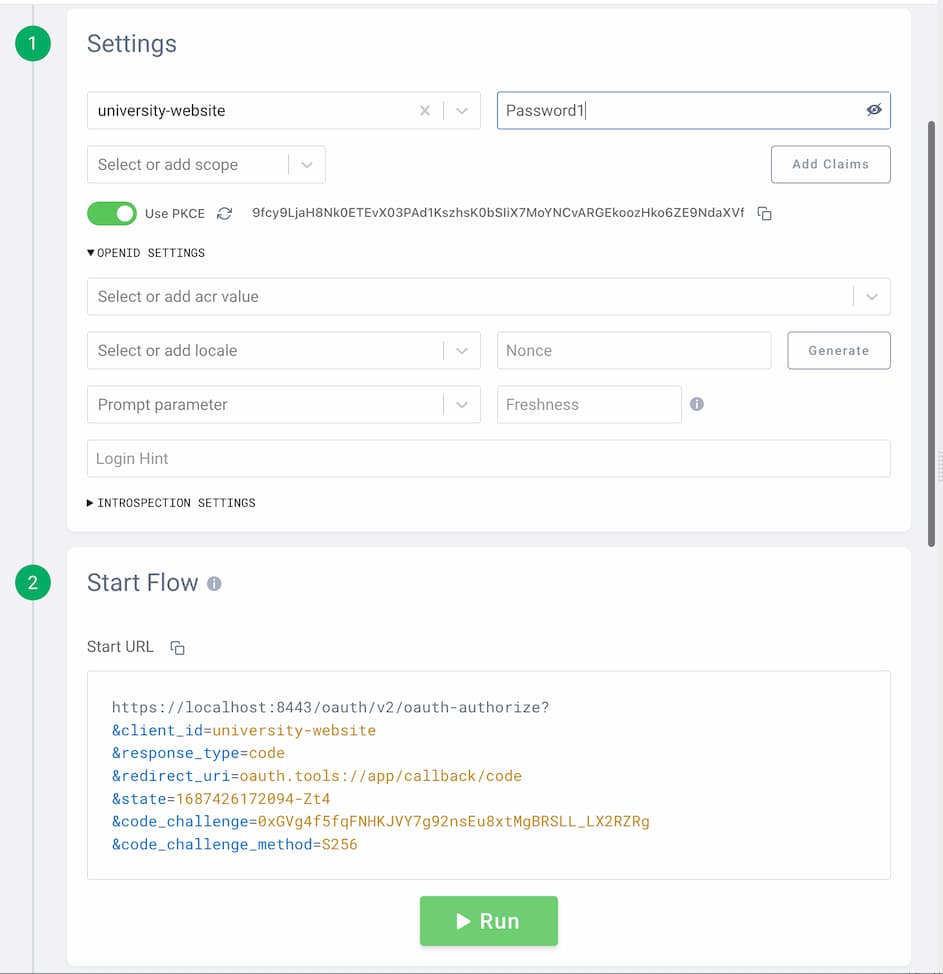
1. Obtain the Website Access Token
This is the usual OAuth 2.0 code flow that would be performed by the university website during the alum's login. To perform this flow in OAuth Tools, create a new Code Flow and enter the client details: university-website/Password1. Start the flow and log in to the system (create a new user if you don't already have one).
2. Exchange the Access Token
Next, the website needs a pre-authorized code that it can present to the user (e.g., in the form of a QR code). This is done using the token exchange flow, which in OAuth Tools is just an API call. Follow these steps to create the flow:
- Click the + symbol to start a new flow.
- Select
Call External APIfrom the list of flows. - Enter the authorization server's token endpoint as the request URL and choose the
POSTmethod. - Add an
Authorizationheader with the following value:Basic dW5pdmVyc2l0eS13ZWJzaXRlOlBhc3N3b3JkMQ==(it's the URL-safe base64 representation of the website's client and secret concatenated with a colon:base64('university-website:Password1')). - In the body tab select the
Form URL encodedbody and fill in these values:
| key | value |
|---|---|
grant_type | https://curity.se/grant/accesstoken |
token | the value of the access token from the previous flow |
scope | "" (empty value) |
client_id | university-website |
- Send the token exchange request.
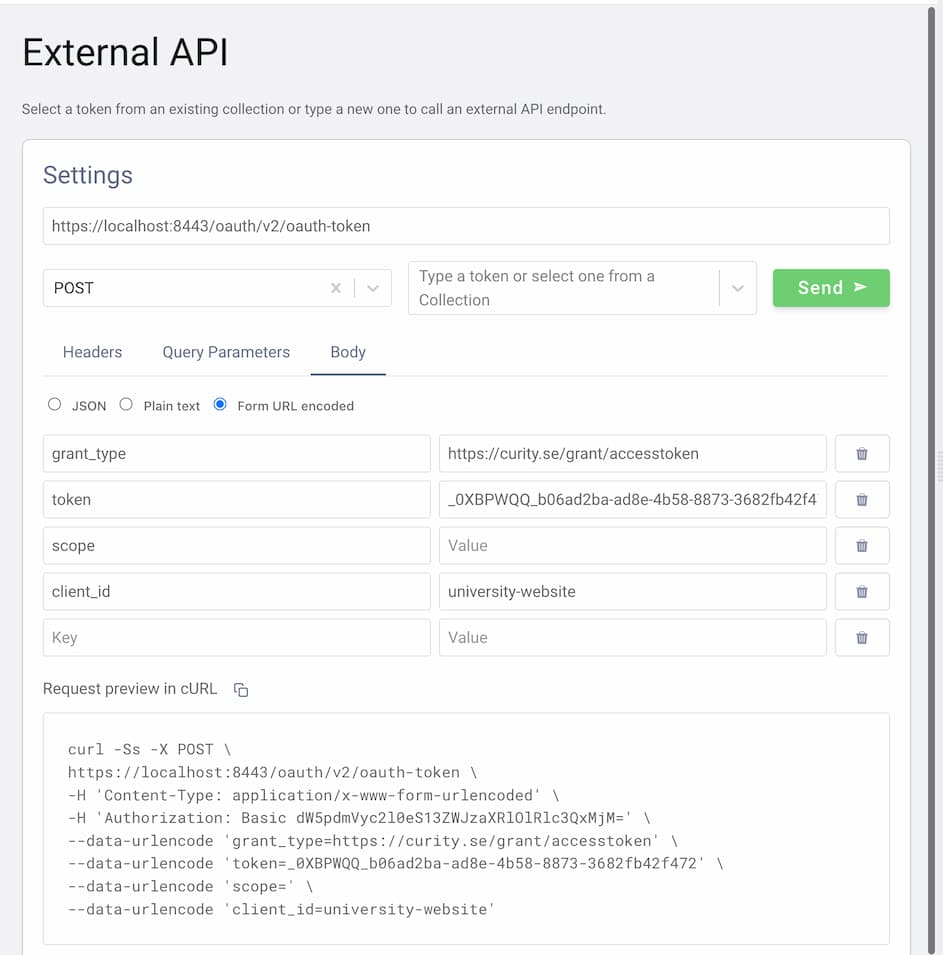
As a result, you should get the pre-authorized code and a user PIN.
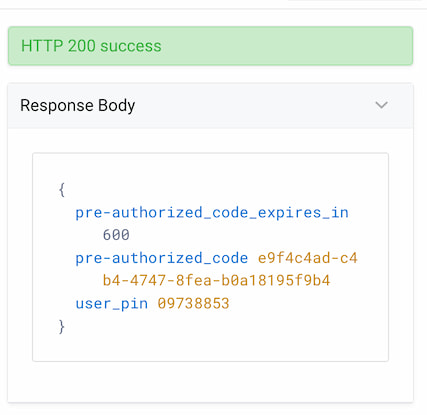
At this point the website has the pre-authorized code details and can form a QR code and present it in a UI element for the mobile wallet to scan. Note that the website also received a PIN. The OpenID4VC specification recommends that the PIN is sent to the user via a different channel than the pre-authorized code. E.g., if the pre-authorized code is presented within a QR code then the PIN could be sent via a text message directly to the user.
3. The Pre-authorized Code Flow Request
Now, the wallet can perform the pre-authorized code flow to obtain an access token that can be used in the VCI request.
- Click the + symbol to start a new flow.
- Select
Pre Authorized Codefrom the list of flows. - Fill in the client details with
wallet/Password1. - Copy the pre-authorized code and PIN from the token exchange flow.
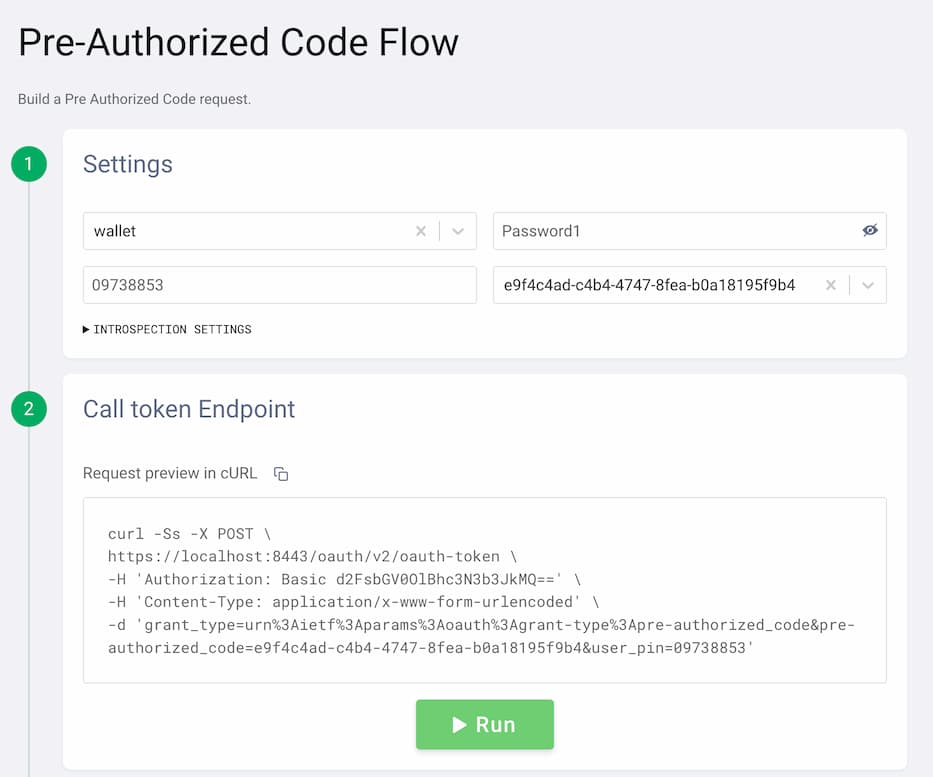
- Run the flow to obtain a new access token.
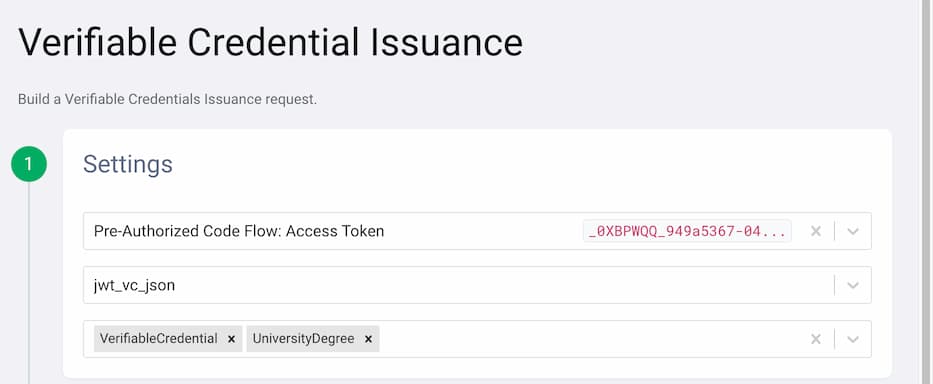
4. The VCI Flow Request
The wallet can now obtain the verifiable credentials from the issuer using the VCI flow. Follow these steps to obtain the credentials:
- Click the + symbol to start a new flow.
- Select
VCIfor verifiable credential issuance. - Select the access token from the Pre Authorized Flow.
- Select
jwt_vc_jsonas the format. - Choose
UniversityDegreeandVerifiableCredentialfrom the list of credential types.
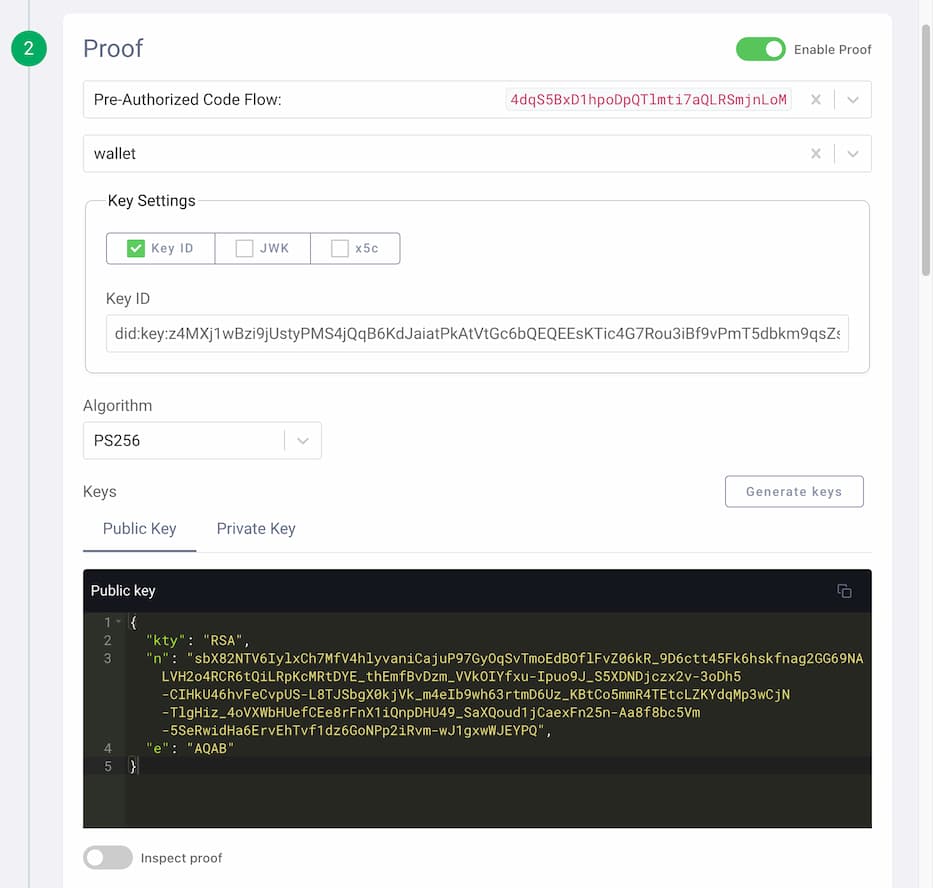
- Enable to include a subject proof in the request by turning on Enable Proof.
- Select the c_nonce from the Pre Authorized Flow.
- Select
walletas the client. - Enable Key ID from the key settings.
Now, use a supported DID method for the user. You can, for example, refer to the test vectors for did:key and copy the fields of the RSA key:
- Use the value of the
idof theverificationMethodas the Key ID. - Make sure to copy and save the value of the public key
publicKeyJwkin the input field for the Public Key. - Repeat for the private key
privateKeyJwk. - Choose
PS256for the Algorithm.
Finally, click Run. The credential appears on the right-hand side of the window. You can decode the obtained JWT and study its content to verify that it matches your expected credential.
Final Remarks
Note that in the pre-authorized code flow the credential was obtained by the wallet client without the need of running an interactive flow through the browser. The issuer was responsible for authenticating and authorizing the user out-of-band. Still, the pre-authorized flow allows the issuer to return a pending response to the wallet and use out-of-band mechanism to ask the user for additional authorization.
The pre-authorized code flow enables a more natural user experience when using verifiable credentials, and provides greater flexibility to the party responsible for issuing the VCs. The user can interact with a familiar application from this party, to get a verifiable credential and store it in her mobile wallet. At any future time, the user can then use the wallet to present the credential to other applications, as a digital proof.
Customer Stories
Learn how organizations run identity and API security at scale.
Read customer storiesWas this helpful?