Authorization Rules for the RESTCONF API
On this page
You can manage Curity Identity Server in several ways. One option is using the Admin UI, which is relatively straightforward. To set access controls for the Admin UI, one must configure access policies. For this, Curity Identity Server uses the Network Configuration Access Control Model. We've outlined these setup details in the Curity Access Control Rules article, and the same permission rules apply to both the CLI and RESTCONF API.
You can configure the RESTCONF API as a token-protected API that requires an access token with the correct scope. Below, we'll outline how to configure Curity Identity Server to enable RESTCONF for configuration management and configure authorization permissions.
RESTCONF
RESTCONF is a REST-like protocol that exposes configuration data and provides Create, Read, Update, and Delete (CRUD) capabilities. RFC 8040 and the Curity product documentation describe RESTCONF in depth.
RESTCONF brings flexible and powerful capabilities to fully automate the configuration flow, allowing seamless integration with any CI/CD pipeline.
Enabling RESTCONF in the Admin UI
You can enable RESTCONF in the Admin Service section of the Curity Admin UI. Go to System -> Admin Service and switch the flag RESTCONF API to enabled.
Once enabled, it is also possible to Enable OAuth and DevOps Dashboard. From this view, you can select the Token Service Profile to accept tokens when accessing the Dashboard. You can also choose one or more clients to authenticate users to the RESTCONF API.

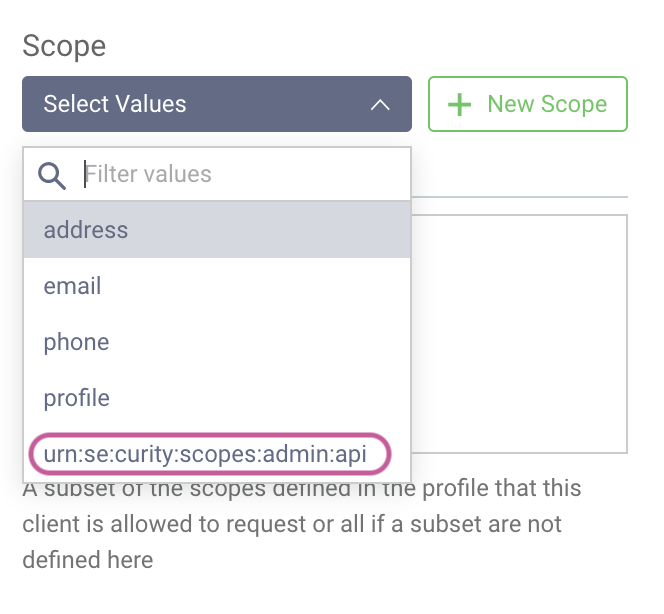
The clients configured here will be able to issue tokens with the appropriate scope (urn:se:curity:scopes:admin:api) to allow access to the RESTCONF API. When you add a client, the scope will be automatically configured.

Authenticating the RESTCONF API
When requesting the initial access token, the scope urn:se:curity:scopes:admin:api is required to access the RESTCONF API.
Here's an example of a cURL command that obtains an appropriate access token using the client_credentials flow.
curl -Ssk \https://iggbom-curity.ngrok.io/oauth/v2/oauth-token \-u www:Password1 \-d grant_type=client_credentials \-d scope=urn:se:curity:scopes:admin:api \| jq
The response will look something like this. We receive a token to use for access, and we've been granted the urn:se:curity:scopes:admin:api scope.
{"access_token": "b237aef9-e221-43c8-9a9e-3ba817253646","scope": "urn:se:curity:scopes:admin:api","token_type": "bearer","expires_in": 300}
At this point, we have enabled the RESTCONF API to control access using tokens. However, this is still rather coarse-grained. With a valid token and the correct scope, you can access the RESTCONF API, or you can't. Let's examine how to set more detailed permissions when accessing Curity Identity Server using RESTCONF.
Configuring Access Rules for RESTCONF
By default, Curity Identity Server enables Default Read Access and Default Write Access for RESTCONF. You can review this by navigating to System -> Administrators -> Permissions.
If no explicit rules deny access, it will allow both read and write operations. However, we advise you to disable these defaults and instead configure explicit access to different parts of the configuration accordingly.

It is possible to set permissions for configurations within the Admin UI. For example, consider access rules for a specific client. When viewing all configured clients in the system, click Edit for a given client and choose Permissions.

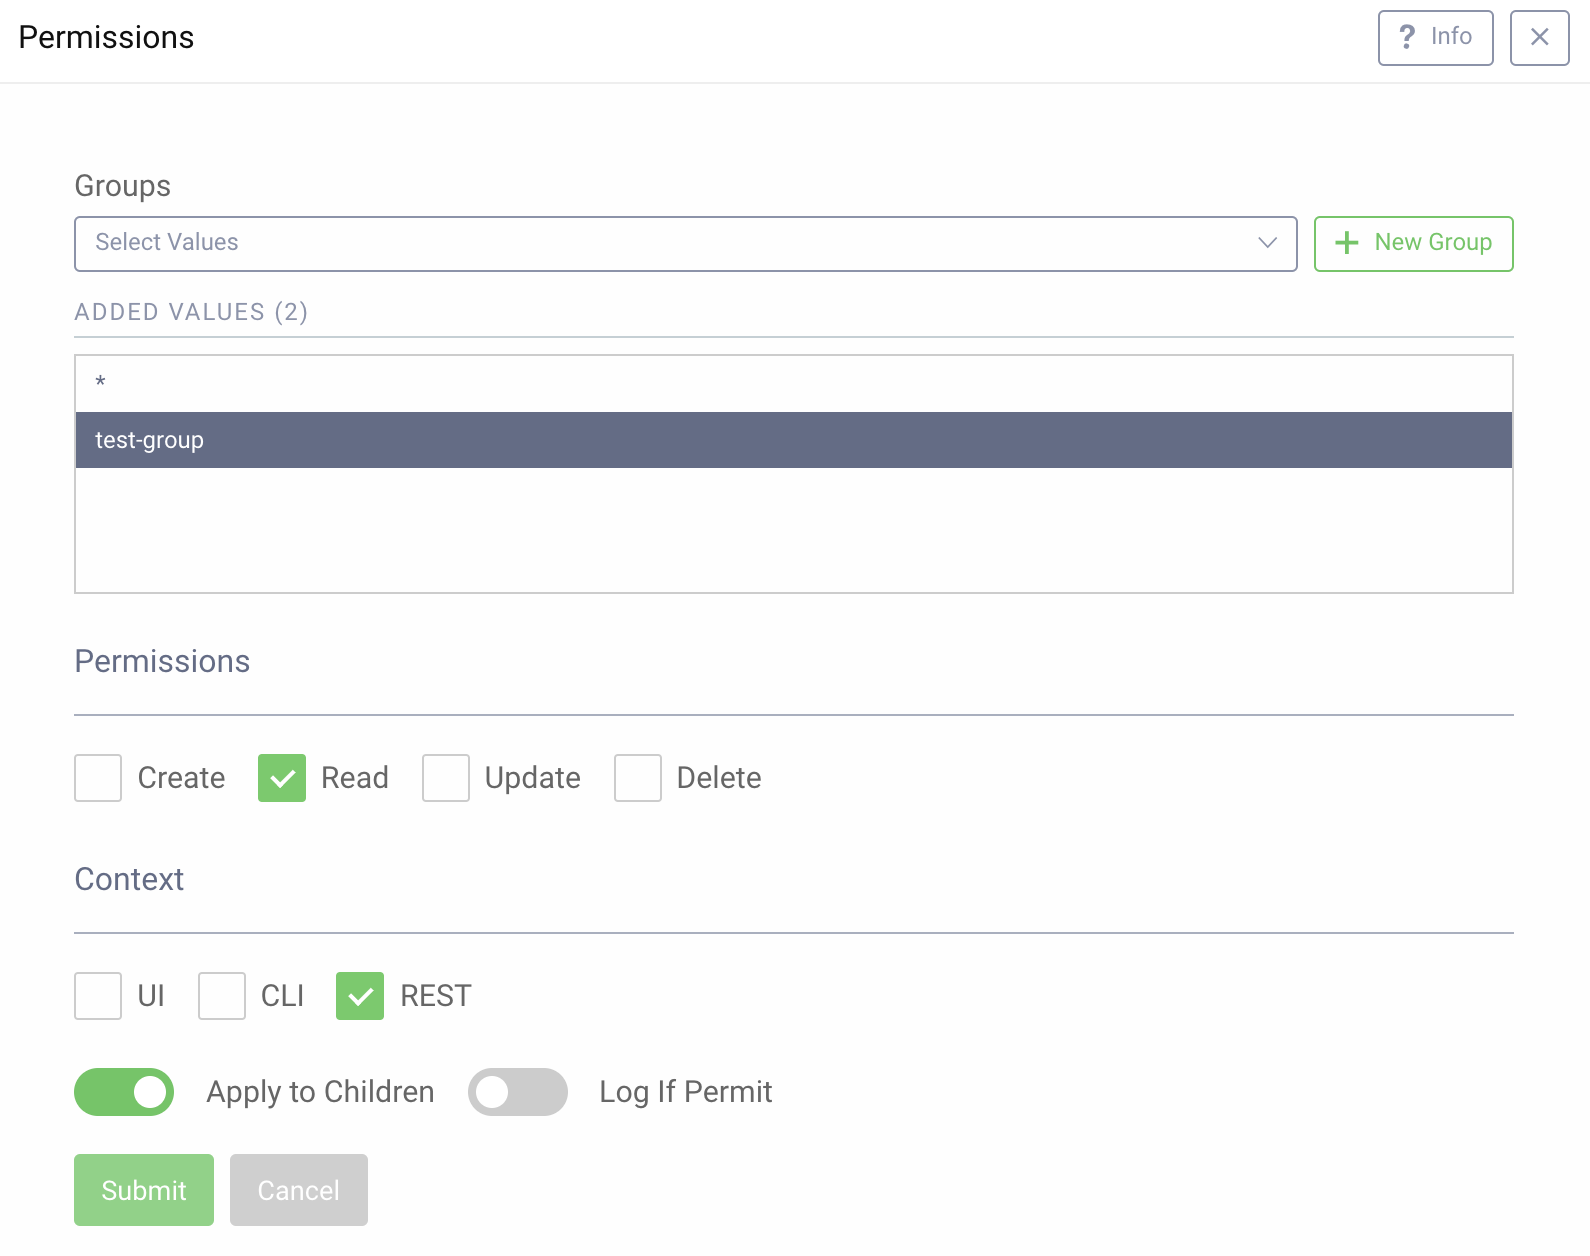
Here, you can set specific permissions for this client for different contexts (UI, CLI, and REST). We can also create a New Group or choose an already existing group. With a group selected, we can customize the specific access. As depicted in the screenshot below, the test-group has Read permissions only for the REST context.

Configuring permissions using the CLI or RESTCONF
In this article, we set the permissions using the Admin UI. However, it is also possible to set these permissions using the CLI or RESTCONF.Testing the Configuration
The configuration above would allow a token containing the groups claim holding the value test-group to have read access. The claim could, for example, come from an AD/LDAP or another authentication method. Or, it might be retrieved from some data source during the
token issuance process.
Reading Client Information
Here's a simple example of a request reading the information of a client with the id client-three:
curl GET \-k \-v \'https://localhost:6749/admin/api/restconf/data/base:profiles/base:profile=token-service,oauth-service/base:settings/profile-oauth:authorization-server/profile-oauth:client-store/profile-oauth:config-backed/profile-oauth:client=client-three?with-defaults=report-all' \--header 'Content-Type: application/yang-data+json' \--header 'Authorization: Bearer b237aef9-e221-43c8-9a9e-3ba817253646' | jq
The response to this request will be unique to your client configurations but will look similar to this:
{"profile-oauth:client": {"id": "client-three","secret": "$5$vmUSs252WTOmSfV7$MuKA6n0TTCq3ZZUFQXjep8Vc7ea2h2d9hlnTI2WjZv1","redirect-uris": ["https://oauth.tools/callback/code"],"enabled": true,"proof-key": {"require-proof-key": false},"access-token-ttl": 300,"refresh-token-ttl": 3600,"user-authentication": {"allowed-authenticators": ["username-password"],"context-info": ""},"allowed-origins": ["https://oauth.tools"],"capabilities": {"code": [null],"assisted-token": [null]},"use-pairwise-subject-identifiers": {"sector-identifier": "client-three"},"validate-port-on-loopback-interfaces": true}}
So far, so good. We were able to read the information of the client.
Creating a Client
Now let's imagine a scenario where we use the RESTCONF API to automate the creation of clients. Perhaps another application captures details for client creation. You can tailor permissions so that a specific group can create a client but not read or update it.
However, according to our configuration, we don't have permission to create a client. Let's try it anyway to see what happens.
The example below creates a new client:
curl \-k \-v \--header 'Content-Type: application/yang-data+xml' \--header 'Authorization: Bearer b237aef9-e221-43c8-9a9e-3ba817253646' \'https://localhost:6749/admin/api/restconf/data/base:profiles/base:profile=token-service,oauth-service/base:settings/profile-oauth:authorization-server/profile-oauth:client-store/profile-oauth:config-backed' \-d '<client xmlns="https://curity.se/ns/conf/profile/oauth"><id>cannot_issue_refresh_token_client3</id><secret>$5$4lzvhAxAUwHG4osE$2vmgyfA8j3ZIT3kXrfkk8xvv/FhK94i5gmJBLdr8bH5</secret><redirect-uris>https://localhost/callback</redirect-uris><refresh-token-ttl>disabled</refresh-token-ttl><audience>se.curity</audience><scope>email</scope><user-authentication><allowed-authenticators>username-password</allowed-authenticators><context-info>Cannot Issue Refresh Token Client</context-info></user-authentication><capabilities><code/><implicit/></capabilities></client>'
The response will give an error and indicate that we do not have access to create a client using the RESTCONF API.
<errors xmlns="urn:ietf:params:xml:ns:yang:ietf-restconf"><error><error-message>access denied</error-message><error-path>/base:profiles/profile=token-service,as:oauth-service/settings/profile-oauth:authorization-server/client-store/config-backed</error-path><error-tag>access-denied</error-tag><error-type>application</error-type></error></errors>
Let's fix this so we can create a client successfully. Go to Profiles -> Token Service -> Client and click the menu in the top right corner and choose Permissions. We can now add a permission to give test-group Create and Update access to REST.
Now, we can execute the same request as above to successfully create a client. Note that both Create and Read are needed to create a client. In our example, the Apply to all children option is also disabled so that these permissions don't trickle down.
Summary
The RESTCONF API is a standardized and powerful way to handle configurations in the Curity Identity Server. It is very useful in scenarios where other systems need to modify the configurations or when there is some type of automated process. To limit exposure and control exactly who/what can perform what actions on the different configurations, we can enable OAuth to control access to the RESTCONF API. We can also set explicit permissions and assign them to groups.
For further details on the RESTCONF API, see the product documentation.
Join our Newsletter
Get the latest on identity management, API Security and authentication straight to your inbox.
Start Free Trial
Try the Curity Identity Server for Free. Get up and running in 10 minutes.
Start Free Trial


