OAuth Customization using Scripting
On this page
When building your identity solutions, it is common to want to customize behavior during OAuth flows. This can include manipulating authentication attributes from an external system such as Google, customizing the contents of access tokens sent to APIs, and many other use cases.
Customization Techniques
There are various techniques that can be used to customize logic in the Curity Identity Server. The option you choose will depend upon the size of the task.
Drag and Drop Customization
You can customize authentication behavior in a visual way, using actions. Similarly, you can customize token issuing using the token designer. Both of these provide a drag and drop interface, where you also work with input and output attributes. At times though, this technique is insufficient, and you need to write some custom code.
Plugins
To take complete control over an important behavior, such as implementing a bespoke authentication method, you can write a Java or Kotlin plugin. This involves creating a small project that is built to a JAR file, then deployed to runtime nodes of the Curity Identity Server.
Scripted Customization
A middle ground between the previous two customization techniques is provided by JavaScript procedures. The scripting guide provides detailed information. This tutorial provides a summary of how JavaScript execution works, and explains the development setup and deployment. It also provides links to tutorials on common use cases.
JavaScript Engine
At runtime, the Curity Identity Server processes JavaScript code in a Java Virtual Machine (JVM), using the Nashorn engine. This is ECMAScript 5.1 compliant, and there are some code limitations. JavaScript code can interoperate with Java classes, as in the following code snippet, which creates a SHA256 hash for the bytes of some input text:
function createSha256Hash(text) {var md = Java.type('java.security.MessageDigest');var instance = md.getInstance('SHA-256');return instance.digest(text.getBytes());}
Scripting is not intended to be used for large code bases, and you cannot install dependencies, as you would in a Node.js environment. Shared scripts are supported though, by placing them in a global-scripts folder, then calling the function name directly, without any import statements:
var result = createSha256Hash('sometext');
Scripting Development Setup
To understand how JavaScript code and deployment works, start by running an install using docker, then sign in to the admin UI and complete the initial setup wizard. Next, save the following OAuth client settings to a client.xml file. Then select the Changes / Upload menu option in the Admin UI, to import and merge the client.
<config xmlns="http://tail-f.com/ns/config/1.0"><profiles xmlns="https://curity.se/ns/conf/base"><profile><id>token-service</id><type xmlns:as="https://curity.se/ns/conf/profile/oauth">as:oauth-service</type><settings><authorization-server xmlns="https://curity.se/ns/conf/profile/oauth"><client-store><config-backed><client><id>demo-client</id><secret>Password1</secret><capabilities><client-credentials/></capabilities><properties><property><key>at_issuer</key><value>jwt</value></property></properties></client></config-backed></client-store></authorization-server></settings></profile></profiles></config>
Add a Script
The example client uses the client credentials flow, which would be used by a backend component. Often, the most convenient type of access token would be a JSON Web Token (JWT), which could be sent directly to an API in the same backend cluster.
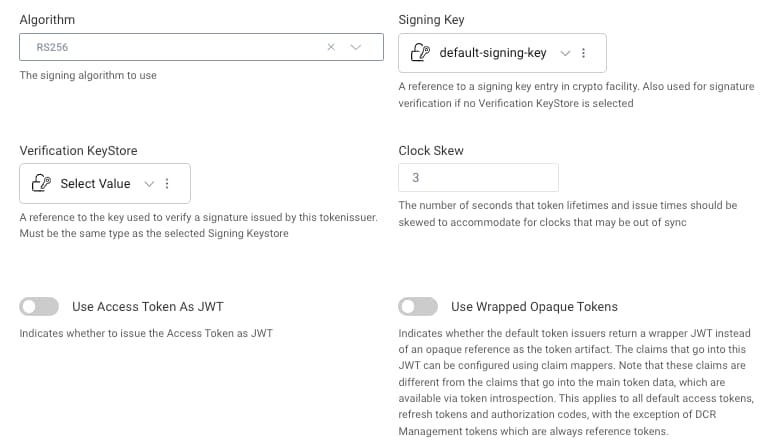
By default, the Curity Identity Server issues opaque access tokens, to ensure that access token information is not accidentally leaked to clients. To enable issuing of JWT access tokens, one option is to use an instance of the token service whose token issuer has the Use Access Token as JWT setting enabled:
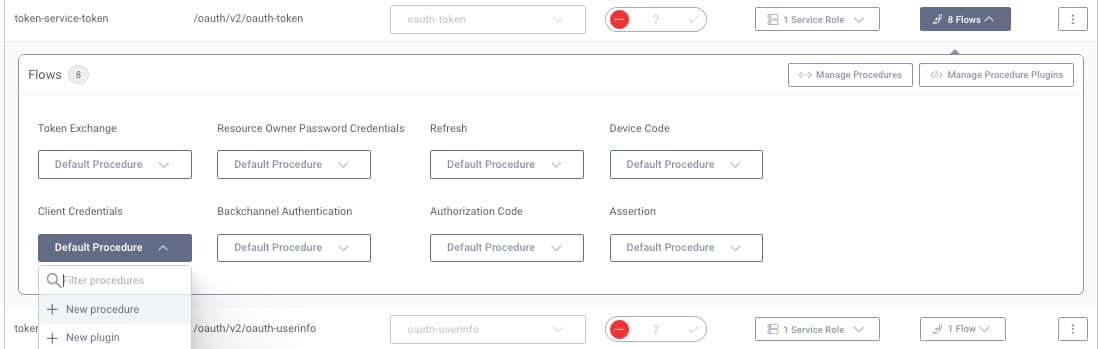
Often though, you want more dynamic token issuing behavior per client. To enable this, a small amount of scripting can be used. Browse to Token Service -> Endpoints, then select token-service-token and add a procedure for the Client Credentials flow.
Name the procedure custom-client-credentials and update it with the following content. Also, save this code to a .js text file with the same name as the procedure. In the admin UI, save the procedure and commit the configuration. The following code is explained in further detail in the custom token issuer tutorial.
/*** @param {se.curity.identityserver.procedures.context.ClientCredentialsTokenProcedureContext} context*/function getAccessTokenIssuer(context) {var issuerType = context.client.properties['at_issuer'];if (issuerType === 'jwt') {logger.debug('*** ISSUING JWT ACCESS TOKEN ***');return context.getDefaultAccessTokenJwtIssuer();} else {logger.debug('*** ISSUING OPAQUE ACCESS TOKEN ***');return context.accessTokenIssuer;}}function result(context) {var delegationData = context.getDefaultDelegationData();var issuedDelegation = context.delegationIssuer.issue(delegationData);var accessTokenData = context.getDefaultAccessTokenData();var issuedAccessToken = getAccessTokenIssuer(context).issue(accessTokenData, issuedDelegation);return {scope: accessTokenData.scope,access_token: issuedAccessToken,token_type: 'bearer',expires_in: secondsUntil(accessTokenData.exp),};}
SDK Objects
The comment at the top of the script includes a ClientCredentialsTokenProcedureContextreference. This is a Java object from the procedures API, and you can use intellisense and the procedure docs to better understand its child properties. For example, you could send a custom field in an OAuth client credentials request, then access it with the following script:
var customfieldvalue = context.request.getFormParameter('mycustomfield`);
Test the Script
Run the following HTTP request to test the example token procedure, and a JWT access token will be returned:
curl -X POST http://localhost:8443/oauth/v2/oauth-token \-u "demo-client:Password1" \-H "Content-Type: application/x-www-form-urlencoded" \-H "Accept: application/json" \-d "grant_type=client_credentials"
Export Scripts
Next, return to the admin UI and export the configuration, using the Changes / Download menu option. Then open the downloaded curity-config.xml file, and find the following sections. By default, the JavaScript code is saved in a <script> tag, containing the JavaScript in base64 encoded format:
<endpoint><id>token-service-token</id><uri>/oauth/v2/oauth-token</uri><endpoint-kind>oauth-token</endpoint-kind><token-endpoint-procedures><flow>oauth-token-client-credentials</flow><procedure>custom-client-credentials</procedure></token-endpoint-procedures></endpoint><procedures><token-procedure><id>custom-client-credentials</id><flow>oauth-token-client-credentials</flow><script>LyoqCiAqIEBwYXJhbSB7c2UuY3VyaXR5Lm...</script></token-procedure></procedures>
Rather than managing scripts as base64 text, it is instead recommended to remove the inner token-procedure XML node and check the custom-client-credentials.js file into your source control system. On the next deployment, you then need to include .js files, using the folder structure explained in the Developer Guide.
For the above example script, this would involve deploying the script to the following location, under the /opt/idsvr/etc/init location of the Docker container. Any shared functions used by the example script would be deployed to the global-scripts folder:
├── global-scripts├── token-procedures│ └── oauth-token-client-credentials│ └── custom-client-credentials.js
Deploy Scripts
To redeploy the system, you would typically use a custom Dockerfile. Doing so would ensure that each stage of your deployment pipeline uses the same JavaScript customizations:
FROM curity.azurecr.io/curity/idsvr:latestCOPY custom-client-credentials.js /opt/idsvr/etc/init/token-procedures/oauth-token-client-credentials/
You can then build and redeploy the system with commands similar to these:
docker build -t custom_idsvr:latest .docker run -it -e PASSWORD=mypassword -p 6749:6749 -p 8443:8443 -e LOGGING_LEVEL=DEBUG -v $(pwd)/curity-config.xml:/opt/idsvr/etc/init/config.xml custom_idsvr:latest
Scripting Use Cases
Once you understand the setup and deployment aspects of JavaScript customization, you can start implementing use cases. This section provides a selection of common use cases where scripting can be used, related to authentication and claims issuing. In each case, a link to a tutorial that explains the end-to-end solution is also provided.
Script Transformer Authentication Action
During authentication, a script transformer action can be used. The DevOps dashboard tutorial provides an example where employee roles or groups originate from an external system such as Microsoft Entra ID. You typically need to capture and transform this value, and may need to issue it in tokens later. This type of requirement is easily met by adding a script action that runs after the authenticator:
function result(context) {var attributes = context.attributeMap;attributes.role = getRoleFromAzureActiveDirectory(attributes);return attributes;}
Script Authentication Filter
At times, there are multiple authentication methods, and you want to take closer control over the choices presented to the user. In this case a script authentication filter can be used. The mobile web single sign-on code example provides an example, to ensure that a nonce authenticator is never presented in an authentication selection screen:
function result(context) {if (context.authenticator.id === 'nonce_authenticator') {var acr = context.request.getQueryParameter("acr");if (acr !== 'urn:se:curity:authentication:nonce:nonce_authenticator') {return false;}}return true;}
Claims Transformation Procedures
When tokens are issued, you can use a transformation procedure to set claim values dynamically. The claims from authentication tutorial provides a worked example of how to issue claims using values produced by authentication actions. This technique could enable a Microsoft Entra ID role to be issued to tokens.
function transform(attributes) {if (attributes.emails !== undefined&& attributes.emails.length > 0&& attributes.emails[0].value !== null) {return attributes.emails[0].value;}return null;}
Script Claims Provider
When issuing tokens, you may also need to include values from your business data. The implementing custom claims tutorial provides a worked example, that calls a remote API. If required, you can use a script claims value provider to take full control over the HTTP request:
function result(context) {var requestData = {subject: context.subjectAttributes.subject,email: context.subjectAttributes.userName};var requestHeaders = {'accept': 'application/json','content-type': 'application/json'};var options = {method: "POST",headers: requestHeaders,body: requestData}var response = context.getWebServiceClient().request(options);if (response.statusCode != 200) {var message = 'API custom claims endpoint returned status: ' + response.statusCode;logger.info(message);throw exceptionFactory.forbiddenException(message);}var responseBody = response.getBody();return JSON.parse(responseBody);}
Advanced Examples
All of the important behaviors can be customized when using the Curity Identity Server. This includes advanced scripting for financial-grade scenarios, as demonstrated in the claims consentor demo and the custom DCR request validation tutorial.
If you need to go beyond scripting, you can use the plugin SDK and base your solution on a Curity plugin code example. An example is the refresh token customization tutorial, which demonstrates how to control behavior dynamically, using both client specific custom properties and custom HTTP request parameters.
Conclusion
The Curity Identity Server can be quickly extended using simple JavaScript, which any developer can write to a basic level. This enables custom logic to be implemented quickly, in an easy to manage way. JavaScript customizations can also be treated as code and checked into source control, so that they are easy to review and manage over time.
Customer Stories
Learn how organizations run identity and API security at scale.
Read customer storiesWas this helpful?