Integrating Curity Identity Server with Apigee Edge using the Split Token Approach
On this page
The Split Token approach is a way of integrating the Curity Identity Server with an API gateway. In this approach you cache part of the token on the gateway's side. The part in the client's possession together with the value in the cache is glued together to create a JWT, which is then used to access resources in the APIs behind the gateway. Thanks to that, a high level of security is maintained - neither the client, nor the gateway are in possession of a token that can be used to access the APIs. What is more, throughput is increased, as there is no need for the API gateway to introspect the incoming token. Incoming requests don't get held up waiting for the introspection so more API calls can be made in the same amount of time.
To learn more about this approach, have a look at the Split Token Approach article.
This tutorial explains how to integrate Apigee Edge with the Curity Identity Server using the Split Token Approach.
Prerequisites
In order to complete this tutorial you will need the following:
- An Apigee Edge account
- The Curity Identity Server at least in version 5.1.0. The sample configuration is enough to run this tutorial.
Configuration assumptions
We'll use different configuration options throughout the tutorial. Any time an option is used in the text, we'll use a value as shown in the table below. Use values corresponding to your installation and configuration:
| Name of the option | Value |
|---|---|
| Curity DCR endpoint | /client-registration |
| Curity instance hostname | https://my-curity-instance.com |
| Apigee instance hostname | https://your-apigee-host.com |
id/username to secure the Apigee's /token endpoint | apigee-username |
secret to secure the Apigee's /token endpoint | secret |
Overview
We will need a few things configured to achieve the goal of this tutorial:
- Ideally the Apigee Edge and the Curity Identity Server should share information about registered clients. You'll see how to do that in the first section, though this part is optional and can be omitted under some circumstances.
- The Curity Identity Server must issue split tokens whenever it's asked for a token. We'll add a token procedure which will take care of that.
- We'll add an Event Listener to the Curity Identity Server. Whenever an access token is issued it will send a request to the Apigee Edge, so that the gateway can cache parts of the token.
- Apigee Edge will expose an endpoint which can accept tokens from Curity, cache them and register as OAuth tokens for logging and metrics purposes.
- Finally we'll create a Shared Flow in the Apigee Edge, which will be responsible for reconstructing the JWT. The shared flow can then be applied to any proxy endpoint exposed with Apigee Edge, so that it uses the split token flow.
Let's dive in into the details.
Configure Apigee and Curity to generate a shared client
In order to properly report API usage, enforce rate limits, etc. Apigee Edge needs to be aware of the tokens issued by Curity. Moreover it needs to have the knowledge of the clients for whom the tokens were issued. On the other hand, Curity needs to know the clients in order to issue the tokens in the first place. Thus, we need Apigee Edge and the Curity Identity Server to synchronize the client data. To do that we'll leverage the Dynamic Client Registration feature of Curity. Make sure that this option is enabled in your configuration. Have a look at the DCR tutorial to learn how to do it.
This part can be omitted
If you feel you won't need this kind of synchronization you can skip this part. There's one thing you'll have to make sure of: any client registered at the Curity Identity Server should have its ID set to the value of the Key found in the Credentials tab of an App's data in Apigee Edge. Or the other way round - an app created in Apigee Edge should have the Key set to Curity's client_id (you'll have to use Apigee's API to do that though).
To enable this synchronization we'll create a proxy endpoint in Apigee that will sit in front of Curity's DCR endpoint.
We have to create an API Proxy for the /client-registration path in the Apigee Edge, which will proxy to the Curity
Identity Server instance.
Note on invoking the registration endpoint
The registration endpoint configured in this step should be made available to your users that want to register with
your Apigee Edge gateway, or should be invoked from a backend whenever a user wants to register an app. It is beyond the
scope of this tutorial to show how to implement that. You should remember a few things about the request to /client-registration
though:
- It should contain a
Bearerauthorization token and the token needs to have the scopedcr. In other words, it has to be an Initial Access Token, issued by Curity Identity Server. - Apart from the data needed by Curity's DCR endpoint (like
software_id, etc.) this request should also contain adeveloperfield in the JSON request. This should be set to the identifier of the Apigee developer who creates the client. This information is ignored by Curity, but is needed by Apigee Edge.
Have a look at the Integrating Curity Identity Server with Apigee Edge tutorial, as we've covered this part there in more detail.
Preparing the client registration proxy
Follow these steps to configure the client registration proxy. This should be done in your Apigee Edge Management Console:
- Go to Develop > API Proxies and click + Proxy.
- Choose the
Reverse Proxytype. - Enter a suitable name, set the base path to
/client-registrationand the target tohttps://my-curity-instance.com/client-registration. Click Next. - Leave default settings in the next step and click Next.
- Choose the virtual host which you want to use (we recommend using the
secureoption). Click Next. - Click Create and Edit Proxy to go to the edit page.
- In the top right corner choose the Develop tab.
In the Develop tab we'll add some flow policies that will take care of the synchronization. What we want to achieve is to take some data from the Curity's response and create an App in Apigee Edge using the Edge Management API. Here's an overview of the finished flow:
- We'll extract the
developerID from the request and keep it in variable. - The request will be proxied to Curity to create a client.
- Assuming that an 201 response is received we'll extract the
client_idandclient_namefrom the Curity's response. - We'll make a request to the Apigee Edge API that will create a new App in Apigee Edge.
- We'll extract the
keyandsecretfrom the API's response. Apigee creates the App with a randomkeybut we want it to have the id used in Curity, so that both systems can know this is the same client. In the final two steps we'll achieve this. - We'll create a new set of credentials for the App in Apigee, this time using the
client_idfrom Curity as thekey. - Finally we'll delete the original generated credentials, as they won't be needed any more.
It may sound a bit complicated but it's just a few different API calls that finally achieve the desired goal - we
have a new client in Curity, we have a new App in Apigee, and the app in Apigee has the key set to the value of Curity's
client_id.
Below are the steps that you have to fulfill. Still in the Develop tab of the new proxy, in the panel on the left find the Target Endpoints tab, and select the PostFlow. You'll see a summary of the flow in the middle.
- Add a new Request step by clicking the + Step button above the Request arrow. Choose the
Extract VariablesPolicy. Enter the nameExtract-Developerand click Add. - Make sure you have the new policy icon selected and paste the following configuration into the policy editor:
<?xml version="1.0" encoding="UTF-8" standalone="yes"?><ExtractVariables name="Extract-Developer"><DisplayName>Extract Developer</DisplayName><JSONPayload><Variable name="developer"><JSONPath>$.developer</JSONPath></Variable></JSONPayload><Source>request</Source></ExtractVariables>
This will extract the developer field from the JSON request and assign it to the developer variable.
- Then the request can be proxied to Curity, and we'll add next steps which work on the response from Curity. Add a new
Response step by clicking the + Step button below the Response arrow. Again choose the
Extract VariablesPolicy. Enter the nameExtract-Dynamic-Client-IDand click Add. - Paste the following configuration into the policy editor window:
<?xml version="1.0" encoding="UTF-8" standalone="yes"?><ExtractVariables name="Extract-Dynamic-Client-ID"><DisplayName>Extract Dynamic Client ID</DisplayName><IgnoreUnresolvedVariables>false</IgnoreUnresolvedVariables><JSONPayload><Variable name="clientId"><JSONPath>$.client_id</JSONPath></Variable><Variable name="clientName"><JSONPath>$.client_name</JSONPath></Variable></JSONPayload><Source>response</Source></ExtractVariables>
This will extract the client_id and client_name from the Curity's response and assign it to variables, accordingly:
clientId and clientName.
- Add a new Response step, choose the
AssignMessagePolicy. Name itGenerate-Apigee-Client-Creation-Requestand click Add. Paste the following configuration into the policy editor:
<?xml version="1.0" encoding="UTF-8" standalone="yes"?><AssignMessage name="Generate-Apigee-Client-Creation-Request"><DisplayName>Generate Apigee Client Creation Request</DisplayName><AssignTo createNew="true" type="request">apigeeClientRequest</AssignTo><Set><!-- Client name is the template ID followed by the newly generated ID --><Payload contentType="application/json">{"name":"{clientName}-{clientId}"}</Payload><Path>/v1/organizations/{organization.name}/developers/{developer}/apps</Path></Set><IgnoreUnresolvedVariables>false</IgnoreUnresolvedVariables></AssignMessage>
This will prepare the first request to the Edge API - to create a new App with a given name.
- The request to the Apigee API must be authenticated. You can have a look at the API docs
to check the available options to authenticate such requests. Here we'll use the username and password (this can be the
same that you use to login to the Apigee Edge UI). In the step we'll read the username and password from an encrypted
key-value storage - we don't want to keep them hardcoded in plain text in the step configuration itself. Add another
Response step, choose the
Key Value Map OperationsPolicy and set the nameApigee-Credentials-Key-Value-Map, then click Add. Paste the following configuration into the policy editor:
<?xml version="1.0" encoding="UTF-8" standalone="yes"?><KeyValueMapOperations name="Apigee-Credentials-Key-Value-Map" mapIdentifier="apigeeCredentials"><DisplayName>Apigee Credentials Key Value Map</DisplayName><ExpiryTimeInSecs>300</ExpiryTimeInSecs><Get assignTo="private.apigeeClientId" index="1"><Key><Parameter>id</Parameter></Key></Get><Get assignTo="private.apigeeClientSecret" index="1"><Key><Parameter>secret</Parameter></Key></Get></KeyValueMapOperations>
Note that this Policy reads id and secret entries from a Key Value Map called apigeeCredentials. You can create the
map by navigating to Admin > Environments > Key Value Maps (remember to save your proxy before you go to another
tab, or manage the KV Maps in a different browser tab). Choose the appropriate environment and click the + Key value map
button. Enter the name apigeeCredentials, select the Encrypted option and click Add. Then click the newly created
map on the list and use the + button in the upper right to add the id and secret entries to the map. At first
you'll be able to see their values, but once you refresh the page they'll be encrypted.
When assigning values to variables in the policy you can note that a private. prefix is used for the variable names.
This tells Apigee Edge that this map is encrypted and that the values should not appear in logs or debugging sessions.
- Once the
idandsecretis read from the Key Value Map, the Authorization header can be set on the request object. Create a new Response step, choose theBasic AuthenticationPolicy, set the nameApigee-Basic-Authenticationand click Add. Paste the following configuration into the policy editor:
<?xml version="1.0" encoding="UTF-8" standalone="yes"?><BasicAuthentication name="Apigee-Basic-Authentication"><DisplayName>Apigee Basic Authentication</DisplayName><Operation>Encode</Operation><IgnoreUnresolvedVariables>false</IgnoreUnresolvedVariables><User ref="private.apigeeClientId"/><Password ref="private.apigeeClientSecret"/><AssignTo>apigeeClientRequest.header.authorization</AssignTo></BasicAuthentication>
- We can now make the first call to the Edge API. Create a new Response step, choose the
Service CalloutPolicy, set the name toCreate-Apigee-Appand click Add. Paste the following configuration into the policy editor:
<?xml version="1.0" encoding="UTF-8" standalone="yes"?><ServiceCallout name="Create-Apigee-App"><DisplayName>Create Apigee App</DisplayName><Request clearPayload="false" variable="apigeeClientRequest"/><Response>apigeeClientResponse</Response><HTTPTargetConnection><URL>https://api.enterprise.apigee.com</URL></HTTPTargetConnection></ServiceCallout>
This will make a request to the Edge API, create a new App and save the response in a new variable - apigeeClientResponse.
- Next, we want to extract the
keyandsecretgenerated by Edge. Create a new Response step, choose theExtract VariablesPolicy, set the nameExtract-Generated-Client-IDand click Add. Paste the following configuration into the policy editor:
<?xml version="1.0" encoding="UTF-8" standalone="yes"?><ExtractVariables name="Extract-Generated-Client-ID"><DisplayName>Extract Generated Client ID</DisplayName><JSONPayload><Variable name="consumerKey"><JSONPath>$.credentials[0].consumerKey</JSONPath></Variable><Variable name="consumerSecret"><JSONPath>$.credentials[0].consumerSecret</JSONPath></Variable></JSONPayload><Source clearPayload="false">apigeeClientResponse</Source></ExtractVariables>
- Then, we can add a new set of credentials to the created App. One which will have the Curity's
client_idused as thekey. Add a new Response step, choose theService CalloutPolicy, set the nameSet-Client-IDand click Add. Paste the following configuration into the policy editor:
<?xml version="1.0" encoding="UTF-8" standalone="yes"?><ServiceCallout name="Set-Client-ID"><DisplayName>Create Client ID</DisplayName><Request clearPayload="false" variable="apigeeClientRequest"><Set><!-- Set the client ID to Curity's but keep using the random secret because no one will ever use it anyway --><Payload contentType="application/json">{"consumerKey":"{clientId}","consumerSecret":"{consumerSecret}"}</Payload><Path>/v1/organizations/{organization.name}/developers/{developer}/apps/{clientName}-{clientId}/keys/create</Path></Set></Request><Response>apigeeClientResponse</Response><HTTPTargetConnection><URL>https://api.enterprise.apigee.com</URL></HTTPTargetConnection></ServiceCallout>
Note that we're reusing the apigeeClientRequest created in the second Step. We change the path and payload inline (which
saves us the hassle of creating another step that would do that) but the Basic authentication setting stays the same.
- Finally we can delete the old set of credentials. We need to make another API call, again reusing the
apigeeClientRequestobject. Add a new Response step, choose theService CalloutPolicy, set the nameDelete-Generated-Client-IDand click Add. Paste the following configuration into the policy editor:
<?xml version="1.0" encoding="UTF-8" standalone="yes"?><ServiceCallout name="Delete-Generated-Client-ID"><DisplayName>Delete Generated Client ID</DisplayName><Request clearPayload="false" variable="apigeeClientRequest"><Remove><Payload>true</Payload></Remove><Set><Path>/v1/organizations/{organization.name}/developers/{developer}/apps/{clientName}-{clientId}/keys/{consumerKey}</Path><Verb>DELETE</Verb></Set></Request><Response>apigeeClientResponse</Response><HTTPTargetConnection><URL>https://api.enterprise.apigee.com</URL></HTTPTargetConnection></ServiceCallout>
- You can now Save the Proxy and click the Deployment button. Deploy the proxy to the environment of your choice.
Now, any request to the
/client-registrationendpoint will create both a client in the Curity Identity Server and a corresponding app in Apigee Edge.
Configure Curity to issue a split access token
The Curity Identity server need to issue split tokens instead of the usual opaque tokens or JWTs. In order to achieve that you'll need to create a Token Procedure. Token Procedures are a way of modifying the data that is returned by the different endpoints exposed by the Curity Identity Server. You can read more about token procedures in the procedures documentation.
To create the Token Procedure that will modify the access tokens do the following. In the Curity Identity Server admin UI:
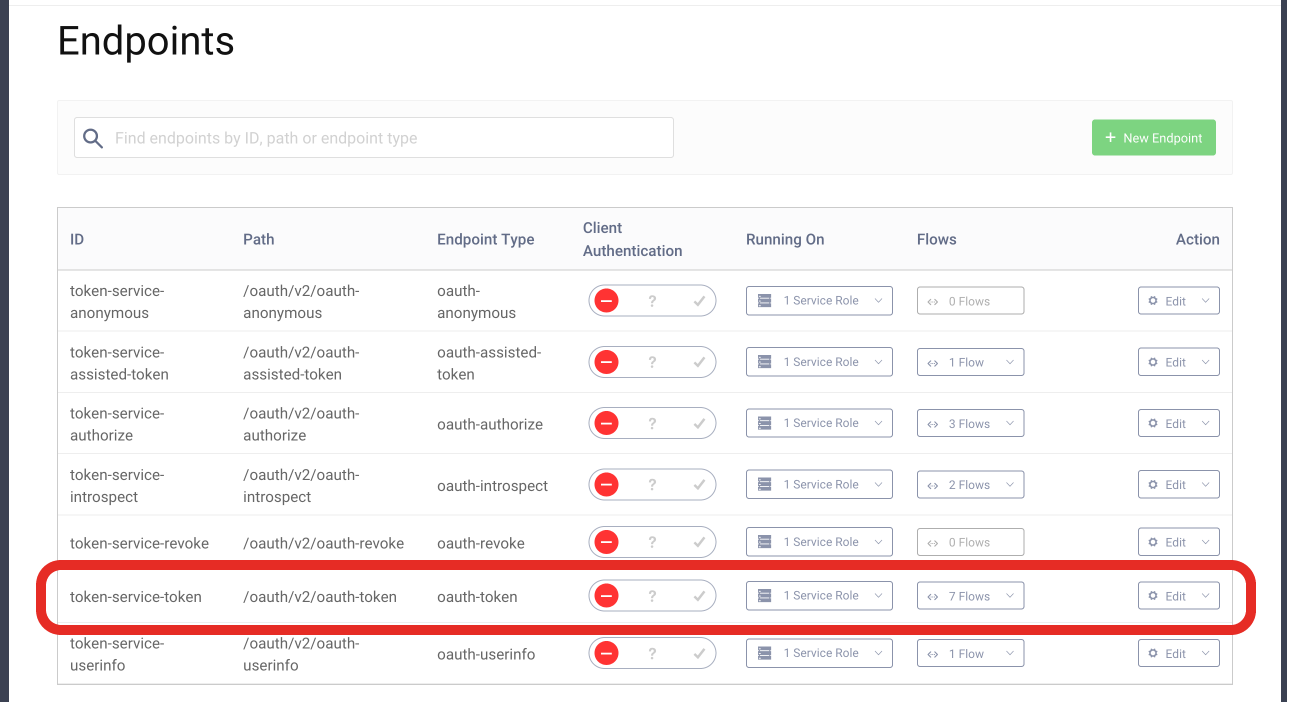
- Go to Profiles > Token Service > Endpoints, find the endpoint with the type
oauth-tokenand click the select box in the Flows column.
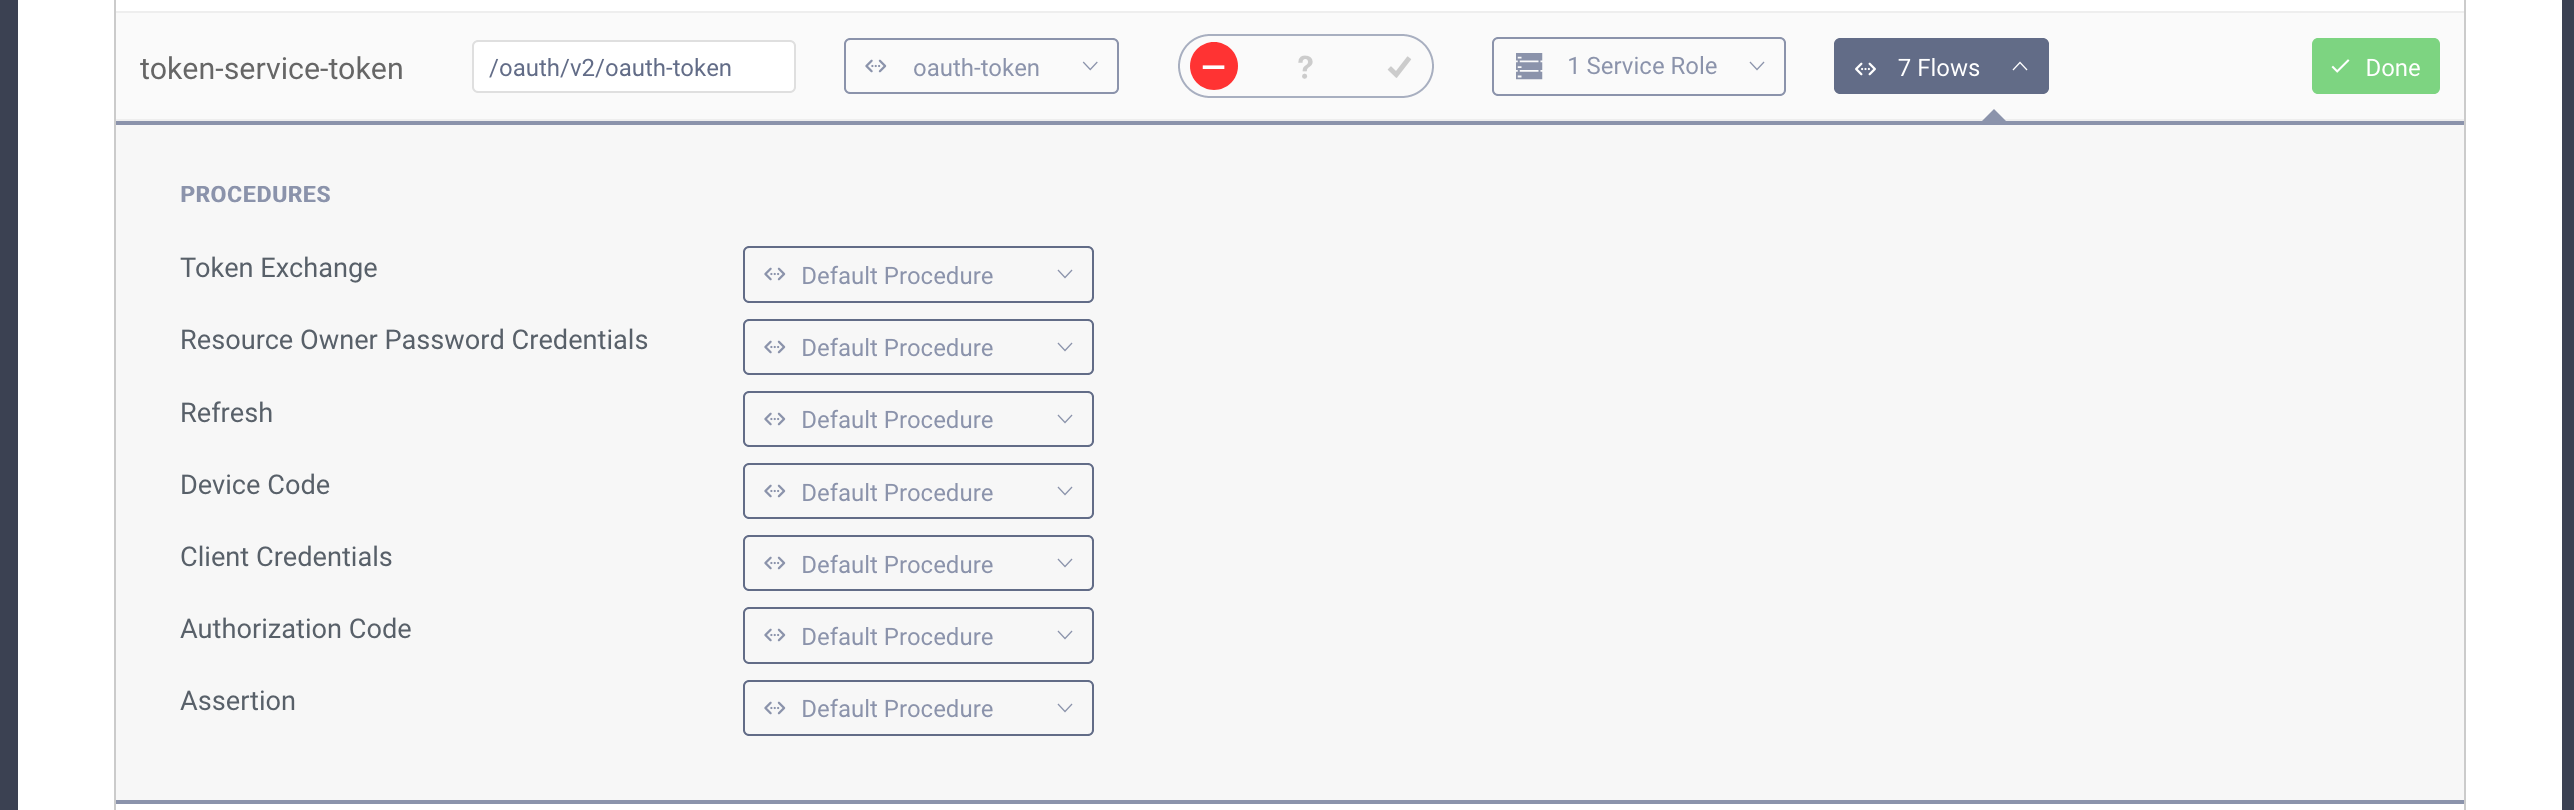
- Next find the Authorization Code procedure and click the select box next to it. Enter a name for your procedure and click save.

- A popup will appear where you can type the procedure code. Replace the code in the popup with the following one:
function result(context) {var delegationData = context.getDefaultDelegationData();var issuedDelegation = context.delegationIssuer.issue(delegationData);var accessTokenData = context.getDefaultAccessTokenData();var issuedAccessToken = context.getDefaultAccessTokenJwtIssuer().issue(accessTokenData, issuedDelegation);var token = issuedAccessToken.split('.')[2];var refreshTokenData = context.getDefaultRefreshTokenData();var issuedRefreshToken = context.refreshTokenIssuer.issue(refreshTokenData, issuedDelegation);var responseData = {access_token: token,scope : accessTokenData.scope,refresh_token: issuedRefreshToken,token_type: 'bearer',expires_in: secondsUntil(accessTokenData.exp)};if (context.scopeNames.contains('openid')) {var idTokenData = context.getDefaultIdTokenData();var idTokenIssuer = context.idTokenIssuer;idTokenData.at_hash = idTokenIssuer.atHash(issuedAccessToken);responseData.id_token = idTokenIssuer.issue(idTokenData, issuedDelegation);}return responseData;}
Note the highlighted lines - this is where we take the original JWT from an issuer and leave only the signature part.
- Click the Update button to save changes in the procedure. You can close the popup. Save and Commit changes to the server.
Now, every time you use the code flow, Curity will use the signature part of the original JWT as an access token.
Add an Event Listener in Curity
We'll need an Event Listener in Curity that will listen to events on newly issued access tokens and post these tokens to Apigee Edge. Event Listeners are Java library plugins capable of expanding Curity's functionality. You can read more about plugins in the plugins documentation.
An Event Listener plugin lets you run code when one of the many different events in the Curity Identity Server occurs.
The one we'll use, listens to events of the type IssuedAccessTokenOAuthEvent, so it will run whenever the Curity Identity
Server issues an access token.
Install the plugin
- Download the latest jar release of the plugin from the GitHub repository.
(If you prefer you can download source code and build it with maven, using the command
mvn package.) - Create a directory for the plugin in your Curity Identity Server plugins directory:
$IDSVR_HOME/usr/share/plugins:
mkdir $IDSVR_HOME/usr/share/plugins/apigee-split-token-publisher
- Copy the downloaded jar to the plugins directory (it's in the
/targetdirectory if you built it manually):
cp identityserver.plugins.events.listeners.apigee-split-token-publisher-0.1.0.jar $IDSVR_HOME/usr/share/plugins/apigee-split-token-publisher/
- Restart the Curity Identity Server.
The plugin will now be available in the Curity Identity Server.
Enable the plugin
To enable the Event Listener plugin follow these steps:
-
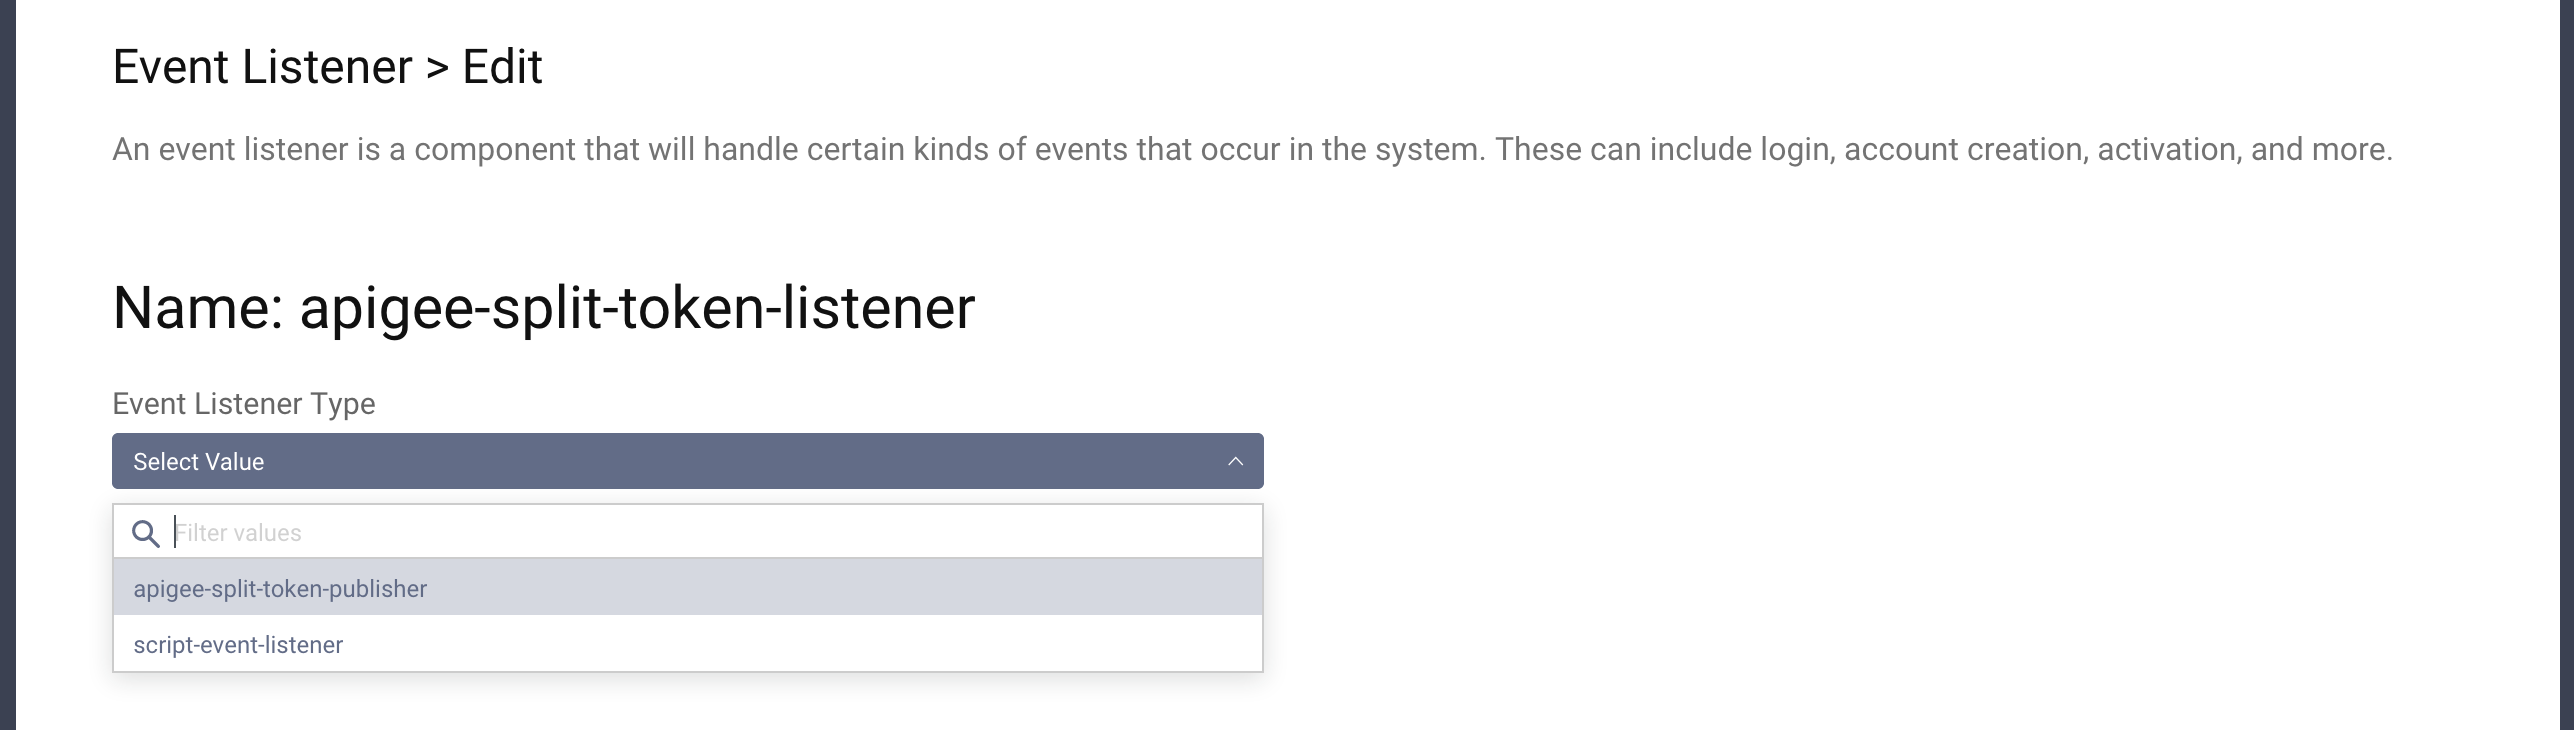
In the admin UI go to System > Event Listeners and click the New Event Listener button.
-
Enter a suitable name and hit Create.

- Select the type
apigee-split-token-publisher.
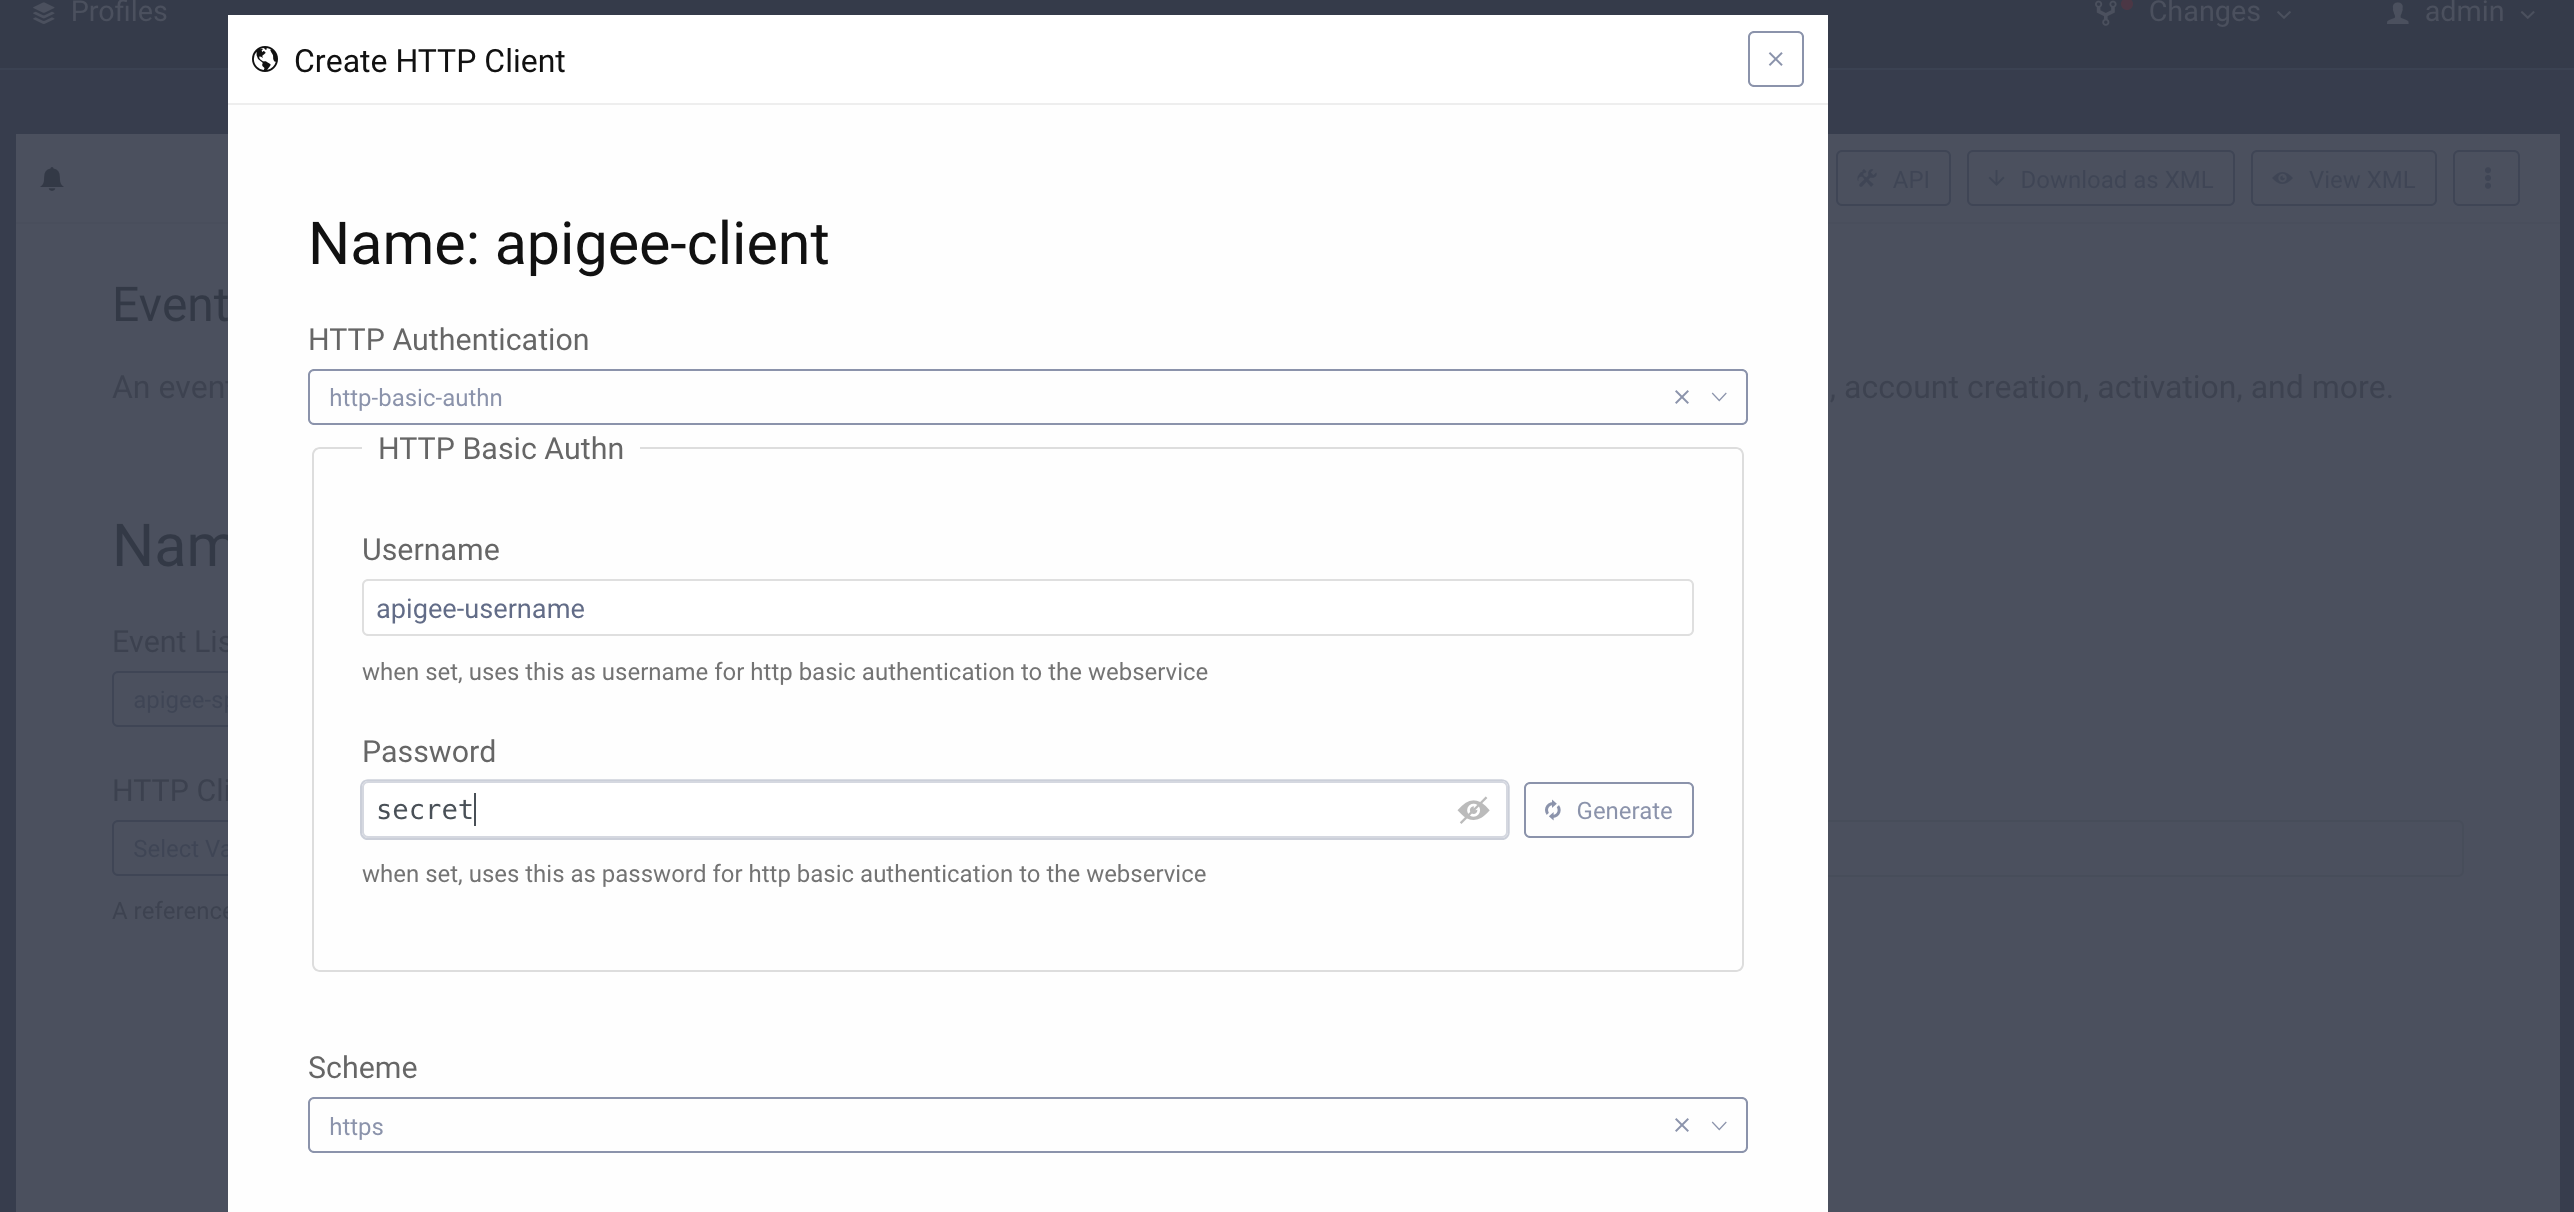
- The Apigee token listener needs an http client configured for communication with Apigee Edge. Click the + Create button next to the Http Client dropdown and provide a name for the client:

- Choose
http-basic-authnas the HTTP Authentication mechanism and fill in the values for username and secret:apigee-usernameandsecret. These will be later added in Apigee to secure the/tokenendpoint, which will receive the generated tokens.
- You can leave the rest of the options set to default. Close the form. Fill in the hostname of your Apigee Edge:

- Save and Commit the changes.
Now, every time a new access token is generated in Curity it will be sent to Apigee Edge as a split token. The request will
have a payload like the one below, sent in the application/x-www-form-urlencoded format:
client_id=a-client-idscope=openid profiletoken=eyJr...I1NiJ9.eyJqdG...2tlbiJ9signatureHash=ohl09XKmYgGMMAelDUnO2+kaatE/CLC+SfIIHLGZ7qs=grant_type=client_credentialsexpiration=300
Note that the token does not contain the signature part, and the signature is hashed. The expiration field tells Apigee
Edge for how long should the token be cached. client_id and grant_type fields are required so that Apigee can properly
register an external OAuth token. The value of the grant_type is actually irrelevant here, but it must be present in the
request. The plugin always sets it to client_credentials.
Cache the tokens in Apigee
Now we need to add another endpoint in Apigee Edge. This time though, it will not proxy the request to any backend service.
In the Apigee Edge UI:
- Go to Develop > API Proxies and click + Proxy.
- Choose the
No targettype. - Enter a suitable name, set the base path to
/token. Click Next. - Leave default settings in the next step and click Next.
- Choose the virtual host which you want to use (we recommend using the
secureoption). Click Next. - Click Create and Edit Proxy to go to the edit page.
- In the top right corner choose the Develop tab.
Again, we'll be adding policies to the endpoint which will fulfill the task that we need. In an overview what will happen here:
- First we'll extract the Basic authorization credentials from the request and compare them with credentials kept in a Key Value Map. If those don't match we need to reject the request.
- Next we'll register the incoming hashed signature as an Apigee OAuth token. This will enable the different features of Apigee that need information from an OAuth token.
- Finally we'll put the JWT head and body into Apigee's cache.
This time we'll be adding the policies to the Proxy Endpoint and PreFlow. Select this in the left hand panel, and follow these steps:
- Add a new Request step by clicking the + Step button above the request line. Choose the
Basic AuthenticationPolicy and set the nameDecode-Basic-Authentication-Credentials, then click Add. - Make sure you have the new policy icon selected and paste the following configuration into the policy editor:
<?xml version="1.0" encoding="UTF-8" standalone="yes"?><BasicAuthentication name="Decode-Basic-Authentication-Credentials"><DisplayName>Basic Authentication</DisplayName><Operation>Decode</Operation><User ref="oauthServerId"/><Password ref="oauthServerSecret"/><Source>request.header.Authorization</Source></BasicAuthentication>
This will decode the Authorization header value and populate two variables: oauthServerId and oauthServerSecret.
- Add a new Request step and choose the
Key Value Map OperationsPolicy. Set the nameGet-Encrypted-OAuth-Server-Credentialsand click Add. Paste the following configuration into the policy editor:
<?xml version="1.0" encoding="UTF-8" standalone="yes"?><KeyValueMapOperations name="Get-Encrypted-OAuth-Server-Credentials" mapIdentifier="oauthServerCredentials"><Get assignTo="private.oauthServerId" index="1"><Key><Parameter>id</Parameter></Key></Get><Get assignTo="private.oauthServerSecret" index="1"><Key><Parameter>secret</Parameter></Key></Get><Scope>environment</Scope></KeyValueMapOperations>
This policy reads values from an encrypted key value map called oauthServerCredentials. In the first part of the tutorial
we already showed you how to create such map. In this one you have to put two fields: id and secret, which should have
the same values as used in Curity to configure the HTTP client for Apigee: apigee-username and secret.
If you've skipped the first part of the tutorial here's a quick explanation on how to create and populate the Key Value Map:
- Go to Admin > Environments > Key Value Maps. (remember to save your proxy before you go to another tab, or manage the KV Maps in a different browser tab).
- Choose appropriate environment and click the + Key value map button.
- Enter the name
oauthServerCredentials, select theEncryptedoption and click Add. - Click the newly created map on the list and use the + button in the upper right to add the
idandsecretentries to the map. At first you'll be able to see their values, but once you refresh the page they'll be encrypted.
Now let's go back to adding further steps to our flow.
- Add a new Request step, choose the
Raise FaultPolicy, set the nameAccess-Denied-Faultand click Add. Paste the following configuration into the policy editor:
<?xml version="1.0" encoding="UTF-8" standalone="yes"?><RaiseFault name="Access-Denied-Fault"><DisplayName>Access Denied Fault</DisplayName><FaultResponse><Set><StatusCode>401</StatusCode><Payload contentType="text/plain">Access Denied</Payload><ReasonPhrase>Access Denied</ReasonPhrase></Set></FaultResponse></RaiseFault>
This policy returns a 401 response to the caller. But we want to return a 401 response only if the credentials do not match. To do that, we need to add a condition that will tell Apigee when to actually use this policy in the flow:
- In the policy editor window switch to the Endpoint default tab.
- Find the
<Step>node with the<Name>Access-Denied-Fault</Name>inside. - Add the following
<Condition>to the<Step>node:
<Condition>(oauthServerId != private.oauthServerId) or (oauthServerSecret != private.oauthServerSecret)</Condition>
So your <Step> node should now look like this:
<Step><Condition>(oauthServerId != private.oauthServerId) or (oauthServerSecret != private.oauthServerSecret)</Condition><Name>Access-Denied-Fault</Name></Step>
Now Apigee will know that the error response should be used only when the credentials from the request do not match the ones kept in the Key Value Map. Let's move on.
- Add a new Request step, choose the
Assign MessagePolicy, set the nameAssign-OAuth-Variablesand click Add. Paste the following configuration into the policy editor:
<?xml version="1.0" encoding="UTF-8" standalone="yes"?><AssignMessage name="Assign-OAuth-Variables"><DisplayName>Set Mandatory variables to use external authorization</DisplayName><AssignVariable><Name>oauth_external_authorization_status</Name><Value>true</Value></AssignVariable></AssignMessage>
This is a step required by Apigee. In order to use external OAuth tokens the oauth_external_authorization_status flow
variable must be set to true. Otherwise the whole thing won't work.
- Next, we're ready to register the OAuth token. Add a new Request step, choose the
OAuth v2.0Policy, set the nameOAuth-v20-GenerateAccessTokenand click Add. Paste the following configuration into the policy editor:
<?xml version="1.0" encoding="UTF-8" standalone="yes"?><OAuthV2 name="OAuth-v20-GenerateAccessToken"><DisplayName>OAuth GenerateAccessToken</DisplayName><ExternalAccessToken>request.formparam.signatureHash</ExternalAccessToken><ExternalAuthorization>true</ExternalAuthorization><Operation>GenerateAccessToken</Operation><StoreToken>true</StoreToken><ExpiresIn>request.formparam.expiration</ExpiresIn><Scope>request.formparam.scope</Scope><SupportedGrantTypes><GrantType>client_credentials</GrantType></SupportedGrantTypes></OAuthV2>
In the first highlighted line we're telling Apigee to use the signature hash from the request as the access token value. It's not that important which value we choose here - whether the JWT head and body or the hash of the signature, as long as we provide Apigee with the same value when using the token.
In the second highlighted line we're hard-coding the client_credentials grant, even though the token might have been
generated with a different grant. This is actually an irrelevant information in this case. We need Apigee to have information
about the token to properly connect it with a registered app and a developer. The value of the SupportedGrantTypes will
not be used anywhere, but we have to set it.
- Finally let's add the last policy - the one that will populate the cache. Add a new Request step, choose the
Populate CachePolicy, set the nameAdd-to-cacheand click Add. Paste the following configuration into the policy editor:
<?xml version="1.0" encoding="UTF-8" standalone="yes"?><PopulateCache async="false" continueOnError="false" enabled="true" name="Add-to-cache"><DisplayName>Add to cache</DisplayName><Properties/><CacheKey><KeyFragment ref="request.formparam.signatureHash"/></CacheKey><Scope>Global</Scope><ExpirySettings><TimeoutInSec ref="request.formparam.expiration"/></ExpirySettings><Source>request.formparam.token</Source></PopulateCache>
We're using the signature hash as the cache key and we're setting the TTL to the value of the expiration field, which
is set to the expiration time of the token in seconds.
- The flow is now ready. Click Save, then Deployment and choose the environment where you want to deploy the token.
We are now able to cache the access tokens generated by Curity in the Apigee Cache. There's just one thing left to do: we need to glue the parts of a split token for any incoming request.
Configure a Shared Flow which reconstructs the split token
We will need another flow that will be responsible for reconstructing the split token whenever a client sends a request. As this functionality will most probably be shared between different endpoints in your API we'll create a shared flow for that. The flow will extract the signature part of the token from the Authorization header of the request, then hash it and retrieve the remaining part of the token from the cache. It will then set a new value of the Authorization header, one containing the whole JWT. In case the value in the original Authorization header is somehow invalid, or the token can't be found in cache, an appropriate error response will be returned to the caller.
To create the shared flow, follow these steps:
- Go to Develop > Shared Flows, click + Shared Flow and select New Shared Flow.
- Enter a suitable name and click Create.
- Leave default settings in the next step and click Next.
- In the top right corner choose the Develop tab.
The shared flow doesn't have a Request and Response flow arrows - the configured flow can be attached to both request or response flows, whatever is needed. Adding steps to the flow looks pretty much the same as when working with an API Proxy.
- Add a new step, choose the
JavaScriptPolicy. Set the nameExtract-Access-Token-from-Authorization-Header. - From the Script File dropdown select
Create new scriptand name itextract-access-token.js. Click Add.
You'll notice a new resource file extract-access-token.js created in the Resources tab on the left hand side.
- Click on the file and paste the following code into the editor:
function isBlank(str) {return (!str || /^\s*$/.test(str));}function valueElse(str, def) {return isBlank(str) ? def : str;}var authorizationHeaderValue = valueElse(context.getVariable('request.header.authorization'), "");var authorizationHeaderValueParts = authorizationHeaderValue.split(/\s+/);if (authorizationHeaderValueParts.length == 2) {var bearer = authorizationHeaderValueParts[0];if (bearer.toLowerCase() === "bearer") {var token = authorizationHeaderValueParts[1];context.setVariable("clientRequest.rawToken", token);}}
This code takes the Authorization header from the request, checks if it has the form Bearer ... and assigns the value
of the incoming access token to a variable called clientRequest.rawToken.
- Next we'll create an error response that will be returned to the caller if the token was not found at this point. Add
a new step, choose the
Raise FaultPolicy, set the nameAccess-Denied-Faultand click Add. Paste the following configuration into the policy editor:
<?xml version="1.0" encoding="UTF-8" standalone="yes"?><RaiseFault name="Access-Denied-Fault"><DisplayName>Access Denied Fault</DisplayName><FaultResponse><Set><StatusCode>401</StatusCode><Payload contentType="text/plain">Access Denied</Payload><ReasonPhrase>Access Denied</ReasonPhrase></Set></FaultResponse></RaiseFault>
- As previously with a fault response, we need to add a condition when should the fault actually be raised. Switch to the
Shared Flow default tab in the editor. Add the following
<Condition>node to the<Step>node with nameAccess-Denied-Fault.
<Condition>clientRequest.rawToken is null</Condition>
- We're now sure that we received a token from the client, which should be the signature part of our final JWT. Next, we
need to hash the token in order to retrieve the remaining part from the cache. Add a new step, choose the
JavaScriptPolicy, and set the nameHash-incoming-token. - From the Script File dropdown choose
Create new scriptand name ithash-token.js. Click Add. - Click on the
hash-token.jsfile on the resources list and paste the following code into the editor:
const sha = crypto.getSHA256();sha.update(context.getVariable("clientRequest.rawToken"));context.setVariable("clientRequest.hashedToken", sha.digest64());
Apigee gives us access to a global crypto variable which can be used to easily create a hash of the incoming token.
The resulting hashed value is then assigned to a new variable clientRequest.hashedToken.
- Time to try to retrieve the token from cache. Add a new step, choose the
Lookup CachePolicy, set the nameGet-Token-From-Cacheand click Add. Paste the following configuration into the policy editor:
<?xml version="1.0" encoding="UTF-8" standalone="yes"?><LookupCache async="false" continueOnError="false" enabled="true" name="Get-Token-From-Cache"><DisplayName>Get token from cache</DisplayName><Properties/><CacheKey><KeyFragment ref="clientRequest.hashedToken"/></CacheKey><Scope>Global</Scope><AssignTo>clientRequest.tokenValue</AssignTo></LookupCache>
Should the token be found, its value will be assigned to the clientRequest.tokenValue variable.
-
If the token is not found, we want to reject the request. We already have a policy that returns a 401 error, so let's reuse it. Add a new step, switch the Policy Instance to
Existing(you can find the switch at the top of the modal), choose theAccess Denied Faultpolicy and click Add. -
We only need to specify a different condition for this instance of the fault response. Switch again to the Shared Flow default editor tab and add the following condition in the
<Step>node corresponding to the new instance of the Fault.
<Condition>clientRequest.tokenValue is null</Condition>
- Now we have both parts of the JWT, but before we set the appropriate header let's let Apigee know that someone has just
called the API with this token. To do that we'll again use the
OAuth v2.0Policy but with a different operation. Add a new step to the flow, choose theOAuth v2.0Policy, set the nameValidate-Apigee-Tokenand click Add. Paste the following configuration into the policy editor:
<?xml version="1.0" encoding="UTF-8" standalone="yes"?><OAuthV2 name="Validate-Apigee-Token"><DisplayName>Validate Apigee Token</DisplayName><Operation>VerifyAccessToken</Operation><AccessToken>clientRequest.hashedToken</AccessToken></OAuthV2>
Like before, we're using the hashed signature as the access token value used by Apigee.
- Finally, we can add the JWT to the proxied request. Add a new step, choose the
Assign MessagePolicy, set the nameUpdate-Target-API-Requestand click Add. Paste the following configuration into the policy editor:
<?xml version="1.0" encoding="UTF-8" standalone="yes"?><AssignMessage name="Update-Target-API-Request"><DisplayName>Update Target API Request</DisplayName><AssignTo createNew="false" transport="http" type="request"/><Set><Headers><Header name="Authorization">Bearer {clientRequest.tokenValue}.{clientRequest.rawToken}</Header></Headers></Set></AssignMessage>
The split token is glued together to create a signed JWT. The flow is now ready to be used in your proxy endpoints.
- Click the Save button and then the Deployment button, deploy to the environment of your choice. In order to use the flow in your API proxies, the flow needs to be deployed.
Test the solution
To test that everything works as expected we'll need an API sitting behind the Apigee Edge. Let's assume that you have a
service at http://my-service-instance.com. The service exposes an endpoint using the path /secured which is secured with
a JWT. The endpoint validates the JWT, decodes id, and returns the map of claims from the JWT as JSON. If you want to
quickly learn how to create such endpoint with Node.js and Express have a look at this tutorial.
Now we have to configure a proxy in Apigee Edge, that will use the flow we've just created.
- Go to Develop > API Proxies and click + Proxy.
- Choose the
Reverse Proxytype. - Enter a suitable name, set the base path to
/securedand the target tohttps://my-service-instance.com/secured. Click Next. - Leave default settings in the next step and click Next.
- Choose the virtual host which you want to use (we recommend using the
secureoption). Click Next. - Click Create and Edit Proxy to go to the edit page.
- In the top right corner choose the Develop tab.
- Select the Proxy Endpoints tab on the left hand side, then PreFlow
- Add a new Request step, choose the
Flow CalloutPolicy, give it a suitable name and choose your shared flow in the select box. Click Add. - Click Save, then Deployment and deploy the endpoint to a suitable environment.
Let's make some calls!
Create a dynamic client
If you decided to implement the client synchronization, let's first create dynamically a new client. Make this request:
curl \-H "Authorization: Bearer ..." \-H "Content-Type: application/json"-d '{ "developer": "developer@email.com", "software_id": "client_id_of_the_template_client" }'https://your-apigee-host.com/client-registration
The authorization token must be a token issued with the dcr scope. The method how this token can be obtained depends on
the configuration of the client used as the software template. Using the example configuration from the developer portal, the client template named
dynamic-client-template will require the user to authenticate. This can be seen by opening the client template
(Profiles → Token Service → Clients → dynamic-client-template). Under the Dynamic Client
Registration section of that client, you should see configuration like the following:

If this configuration section is not present, ensure that DCR is enabled on the profile.
Because this is set to user-must-authenticate, the code, implicit, assisted token or Resource Owner Password Credential
(ROPC) flow must be used to obtain the access token; which of these is allowed also depends on the client that will
authenticate the user. For instance, in the sample config, the client www only has the implicit and code flow capabilities
enabled, so assisted token and ROPC cannot be used. The authentication requirements for DCR can also be changed to
client-must-authenticate and then the client credential flow can be used to obtain the initial access token used for
registration.
You can verify that the client has registered properly in the Apigee UI. Under Publish → Apps, the new app
should be shown. The name should be {clientName}-{clientId} as shown in the following screenshot:

If you click this app to drill into it, you'll find a Credentials section with one credential. Clicking the Show
button in the Consumer Key column should reveal the dynamically-generated client ID provided by Curity in the DCR
response and also output by curl. If you see these things, client registration is working.
Obtain an access token
Next we need an access token from the Curity Identity Server. To obtain a valid token you can use the online tool OAuth Tools which is a powerful tool to explore OAuth and OpenID Connect. You can easily add configuration of your Curity Identity Server and use any flow to generate a valid access token. If you're not sure how to create an access token using OAuth flows have a look at the Code Flow tutorial.
You will note that the token you get is different from the ones you normally generate with the Curity Identity Server. It's much longer than an opaque token, but it is not a JWT either - you will not see the typical dot-separated parts you find in JWTs. The token should look something like this (line breaks added for readability):
bVklKyJloYrakUylwIjAhQucpkTAFbSiLM1i3sYu-_4hunLyxAXUzsY048sSohoRfhR0spSdHCJ1lbzLeddDQoXk0gQmXHAIaluTT4BESoi3HFm6whRZcx0G5wVO_FpSMLP2f3MJ0WGzTORJsDG89HC_jgwAeGRp2Q7V-0dhrUarqSrDl_Wa5fYdRRhvtZ2XTAx7Z31xqn215UDpFNML-6TrBuCgdbSEThS1yQ1ohP4s9LIa0rUiZDX4gVB5-DnbmVwB4k21qnG2qyN4IE0yWA1Im-CZjZfrEckVkURAiYke4b-BGVdIG-q1ns9tx25zd0wA0ERW9cpminAKY3C4cw
It is the signature part of your generated JWT.
Make the call to the API
Now make the call to your API with the generated token.
curl https://your-apigee-host.com/secured -H "Authorization: bVkl...C4cw" -i
If everything went fine, you should see a 200 response from you service sitting behind Apigee Edge. The gateway reconstructed the JWT using data kept in cache and the signature part, and your service received a valid JWT.
Try calling the API without the token, you should see a 401 response from Apigee. The request will not be proxied to your microservice.
Conclusion
In the tutorial we showed you how to setup the Split Token approach to work between the Curity Identity Server and Apigee Edge. This example shows the basic usage and further tweaks might be needed in specific deployments, e.g. if you enable the refresh flow you would need to also modify the procedure serving tokens from the refresh flow, so that it returns the split token. This tutorial gives you a starting point from which you can continue to work on the integration. The Curity plugin system and Apigee Edge together give you a powerful tool which can be tailored to suit your needs.
Resources
To learn more about some of the topics touched in this tutorial, have a look at these resources:
- The Curity Identity Server plugins documentation
- The Curity Java SDK documentation
- An article on the Split Token Approach.
- An article on the similar Phantom Token Approach.
- The code for the Curity Event Listener plugin: apigee-split-token-publisher
- An overview of an architecture shown in this tutorial: How to Control User Identity within Microservices.
Customer Stories
Learn how organizations run identity and API security at scale.
Read customer storiesWas this helpful?