Using Subject Alternative Names to Authenticate an OAuth Client
On this page
In a mutual TLS (mTLS) connection, both parties — the server and the client — must present a valid certificate to establish the connection. At the transport level, this gives both ends certainty about the identity of the other party. (In a standard TLS connection only the client validates the identity of the server.) Because the server knows the identity of the caller, mTLS can be used by an OAuth authorization server to perform client authentication based on the connection's certificate.
To authenticate a client, the server needs information about the client's identity. Usually, in an mTLS scenario, this information is taken from the Distinguished Name (DN) part of the certificate. The server knows what to expect in the DN field for a given client and compares it with the value found in the presented certificate. However, in some situations, the DN entry can contain temporal or arbitrary data and makes the client identification much more difficult. For example, some certificate issuers might put a company's address in the DN field. The address might change when a new certificate is issued even though it still identifies the same client. When you have a service deployed in a cluster, the DN name might contain an ID of the instance that runs the service. Several instances of the same client might then have certificates with a different value of DN even though they represent the same client identity.
Subject Alternative Names as a Solution
The X.509 certificate specification introduces a certificate extension called Subject Alternative Names (SAN). The SAN field will usually contain a DNS entry, IP address, email, or a URI, though other types of information are also allowed. What is important is that the SAN's value is asserted by the issuer of the certificate. The SAN extension allows putting immutable information in the certificate outside the DN field, which makes it well suited for authenticating clients to the authorization server. RFC 8705, which standardizes using mutual TLS as a client authentication method, allows using a single entry from the SAN extension instead of the DN field to authenticate the client.
SPIFFE uses SAN
A novel example of SAN usage is the SPIFFE ID used by the identity framework SPIFFE. Services registered in SPIFFE are assigned a URI that is put in the SAN extension of a SPIFFE certificate. This URI can then be used to assert the client's identity.
Authenticating a Client With SAN
It is possible to authenticate clients in a mutual TLS scenario with a value from the SAN field instead of a DN entry. To configure a client to use SAN for authentication, follow these steps.
- Go to Profiles -> Token Service -> Clients and edit a chosen client.
- From the Authentication Method dropdown select
mutual-tlsormutual-tls-by-proxyif your TLS connection is terminated at a proxy. - In the Trust by PKI tab, in the Select Client DN or Alternative Name select a proper entry to tell the Curity Identity Server which certificate field and which value should be used to perform authentication.
| Entry | Description |
|---|---|
| client-dn | The value of the certificate's DN field will be used as described in the documentation. |
| client-dns-name | An entry with the DNS label from the SAN field will be used. |
| client-uri | An entry with the URI label from the SAN field will be used. |
| client-ip | An entry with the IP label from the SAN field will be used. |
| client-email | An entry with the email label from the SAN field will be used. |
Refer to the specification to learn the expected syntax for each field.
- Enter the value that the Curity Identity Server should expect in the chosen field.
- Add a Certificate Authority (CA) that will be used to verify the request's certificate.
- Commit changes.
You can now authenticate the chosen client with a certificate that contains the configured SAN/DN value. There is a working example step-by-step below that you can use to test the feature.
Authenticating Dynamically Registered Clients with SAN
SAN entries can also be used for authentication by dynamically registered clients. During registration, the client informs the authorization server which entry from the SAN field will be used for client authentication. This is done by using one of the following parameters. The value of the parameter should contain the value expected in the certificate.
| Parameter | Value |
|---|---|
| tls_client_auth_san_dns | The value of the entry with the DNS label from the SAN field. |
| tls_client_auth_san_uri | The value of the entry with the URI label from the SAN field. |
| tls_client_auth_san_ip | The value of the entry with the IP label from the SAN field. |
| tls_client_auth_san_email | The value of the entry with the email label from the SAN field. |
Working Example
Follow these steps to create a working example in your instance of the Curity Identity Server.
Prerequisites
- The Curity Identity Server version 7.2 or later.
- Mutual TLS enabled as a client authentication method as described in the documentation.
Create a Certificate with SAN
You will need a certificate with the Subject Alternative Name extension to test the solution. You can have a look at this tutorial, or follow these steps to create such a certificate together with a CA root certificate.
- Create an
extensions.cnffile with the following contents:
[ client_ext ]subjectAltName=DNS:client.example.com
- Create a
create-certs.shfile, with the following contents:
#!/bin/bash##################################################################### A script to create development certificates for SAN testing####################################################################set -e## Point to the OpenSSL configuration file for macOS or Windows#case "$(uname -s)" inDarwin)export OPENSSL_CONF='/System/Library/OpenSSL/openssl.cnf';;MINGW64*)export OPENSSL_CONF='C:/Program Files/Git/usr/ssl/openssl.cnf';export MSYS_NO_PATHCONV=1;;;esac## Certificate parameters#ROOT_CERT_FILE_PREFIX='root'ROOT_CERT_DESCRIPTION='Curity Self Signed Root CA for SAN Testing'CLIENT_CERT_NAME='demo-partner'CLIENT_CERT_FILE_PREFIX='example.client'## Create a root certificate authority#openssl genrsa -out $ROOT_CERT_FILE_PREFIX.key 2048echo '*** Successfully created Root CA key'openssl req \-x509 \-new \-nodes \-key $ROOT_CERT_FILE_PREFIX.key \-out $ROOT_CERT_FILE_PREFIX.pem \-subj "/CN=$ROOT_CERT_DESCRIPTION" \-reqexts v3_req \-extensions v3_ca \-sha256 \-days 3650echo '*** Successfully created Root CA'## Create the client certificate#openssl genrsa -out $CLIENT_CERT_FILE_PREFIX.key 2048echo '*** Successfully created client key'openssl req \-new \-key $CLIENT_CERT_FILE_PREFIX.key \-out $CLIENT_CERT_FILE_PREFIX.csr \-subj "/CN=$CLIENT_CERT_NAME"echo '*** Successfully created client certificate signing request'openssl x509 -req \-in $CLIENT_CERT_FILE_PREFIX.csr \-CA $ROOT_CERT_FILE_PREFIX.pem \-CAkey $ROOT_CERT_FILE_PREFIX.key \-CAcreateserial \-out $CLIENT_CERT_FILE_PREFIX.pem \-sha256 \-days 365 \-extensions client_ext \-extfile extensions.cnfecho '*** Successfully created client certificate'# Remove temporary filesrm $CLIENT_CERT_FILE_PREFIX.csr $ROOT_CERT_FILE_PREFIX.key $ROOT_CERT_FILE_PREFIX.srl
- Run the
create-certs.shto generate certificates. Three files will be generated:
root.pem- the root CA certificateclient.example.pem- the client certificate with the SAN fieldclient.example.key- the client's private key
You can verify that the certificate contains the SAN entry by viewing the certificate. E.g., with the following command.
openssl x509 -in example.client.pem -text
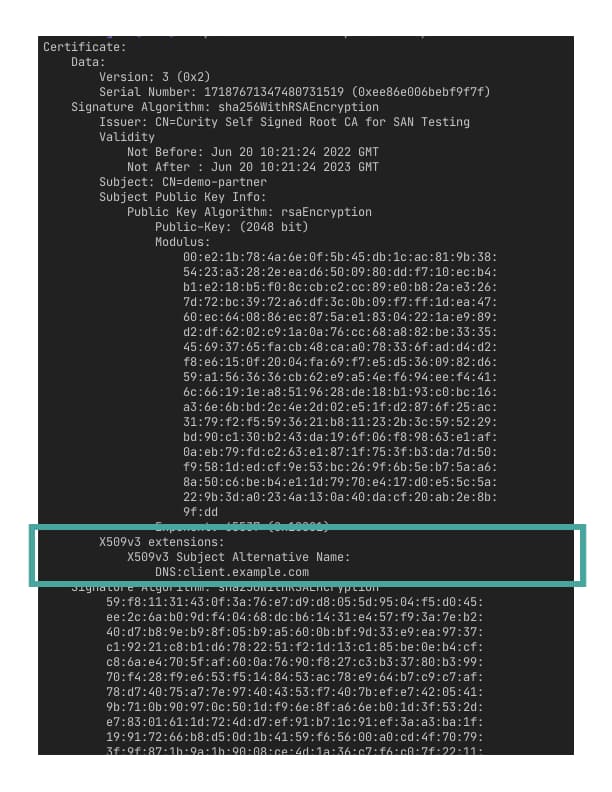
Configuring the Client Trust Store
-
In the admin UI go to Facilities → Keys and Cryptography → Trust Anchors → Client Trust Stores and then click + Add.
-
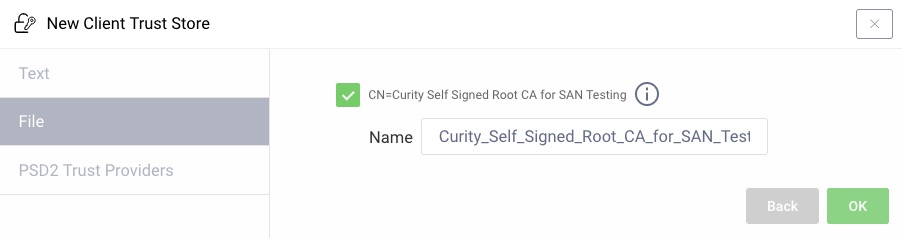
Choose the File tab and click + Select File
-
Browse to the
root.pemfile previously created via the script. No password was set on this file so the password field should be left blank. Now click Next. -
The name is automatically set based on the description of the root certificate. Change the name if needed and then click Ok.
Configuring the Client
-
In the admin UI go to Token Service → Clients and create a new client. Give it a name, e.g.,
san-client, then add theClient Credentialscapability. -
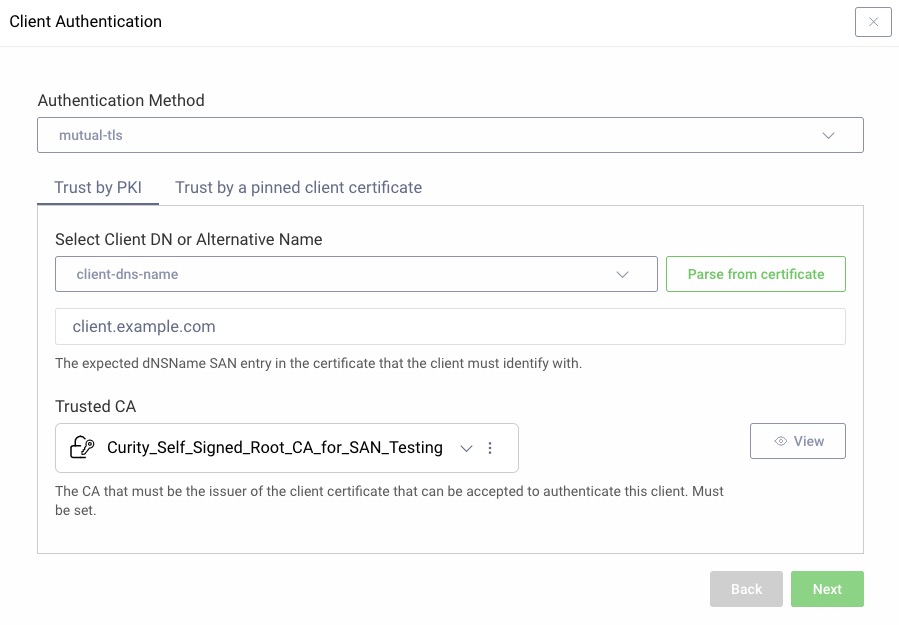
In the Client Authentication modal choose
mutual-tls. -
In the Select Client DN or Alternative Name choose
client-dns-nameand enterclient.example.comin the value input. -
Add the root CA by clicking the Trusted CA dropdown and select the previously created Client Trust Store and click Next. Commit the changes.
Authenticating With SAN
Issue a client credentials token request using the previously generated certificate:
curl https://localhost:8443/oauth/v2/oauth-token \-i \-d 'grant_type=client_credentials&client_id=san-client' \--cert example.client.pem \--key example.client.key
This should produce a response similar to this one:
HTTP/2 200content-type: application/jsoncontent-length: 114{"access_token":"_0XBPWQQ_079bd74e-fcdc-43b8-9590-e63f6fdaac77","scope":"","token_type":"bearer","expires_in":299}
Accepting the Curity Identity Server's Certificate
Note that you might need to use curl's --insecure option unless you have your Curity Identity Server instance's certificate in your system keychain or pass curl the server's certificate with the --cacert option.
Conclusion
Mutual TLS makes it possible for clients to authenticate securely without using hard-coded secrets. The DN of the certificate is usually used to perform authentication in a mutual TLS scenario; however, this part of a certificate is sometimes unfit for this purpose (e.g., because it contains temporal or mutable data). If this is the case, then authenticating a client with data contained in the SAN part of the certificate might be the answer. It can also be useful when the SAN part is the only one to contain data necessary to identify the client (e.g., the SPIFFE ID when the SPIFFE framework is used to manage client identities). In the Curity Identity Server, you can configure the client authentication to use a SAN entry instead of the DN value in a simple way, using the usual methods of configuration — through the admin UI, the RESTCONF API, or the configuration CLI.
Customer Stories
Learn how organizations run identity and API security at scale.
Read customer storiesWas this helpful?