Code Flow
On this page
The most popular OAuth 2 flow is the code flow. The code flow is a message exchange pattern used by web-based applications. These apps are ones that have a backend or use a traditional approach to web application development. Because such applications reside on a server, it is feasible to issue the client a secret or other kind of credential which it can keep safe. Such clients are referred to as confidential or private clients.
In this tutorial, you will learn how the code flow works and how to configure it in the Curity Identity Server. The tutorial also explains the common extensions that can be made to this flow and discuss when and why you may use them.
Overview
The code flow is divided into two parts - the authorization request and the token request - as shown in the following figures:
Authorization Endpoint

- Browser redirects to the authorization endpoint at the Token Service of the Authorization Server.
- If the user is not yet authenticated, the Token Service redirects to the Authentication Service. Note that these two entities, while running in the same product, are separate conceptually.
- The User authenticates, and is redirected back to the Token Service.
- The Authorization Server issues a one time token called the authorization code.
Token Endpoint

- The client backend makes a POST request to the token endpoint with the authorization code and client credentials.
- The Authorization Server validates the code and the credentials. It returns an access token and optionally a refresh token if configured.
The refresh token is an important feature of the code flow. It allows a client to extend the user's session for a prolonged period of time without troubling the user to authenticate again. This is often desirable and one of the primary reasons that the code flow is preferred over the implicit flow or other flow where the client is public (i.e., it cannot keep a secret).
To learn more about the client parameters of the code flow study the OAuth Code Flow description.
RFC Reference
For reference, the code flow is specified in section 4.1 of the OAuth standard
Pre-requisites
This tutorial builds on the configuration setup described in the steps First Configuration and Configure an Authenticator under the menu Getting Started. If you have not gone through those steps yet, you can visit the guides by clicking on the links.
You may run this tutorial on a custom setup also, but keep in mind that names and URLs may be different, as well as the capabilities configured in the profiles.
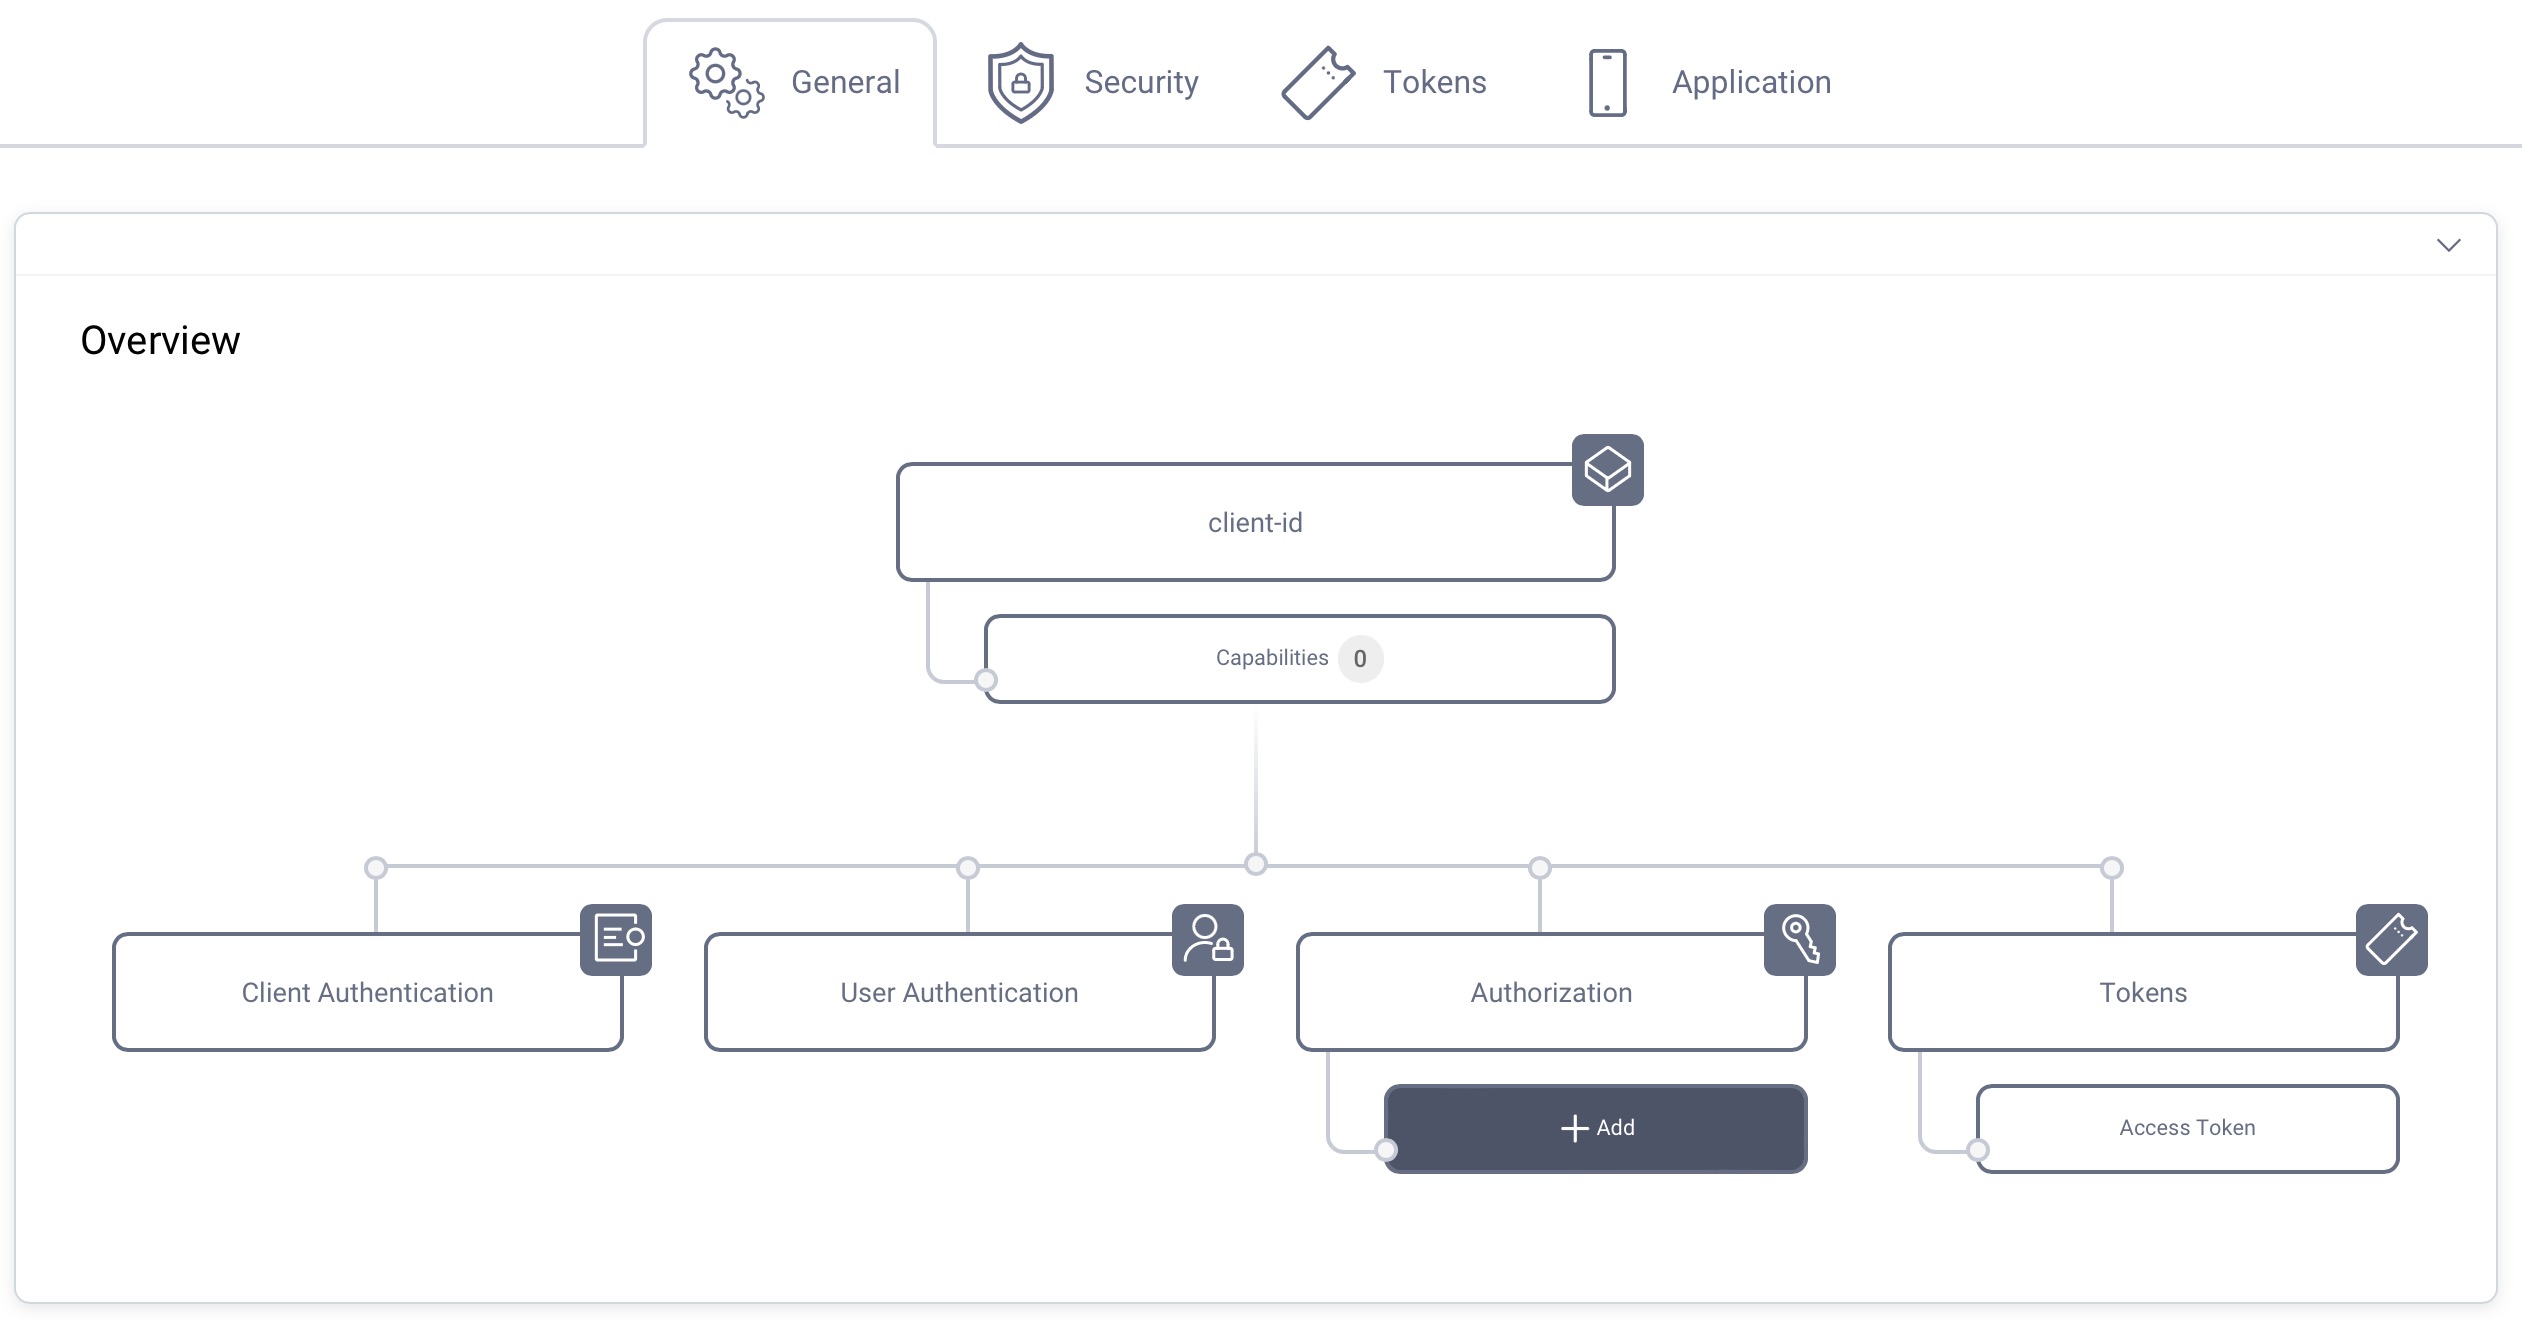
Setup in the Curity Identity Server
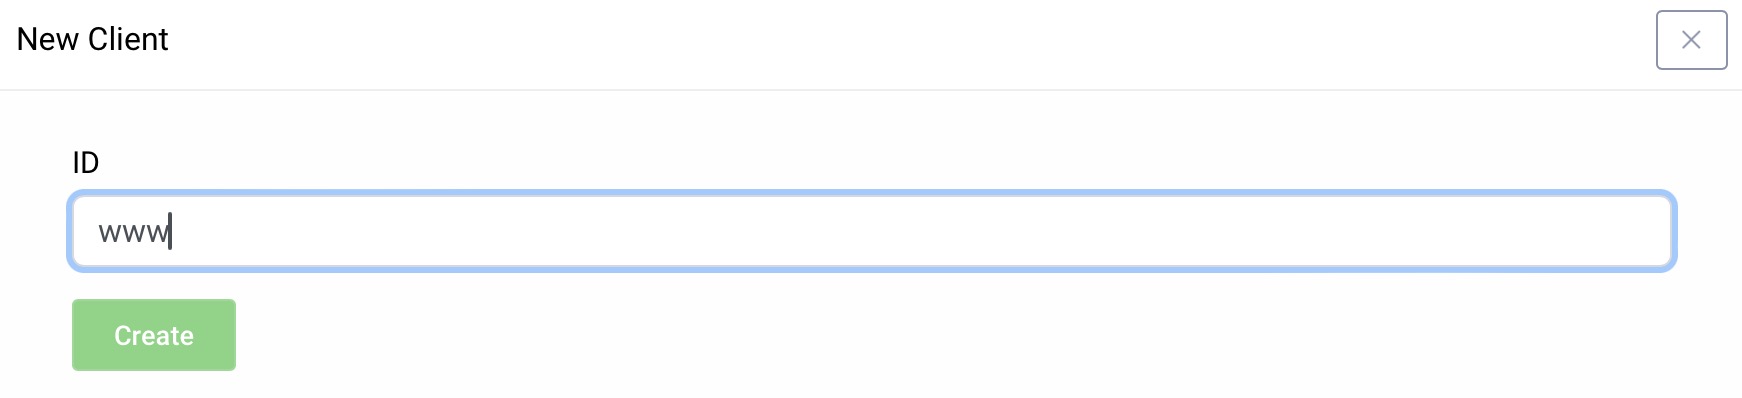
Visit the Profiles screen and click the Token Service. On the left select Clients and click New Client.
New Client
Give the client an ID (e.g., enter www for a website client).
Capabilities
In the Overview panel click on the Capabilities box to add a new capability.
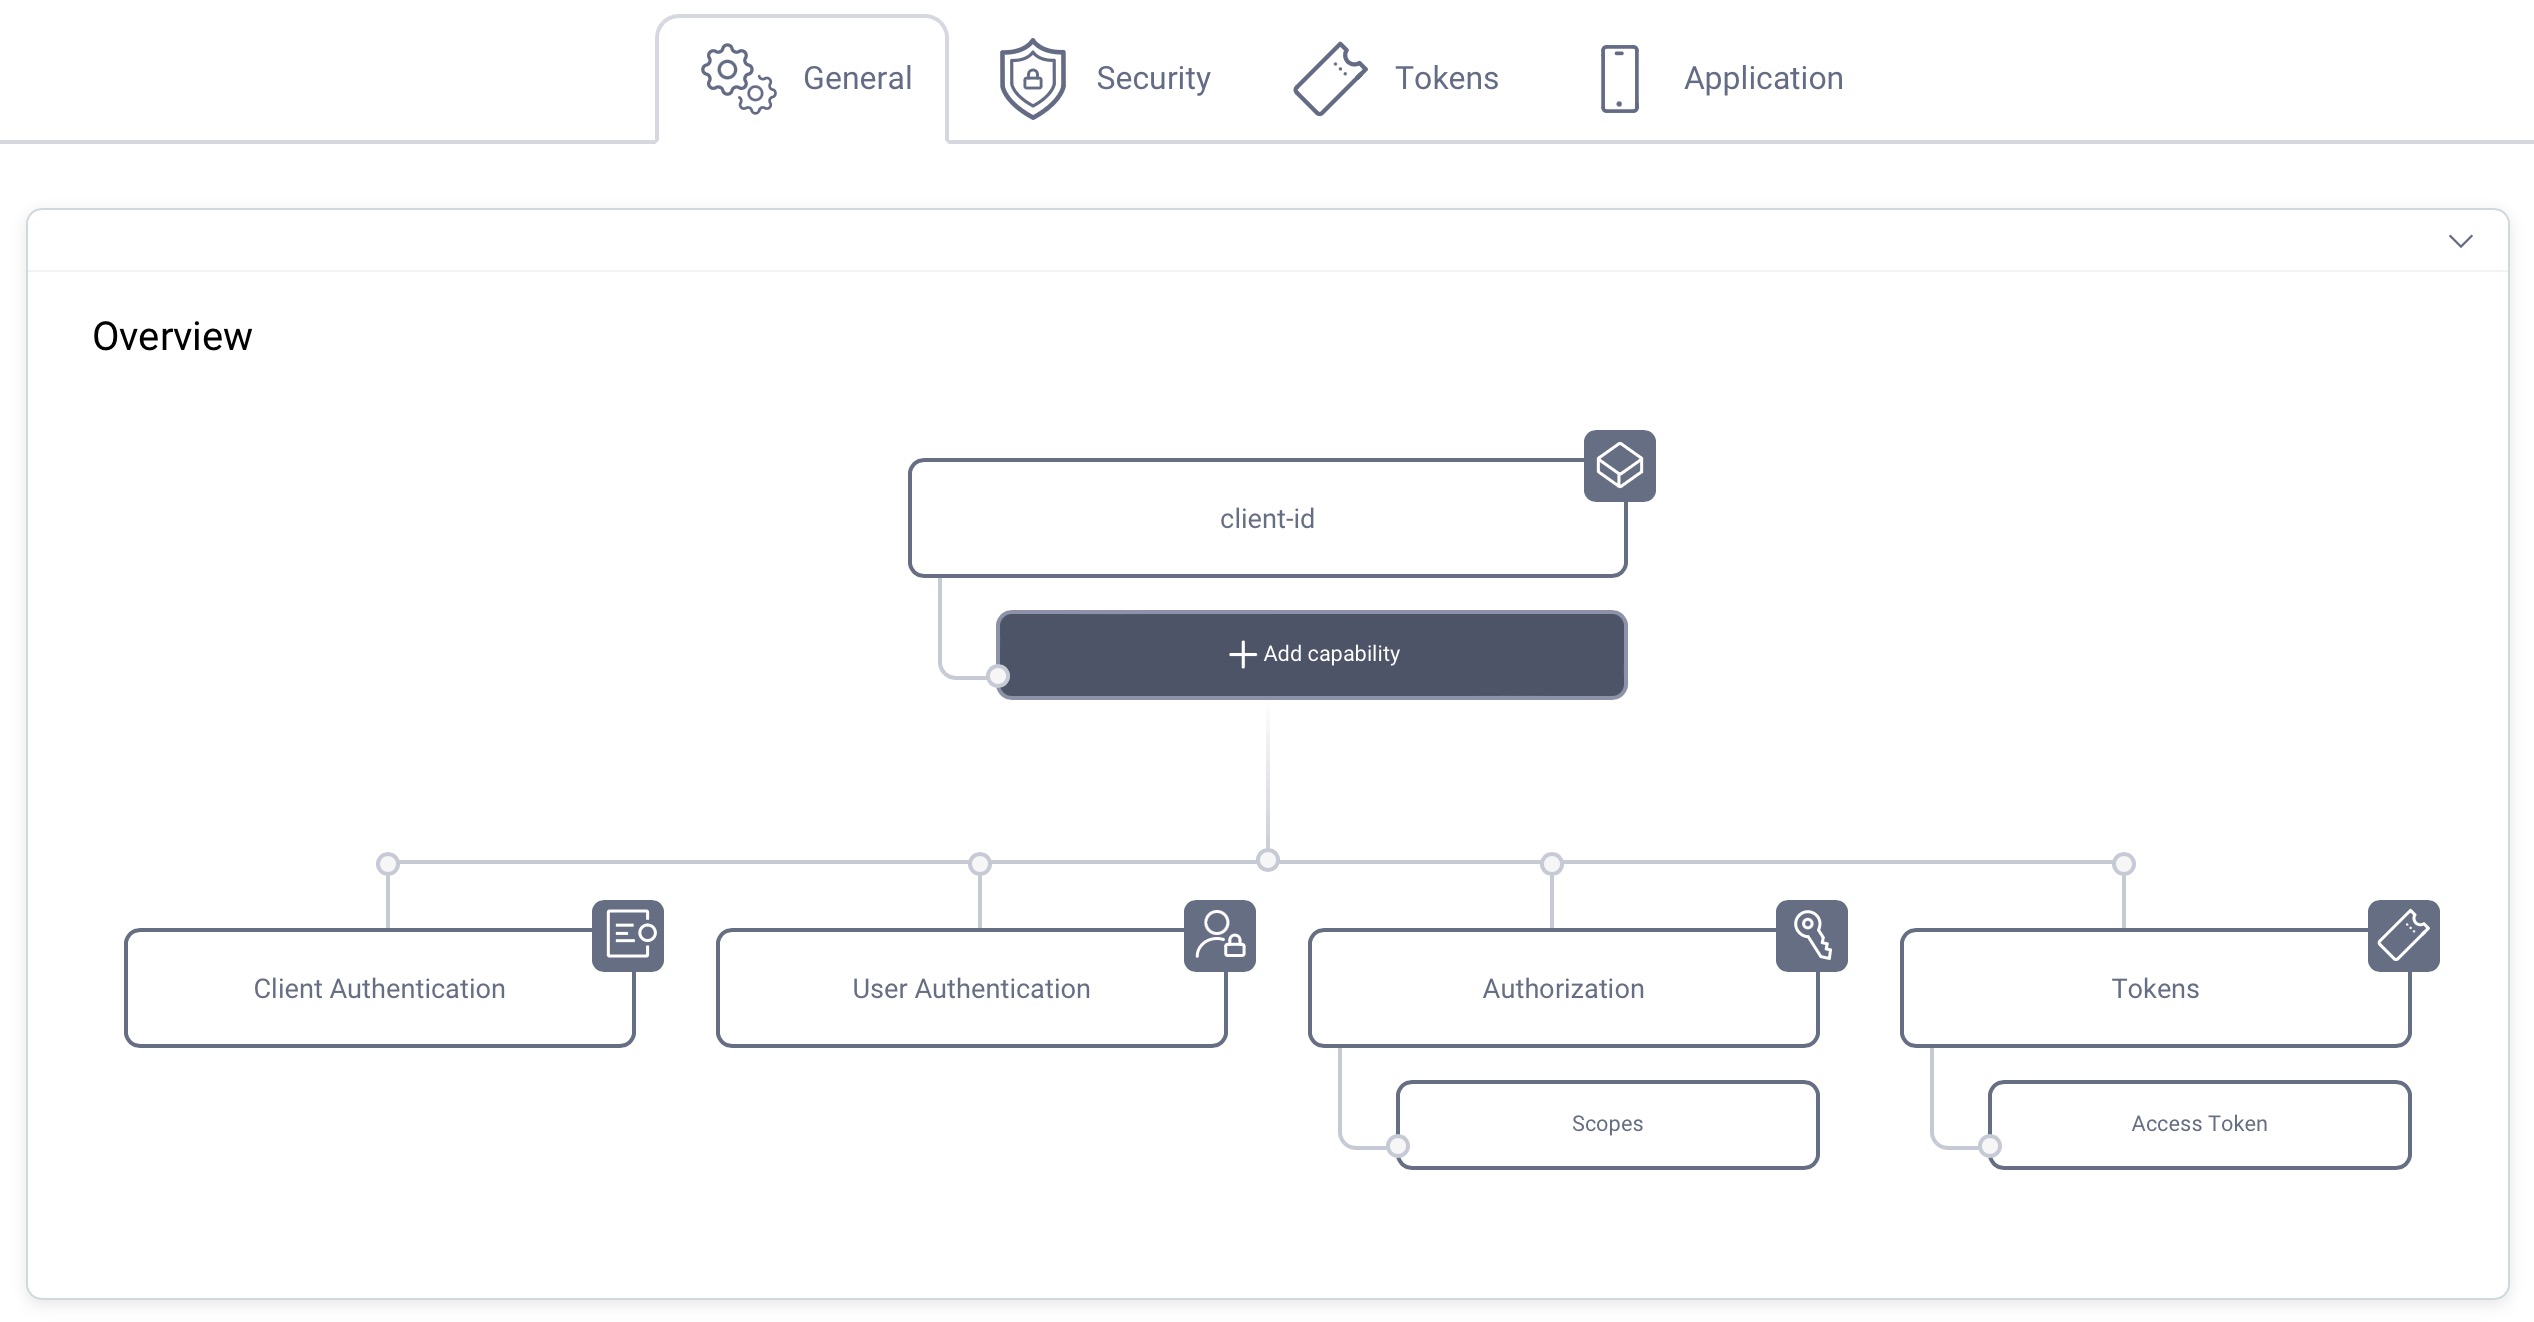
Select the Code Flow capability and click Next.

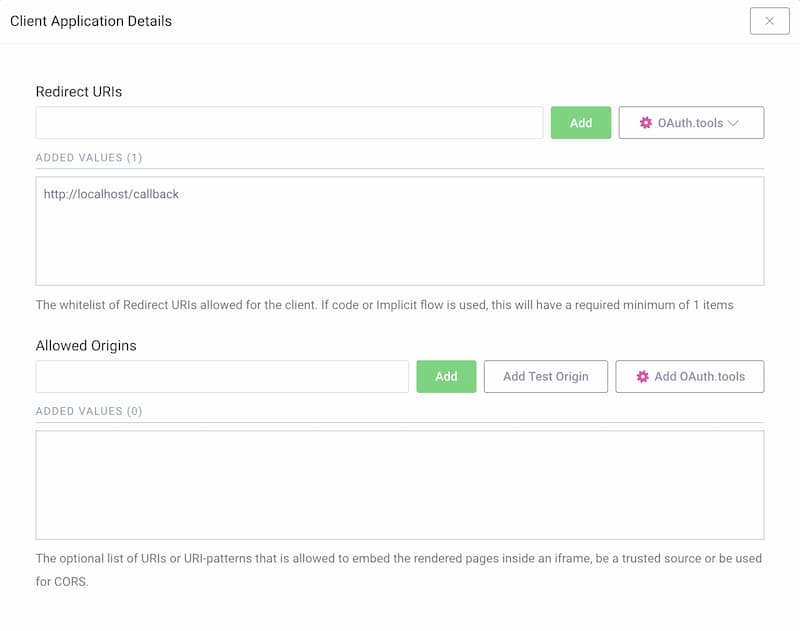
Redirect URL
If you don't know what you will use for the redirect URI, just enter http://localhost/callback for now. The value can be changed later.
This tutorial shows how to manually run the flow, so localhost is fine. If you plan to use OAuth Tools for testing purposes, add the appropriate redirect URIs from the OAuth.tools dropdown menu.
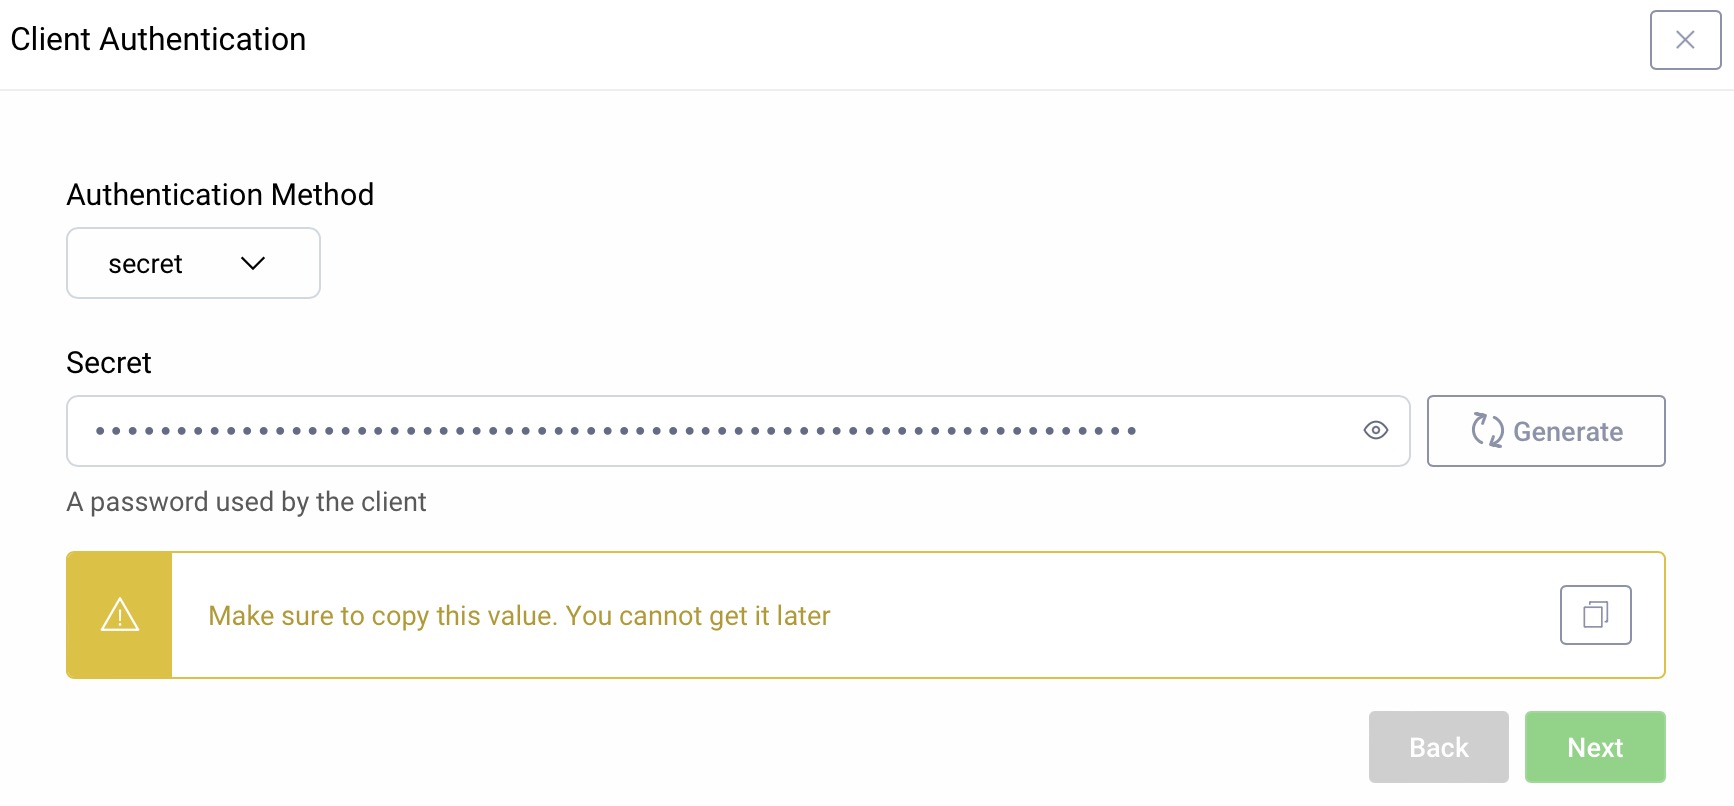
Client Authentication
For client authentication select secret and enter or generate a secret value. Make sure to remember the value since it cannot be retrieved later, though you can reset it if required.
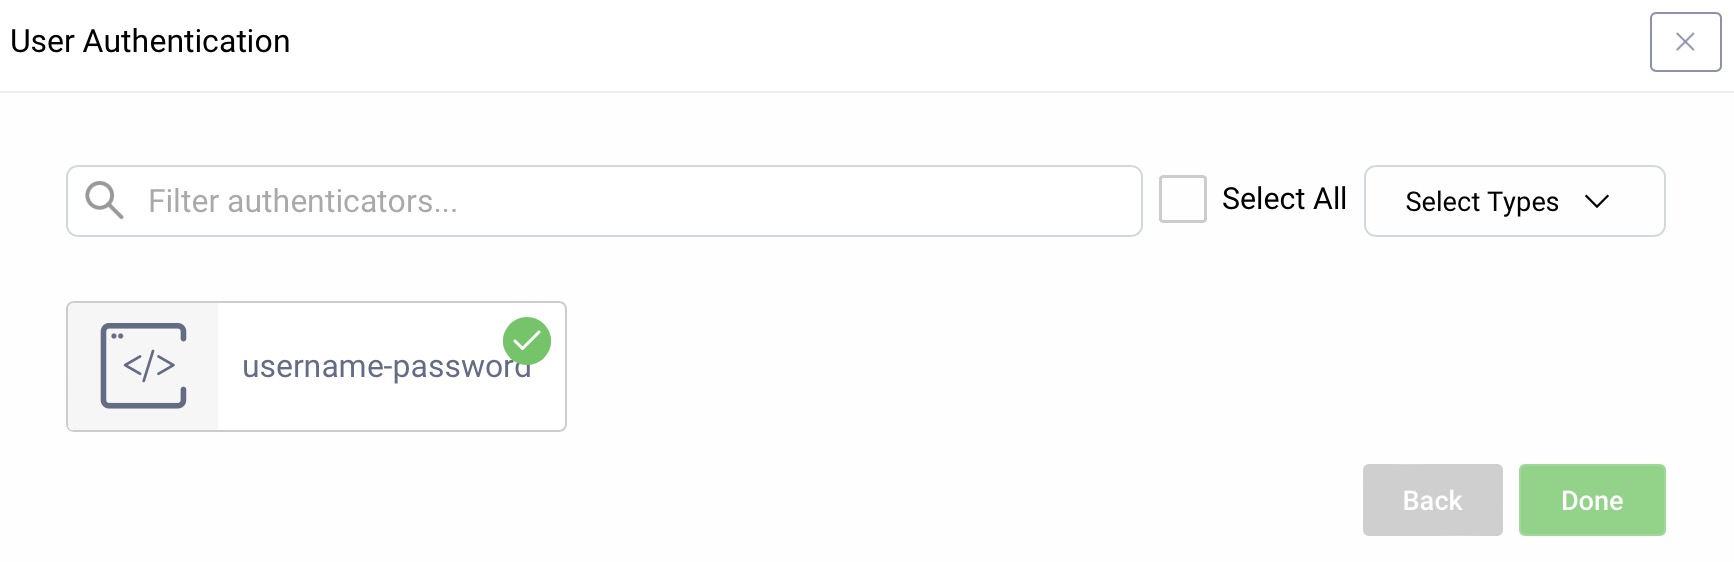
User Authentication
For user authentication select the authenticator created in the authenticator tutorial.
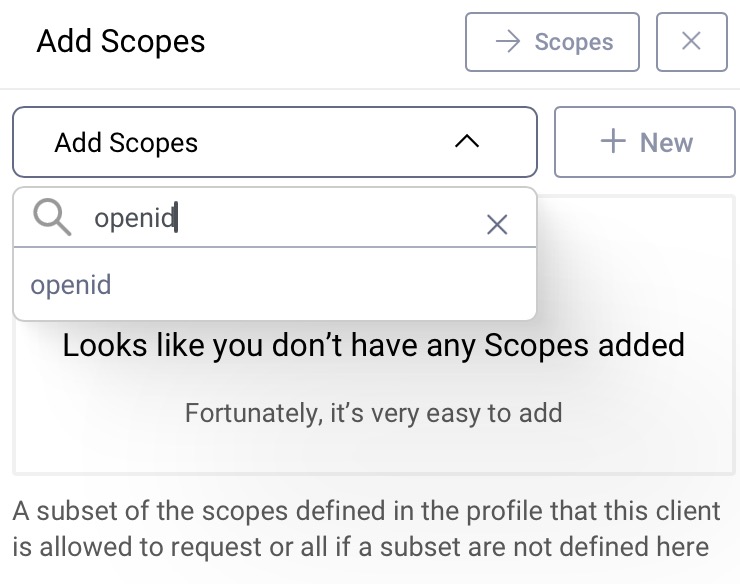
Add the openid Scope
In the Overview panel locate the Authorization box and click on Scopes:
Select openid from the list of scopes in the dropdown menu to add that scope to the client. The client can then run an OpenID Connect code flow and receive an ID token with information about how and when the user authenticated.
Commit
Make sure to remember to commit the changes in the Changes -> Commit menu.
Requesting an Authorization Code
Once the client is configured, you can request the authorization code. The request is sent to the authorization endpoint at the Token Service and its path may vary depending on the configuration details. If you used the setup wizard, the flow starts at:
https://localhost:8443/oauth/v2/oauth-authorize
The parameters must at least contain response_type with a value of code and the client_id parameter. state should be included and so should a redirect_uri.
If the client has defined multiple redirect endpoints, then the authorization request must set the redirect_uri.
If the client needs an ID token, then a scope parameter must be included that contains openid.
Study the description of the OAuth Code Flow for details about the OAuth related parameters.
An example of the minimum required inputs is a URL such as this:
https://localhost:8443/oauth/v2/oauth-authorize?response_type=code&client_id=www
If things are set up correctly, then you should be presented with a login form. If this is a first use and no accounts have been created yet, you can click Create Account, and register a new account.
After logging in, the browser will be redirected to the redirect URI of the client application. The URI contains a code query string parameter. If the state was included in the original request, it will also be included on the query string. If the authorization server supports the OAuth 2.0 Authorization Server Issuer Identifier specification, then it adds its issuer identifier in the iss parameter. A sample response looks similar to this:
HTTP/1.1 303 See OtherLocation: https://localhost/callback?code=YJBtNPyndBUH7ddx5AsF9HAnTgYtnV9l
The client should make no assumptions about the HTTP status code used to redirect the user's browser, nor that there will even be a redirect. The OAuth specification allows this change of control to be made using any method understood by the user agent.
Including a State
It is important to include a state query string parameter in the original request. This is technically optional according to the OAuth specification, but highly recommended. When included, the state should be verified when the callback is received. The way in which it is created and verified varies, but an easy way is to symmetrically encrypt a value, send the cipher-text, and verify that it can be decrypted later. The value could be the client ID, the date, etc. The point of the state is to verify that the request originated from the client. A request that includes a state could look something like this:
https://localhost:8443/oauth/v2/oauth-authorize?response_type=code&client_id=www&state=9dDZSJvwRrnJS8YFLK0NckPkEwvgKQKeG4LA06yV%2BftWGq%2FxlYRdCw%3D%3D
Issuer Identifier
Clients that integrate with multiple authorization servers are vulnerable to mix-up attacks. In a mix-up attack, the client sends an authorization request to one authorization server but receives the authorization response from a different one. This is possible, because the client cannot verify the origin of a callback, i.e. verify who issued the code. To enable the client to verify that a callback originated from a certain authorization server and to avoid mix-up attacks, the authorization server can add its issuer identifier in the iss parameter to the authorization response. The following non-normative example includes the issuer identifier https://localhost:8443/oauth/v2/oauth-anonymous:
HTTP/1.1 303 See OtherLocation: https://localhost/callback?code=YJBtNPyndBUH7ddx5AsF9HAnTgYtnV9l&state=9dDZSJvwRrnJS8YFLK0NckPkEwvgKQKeG4LA06yV%2BftWGq%2FxlYRdCw%3D%3D&https%3A%2F%2Flocalhost%3A8443%2Foauth%2Fv2%2Foauth-anonymous
If supported, the client must verify that the iss parameter contains the issuer identifier of the authorization server that the request was sent to.
Redeeming the Code
With the state and issuer verified (if applicable), the client app can redeem the code for an access token and possibly other tokens -- like a refresh token and an ID token. To do so, the client app must make an HTTP POST request to the token endpoint (step 5 in the figure above) of the Authorization Server. The body of this request must include the following parameters:
- A
grant_typeparameter with a value ofauthorization_code - A
codeparameter where the value is the authorization code plucked off of the callback request - A
redirect_uriif it was sent in the request to the authorization endpoint
All of these must be form URL encoded according to the specification. JSON format is not supported.
This call is authenticated, that is the client must prove its identity by authenticating. There are various ways to achieve this, but the most common method is to use the client ID together with a secret. The ID must be the same as the one used in the request to the authorization endpoint (step one above) of the Authorization Server. The ID and secret can be sent in either of two ways:
- In the form-URL-encoded request body together with the other parameters. In this case, the parameters
client_idandclient_secretshould be used. - In an
Authorizationrequest header using the HTTP basic mechanism.
If the client includes its credentials in both of these locations, they must match. The Curity Identity Server will reject the call otherwise. A sample HTTP request is shown in the following listing (which includes line breaks for readability):
POST /oauth/v2/oauth-token HTTP/1.1Host: localhost:8443Content-Type: application/x-www-form-urlencodedgrant_type=authorization_code&code=xPwTedMCpix4I14rYlrlkXWYnBOxEv4G&client_id=www&client_secret=the_secret&redirect_uri=https%3A%2F%2Flocalhost%2Fcallback
Redirect URI
This request will be rejected if the original request did not include the redirect_uri. A redirect_uri should only be sent to the token endpoint if it was also sent in the authorization request.
The response is formatted in JSON. If things go well, it contains at least an access token. If so configured, the response also includes a refresh token. If the client provided the openid scope in the authorization request, the response also includes an ID token. The following is a response that only includes an access token and a refresh token:
{"access_token": "7efda4da-e316-452c-88a6-4cd2482a6f00","refresh_token": "d392c88c-5080-451b-a551-c5119e98195c","scope": "","token_type": "bearer","expires_in": 299}
This response does not include a scope value. This is because the authorization request did not include any either.
Additional Tokens
Including or Excluding a Refresh Token
To enable or disable refresh tokens, navigate to the Token Service profile, open the Clients menu and select the client. Under the Tokens tab you can find the Enable Refresh Token option. When enabled, you can configure settings such as the life time of the refresh token.

Refresh Token
By default, the Curity Identity Server issues refresh tokens for a client that supports the code flow.
To disable the issuance of a refresh token navigate to the Token Service profile, open the Clients menu and select the client. Open the Tokens tab and deactivate the Enable Refresh Token option:

When this is done, a token response will look more like this:
{"access_token": "9c6d9647-d100-49cc-8c1f-66a96a305c90","scope": "","token_type": "bearer","expires_in": 300}
Including an ID Token
The client can indicate to use OpenID Connect by including the openid scope in the authorization request, like this:
https://localhost:8443/oauth/v2/oauth-authorize?response_type=code&client_id=www&scope=openid&redirect_uri=https://localhost/callback
OpenID Connect Request
When requesting an ID token using the openid scope, the redirect_uri is required in the authorization request according to the OpenID Connect specification. Omitting the redirect_uri will result in a bad request.
The response from the token endpoint will look similar to the following example:
{"id_token": "eyJraWQiOiItMzgwNzQ4MTIiLCJ4NXQiOiJNUi1wR1RhODY2UmRaTGpONlZ3cmZheTkwN2ciLCJhbGciOiJSUzI1NiJ9.eyJhdF9oYXNoIjoiNEt1SXFOUmFsWWFlZUFYZnlSM21TdyIsImFjciI6InVybjpzZTpjdXJpdHk6YXV0aGVudGljYXRpb246aHRtbC1mb3JtOmh0bWwxIiwiYXpwIjoid3d3IiwiYXV0aF90aW1lIjoxNTIwMzIxOTEyLCJleHAiOjE1MjAzMjYzNzQsIm5iZiI6MTUyMDMyMjc3NCwianRpIjoiZmI2MGZiNDYtNGYwZS00NmI2LTkyNzQtYzJlZDBhMzE0MDU2IiwiaXNzIjoiaHR0cHM6Ly9zcHJ1Y2U6ODQ0My9-IiwiYXVkIjoid3d3Iiwic3ViIjoiam9obmRvZSIsImlhdCI6MTUyMDMyMjc3NCwicHVycG9zZSI6ImlkIn0.D_vHKt1rRwqIXX5VumzFkweiTKWykx7X6Wv7LLYSgAgNoq67ews6PoLlWTnviMNSYXhPV4xpsEqt4b-lMdG53I8g_tslrxVOI3FOy5mysZIub74wkkE0J6Qgba3s8DlbWhj9h4zIO3MNkhfdURJ2PJ6GY6kwc_8Eril0ilNZ8TU_puT8bQHJ_QWxghY3XpeQHtCyzuVDgVv6q7gfcGoy1JxZaLoXNSh02ZIpp7thVrgEAWAiWo7v46HJFiBNpyPnJfzDRwbTIdPFMEKoHOLjUCczsii_4akCb97IVPz5I3bRWASTyig7P_Q0646cNHsHZM-pan7cl5bYb42JI0ykCw","token_type": "bearer","access_token": "858a3746-ebbd-473c-9af7-f74bedd114c5","refresh_token": "3aba4d9b-6339-442e-9c05-126d9cce29da","scope": "openid","expires_in": 299}
The id_token is a JSON Web Token (JWT). The contents of the payload include information about the user and the authentication method that was used (the acr claim):
{"at_hash": "4KuIqNRalYaeeAXfyR3mSw","acr": "urn:se:curity:authentication:html-form:username-password","azp": "www","auth_time": 1520321912,"exp": 1520326374,"nbf": 1520322774,"jti": "fb60fb46-4f0e-46b6-9274-c2ed0a314056","iss": "https://spruce:8443/~","aud": "www","sub": "johndoe","iat": 1520322774,"purpose": "id"}
The ID token is intended for the client app whereas the access token is for the API and the refresh token for the Authorization Server. For more details about how to validate an ID token see Validating an ID Token
Testing
Testing the code flow can be done using a browser to begin with and then some HTTP client, like curl or Postman to redeem the authorization code. This is a very helpful way to see exactly what is going on but it can also be challenging.
We recommend to use the online tool OAuth Tools instead which is a powerful tool to explore OAuth and OpenID Connect.
More Variations and Info
In this tutorial, you got to know variations of the code flow that effect the kinds of tokens that are issued, the scope of access that is granted and more. Some other variations are covered in related tutorials:
- Enabling Interactive User Consent
- Using Proof Key for Code Exchange (PKCE)
- Using Pairwise Pseudonymous Identifiers (PPIDs)
If you have questions on anything in this tutorial, don't hesitate to use the feedback button below or contact us.
Customer Stories
Learn how organizations run identity and API security at scale.
Read customer storiesWas this helpful?