Integrating the Curity Identity Server with AWS API Gateway using the Split Token approach
On this page
Overview
The AWS API Gateway is very powerful and have lots of possibilities for extensions. One such extension is the ability to create a custom Lambda Authorizer.
This how-to will cover how to configure the Curity Identity Server to send a partial token or a split token to a configured instance of AWS DynamoDB. Setting up a Lambda Authorizer that the AWS API Gateway can leverage to authorize the incoming API call and pass on a JWT to the upstream API.
The details of the Split Token approach is a useful read before diving fully into how to set up this integration.
Prerequisites
- An installation of the Curity Identity Server
- Basic understanding of the AWS ecosystem and especially as it related to the API Gateway, DynamoDB and Lambda functions.
If you do not have an installation of the Curity Identity Server, follow this tutorial installation of the Curity Identity Server and configure the installation by running Curity Basic Setup Wizard as outlined in this tutorial Curity Basic Setup Wizard.
Configure the AWS Token Publisher
The Curity Identity Server has the capability to configure event listeners. These are plugins that will trigger when a specific event occurs in the system. For the purpose of integrating with the AWS API Gateway there is a specific AWS token publisher plugin. The plugin can be obtained from Curity's GitHub repo and there are full instructions on how to deploy the plugin: AWS Split Token Publisher Event Listener
The AWS Token Publisher will detect when a token is issued. In order to integrate with AWS API Gateway the Curity Identity Server needs to send the hashed signature part of the issued token along with the header and body to an instance of DynamoDB. This information will later be read by the Lambda Authorizer invoked by the AWS API Gateway.
Configure the split token procedure
In addition to the Curity Identity Server sending the token information to the DynamoBD instance when a token is issued the way the tokens are issued also needs to be modified. This can be achieved by modifying the procedure that runs when the Curity Identity Server executed the procedure for Authorization Code.
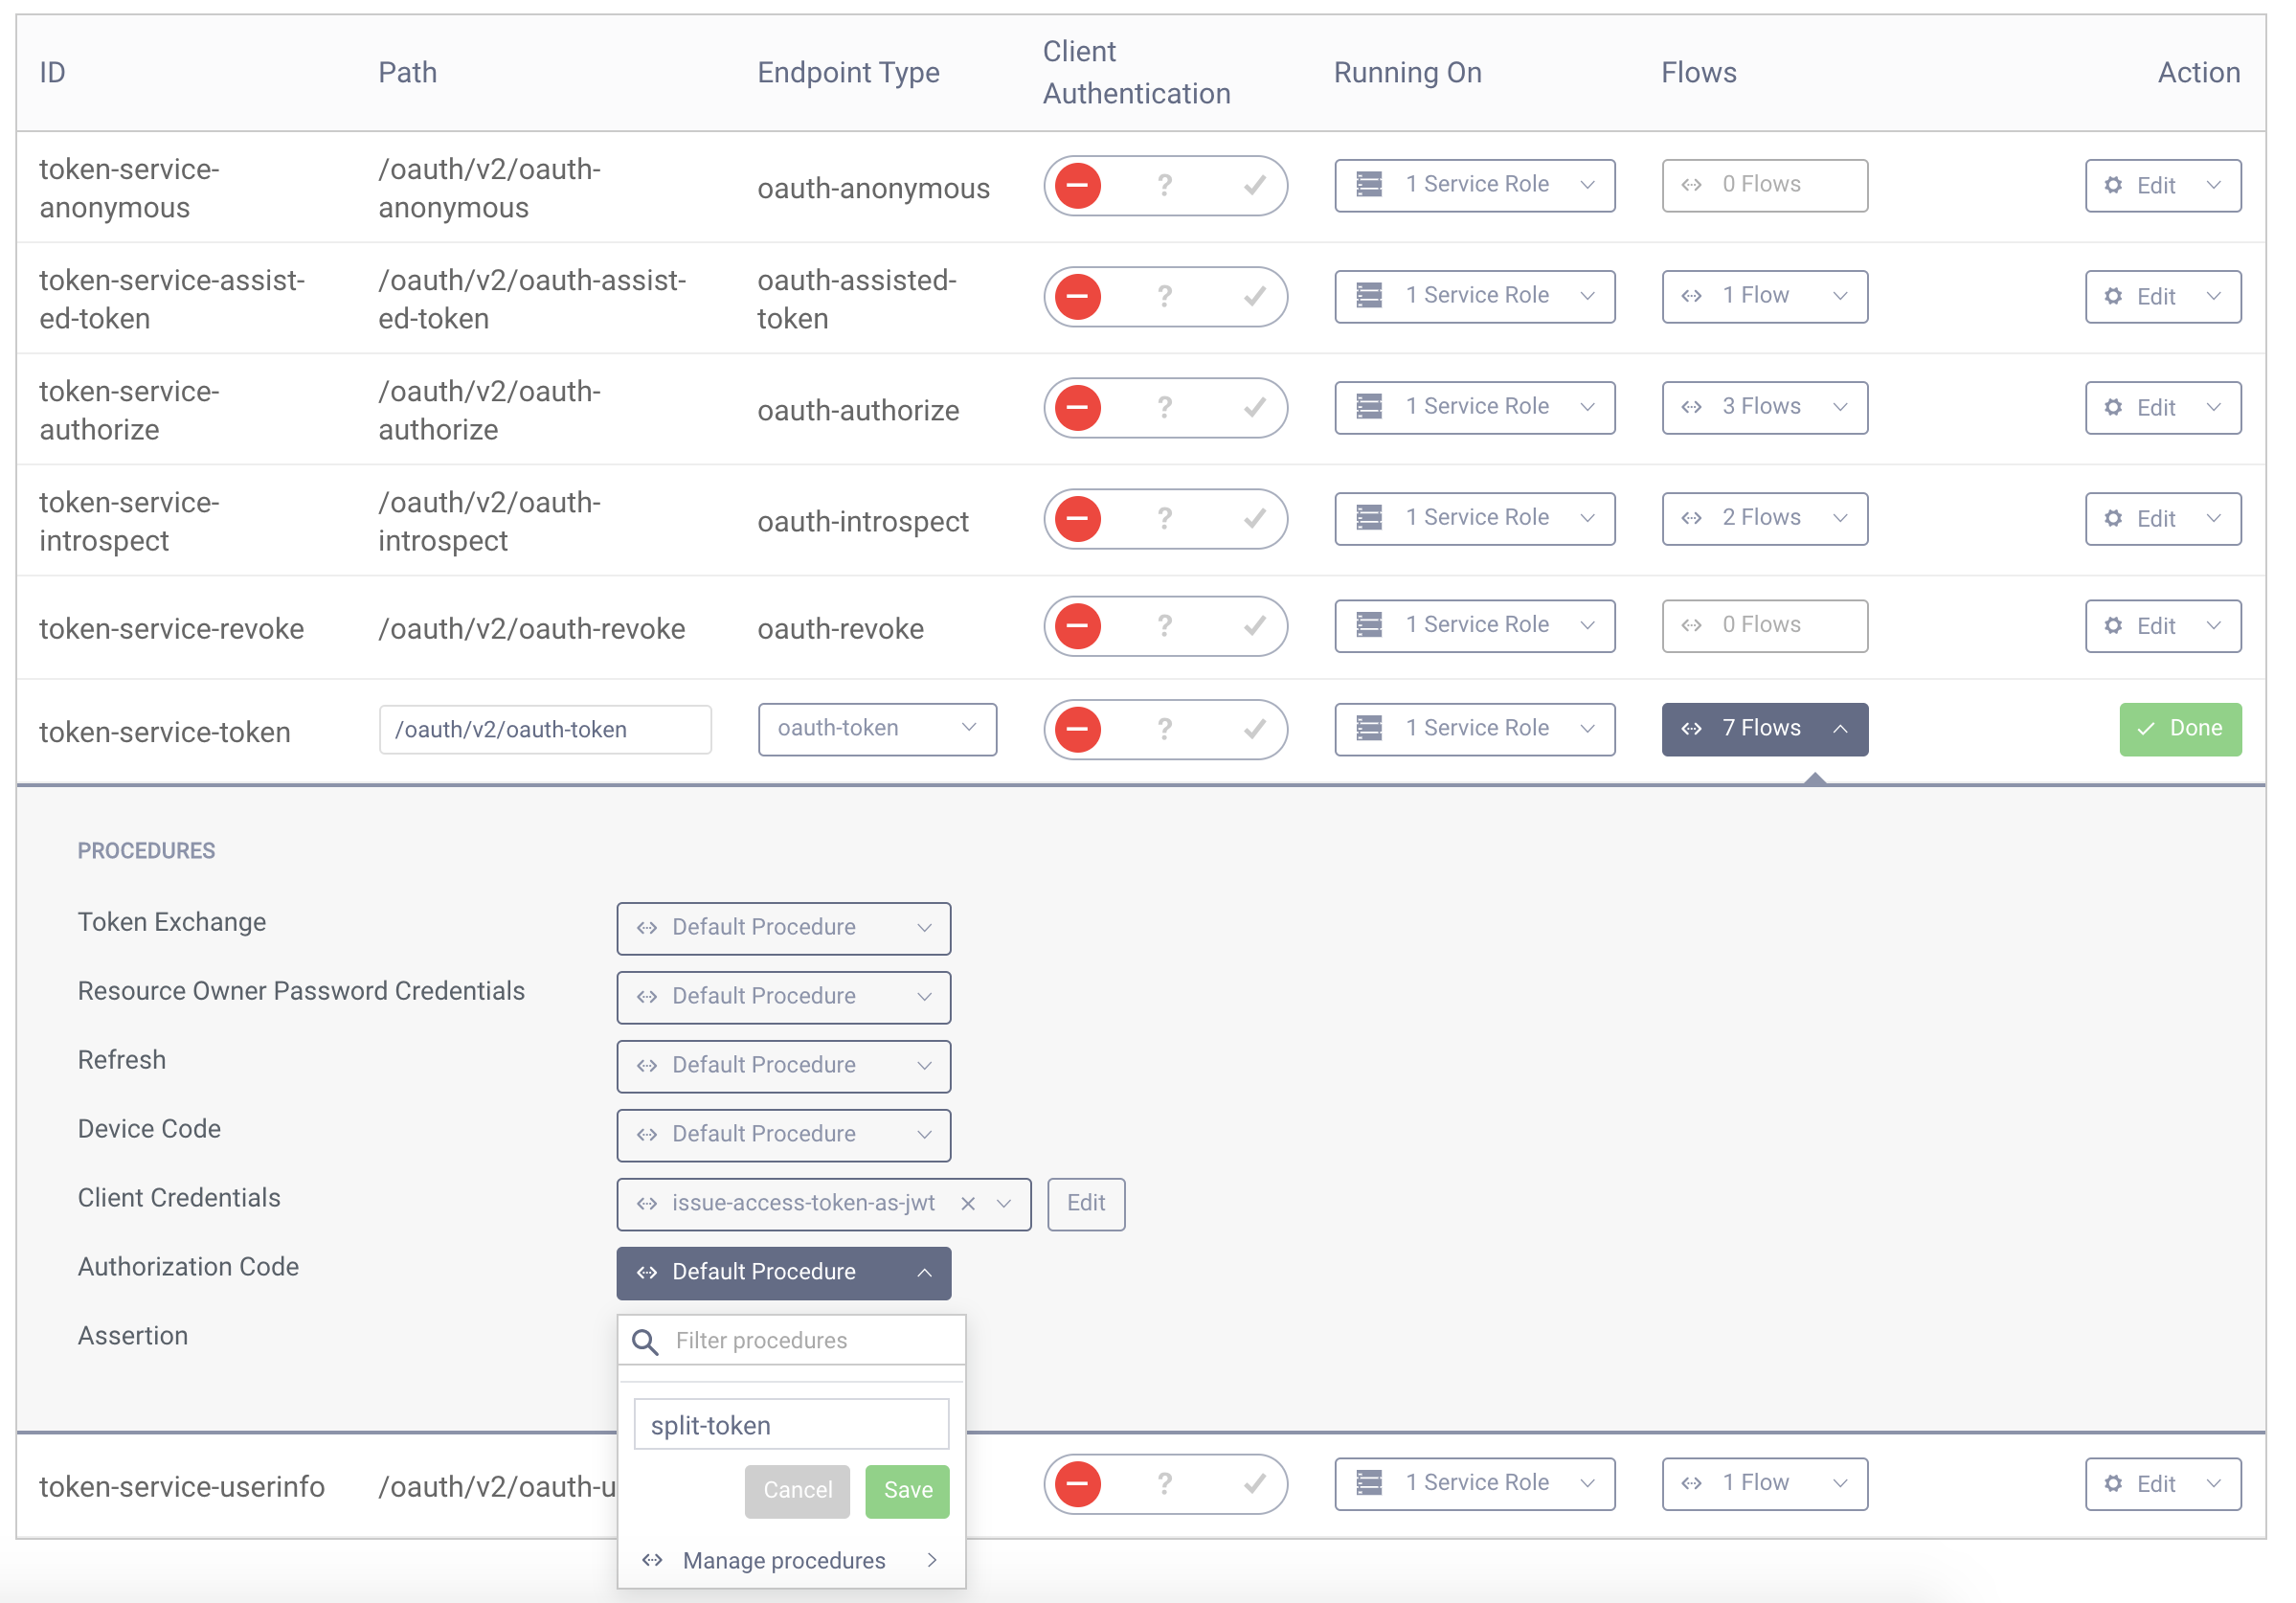
- Go to Profiles > Token Service > Endpoints, find the endpoint with the type oauth-token and click the select box in the Flows column.
- Next find the "Authorization Code" procedure and click the select box next to it. Enter a name for your procedure and click save.
- A popup will appear where you can type the procedure code. Replace the code in the popup with the following one:
function result(context) {var delegationData = context.getDefaultDelegationData();var issuedDelegation = context.delegationIssuer.issue(delegationData);var accessTokenData = context.getDefaultAccessTokenData();var issuedAccessToken = context.getDefaultAccessTokenJwtIssuer().issue(accessTokenData, issuedDelegation);var token = issuedAccessToken.split('.')[2];var refreshTokenData = context.getDefaultRefreshTokenData();var issuedRefreshToken = context.refreshTokenIssuer.issue(refreshTokenData, issuedDelegation);var responseData = {access_token: token,scope : accessTokenData.scope,refresh_token: issuedRefreshToken,token_type: 'bearer',expires_in: secondsUntil(accessTokenData.exp)};if (context.scopeNames.contains('openid')) {var idTokenData = context.getDefaultIdTokenData();var idTokenIssuer = context.idTokenIssuer;idTokenData.at_hash = idTokenIssuer.atHash(issuedAccessToken);responseData.id_token = idTokenIssuer.issue(idTokenData, issuedDelegation);}return responseData;}
- Click the Update button to save changes in the procedure. You can then close the popup. Save and Commit changes to the server.
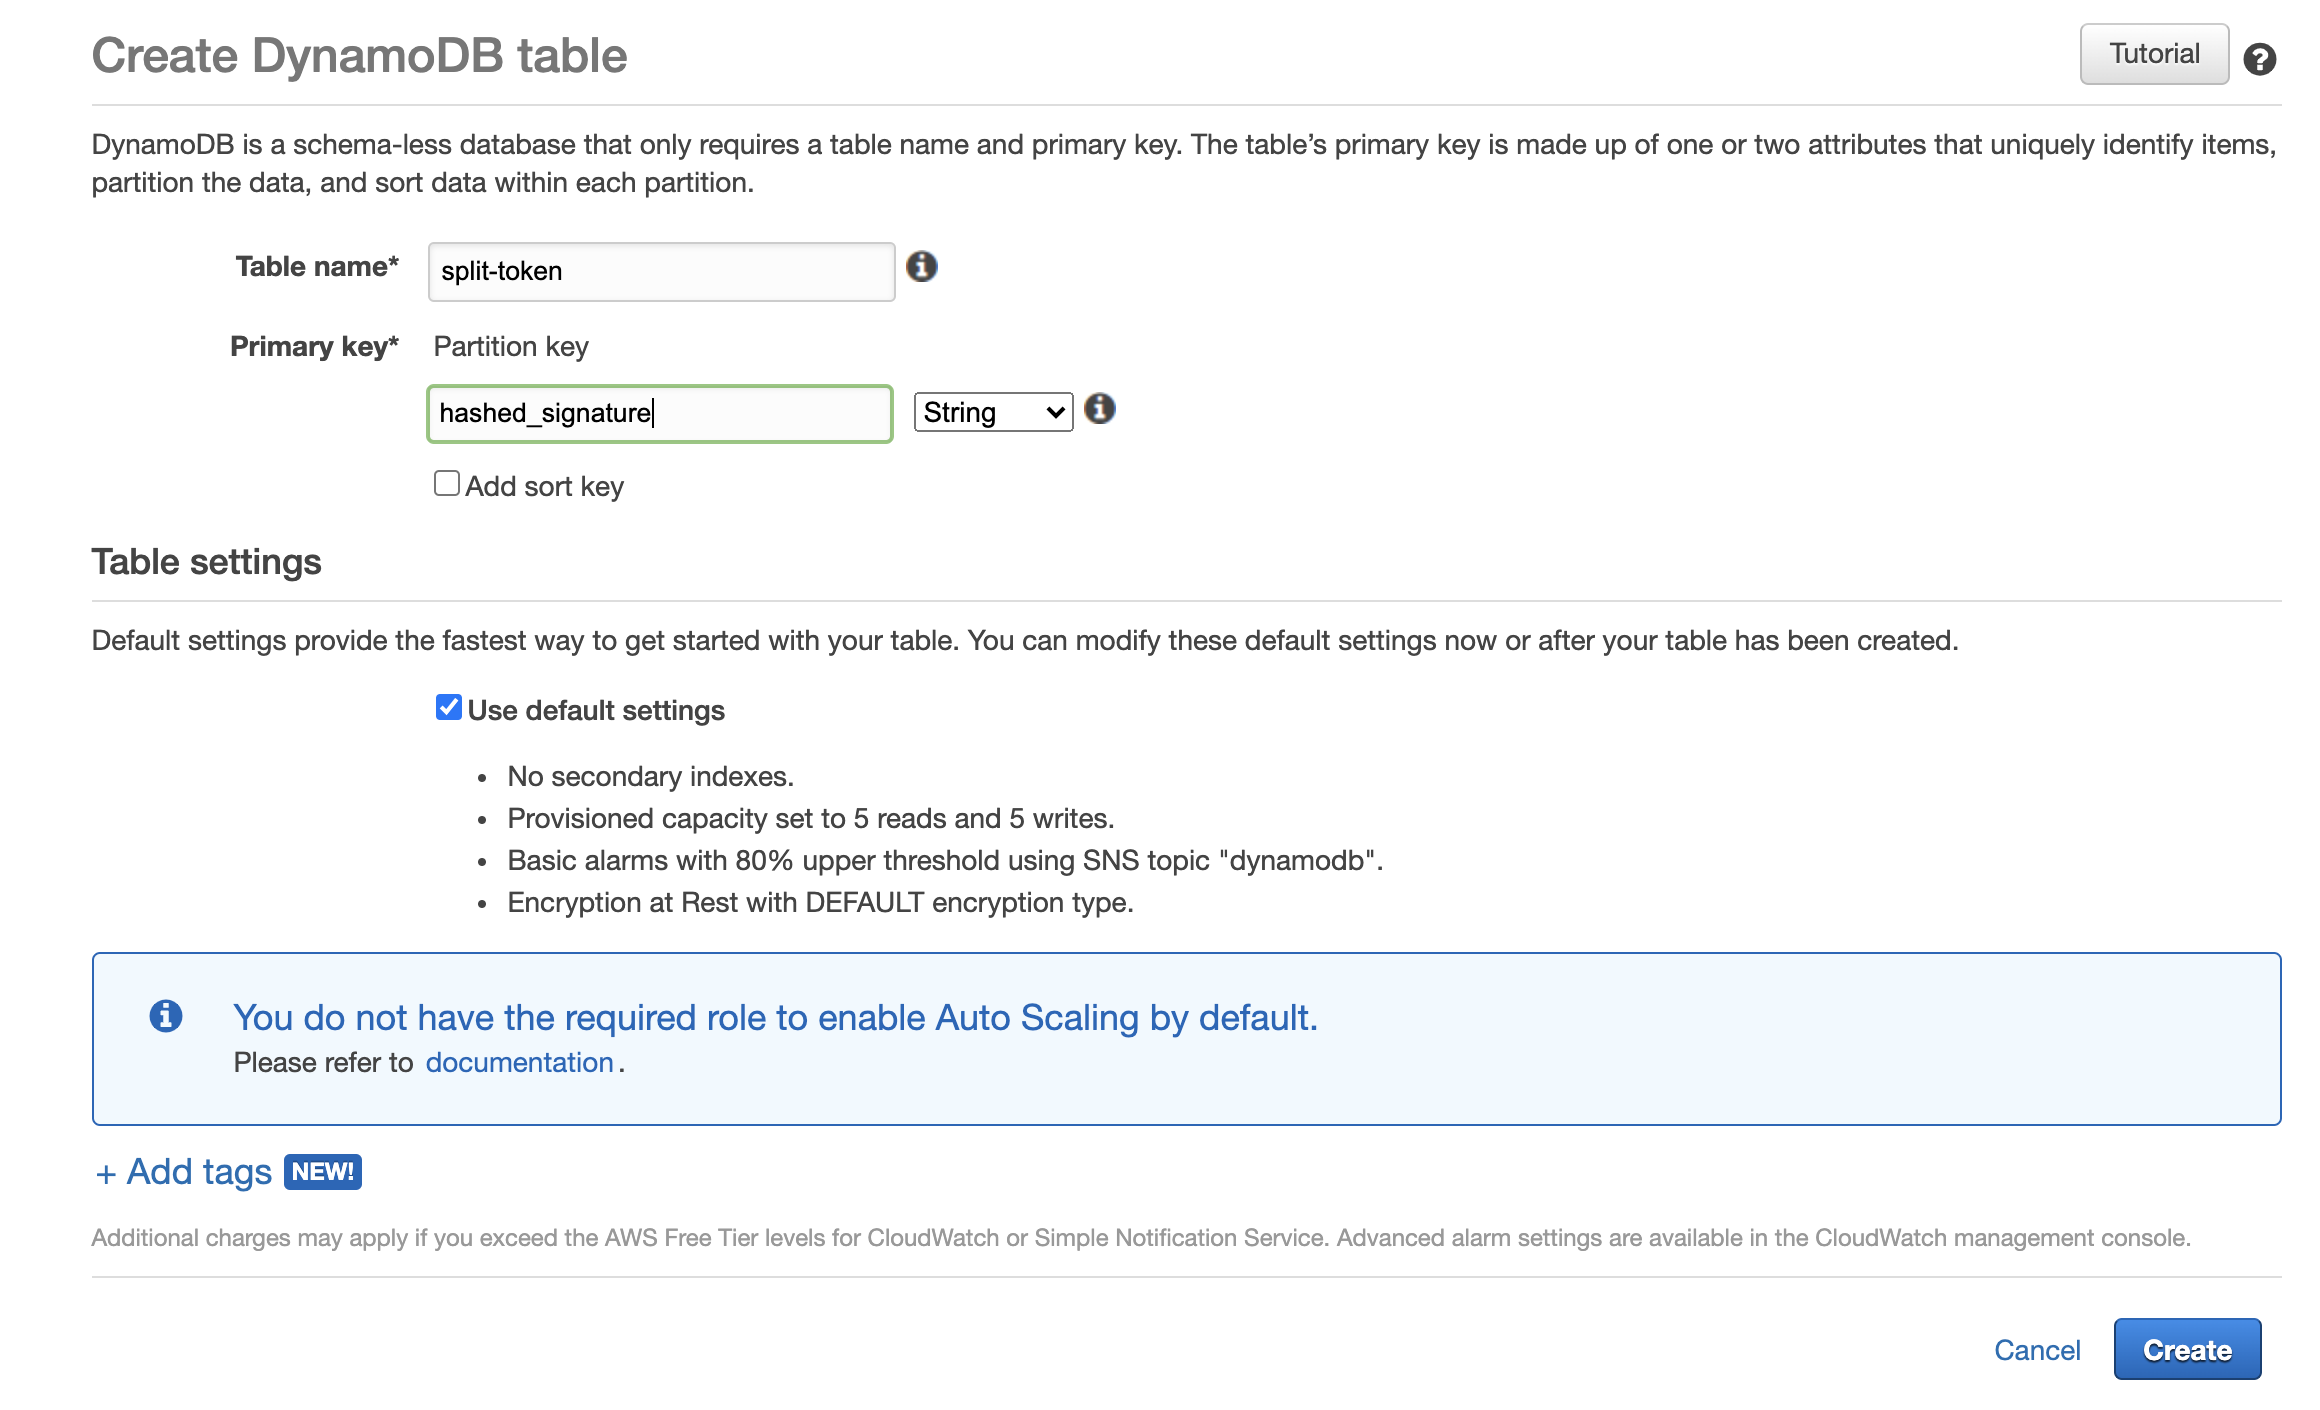
Configure DynamoDB
- Got to AWS Management Console
- Search for the DynamoDB service
- Click
Create table - Name the table, ex
split-token - Enter a Primary key, ex.
hashed_signature. Make sure the data type is set to String - Click Create
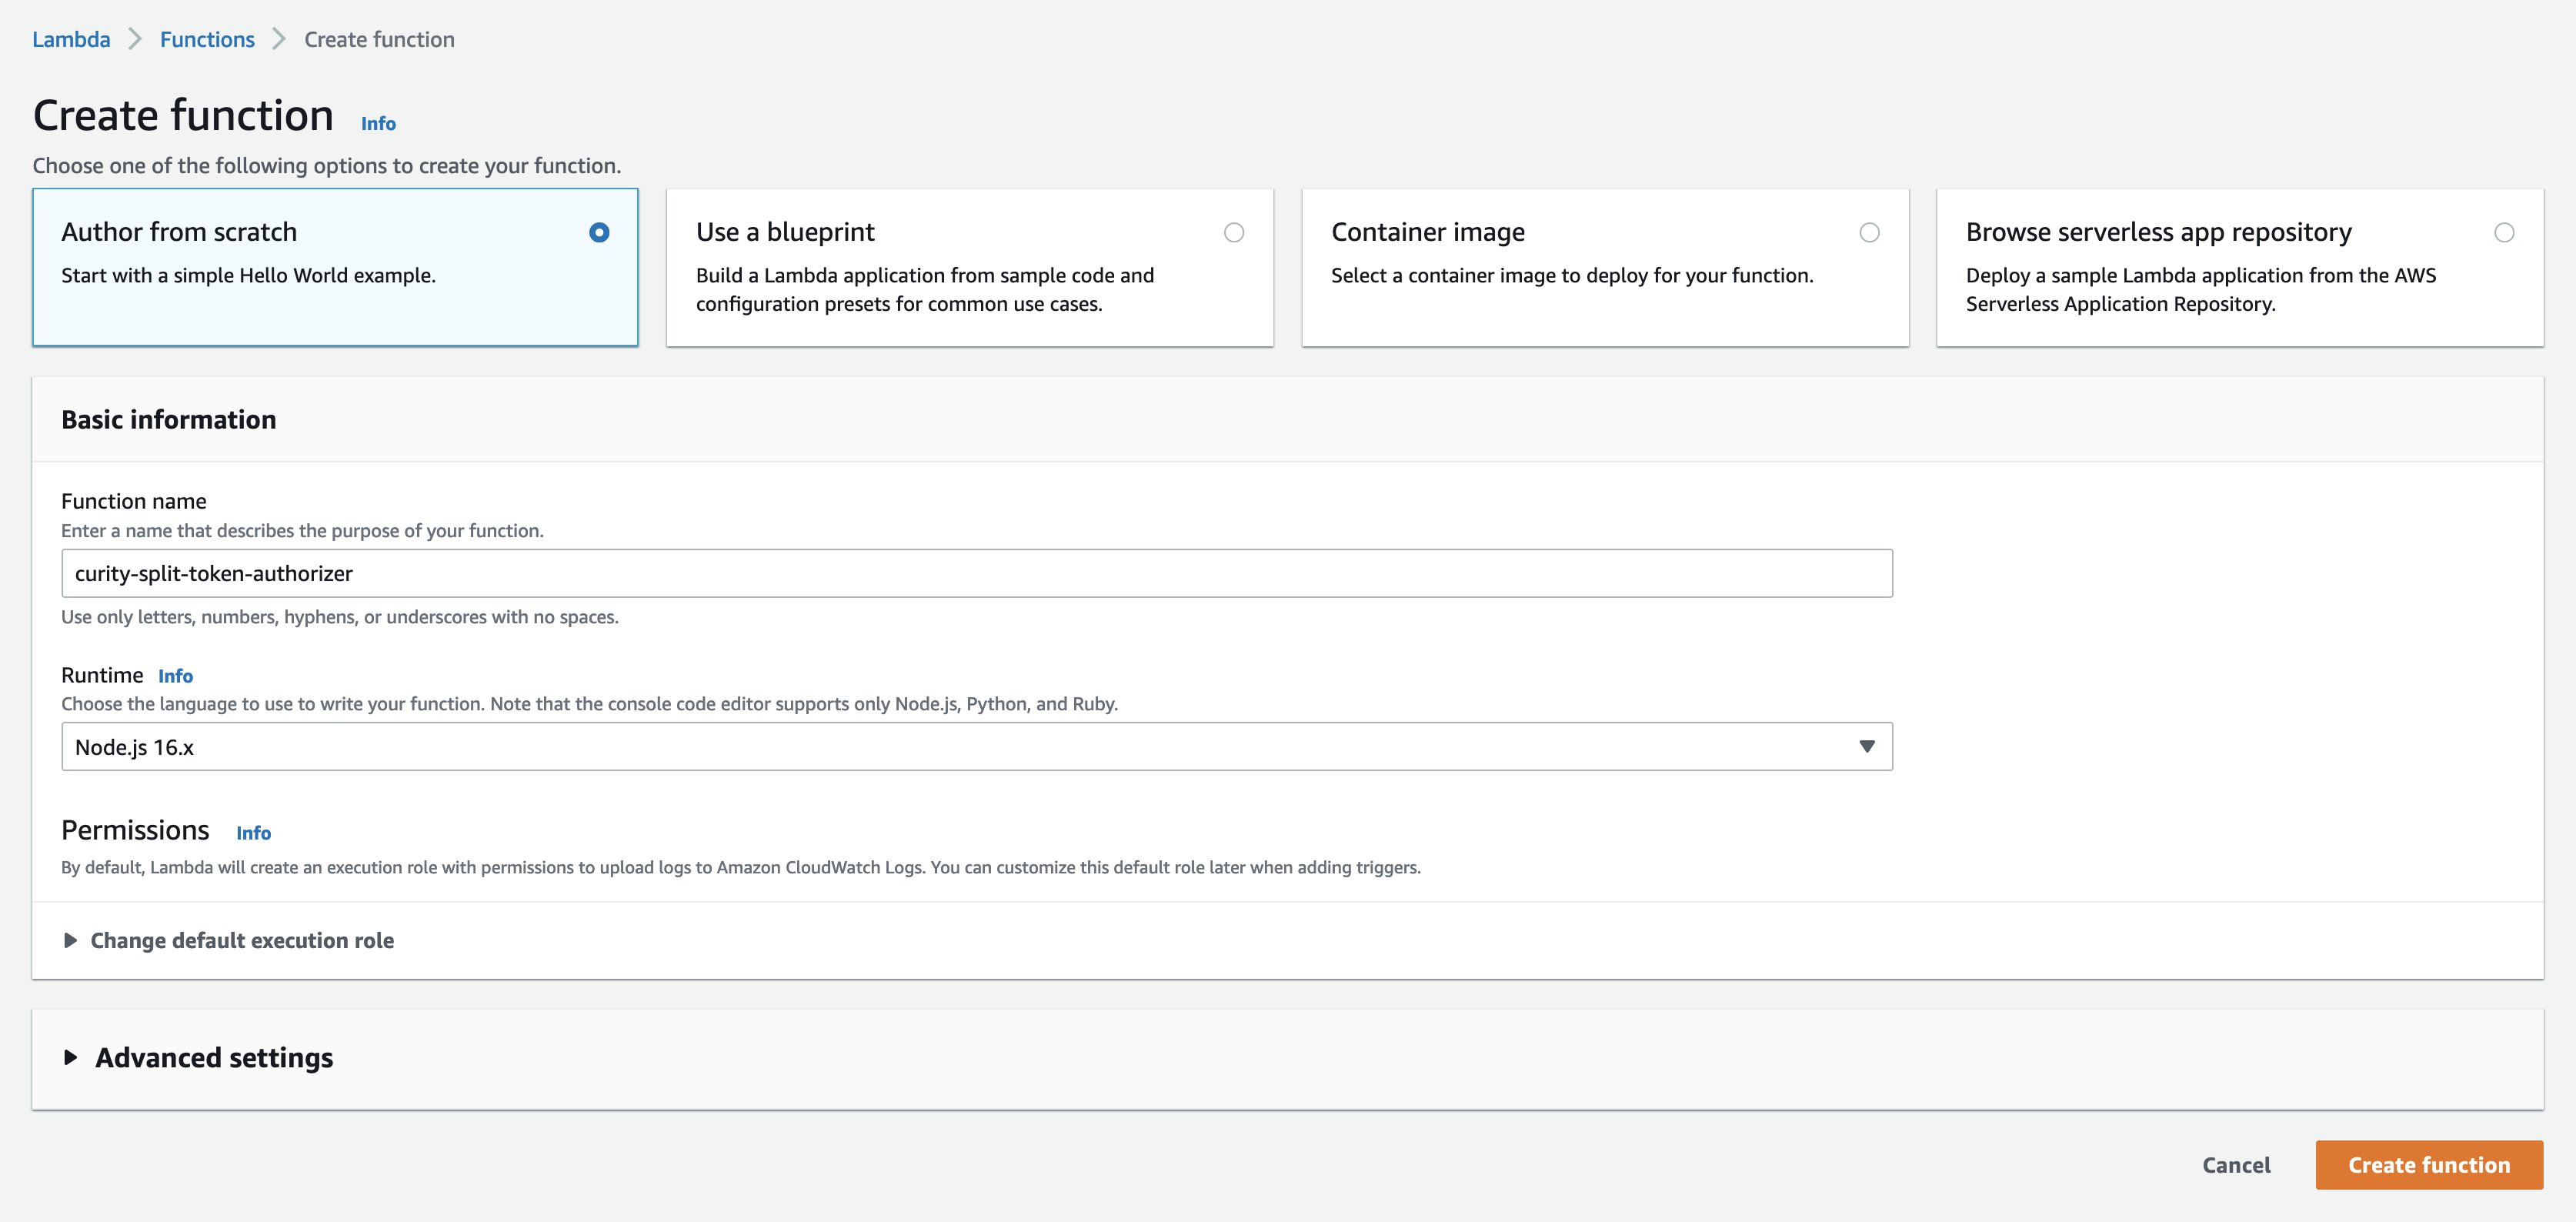
Configure the lambda-authorizer
-
In the AWS Management Console, go to Lambda
-
Choose Create function and then Author from scratch
-
Give the function a name, ex.
curity-split-token-authorizer -
Choose the Node.js 16.x runtime (or newer)
-
Click Create function
-
In the default index.js, replace all the code with the following code:
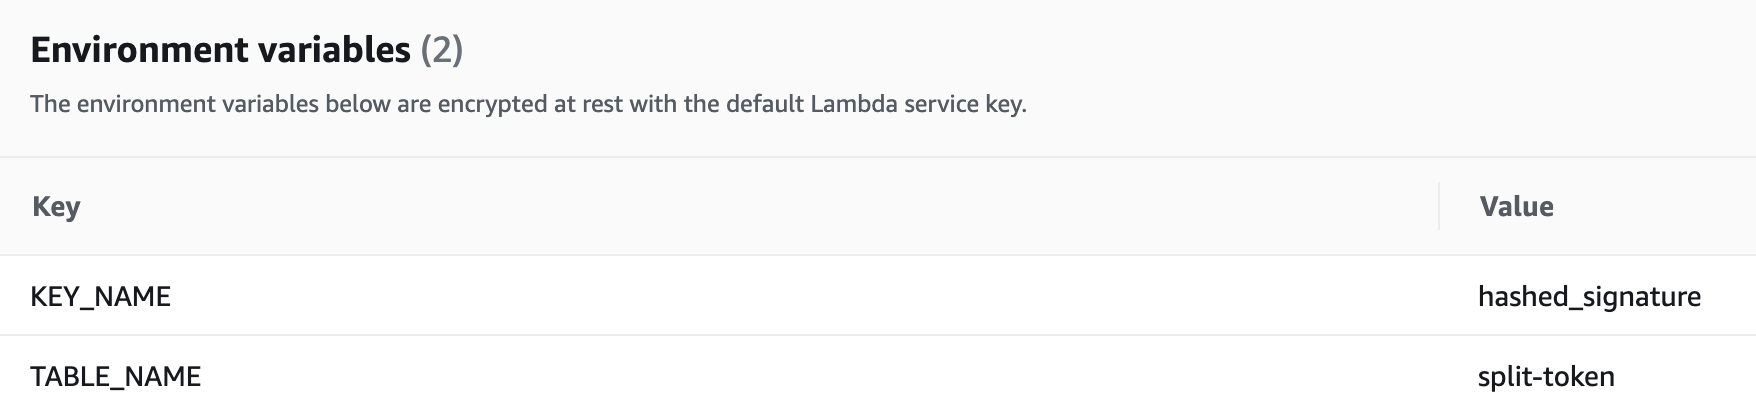
- In the Environment variables section, click Edit
- Click Add environment variable
- Add, Key
TABLE_NAMEwith the Value configured in DynamoDB, ex.split-token - Add, Key
KEY_NAMEwith the Value configured in DynamoDB, ex.hashed_signature - Click Save
Configure AWS API GW
In the AWS Management Console, go to API Gateway, choose the API to protect or create a new API.
Create & configure the Authorizer
- Select Authorizers.
- Click Create New Authorizer
- Give it a name, ex.
curity-authorizer - Make sure the type is set to Lambda
- Under the Lambda Function section, make sure the correct Zone is selected, the previously configured Lambda Authorizer with the name
curity-split-token-authorizershould be available in the text field - In the Lambda Event Payload section choose Request
- For Identity Sources choose Header and enter
Authorizationin the field - If Authorization Caching is left enabled the API Gateway will not invoke the Lambda function if the same Authorization header is used within the time span of the cache configuration (300 seconds by default)
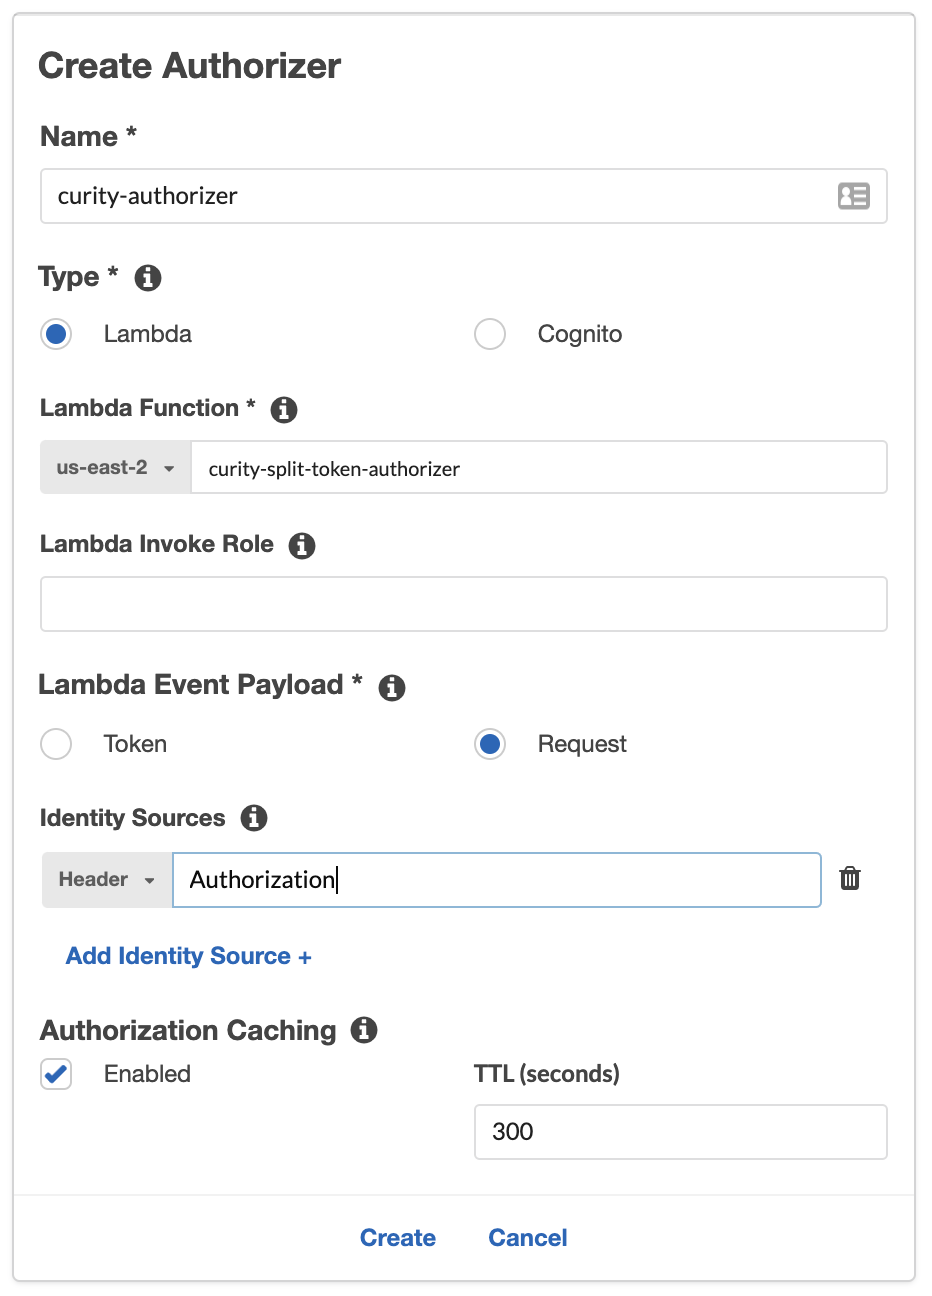
- Click Create
- Then click Grant & Create
Configure API
- For the API to protect, go to Resources
- Select the Resource and the Method to protect
- Click Method Request
- Under Settings -> Authorization, choose the previously created Authorizer,
curity-authorizer. NOTE: The drop-down list is populated when the API method is created. If the Authorizer does not show up, delete the method and re-create it and the Authorizer should show up. - In the HTTP Request Headers section, click Add header and enter
Authorizationthen click the grey checkbox to the right.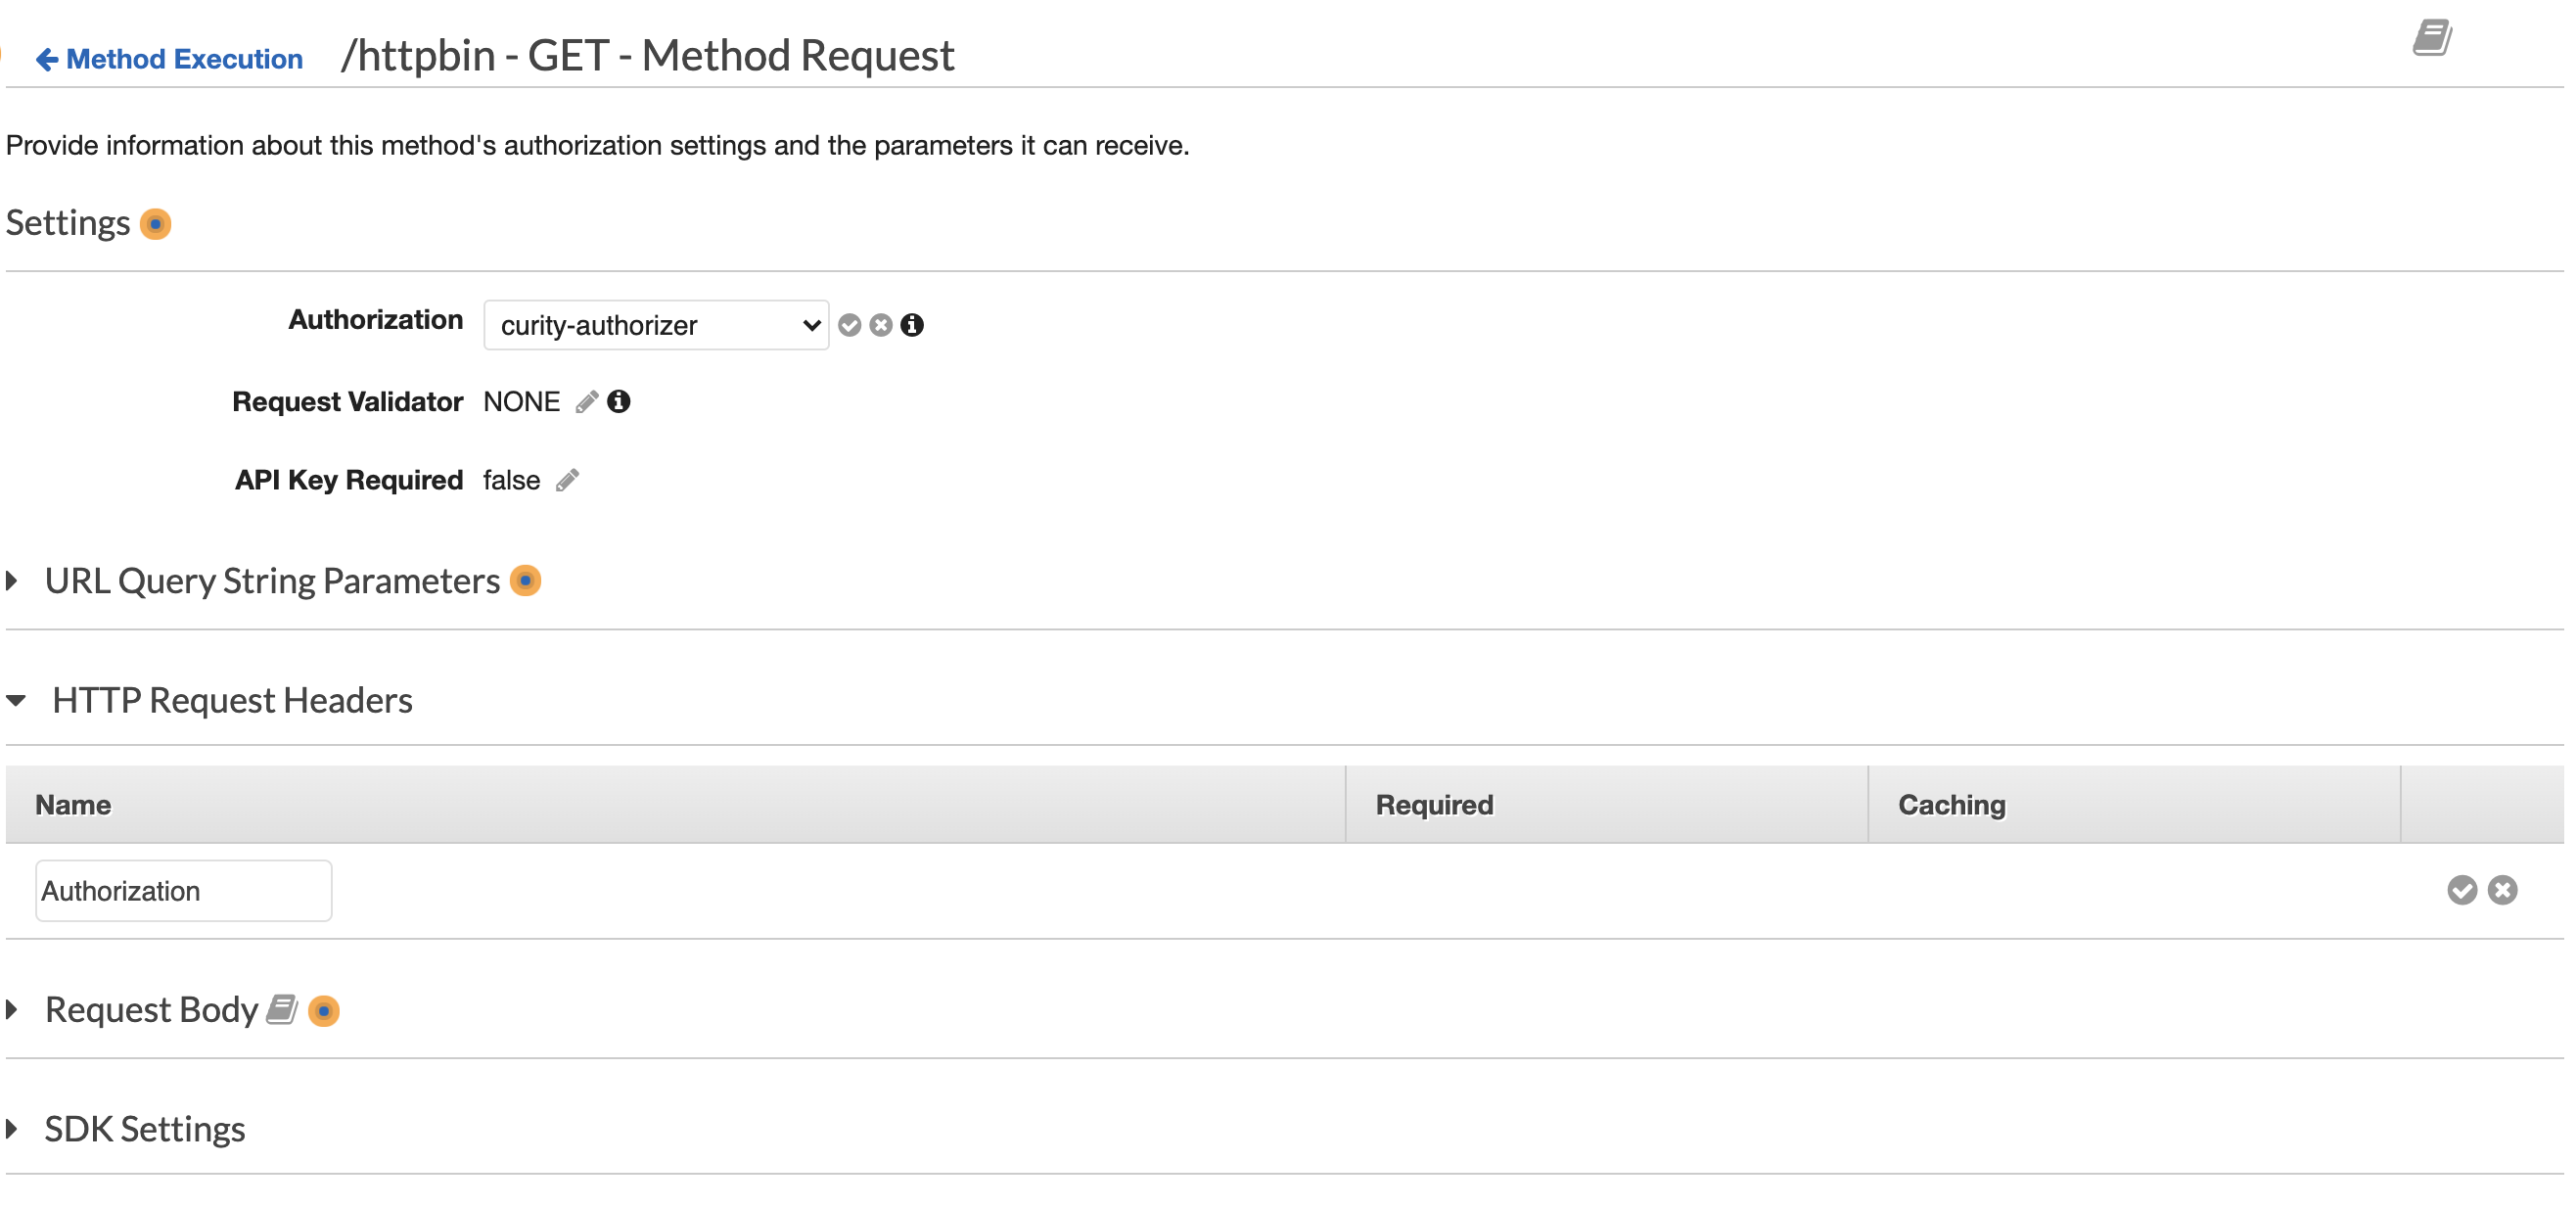
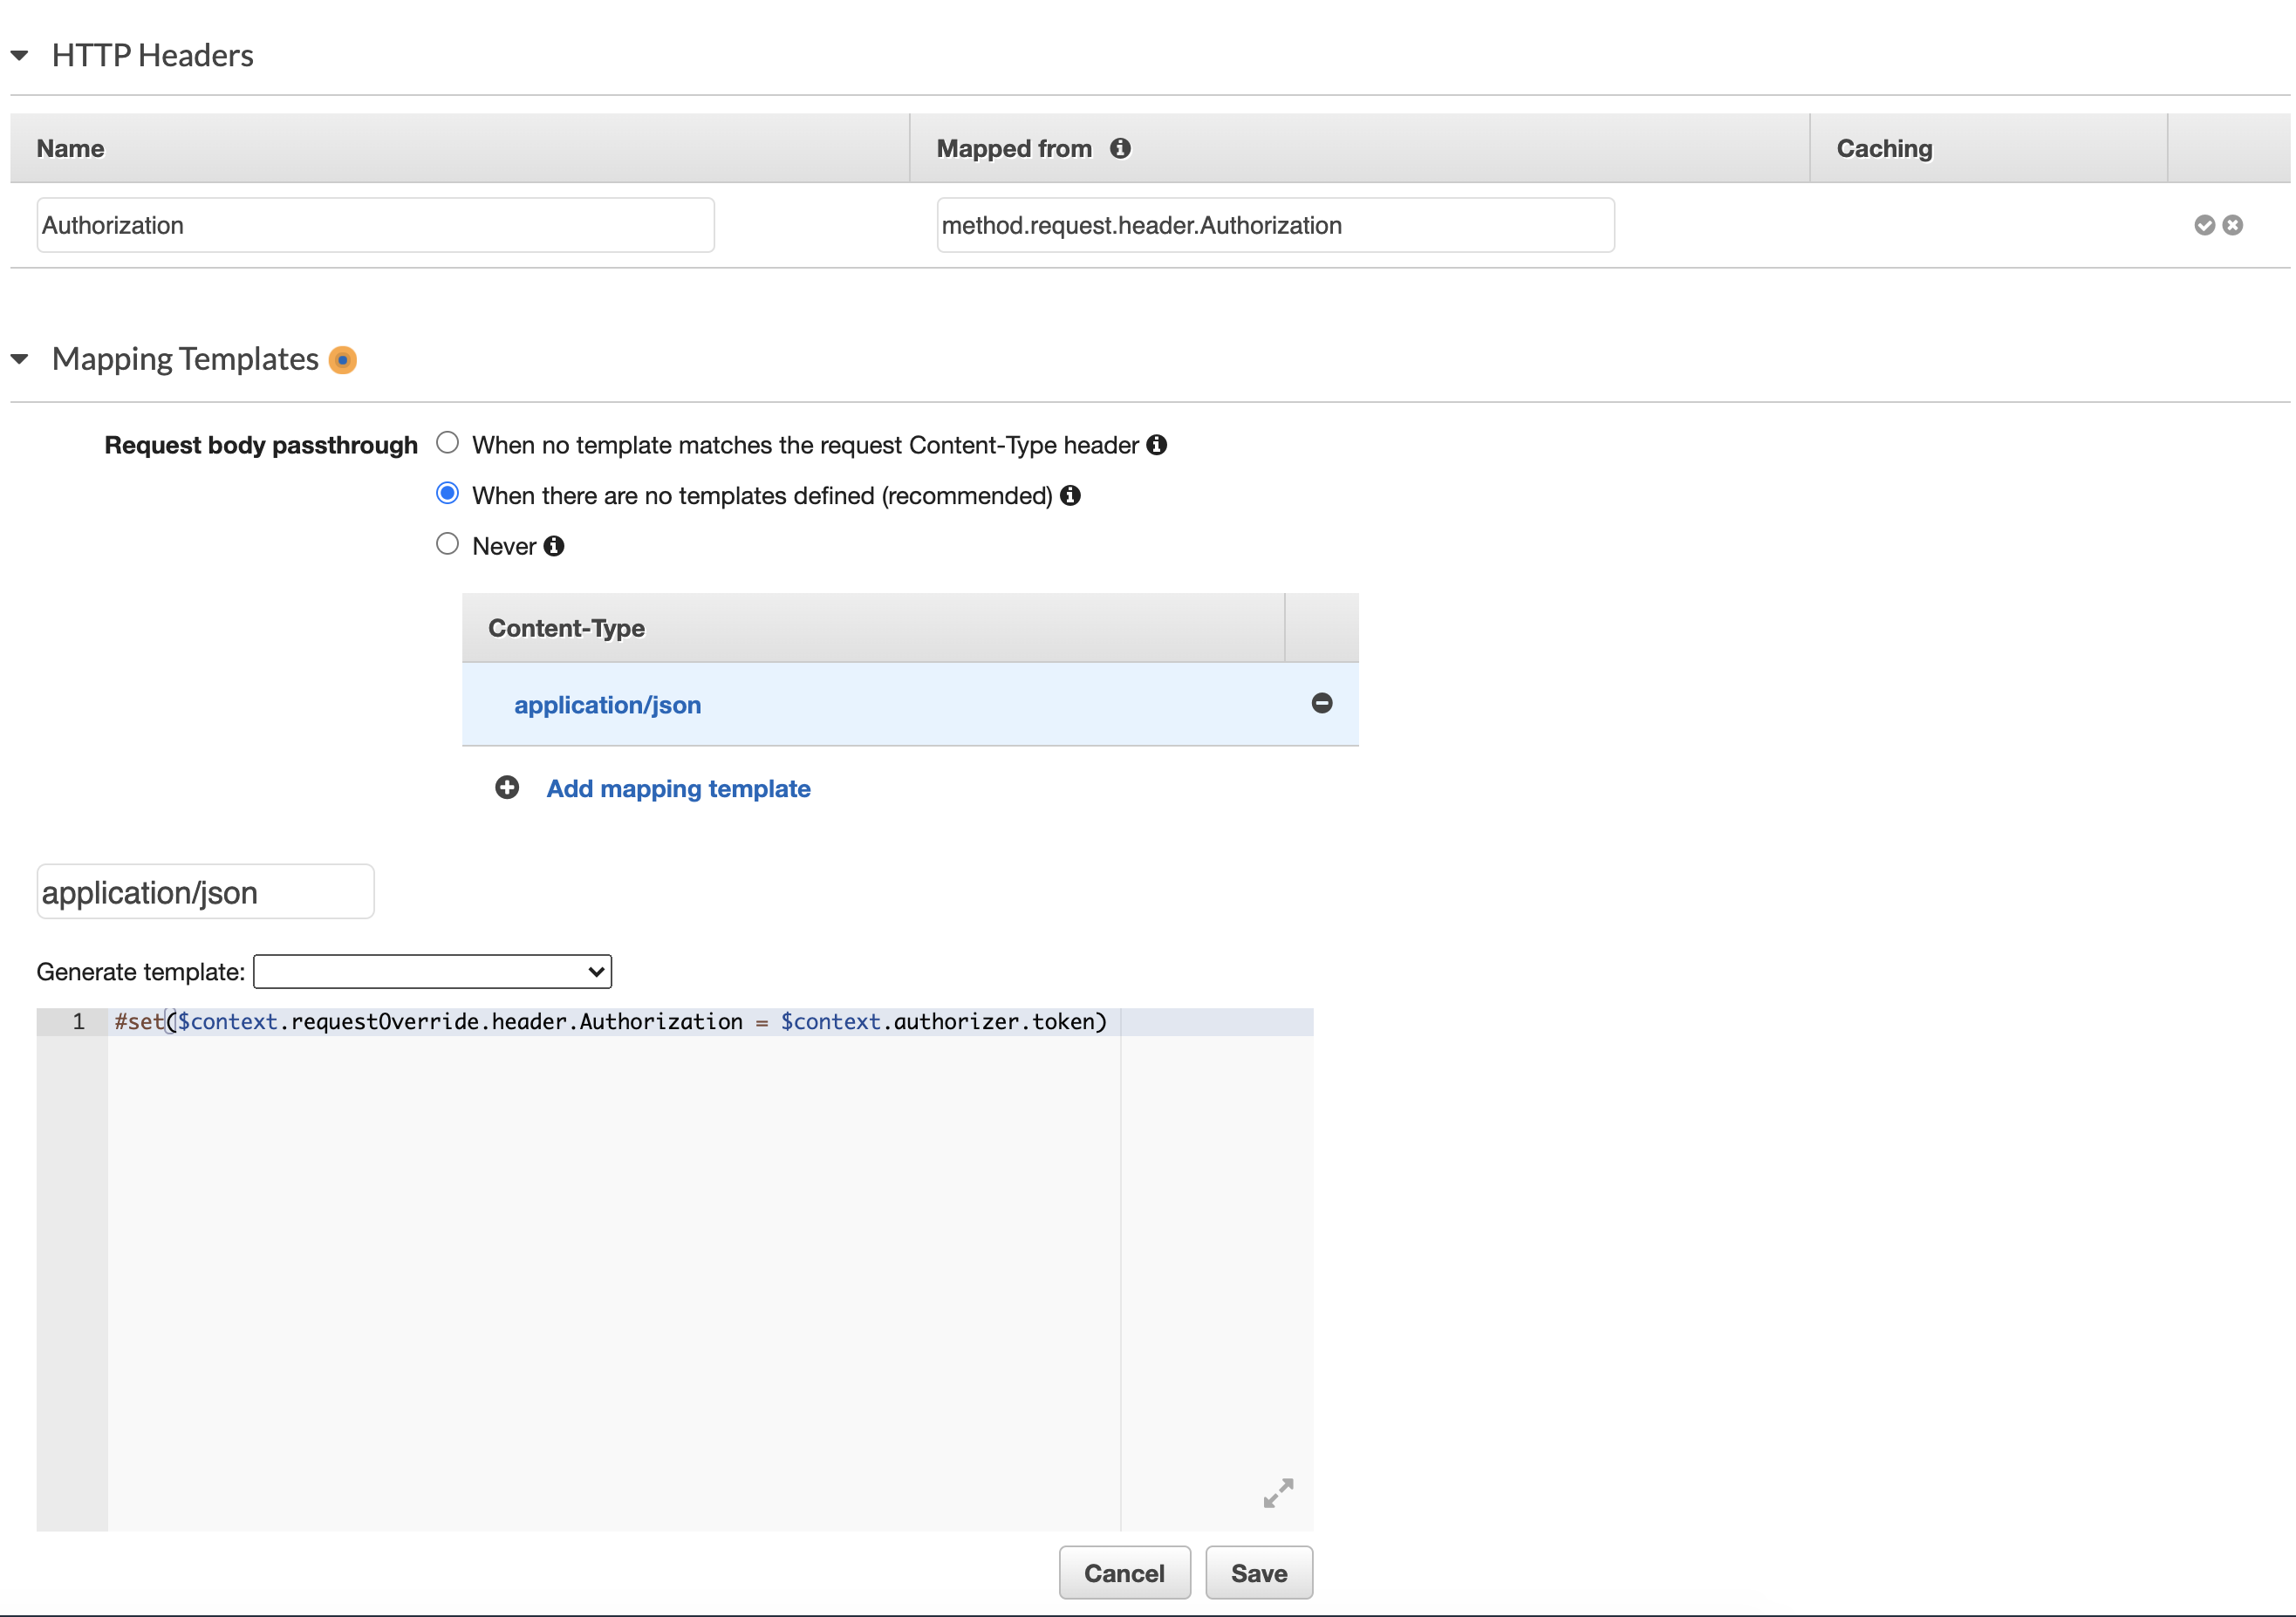
- Go back to Method Execution
- Click Integration Request
- Set the Integration type to
HTTP - In the HTTP Headers section, click Add header, for Name enter
Authorizationand for Mapped from entermethod.request.header.AuthorizationExpand Mapping Templates - Choose
When there are no templates defined (recommended) - Click Add mapping template
- Under Content-Type, enter
application/jsonand click the checkbox - In the template editor, on line 1, enter
#set($context.requestOverride.header.Authorization = $context.authorizer.token) - Click Save
Test using OAuth Tools
- In OAuth Tools, create a flow, for example the code flow. The Access token created should now be the signature part of the split-token and will be much longer than a traditional access token provided.
- Now create a Call External API flow. Enter the URL for the AWS API Gateway exposed API. Configure the method according to what’s possible with the API. Select the token retrieved in the previous flow from the drop down list. Add a header with the name
Content-Typeand the valueapplication/jsonand click Send.

Resources
Useful resources that covers the topics of this article.
- The Curity Identity Server plugins documentation
- The Curity Java SDK documentation
- An article on the Split Token Approach.
- The code for the Curity Event Listener plugin: aws-token-publisher
- AWS Lambda Authorizers
- AWS Lambda with DynamoDB
- AWS API Gateway
Customer Stories
Learn how organizations run identity and API security at scale.
Read customer storiesWas this helpful?