Migrating from IdentityServer4
On this page
The IdentityServer4 is an open source middleware for ASP.NET Core that facilitate OpenID Connect and OAuth 2.0 features of your application. It provides all the interfaces and extension points to add authentication, single-sign-on and token-based authorization to a project. However, the IdentityServer4 reached end-of-life and is not actively maintained anymore. This guide provides steps on how to migrate from the IdentityServer4 to the Curity Identity Server so that you can keep your applications up to date and can benefit from both security and feature updates.
Ideally, you do not need to update any clients (applications) or APIs but only point them to the Curity Identity Server. This is because both products support the OpenID Connect and OAuth standards. Migration mainly involves importing user accounts, OAuth client settings, and scopes and claims from the IdentityServer4.
This guide starts with introducing some concepts of the Curity Identity Server, to provide you with the big picture.
Data Protection Concepts
The Implementing Zero Trust APIs article summarizes the architecture Curity recommends when protecting data in APIs, which can be implemented without much code, or any adverse impact on API development:
- Each API verifies a JWT access tokens on every request, in a zero trust manner
- Opaque tokens are returned to internet clients, as a privacy best practice
- An API gateway introspects opaque access tokens, then forwards JWTs to APIs
- Each API uses claims from the JWT to implement its business authorization
The recommendations may sound familiar to you as they are similar to the big picture of the IdentityServer4. In particular, both systems emphasize the use of claims for fine-grained authorization as part of the application and business logic.
If your instance of the IdentityServer4 issues opaque tokens, that is reference tokens, to clients, consider to use an API gateway to perform token introspection and forward JWTs to the APIs. In this way, you can skip duplicate code in your APIs and minimize the calls to the identity server which improves maintenance and performance of your system without having to trade privacy off. We call this approach Phantom Token pattern. You can migrate to the Curity Identity Server without the pattern and introduce it at a later stage as well which we highly recommend.
Authentication Concepts
OpenID Connect provides a powerful authentication model for your web and mobile apps. Your Identity and Access Management (IAM) system implements the authorization server role from RFC6749. The app simply implements a code flow, after which authentication can work in many ways. Although the application code is simple, meeting some requirements will require a high level of extensibility within the IAM system.
It is common to provide a default username and password login method, to ensure that no users are blocked from signing in, though you will usually need to go beyond that. An example is the trend to support passwordless logins, where some users provide their identity using solutions built on WebAuthn, passkeys or digital wallets.
If you sketch out your desired logic for authentication, it will typically look like a flow chart. Curity provides two main mechanisms for implementing the logic, via Authenticators and Authentication Actions. It is usually critical to ensure a single user account, regardless of the authentication methods used, and actions enable this. See the Account Linking article for some examples.
Design Deployment
If possible, aim to deploy the Curity Identity Server as a replacement for IdentityServer4, and use the same external URLs. Aim for minimal code or configuration changes in your APIs or user facing applications.
Deployment Resources
There are many options to deploy your IdentityServer4 implementation.
When migrating to the Curity Identity Server, you will not be able to use dotnet commands or your IDE to deploy the authorization server,
but you will nevertheless have a lot of options when it comes to the deployment of the Curity Identity Server,
including running it locally, docker images or installation on Azure with the help of an ARM template.
For a more advanced deployment consider deploying the Curity Identity Server on Azure using AKS and the helm chart.
The helm command would look similar to the following:
helm install idsvr-tutorial curity/idsvr \--values idsvr-config/helm-values.yaml
The values would contain a reference to the secret with the configuration backup and license, for example:
curity:config:uiEnabled: trueconfiguration:- secretRef:name: idsvr-configitems:- key: license.jsonpath: license/license.json- key: idsvr-config.xmlpath: idsvr-config.xml
Migrate Endpoints
By default, the IdentityServer4 publishes OpenID Connect and OAuth protocol endpoints at /connect.
Applications typically download a list of endpoints from the OpenID Connect metadata endpoint, at a location like https://login.example.com/.well-known/openid-configuration
In the Curity Identity Server, the path for each endpoint can be configured separately, so you can maintain existing URLs if required. You can also create copies of endpoints for special use cases, such as providing a second token endpoint that requires Mutual TLS. Any edits are immediately available in OpenID Connect metadata.

Server Configuration
Configuration of an IdentityServer4 hosting application can reside in the code, in configuration files or in a configuration database. In the Curity Identity Server most of the functionality can be set in configuration using either the UI, a REST API (which uses the RESTCONF standard) or through an interactive Command Line Interface (CLI). There is no need to explicitly share configuration between instances of the Curity Identity Server. As long as you have an admin node, it will distribute configuration changes to the runtime nodes in the cluster in a secure manner. You can back up the configuration in XML files.
In comparison to the IdentityServer4, where you can implement a lot of customization and features as long as you know how to write the code, there is hardly any need for coding in the Curity Identity Server. Some coding experience can be helpful though, as you can write scripts to adapt the behavior. If scripts are not enough, the Curity Identity Server includes extension points via a plugin system and provides the SDKs needed to write custom plugins.
Importing Configuration
In a simple setup you can manually add the configuration via the Admin UI of the Curity Identity Server. In more complex setups you may use scripts to read the configuration from the source system and send it to the Curity Identity Server either via the RESTCONF API or by using the CLI. Full details about the configuration schema are available in the configuration reference.
Most commonly you will use PATCH operations to merge data into the existing configuration:
curl -k -s \-X PATCH "$RESTCONF_BASE_URL" \-u "$ADMIN_USER:$ADMIN_PASSWORD" \-H 'Content-Type: application/yang-data+xml' \-d @./config.xml
A configuration with a single OAuth client is shown below. Once the technique is understood, it can be used to manage many different resources:
<data xmlns="urn:ietf:params:xml:ns:yang:ietf-restconf"><profiles xmlns="https://curity.se/ns/conf/base"><profile><id>token-service</id><type xmlns:as="https://curity.se/ns/conf/profile/oauth">as:oauth-service</type><settings><authorization-server xmlns="https://curity.se/ns/conf/profile/oauth"><client-store><config-backed><client><id>spa-client</id><client-name>spa-client</client-name><description>Demo Single Page Application</description><secret>secret2</secret><redirect-uris>https://www.example.com</redirect-uris><scope>openid</scope><scope>profile</scope><capabilities><code/></capabilities></client></config-backed></client-store></authorization-server></settings></profile></profiles></data>
Continuous Integration
The Curity Identity Server allows you to export the configuration as a whole or in parts into an XML file. Sensitive values are encrypted and, if defined, placeholders for parameters can be filled in during deployment. As a result, you can put the configuration file under version control and use it in your deployment pipelines.
You should only need to do the import work once, in an early stage of your deployment pipeline, typically a development environment. You can then use the same parameterized configuration in all environments. This avoids data duplication and de-risks your production rollout. See the IAM Configuration Best Practices article for further details on managing configuration in the Curity Identity Server.
Crypto Assets
Cryptographic material, including PKCS#12 files used for token signing, certificates and keys used for TLS or mutual TLS, or trust stores, can be imported into the Curity Identity Server's configuration. The easiest option when first getting set up, is to do so via the facilities menu in the Admin UI. Keys and Cryptography resources can then be referenced by any other resources that use them, such as advanced clients, or token issuers.
Secrets used by the Curity Identity Server are always imported into configuration in a protected manner, and are also exported in this form. The Configuration as Code tutorial shows how to provide secrets using a config encryption key, while also using parameterized configuration.
Migrate API Permissions
Scopes, Claims and Tokens
In both the IdentityServer4 and the Curity Identity Server, scopes define which claims to populate in tokens.
The IdentityServer4 distinguishes between IdentityResources and ApiResources (or ApiScopes) for defining scopes and claims for ID and access tokens respectively.
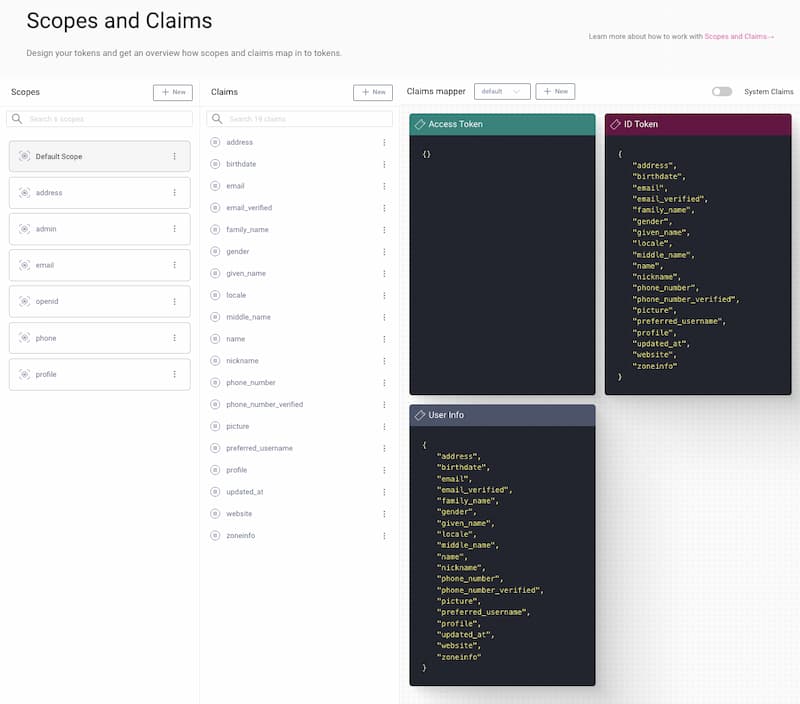
In the Curity Identity Server you define the scopes and related claims at one place.
You can easily configure the available claims for each token type and the response to the User Info endpoint, for example via the Token Designer.
The Token Designer also provides a good overview of which token can contain which claims.
You can find the Token Designer in the Admin UI under Profiles -> Token Service -> Scopes.
Extending Claims Behavior
As mentioned above, APIs may require custom claims from multiple sources in a token.
You may have an implementation of the IProfileService interface that dynamically loads claims from custom databases or APIs and adds them in tokens.
The Curity Identity Server provides configuration options for that functionality.
There is no automated way to migrate the logic of the ProfileService to the Curity Identity Server as the details depend on the individual implementation.
Study Working with Claims and the example Implementing Custom Claims to learn more about scopes and claims in the Curity Identity Server.
To reproduce the behavior of a ProfileService make yourself familiar with
- Claims Mappers to put claims into tokens,
- Claims Providers to fetch the values for a claim,
- Account Managers to load attributes of an account and
- Data Sources to obtain other relevant data.
Custom Token Validation and Issuance
The IdentityServer4 provides an interface, the ICustomTokenRequestValidator that allows you to customize the validation of token requests and at the same time lets you change the input for the token issuance (ValidatedRequest).
For implementing similar functionality in the Curity Identity Server, check out Token Procedures which are scripts that you can assign to certain endpoints and customize the responses, e.g. tokens or cookies, or throw errors.
Migrate Clients
When migrating clients, the Curity Identity Server enables you to maintain existing values for Client IDs and Client Secrets, to prevent you from needing to reconfigure your applications. The details can be typed into the Admin UI, or saved via the RESTCONF API or CLI, as described in the earlier section on migrating configuration.
You must map the data from the IdentityServer4 configuration to the data model used in the Curity Identity Server:
ClientIdto the<id>nodeClientSecretsto<secret>nodeAllowedScopes- every scope string should be added as a separate<scope>nodeRedirectUris- every redirect uri should be added as a separate<redirect-uris>nodeAllowedGrantTypesto<capabilities>node. E.g. if you want your clients to be able to use code grant and client credentials grant, use the following XML:
<capabilities><code/><client-credentials/></capabilities>
You can also check the OAuth Client documentation to learn what other settings should and can be set for a client. In most cases the mapping from the IdentityServer4 configuration to the Curity Identity Server should be self-evident.
Note, that you can configure secrets for APIs in the IdentityServer4 so that an API can introspect tokens.
Don't forget to configure those introspection clients, i.e. ApiResources, in the Curity Identity Server.
Add an ordinary client without any scopes and use the API name as the client ID, the API secret as the client secret.
For example, the following configuration snippet represents a former API resource called "api1":
<client><id>api1</id><client-name>API #1</client-name><description>Primary backend API </description><secret>secret2</secret><capabilities><introspect/></capabilities></client>
You do not need any scopes for introspection clients as the token was already issued and scopes are only relevant during issuance.
As a result the Curity Identity Server will not store the list of supported scopes per API.
We expect that kind of documentation to reside on the API side and not in the identity server.
Migrate Users
The Curity Identity Server uses Account Managers for reading user accounts and Credential Managers for interacting with password hashes. This means you have choices for how you migrate users:
- Keep the existing database as a source.
- Use a script to migrate data.
- Perform a lazy migration of users.
Keep the Existing Database as a Source
Just as with the IdentityServer4, the Curity Identity Server allows you to integrate with a custom database.
If you want to keep the users' data in your current database you can write a Data Access Provider plugin and implement a UserAccountDataAccessProvider and a CredentialDataAccessProvider.
These providers can either read data directly from your current database or via a JSON data source.
Note, that it is not considered good practice to reuse the database as the services most likely have different data models and schemas though the defaults for the IdentityServer4 and the Curity Identity Server are quite similar in many aspects. You could, however, create a read-only Data Access Provider and integrate with the existing database as part of the lazy migration approach.
Use a Script to Migrate Data
It is often simpler to migrate users to the database schema of the Curity Identity Server, and this will need to be done separately per environment.
A script can use either SCIM or GraphQL to save users in the Curity Identity Server.
The schema of the Curity Identity Server includes an attributes field, which is usually stored as JSON.
This is used to store any custom identity data against users.
Have a look at the User Management documentation to learn more about the user management APIs.
Perform a Lazy Migration of Users
If you rather perform a lazy migration of the data, you can use authentication actions, which can perform different tasks during an authentication flow. If existing actions are not sufficient you can write an Authentication Action plugin.
Have a look at the Plugins documentation. In particular check out the Lookup Account Action and the Auto Create Account Action.
Migrate Authentication Workflows
The IdentityServer4 is just a middleware and gives you the freedom to develop authentication methods. The Curity Identity Server ships with a great selection of different sign-in methods that are called Authenticators. There is no need to implement your own callback handlers or keep track of external cookies. However, even at this point, the Curity Identity Server provides extension points so that you can implement a custom authentication in the unlikely case that the available authentication methods are not sufficient for you.
You can combine authenticators and authentication actions to orchestrate an authentication flow that meets different requirements. Examples for authenticators are:
- HTML Form (Username and Password)
- Windows Authenticator (Integrated Windows Authentication)
- OpenID Connect Authenticator (Federation Gateway)
- Facebook Authenticator
- Google Authenticator
Cookies and SSO
The Curity Identity Server stores cookies to keep track of the user's login session. In the IdentityServer4 you have great freedom in how to handle cookies and consequently the user's session. As mentioned above, the Curity Identity Server takes care of handling the cookies for you. It gives you some options to configure the behavior though. For example, you can configure SSO settings in the authentication service. Navigate to Profiles -> Authentication Service -> General to find the settings.
Some procedures even allow you to manipulate the cookies before returning the response. Check out the Scripting Guide for more guidance on the topic.
Customize Look and Feel
It is common to focus early on login screens, to ensure that they are visually aligned with applications. When using the IdentityServer4 you would have to implement all the user interface yourself, though there are quickstarts that help you on the way.
The Curity Identity Server provides a default modern look and feel for all user facing screens. To quickly update it for your company's brand, use the look and feel section of the Admin UI, which saves customizations to the configuration.
The Curity Identity Server also supports a custom look and feel per client. More detailed customizations can be made using the UI Kit, which enables you to edit HTML assets and receive fast feedback. The template system enables customization without duplication, and edited resources are usually then deployed to a custom docker image.
Conclusion
The Curity Identity Server is designed with flexibility in mind. If you have a deep understanding of the status quo and take the time to get to know the Curity Identity Server, migration from the IdentityServer4 can be planned and managed efficiently. If your existing OAuth and OpenID Connect applications are coded in a portable way, changes to your applications will be minimal.
Customer Stories
Learn how organizations run identity and API security at scale.
Read customer storiesWas this helpful?