User Management with GraphQL
On this page
This tutorial shows how to manage user account data within your applications, by connecting to GraphQL endpoints. When managing user accounts, the Curity Identity Server acts as a Web API, so you must present an access token and use scopes and claims for authorization. In order to provide a secure and flexible solution, there are a few layers, which are explained in the following sections.
Prerequisites
First, ensure that you have an enterprise (or trial) license file, that allows access to GraphQL endpoints for user administration. Make sure that you are using a data source that the GraphQL API supports. See the documentation to check what sources are currently supported.
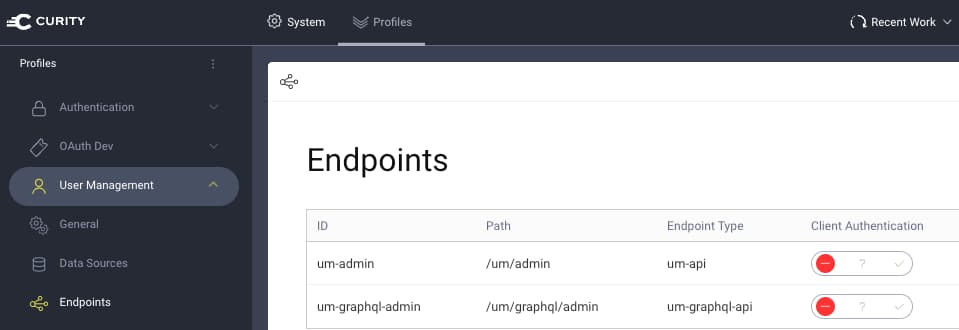
Expose a GraphQL User Endpoint
The User Management Guide provides full details on administering users, and the process starts by creating a User Management Profile. To start using GraphQL to access user accounts, also add an endpoint of type um-graphql-api:
Configure a Client Application
A GraphQL client application must be used to administer user accounts. The DevOps dashboard is a built-in GraphQL client, which can be useful to compare against when developing your own app. See the Running the DevOps Dashboard tutorial for a fast working setup.
Configure Access Tokens
Next, you must configure the GraphQL client to use access tokens that will be accepted at the GraphQL user endpoint. Doing so requires an authorization manager to be configured, and you can choose from one of the following methods:
| Type | Behavior |
|---|---|
| Groups Authorization Manager | The client configures a scope and also a groups claim. Different users can be assigned different coarse-grained privileges. This option is usually used in the DevOps dashboard to enable different teams to access the Curity Identity Server. |
| Attribute Authorization Manager | The client configures a scope and also a groups claim. Different users can be assigned different fine-grained privileges. This is recommended when an organization uses GraphQL in its own applications. |
Ensure that the authorization manager is configured against the User Management Profile. Do this by navigating to Profiles → User Management → General. In the Authorization section choose the previously created authorization manager.
GraphQL Account Operations
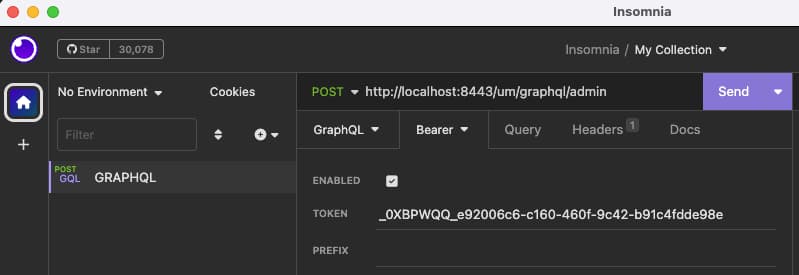
When getting started, a GraphQL client utility, such as the Insomnia tool, can be used to send requests. The DevOps dashboard example deployment exposes a user management endpoint at the following URL:
http://localhost:8443/um/graphql/admin
For a fast local development setup, one option is to run the DevOps dashboard, then use browser tools to view network requests. This enables you to quickly get a working access token to paste into the tool:
The request data in the following subsections can be pasted into Insomnia's GraphQL pane and sent to the user management endpoint. After pasting each payload into the tool, click Prettify GraphQL before sending each request, to verify the syntax and ensure that a correct request is sent.
Once the requests and responses are understood, you can begin GraphQL coding against user accounts in your own apps. There are many client libraries available to choose from, in all the main technology stacks. These provide similar features to the Insomnia tool, to enable productive development.
Only active users by default
The default behavior when creating accounts using the GraphQL API is to set active=false (or 0). The default behavior unless explicitly defined is also to only list accounts where active=true (or 1).
The result is that an account could be created in one query and if the accounts are listed in a subsequent query, it will not be available.
Either explicitly set active=true when creating the account or include active=false accounts in the query listing users.
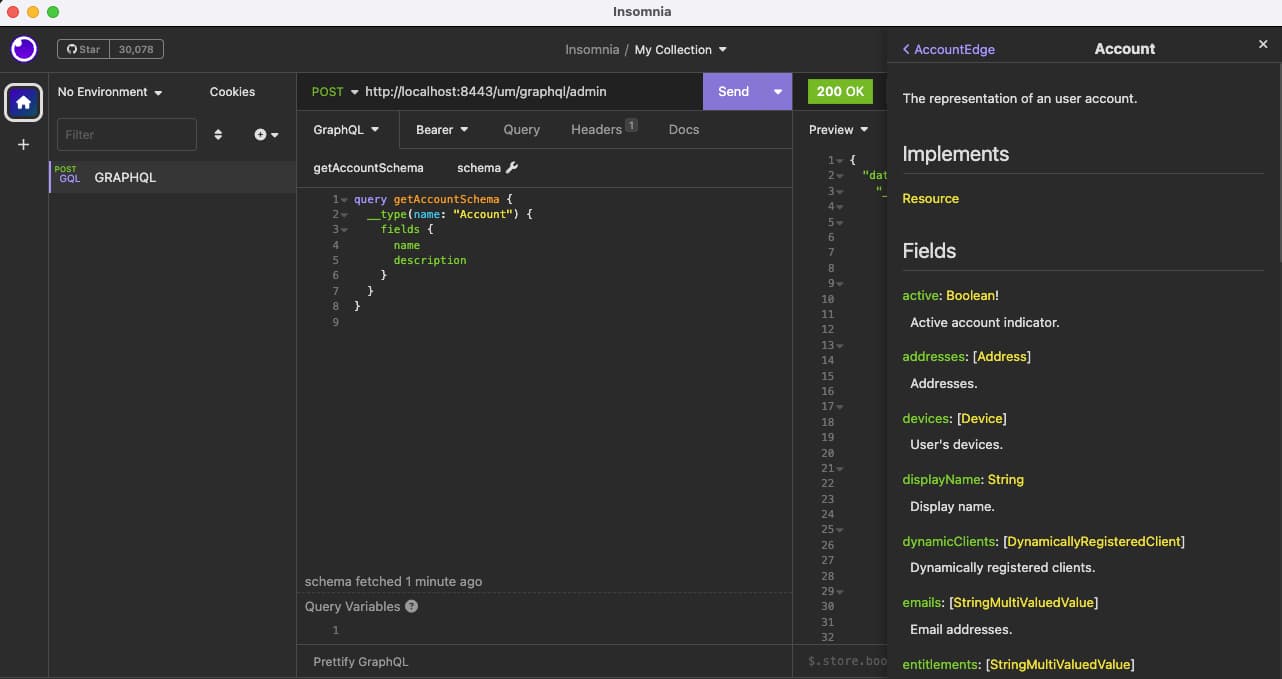
Get the Account Schema
You can retrieve the fields available on the main Account object with this GraphQL introspection command, then click the send button:
query getAccountSchema {__type(name:"Account") {fields {namedescription}}}
The schema can then be browsed to understand the GraphQL queries, mutations, request fields and response fields. These values are also available via intellisense.
Use Account Queries
Find a particular user account using one of the lookup methods.
query findAccount {accountByEmail(email: "jane.doe@mycompany.com") {idname {givenNamemiddleNamefamilyNameformatted}preferredLanguagedisplayNamelinkedAccounts {value}}}
The results are then returned in the standard GraphQL JSON response format, containing the fields requested within a data section:
{"data": {"accountByEmail": {"id": "4d807914-ab51-11ec-b593-0242ac170002","name": {"givenName": "Jane","middleName": null,"familyName": "Doe","formatted": "Jane Doe"},"preferredLanguage": null,"displayName": null,"linkedAccounts": []}}}
Pagination can be used when working with lists, to ensure that queries are efficient. Select a list of the first 10 user accounts like this:
query getAccounts {accounts(first: 10) {edges {node {idname {givenNamemiddleNamefamilyName}userNameemails {valueprimary}}}}}
User Account Mutations
To make data changing commands you can use GraphQL mutations. When creating a user account you can optionally also set a password:
mutation createAccount {createAccount(input: {fields: {userName: "john.doe",password: "Password1",emails: {value: "john.doe@mycompany.com",primary: true}}}) {account {userNameemails {value}}}}
The following example shows an update operation for a user account whose name has changed, so that the userName, displayName and email fields are all set to new values:
mutation updateAccount {updateAccountById(input: {accountId: "fbea947a-aabc-11ec-adcb-0242ac170002",fields: {userName: "jane.smith"displayName: "jane.smith"emails: {value: "jane.smith@mycompany.com"primary: true}}}) {account {displayNameemails {value}}}}
Finally, user accounts can be deleted with the following syntax:
mutation deleteAccount {deleteAccountById(input: {accountId: "fbea947a-aabc-11ec-adcb-0242ac170002"}) {deleted}}
There are potentially many other GraphQL features you can use, to put you in better control of your identity data, though the above examples will enable you to get connected.
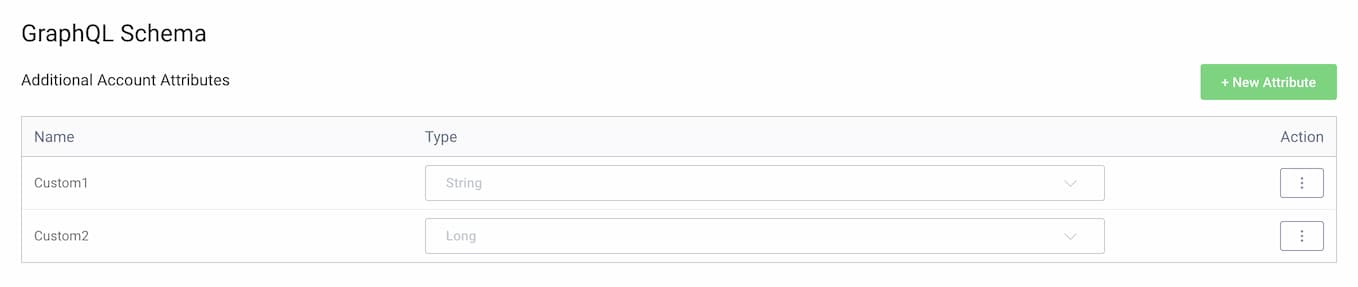
Custom User Account Fields
Starting in version 7.2 of the Curity Identity Server, GraphQL can be used to save custom fields against user accounts. First you need to define custom fields in the Admin UI under Profiles → User Management → General. The following example extends the GraphQL schema to add a string field and a numeric field:
You can then run a mutation of the following form to populate the custom fields for a user and save them to the user account data. This example query also echoes back the values in the mutation response.
mutation updateAccount {updateAccountById(input: {accountId: "4d807914-ab51-11ec-b593-0242ac170002",fields: {Custom1: "A string value"Custom2: 123}}) {account {Custom1Custom2}}}
The custom values are then saved within the attributes column of the data row for the user account, and can be retrieved in the same way as any other GraphQL field. The custom fields can then be used during authentication, and issued to OAuth tokens when required. The Working with Claims tutorial describes how to include custom values from user account data in access tokens.
Users and Dynamic Clients
In some security use cases, Dynamic Client Registration (DCR) is used to register one or more distinct OAuth clients per user. This technique is described in Mobile Best Practices, where a separate dynamic client is registered per user and device. The Authenticated DCR mobile code example provides a working end-to-end solution.
From version 7.2 of the Curity Identity Server, dynamic clients mapped to users can also be accessed using GraphQL. First enable access to the additional data under Profiles → User Management → General:

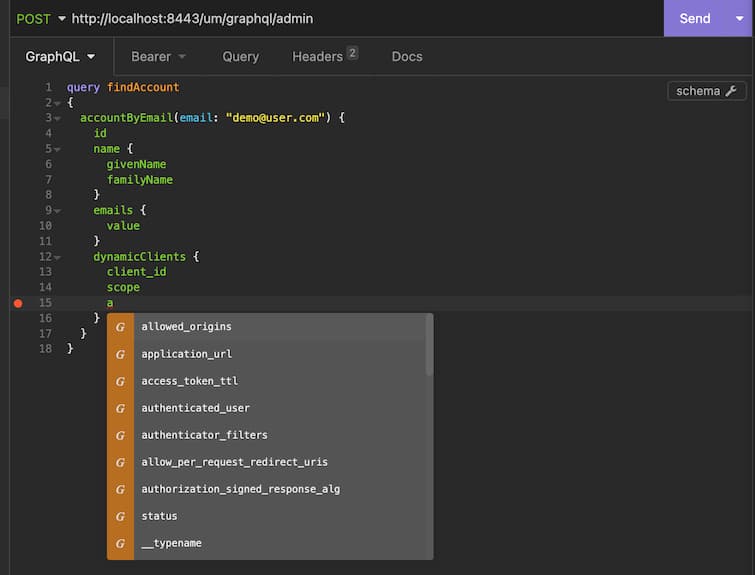
You can then use GraphQL to read details from the dynamically_registered_clients database table. The result set could potentially contain multiple dynamic clients per user, and the DCR fields are described in the Using Dynamic Client Registration article.
query findAccount {accountByEmail(email: "demo@user.com") {idname {givenNamefamilyName}emails {value}dynamicClients {client_idscope}}}
All of this data can then be accessed for any user with an account record. As for other areas of the schema, GraphQL tooling will enable you to easily see which DCR fields are available:
Conclusion
User account information stored in the Curity Identity Server can be securely exposed to your own clients. GraphQL endpoints provide a friendly API with modern tooling for developers, though SCIM endpoints are also available, and may be a better choice for some types of operation. To use GraphQL you must also configure an authorization manager, to enable the right permissions to be assigned to each client and user.
Customer Stories
Learn how organizations run identity and API security at scale.
Read customer storiesWas this helpful?