Entitlements in Introspection
On this page
It is very common to need some form of permissions or entitlements when determining if a user should be able to call an API. This can be done using OAuth scopes, but often additional rights need to be verified. These permissions are often needed in the API gateway, so that it can check the user's right before forwarding the call to the back-end. This is also a convenient location when the API gateway is introspecting the token to convert it from a phantom token to a JWT (i.e., from an opaque GUID used on the Internet to a corresponding JSON Web Token used internally).
To save the rights of a user, the SCIM 2 user account model can be used. This schema defines a standard way of representing these user-specific entitlements. In that specification, it stipulates that a user may have a (possibly empty) set of rights that look like this (when encoded as JSON):
{"entitlements": [{"value": "a"},{"value": "b"},{"value": "c"}],// ...}
The Curity Identity Server supports the SCIM 2 standard and makes the user data available when the token is introspected. As of version 7.0 of the Curity Identity Server, a GraphQL API is also available for User Management. The following walk-through will explain how these features can be combined to solve this need. To follow along, make sure that the following is already setup:
- A Token Service with a client that can get an access token (e.g., via the code flow or assisted token flow) and another that can introspect it. The first will be the one used by a Web or mobile app and the second will be the one used by the API gateway.
- An authentication profile that allows the user to login via an HTML Form Authenticator
- Other basic facilities like a Data Source (DS) and cryptographic keys
Setting Entitlements for a User
The SCIM 2 API can be used to set entitlements of users through a standard mechanism. This API supports GET, POST, PUT, and PATCH on users and groups of users. This provides a known protocol that a customer support portal, for instance, can leverage to update all user attributes, not just entitlements.
In addition to the SCIM 2 API, the Curity Identity Server can be configured to expose a GraphQL API for User Management (version 7.0 and later). This could be used as an alternative mechanism to manage users and with that set entitlements.
Configuring a New User Management Profile
If a user management profile has been created, then this API is available. If not, however, it can be setup by performing the following steps in the Admin UI:
-
From the
Profilesmenu, clickAdd Profileto add a User Management profile. -
Give it some name, e.g.,
user-management, and aURL Prefix, e.g.,/um. Then click Next. -
Select the
Token Servicethat will be used. This defines the Token Service that a client, like the customer support portal, must obtain a token from in order to call the SCIM or GraphQL API.a) Optionally select an existing Authorization Manager or create a new one.
-
On the
Data Sourcespage, first choose the type of User Data Store,data-sourcesor anaccount-manager. If the GraphQL API is to be used and linked accounts are used, choose theaccount-manageroption here. Otherwise choosedata-sources.a) If
data-sourcesis chosen, select theToken Data Sourcewhere tokens are stored. Also select theUser Account Data Source. In a simple deployment, these two data sources will be the same. Optionally select aDevices Data Sourceand aCredential Manager.b) If
account-manageris chosen, select theToken Data Sourcewhere tokens are stored. Also select theAccount Manager. Optionally select aCredential Manager. -
Next select what nodes that the User Management profile should be deployed to. In a simple deployment this is probably the
defaultnode. Then click next and Commit the changes.
Optionally add GraphQL Endpoint
- Navigate to
Profilesand click the User Management Profile - In the left side menu, choose
Endpoints - Click
New Endpoint - Give it a name, e.g.,
um-graphqland set a path, e.g.,/um/graphql - Click Create
- In the column Running On, click
Not deployedand choose the node(s) to deploy the endpoint to. In a simple deployment this is probably thedefaultnode. Click Submit and then Done. - Commit the changes.
The GraphQL API requires an Authorization Manager. If one is already configured, assign it to the User Management Profile.
- Profiles → um → General
- From the Authorization Manager drop-down menu, select the Authorization Manager
- Commit the changes.
If an Authorization Manager needs to be created, the User Management with GraphQL article describes the process to create a Groups Authorization Manager. There are also custom Authorization Manager examples available in the Code Examples section.
Testing the New API
If the configuration was accepted and committed, it should be ready to use. The endpoint(s) will be available on the node(s) that the configuration was deployed to. Each of those have a protocol (e.g., https), a listening address or interface (e.g., 0.0.0.0 for all interfaces on that server host), and a port (e.g., 8443). These together forms the Base URL:
https://localhost:8443
To call either the SCIM or GraphQL endpoints, a token is needed that authorizes the caller. This can be obtained in various ways. When the caller is a customer support portal, for instance, this token will usually be obtained using the client credentials flow. The client ID and secret that the portal uses will be some configured values that it keeps safe. With this, it can make a request such as this to obtain an access token:
POST /oauth/v2/oauth-token HTTP/1.1Host: localhost:8443Authorization: Basic Y2xpZW50LW9uZTowbmUhU2VjcmV0Content-Type: application/x-www-form-urlencodedgrant_type=client_credentials&response_type=token
In this request, the client ID and secret may also be provided in body using the form elements client_id and client_secret. The result will be a JSON document that includes an access token:
{"access_token": "_0XBPWQQ_c25227b2-5e00-4324-934d-ba5ddccd54aa","scope": "","token_type": "bearer","expires_in": 300}
With this access token in hand, the client can now call the SCIM API to get a list of users. The SCIM endpoint is comprised of the base URL, user management path with a SCIM standard defined part added at the end. For a User Management profile with the configured path /um, the complete SCIM endpoint would be something like:
https://localhost:8443/um/Users
To call the SCIM API, a request similar to this would be used:
GET /um/Users HTTP/1.1Host: localhost:8443Authorization: Bearer _0XBPWQQ_c25227b2-5e00-4324-934d-ba5ddccd54aaAccept: application/scim+json
The result could be a number of users with various attributes as shown in the following elided listing:
{"totalResults": 1,"startIndex": 1,"itemsPerPage": 50,"schemas": ["urn:ietf:params:scim:api:messages:2.0:ListResponse"],"Resources": [{"id": "VVNFUjoyOWZmODMzYWQ2NGM0MzY1YmY3Y2QzYjQ1YjM1NWI0Mw","userName": "teddie","active": true,// ...}]}
To restrict this to a particular one, a query string can be added to filter the results by email addresses. To do this, append a query string such as filter=emails eq "teddie@example.com". The quotes in the filter are required by the SCIM specification. The result should be a single user if the filter is precise enough. Another noteworthy part of the request is the Accept header; this should always be application/scim+json or */*.
In any event, the API should be clearly working by performing such requests. If it is not, check that the endpoint was assigned to a server node.
Adding Entitlements to an Existing User
To add entitlements to an existing user, the PATCH method can be used. This will update certain attributes of the user without affecting others. Using the ID of the user, a PATCH request can be made to the SCIM users endpoint like this:
PATCH /um/Users/VVNFUjoyOWZmODMzYWQ2NGM0MzY1YmY3Y2QzYjQ1YjM1NWI0Mw HTTP/1.1Host: localhost:8443Authorization: Bearer 75398416-3958-4828-a738-6c27465204ebAccept: */*Content-Type: application/scim+json{"schemas":["urn:ietf:params:scim:api:messages:2.0:PatchOp"],"Operations":[{"op":"add","path":"entitlements","value":[{"value": "a"},{"value": "b"},{"value": "c"}]}]}
In this request, the user with an ID of VVNFUjoyOWZmODMzYWQ2NGM0MzY1YmY3Y2QzYjQ1YjM1NWI0Mw is being patched to have three new entitlements added: a, b, and c. The string values can be anything that makes sense for the application in question. SCIM also allows certain metadata to be added to the entitlement attribute as well.
With these new rights in place, it is now possible to include them in the introspection results, so that the API or its gateway can make an informed access control decision.
Including Entitlements in Introspection Results
To include these new entitlements in the introspection results, we have to configure the Curity Identity Server to retrieve the attributes. This can be achieved in several different ways and will be done as an Authentication Action configured on the HTML Form Authenticator. The Attribute Query used by the Data Source will be modified, and a token issuance procedure configured that returns the user's rights when the token is introspected.
Custom Attribute Query
To include the entitlements attributes in the ones that are available for a user when that user's token is introspected, a custom attribute query is configured. This should be done on the Data Source that will be used by the Authentication Action assigned to the authenticator used. A custom credential query could be used instead; however, this will not be described in this walk-through. To configure the custom Attribute Query on the Data Source, do the following:
- In the
Facilities→Data Sourcesmenu, find the Data Source that is used (should be the same as used by the User Management Service) and clickEdit. - In the
Attribute Queryfield, enter the following query:
SELECT * FROM accounts WHERE accounts.username = :subject
Here, :subject will be replaced with the username of the user that logged in (e.g., teddie).
Data Source Authentication Action
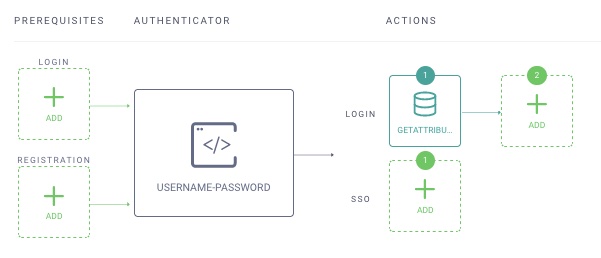
With the Attribute Query modified, a Data Source action can be added to the HTML Form Authenticator.
- Go to
Profiles→Authentication Service→Authenticatorsand click theHTML Form Authenticatorto use. - In the
Actionscolumn and theLoginlane, clickAddand then clickNew Action. - Enter a name, e.g.,
getAttributes. Choose theData Sourcetype and then clickNext. - Select the Data Source that was previously modified from the
Attribute Data Sourcedrop-down and clickclose. - From the
Changesmenu, clickCommit.
The Authenticator configuration should now look like this:
Claims Value Providers
It is also possible to leverage Claims Value Providers to map entitlements in a token issued for a user. This is not covered in this guide but is covered in the Implementing Custom Claims tutorials.
Introspection Procedure
A custom introspection procedure is needed that can add the entitlements to the result. To do this in the UI, perform the following:
- Open the Token Service profile that is being used.
- Click
Endpointson the left-hand side. - Search for the introspection endpoint that is being used.
- In the
Flowsdropdown associated with that endpoint, click theintrospectprocedure drop-down. ChooseNew Procedureand enter a name, e.g.,entitlements-in-introspection. Click theSavebutton. - An editor will open. In this, replace the existing script with the following:
function result(context) {var responseData = {active: context.presentedToken.active};if (context.presentedToken.active) {appendObjectTo(context.presentedToken.data, responseData);responseData.entitlements = getEntitlements(context);responseData.token_type = context.presentedToken.type;responseData.client_id = context.presentedToken.delegation.clientId;responseData.expired_scope = context.presentedToken.expiredScopes;}return responseData;}function getEntitlements(context) {var subjectAttributes = context.subjectAttributes();var jsonAttributes = subjectAttributes["attributes"];if (jsonAttributes) {var parsedJsonAttributes = JSON.parse(jsonAttributes);return parsedJsonAttributes["entitlements"].map(function (x) {return x.value;});}else {return null;}}
- Click
Update, and then close the editor - From the
Changesmenu, clickCommit.
Checking the Introspection Results
To test the procedure, a token that represents the user is required. Tokens that represent a client only, like those issued when the client credential flow is used, will not work. A user-specific access token that runs the custom credential query and gets the entitlements will be issued after the user logs in with an HTML Form Authenticator that uses that Data Source. (The Data Source will not be used directly but through the Credential Manager that the HTML Form Authenticator uses.) With this token in hand, the API or the API gateway can introspect it. A sample request is shown in the following listing:
POST /oauth/v2/oauth-introspect HTTP/1.1Host: localhost:8443Authorization: Basic Y2xpZW50LW9uZTowbmUhU2VjcmV0Content-Type: application/x-www-form-urlencodedtoken=_0XBPWQQ_a7409965-43fb-4fef-9620-0ff9ae4fdc53
Here, the client ID and secret are supplied in the HTTP Authorization header using the basic authentication scheme. This credential is that of the API gateway (or if no such gateway is used, then the API itself). This client must have the introspection capability, and if it is only an API gateway, it should not have any other capabilities. The result will be a JSON document such as the following where the entitlements are returned as an array of values:
{"sub": "teddie",// ..."scope": "read openid write","entitlements": ["a","b","c"]}
These will be the same ones set by the SCIM client at the beginning of the walk-through. With this information in hand, the gateway has not only the scopes but other permissions necessary to make a course-grained access control decision.
Conclusion
This writeup shows how to setup the Curity Identity Server as a SCIM 2 server and optionally enable the User Management GraphQL API by defining a user management profile. With that it's possible to add information to a user, such as entitlements. How that information can be used to enrich introspection results of tokens that are issued through the Curity Identity Server was also demonstrated. With this, an API gateway can enforce access control. In all of this, the APIs exposed through the Curity Identity Server are standards-based, making it fast and easy to integrate into existing customer portals, mobile apps, and web sites. This entire use case was implemented as configuration and required no custom coding and can be setup in just a few minutes.
Customer Stories
Learn how organizations run identity and API security at scale.
Read customer storiesWas this helpful?