OAuth Customization using Plugins
On this page
In an OAuth architecture, your applications interact with endpoints of your authorization server using HTTPS requests. You should never need to build the code for the authorization server or be an expert in its underlying technology. OAuth is a framework though, and at times you need to take closer control over behavior in certain areas. Extensibility is needed to implement some security solutions.
| Area | Description |
|---|---|
| Look and Feel | Control over the login branding, styling and layout |
| Authentication | Customizing or refining user authentication |
| Actions | Using and linking user attributes during or after authentication |
| User Data | Storing custom user attributes in the authorization server |
| Data Sources | Interacting with custom data sources and credential stores |
| Token Issuing | Behaviors like issuing custom claims and exchanging tokens |
| Security Events | Subscribing to security alerts from the authorization server |
The cleanest way to manage this type of concern is to use the authorization server's extensibility features, rather than coding complex workarounds at the application level.
Managing Extensibility
There are three main levels for customizing the Curity Identity Server, from enhancing the look and feel, to writing scripts, to using the plugin SDK.
Look and Feel
It is common to want to customize the Look and Feel of login screens presented to your users. In the Curity Identity Server this can be done in a basic way using the Admin UI, or more detailed HTML customizations can be made via the UI Kit. Most commonly this only requires CSS-related changes.
Scripting
Later on, to control authentication and token issuing, Scripting is used. This requires code, but you only write simple JavaScript procedures. The scripted logic can also interact with infrastructure, such as sending custom HTTP requests or connecting to data sources.
Plugins
Scripting has some limitations though, especially for more complex tasks. When you want to take closer control over behavior, such as building a completely custom authentication method, the Plugin SDK is the preferred option. This requires you to write Java or Kotlin code, using SDK objects and interfaces.
Development Setup
Many developers are not Java coders, and instead build their user facing apps and APIs in other technology stacks, such as Node.js, Python or C#. There may be concerns about how to manage setup and deployment aspects, so this tutorial shows how to quickly overcome these challenges, and provides some useful links.
Plugin Learning Resources
When getting started with plugins, first watch these two introductory videos:
You can integrate the Curity Plugin SDK Coding Skill into an AI coding assistant and generate plugin code from natural language commands. For lower level information, consult the Curity Identity Server's detailed developer documentation:
Install Prerequisites
Next ensure that these tools are installed:
- A Java Development Kit (JDK), such as those provided by Azul
- The maven build tool
- An integrated development environment (IDE), such as IntelliJ Community Edition
The Curity Identity Server stays current with the latest long term support (LTS) version of Java so that developers can write plugins with productive modern code. See the Java Version Details for further information.
Implement a Plugin
The following sections summarize how to manually create a new plugin, then deploy and test it. This provides a development setup so that the only thing left to do is write the Java or Kotlin code, which any skilled developer will soon learn.
Generate the Project
A common type of plugin is a new authenticator, since various third parties offer an authentication API that is vendor specific. To get started building an authenticator plugin, run the following command, which uses Maven Archetypes to create Java project files for a custom authenticator:
mvn -B archetype:generate \-DarchetypeArtifactId=identityserver.plugins.archetypes.authenticator \-DarchetypeGroupId=io.curity \-DarchetypeVersion=3.0.0 \-DartifactId=example-authenticator \-DgroupId=com.example.plugins.exampleauthenticator \-DpluginName=Example \-Dversion=1.0.0-SNAPSHOT
If you prefer to code in Kotlin, run the following command instead:
mvn -B archetype:generate \-DarchetypeArtifactId=identityserver.plugins.archetypes.kotlin-authenticator \-DarchetypeGroupId=io.curity \-DarchetypeVersion=3.0.0 \-DartifactId=example-authenticator \-DgroupId=com.example.plugins.exampleauthenticator \-DpluginName=Example \-Dversion=1.0.0-SNAPSHOT
Get Started Coding
If you open the generated folder in an IDE, you will see these source files:
├── authentication│ └── ExampleAuthentiRequestHandler│ └── RequestModel├── config│ │ └── ExampleAuthenticatorPluginConfig├── descriptor│ │ └── ExampleAuthenticatorPluginDescriptor
The archetypes provide a skeleton implementation where a request handler is injected with its configuration and a request model represents the data in HTTP requests:
class ExampleAuthenticatorRequestHandler(config: ExampleAuthenticatorPluginConfig): AuthenticatorRequestHandler<RequestModel>{override fun preProcess(request: Request, response: Response): RequestModel = RequestModel(request)override fun get(requestModel: RequestModel, response: Response): Optional<AuthenticationResult>{TODO("not implemented")}override fun post(requestModel: RequestModel, response: Response): Optional<AuthenticationResult>{TODO("not implemented")}}
You then need to implement the plugin's code. In some cases this simply requires you to write a method or two. In others you need to use multiple techniques, as summarized later in this tutorial.
Add Library Dependencies
For many plugins you may need to use additional Java libraries. Your plugin can automatically reference Server-provided Dependencies but you must deploy any other dependencies that your plugin uses. The following example shows how you might include an extra JSON serialization library in the generated pom.xml file:
<dependencies><dependency><groupId>se.curity.identityserver</groupId><artifactId>identityserver.sdk</artifactId><version>${project.curityVersion}</version><scope>provided</scope></dependency><dependency><groupId>org.slf4j</groupId><artifactId>slf4j-api</artifactId><version>${project.slf4jVersion}</version><scope>provided</scope></dependency><dependency><groupId>com.google.code.gson</groupId><artifactId>gson</artifactId><version>${project.gsonVersion}</version></dependency></dependencies>
Build the Plugin
In order to compile code to JAR files and also deal with third-party dependencies, you will need to add some plugins to the build setup. If you are using third party libraries, include the maven dependency plugin:
<build><plugins><plugin><artifactId>maven-compiler-plugin</artifactId><version>3.13.0</version><configuration><source>21</source><target>21</target></configuration></plugin><plugin><artifactId>maven-dependency-plugin</artifactId><executions><execution><phase>process-sources</phase><goals><goal>copy-dependencies</goal></goals><configuration><includeScope>compile</includeScope><outputDirectory>${project.build.directory}</outputDirectory></configuration></execution></executions></plugin></plugins></build>
You can then run the following command line to build a JAR file containing the plugin's compiled code and resources:
mvn package
This results in files such as these being built to a target folder:
example-authenticator-1.0.0-SNAPSHOT.jargson-2.11.0.jar
Deploy the Plugin
You must then deploy the JAR files with instances of the Curity Identity Server, to a subfolder of usr/share/plugins. The following docker compose example shows the paths you can use to deploy the JAR files under the plugins root folder:
services:curity-idsvr:image: curity.azurecr.io/curity/idsvr:latestports:- 6749:6749- 8443:8443volumes:- ./example-authenticator-1.0.0-SNAPSHOT.jar:/opt/idsvr/usr/share/plugins/example-authenticator/example-authenticator-1.0.0-SNAPSHOT.jar- ./gson-2.11.0.jar:/opt/idsvr/usr/share/plugins/example-authenticator/gson-2.11.0.jar
Create a Plugin Instance
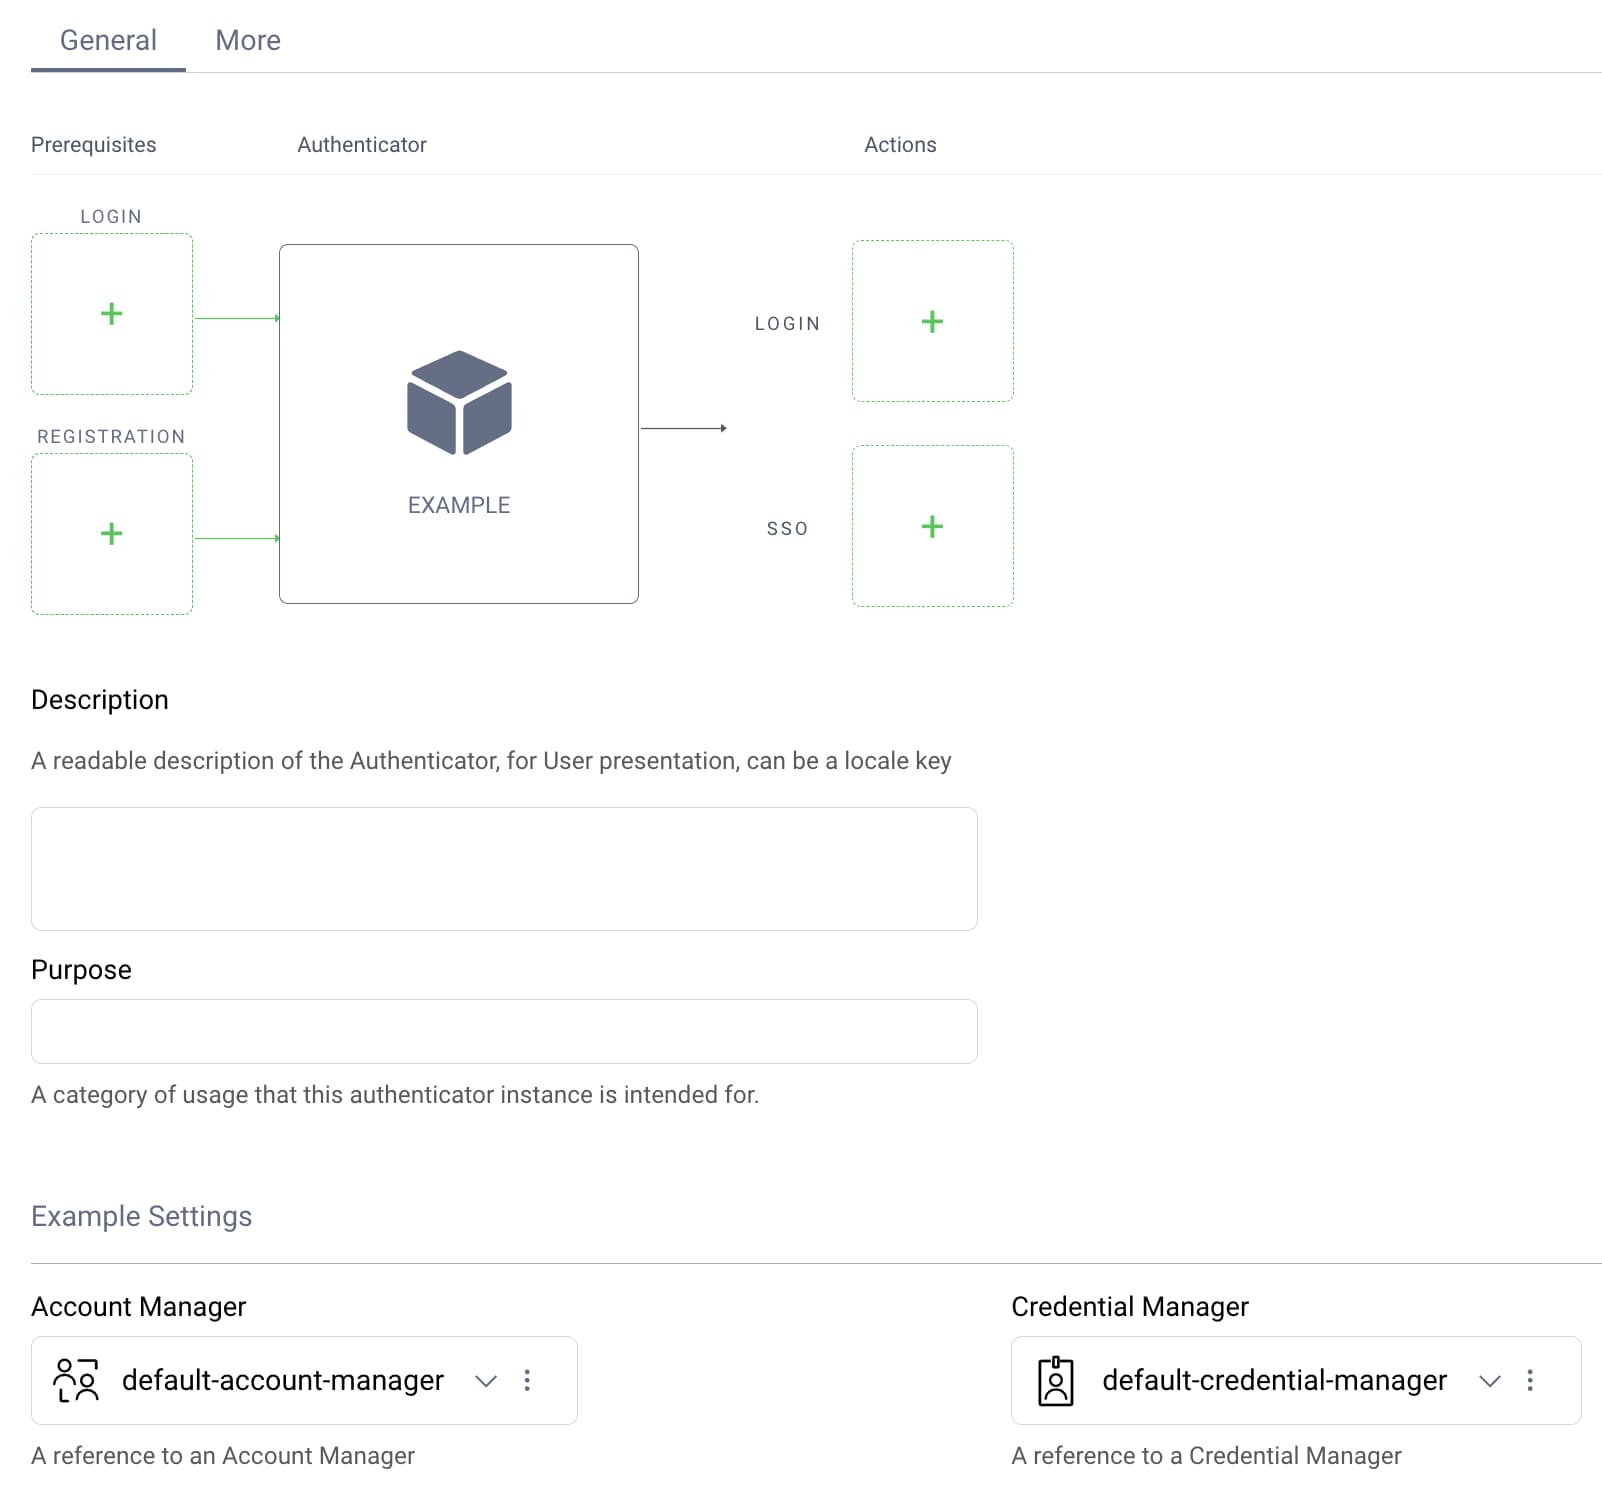
Once the Curity Identity Server and plugin are deployed, you can create one or more instances of the plugin using the Admin UI, and enter its required configuration values. An example is shown here for a custom authenticator plugin that uses account manager and credential manager system objects:
Test the Plugin
To test a plugin you run an OAuth flow and the plugin executes during particular actions, such as when a user authenticates or registers. Your development setup should enable you to make code changes and quickly redeploy the plugin so that you receive fast feedback.
Debug the Plugin
It is also possible to debug your plugin's code, while it is running in a Docker deployed instance of the Curity Identity Server. The Attach a Debugger tutorial explains how you can do this.
Plugin Coding
To implement the code for a particular type of plugin, you can use the following instructions to find further information and understand the design patterns.
Search Existing Plugins
You can browse the many Plugin Code Examples and their GitHub repositories to find working solutions. In some cases, you might find an existing plugin that meets your requirements. In others, you can study existing plugins to understand the coding techniques. For example, to search for authentication action plugins you can enter the following filter in the Find a repository input control:
topic:plugin topic:authentication-action
When searching, you can choose from the following plugin categories:
- Alarm Handlers
- Authenticators
- Authentication Actions
- Data Access
- Claims Providers
- Consentors
- Emailers
- Event Listeners
- SMS Senders
- Authorization Managers
Implement Authentication Plugins
Authentication plugins are often the most intricate. When developing an authentication plugin you must provide HTTP endpoints for login forms, then implement frontend and backend logic. Detailed tutorials explain how you can take full control and implement any custom authentication method:
Issue Custom Claims
You can customize claims issued to tokens and integrate with third party systems in advanced ways, by implementing a ClaimsProvider. The Salesforce Claims Provider shows how to make a more complex external connection that requires a JWT credential. This plugin also demonstrates the use of caching and Managed Objects.
Customize User Creation
The following plugins show how to make HTTP requests to external systems. In both cases a remote user is created after authentication, and this responsibility is best implemented as an authentication action.
| Plugin | Description |
|---|---|
| Kong Dev Portal User Provisioner | Uses an HTTP client managed by the Curity Identity Server |
| Azure API Management User Provisioner | Uses an HTTP client from the Azure SDK |
Customize Data Sources
The Curity Identity Server can connect to many types of data source and provides interfaces for operating on data. The following examples can be used as a guide when integrating with custom data sources directly.
| Plugin | Description |
|---|---|
| Custom Credential Validator | Custom validation of password credentials to support any cryptographic hash algorithm |
| MongoDB Data Source | Shows how to implement various interfaces to connect to NoSQL data sources |
Customize Auditing
Identity audit results can be output to a JDBC data source, though it is also possible to capture events programmatically. The Amazon SQL Event Listener provides an example of receiving audit data, then sending it to a queue. Various subscribers could then use the data.
Conclusion
The plugin SDK for the Curity Identity Server gives you powerful control over core behavior, and you do not need to be a Java expert to use it. A simplified programming model is provided, and this page explained the main steps, with links to further information. Plugins enable you to customize many security-related behaviors during OAuth flows, without adding complexity to your applications.
Customer Stories
Learn how organizations run identity and API security at scale.
Read customer storiesWas this helpful?