Configuration as Code
On this page
The Configure Deployed Environments tutorial explains how to create and redeploy configuration for the Curity Identity Server. This tutorial and video explain some advanced configuration techniques to efficiently manage security settings for a deployment pipeline, which typically has multiple environments like test, staging and production. Such a deployment process also helps to derisk production deployments.
Token Handler Configuration
This tutorial focuses on the Curity Identity Server, which can manage many configuration settings for a deployment pipeline. The techniques work in an equivalent way for the Curity Token Handler, which uses a much smaller configuration.
Parameterize and Split Configuration
Parameterized Configuration allows you to reuse the same configuration in different environments. You can parameterize the values that are different in every environment, like URLs or secrets. You then don't need to maintain a separate complete configuration for the environments. Optionally, you can split the configuration into multiple files. A split configuration keeps configuration readable and keeps the main configuration shareable even when some environments have major differences. The following example uses three distinct configuration files with parameters.
<config xmlns="http://tail-f.com/ns/config/1.0"><environments xmlns="https://curity.se/ns/conf/base"><environment><base-url>#{RUNTIME_BASE_URL}</base-url><admin-service><http><ssl-server-keystore>default-admin-ssl-key</ssl-server-keystore><web-ui></web-ui><restconf></restconf></http></admin-service><services><zones><default-zone><symmetric-key>#{SYMMETRIC_KEY}</symmetric-key></default-zone></zones>...</services></environment></environments>...</config>
In this example there are four parameters that use a #{PARAMETER_NAME} syntax:
RUNTIME_BASE_URL: the base URL for the Curity Identity Server that internet clients use.SYMMETRIC_KEY: a cryptographic key that encrypts SSO cookies.WEB_BASE_URL: the base URL for a web application.WEB_CLIENT_SECRET: a client secret used by the backend for a web application.
At runtime, supply the value of parameters as environment variables. The following Docker Compose example supplies parameters in a .env file and copies the three configuration files from a local configfiles folder to the $IDSVR_HOME/etc/init deployed location. For a Docker container, $IDSVR_HOME evaluates to /opt/idsvr.
services:curity-idsvr:hostname: idsvrimage: curity.azurecr.io/curity/idsvr:latestports:- 6749:6749- 8443:8443volumes:- ./configfiles:/opt/idsvr/etc/initenv_file:- .env
The .env file might contain values similar to those shown here. Notice that the SYMMETRIC_KEY and WEB_CLIENT_SECRET are sensitive values. Later in this tutorial we show how to cryptographically protect sensitive values.
RUNTIME_BASE_URL='https://login.staging.example'SYMMETRIC_KEY='7d56514b9223d1df39bbfc053cba49a3c764540f12a24913fe049072a8ec8f86'WEB_BASE_URL='https://www.staging.example'WEB_CLIENT_SECRET='S3cret'
Create a Custom Docker Image
Once configuration uses parameters, the deployed XML is usually identical for all stages of the deployment pipeline. Therefore, create a custom Docker image that includes the configuration as a shared asset, to simplify deployments. Over time, the shared Dockerfile is likely to also contain various customizations, like themes, scripts and plugins.
Your custom Dockerfile may eventually look similar to the following example, where configuration files, themes, scripts, and plugins are copied into correct locations.
FROM curity.azurecr.io/curity/idsvr:latestCOPY configfiles /opt/idsvr/etc/initCOPY css/custom.css:/opt/idsvr/usr/share/webroot/assets/css/custom.cssCOPY scripts/token-procedures/:/opt/idsvr/etc/init/token-proceduresCOPY plugins/custom-authenticator-1.0.0.jar:/opt/idsvr/usr/share/plugins/authenticators-custom/custom-authenticator-1.0.0.jar
The example Docker compose deployment could then use reduced settings to improve reliability. The deployment for each environment just needs to provide the Docker image and its own parameter values:
services:curity-idsvr:hostname: idsvrimage: custom_idsvr:10.0ports:- 6749:6749- 8443:8443env_file:- .env
Provisioning New Environments
Parameterized configuration and asset sharing enables fast provisioning of new environments by simply adding a new parameters file. For example, to deploy the Curity Identity Server to a loadtest environment, just add parameters and reuse the existing deployment.
Deploy JavaScript Procedures
Scripting can customize the behavior of the Curity Identity Server during authentication and token issuance. By default, JavaScript procedures save to the configuration as base64 encoded text:
<config xmlns="http://tail-f.com/ns/config/1.0"><processing xmlns="https://curity.se/ns/conf/base"><procedures><token-procedure><id>custom-client-credentials-procedure</id><flow>oauth-token-client-credentials</flow><script>LyoqCiAqIEBwYXJhbSB7c2UuY3VyaXR5LmlkZW50aXR5c2 ..</script></token-procedure></procedures></processing></config>
The Scripting Guide explains more about scripts and their deployment layout. Upon completing script development you can save each script to a file whose name matches the id of the procedure. Then, remove the procedure from the XML and deploy the JavaScript file to the Docker container instead.
Protect Sensitive Values
By default, the Curity Identity Server automatically protects sensitive values in exported configuration files. However, with parameterized configuration, sensitive values must be set at deployment time. Do not use plaintext environment variables, since that could leak values to platform logs or anyone who can inspect the environment. Instead, store sensitive values like secrets and cryptographic keys in a secure vault, such as one that your cloud platform provides. At deployment time, CI/CD tools can access secrets from the vault and use crypto utilities to protect them. This ensures that the values are provided to the Curity Identity Server in a form that protects them from being leaked or stolen. The following example shows the same parameters as before, but the sensitive values have been updated with crypto tools to secure the plain entries:
RUNTIME_BASE_URL='https://login.staging.example'SYMMETRIC_KEY='data:text/plain;aes,v:S.MTJjbkR1eVdpWmVqME1wTw==.aLgcneVzGQojDTWCQSVUyg==.hDWC ...'WEB_BASE_URL='https://www.staging.example'WEB_CLIENT_SECRET='$5$mp.M2.0pdI45Seli$7Rl39saPsdL6zQAVshxZuzS.9A8xbB15NIXcyUbjBV5'
This section shows some techniques that you can use to programmatically prepare the secure values required by a parameterized configuration. First, it shows how to generate new symmetric and asymmetric values should you need to generate them on the fly. Then, it shows how you can process different types of values so that you can easily put them into an environment variable. Finally, it shows how to programmatically create encrypted values so that the Curity Identity Server can properly decrypt them.
These are the configuration values that you should treat as sensitive and encrypt before setting as configuration parameters:
- JDBC connection strings
- JDBC passwords
- Symmetric keys
- Private keys
- Public keys and trust stores
Additionally, you should also treat any user passwords and client secrets in the configuration as sensitive values and hash them.
Working With Crypto Tools
The Curity Identity Server comes with tools that you will need to encrypt values and convert them to the required formats. You can read about them in the Keys and Cryptography section of the product documentation. You have different options for how to use the tools:
- Download the Curity Identity Server binaries and use the tools directly. Note that the scripts that provide encryption run as java code and assume that
javais in the executable path. You should ensure this is true, or modify the scripts to use, for example, the JRE provided with the Curity Identity Server (you can find the binary in$IDSVR_HOME/lib/java/jre/bin). Ensure that you use the same java version as listed in$IDSVR_HOME/lib/java/jre/release. - Run the commands directly on a Curity Identity Server Docker container using the
docker execcommand. Note that you need a running container to do that. - Create a custom Docker container that contains the necessary binaries and scripts, which executes the required commands.
You should decide which option works best with the CI/CD workflow you already use. You can read more about the approaches in section Running the Scripts below.
Generate Crypto Keys
If you created the initial configuration for the Curity Identity Server using the setup wizard, the configuration will include example cryptographic keys and certificates, including HTTPS certificates for https://localhost. For deployed systems you might want to replace the example crypto keys with your own. You can also remove keys that you don't need. For example, if an API gateway provides HTTPS URLs for the Curity Identity Server you may not need any SSL crypto resources in the configuration.
If you need to generate new crypto keys, you can use the OpenSSL tool for that. The following example generates a symmetric key to protect SSO cookies:
SYMMETRIC_KEY_RAW=$(openssl rand 32 | xxd -p -c 64)
The following set of commands generates an asymmetric RSA keypair with 2048-bit key length, compatible with the RS256 signing algorithm. It then saves it to a password-protected PKCS#12 file. The Curity Identity Server uses asymmetric keys for different purposes, for example, for key signing.
If you want to use the following commands, remember to change Password1 to a secure password of your choice.
openssl genrsa -out signing.key 2048openssl req -new -nodes -key signing.key -out signing.csr -subj "/CN=curity.signing"openssl x509 -req -in signing.csr -signkey signing.key -out signing.crt -sha256 -days 365openssl pkcs12 -export -inkey signing.key -in signing.crt -name curity.signing -out signing.p12 -passout pass:Password1
Prepare Sensitive Values
Here are the techniques you can use to set sensitive values in environment variables.
For admin passwords and client secrets hash the plain-text value, as shown below:
ADMIN_PASSWORD_RAW='Password1'ADMIN_PASSWORD_PROTECTED=$(openssl passwd -5 $ADMIN_PASSWORD_RAW)
For trust stores, certificates, and key stores, first convert them to a base64-encoded single line format, as shown below. Then, encrypt the value, as we describe in the next section.
CERT_BASE64=$(openssl base64 -in signing.crt | tr -d '\n')KEY_BASE64=$(openssl base64 -in signing.p12 | tr -d '\n')
For key stores, also convert the base64 text to the Curity Identity Server keystore configuration format using the convertks tool. Note that this does not cryptographically protect the key.
Use the following command, if you have a local installation of the Curity Identity Server. Remember to update the key store password to the one you used when generating the key store.
TOKEN_SIGNING_KEY=$($IDSVR_HOME/bin/convertks --in-password Password1 --in-alias curity.signing --in-entry-password Password1 --in-keystore "$KEY_BASE64")
Encrypt Sensitive Values
Once you have the values prepared as shown above, you are ready to encrypt them.
First, create configuration encryption key. Ensure that your deployed system has access to this key so that it can decrypt configuration entries. The best way to provide the key is to pass it to your Curity Identity Server's deployment in the CONFIG_ENCRYPTION_KEY environment variable — for example, add it to the .env file that you pass to the Docker container.
export CONFIG_ENCRYPTION_KEY=$(openssl rand 32 | xxd -p -c 64)
Then, apply encryption as described below, depending on whether you encrypt a simple value like a connection string, or a complex one, like an asymmetric key or a key store.
Encrypt Simple Secrets
To encrypt simple values like JDBC connection strings or symmetric keys, create a script called encrypt_secret.sh using the following code. The script transforms an XML input using an XSLT template with the help of the Curity Identity Server's SecretConverter class. Note that the script requires the environment variable $IDSVR_HOME to point to the installation folder of the Curity Identity Server (or to the folder that contains the lib and bin folders copied from the Curity Identity Server's files). You don't need to set the variable manually if you run the script directly in a Curity Identity Server Docker container.
#!/bin/bashcd "$(dirname "${BASH_SOURCE[0]}")"CLASSPATH="$IDSVR_HOME/lib/*:$IDSVR_HOME/lib/xml-tools/*"XML_FILE=$(mktemp)XSLT_FILE=$(mktemp)trap 'rm -f "$XML_FILE $XSLT_FILE"' EXITcat <<'EOF' > $XSLT_FILE<stylesheet version="1.0" xmlns="http://www.w3.org/1999/XSL/Transform"xmlns:xalan="http://xml.apache.org/xalan"xmlns:sec="xalan://se.curity.identityserver.crypto.SecretConverter"exclude-result-prefixes="xalan"><output indent="no" omit-xml-declaration="yes"/><param name="encryptionKey" select="initialValue"/><param name="decryptionKeys"/><template match="valueToEncrypt"><variable name="data"><value-of select="." /></variable><value-of select="sec:reencryptSecret($data, $encryptionKey, $decryptionKeys)"/></template><template match="text()"/></stylesheet>EOFcat <<EOF > $XML_FILE<values><valueToEncrypt>$PLAINTEXT</valueToEncrypt></values>EOFjava -cp "$CLASSPATH" org.apache.xalan.xslt.Process \-xsl "$XSLT_FILE" \-in "$XML_FILE" \-param encryptionKey "$CONFIG_ENCRYPTION_KEY"
Use the script to encrypt a secret. The script expects the $CONFIG_ENCRYPTION_KEY environment variable to contain the encryption key and the $PLAINTEXT environment variable to contain the value that needs to be encrypted.
export PLAINTEXT='jdbc:hsqldb:file:${se.curity:identity-server:db};ifexists=true;hsqldb.lock_file=false'./encrypt_secret.sh
Encrypt Complex Secrets
To encrypt asymmetric key or certificate-based values, create a script called encrypt_keystore.sh using the following code. The script transforms an XML input using an XSLT template with the help of the Curity Identity Server's ConvertKeyStore class. As for the previous one, this script also requires the environment variable $IDSVR_HOME to point to the installation folder of the Curity Identity Server (or to the folder that contains the lib and bin folders copied from the Curity Identity Server's files). You don't need to set the variable manually if you run the script directly in a Curity Identity Server Docker container.
#!/bin/bashcd "$(dirname "${BASH_SOURCE[0]}")"CLASSPATH="$IDSVR_HOME/lib/*:$IDSVR_HOME/lib/xml-tools/*"XML_FILE=$(mktemp)XSLT_FILE=$(mktemp)trap 'rm -f "$XML_FILE $XSLT_FILE"' EXITcat <<'EOF' > $XSLT_FILE<stylesheet version="1.0" xmlns="http://www.w3.org/1999/XSL/Transform"xmlns:xalan="http://xml.apache.org/xalan"xmlns:sec="xalan://se.curity.identityserver.crypto.ConvertKeyStore"exclude-result-prefixes="xalan"><output indent="no" omit-xml-declaration="yes"/><param name="encryptionKey" select="initialValue"/><param name="decryptionKeys"/><template match="valueToEncrypt"><variable name="data"><value-of select="." /></variable><value-of select="sec:reencryptKeyStores($data, $encryptionKey, $decryptionKeys)"/></template><template match="text()"/></stylesheet>EOFcat <<EOF > $XML_FILE<values><valueToEncrypt>$PLAINTEXT</valueToEncrypt></values>EOFjava -cp "$CLASSPATH" org.apache.xalan.xslt.Process \-xsl "$XSLT_FILE" \-in "$XML_FILE" \-param encryptionKey "$CONFIG_ENCRYPTION_KEY"
Use the script to encrypt the output of the convertks tool or the base64 text for a trust store or public key. The script expects the $CONFIG_ENCRYPTION_KEY environment variable to contain the encryption key and the $PLAINTEXT environment variable to contain the value that needs to be encrypted.
export PLAINTEXT="$TOKEN_SIGNING_KEY"./encrypt_keystore.sh
Running the Scripts
Below are explanations of how to run the previously shown scripts using different approaches.
You can create a custom Docker image that will contain the necessary files to run the scripts. You could follow steps like:
- Use a Linux container as a base and ensure it contains tools like
gitandopenssl. - Put the necessary encryption scripts in a remote git repository. Then, in the Docker image, clone the repository.
- Download the Curity Identity Server package and copy the following folders to the container:
idsvr/bin,idsvr/lib. - Ensure that the image has an
$IDSVR_HOMEenvironment variable that points to the folder where you copied thebinandlibfolders. - Ensure that
lib/java/jre/binis in the image's executable path. - Ensure that
$CONFIG_ENCRYPTION_KEYenvironment variable is properly set in the image. - Finally, run any commands for hashing and encryption and capture their result for further processing in the CI/CD pipeline.
You can then build the image and keep it in a repository that your CI/CD tool can access. The CI/CD tool can then run the image to convert any values to their protected forms.
Manage Configuration Changes
With separated base configuration, parameters and secrets, manage configuration as code and use the following types of storage locations:
- Store parameterized XML configuration in source control.
- Store non-secret parameters for each environment in source control.
- Store secret parameters for each environment in a secure vault.
If required, use source control techniques to assign configuration versions to environments. For example, production might use a stable tag, whereas test systems might use a latest tag.
When teams make configuration changes, also update the configuration in source control. Start with a manual process:
- Make any configuration changes using the admin UI
- Save the configuration by committing it. From the Changes menu choose Commit
- Export the configuration. From the Changes menu choose Downlad
- Inspect the XML and apply the same changes to source control
Source control then provides a history of configuration changes that enables rollback to previous working versions.
You can use Commit Hooks to automate configuration backups. To do so, deploy a bash script with the Curity Identity Server to the $IDSVR_HOME/usr/bin/post-commit-scripts/ folder. The following example script checks that the Curity Identity Server is running and then collects the latest configuration and its commit message:
#!/bin/bashcd "$(dirname "${BASH_SOURCE[0]}")"STATUS=$(/opt/idsvr/bin/status)IS_READY=$(echo "$STATUS" | grep 'isReady' | awk -F':' '/isReady/ {print $2}')IS_SERVING=$(echo "$STATUS" | grep 'isServing' | awk -F':' '/isServing/ {print $2}')if [ "$IS_READY" == 'true' -a "$IS_SERVING" == 'true' ]; thenCOMMENT_LINE=$(idsh <<< "show commit changes" | grep "# Comment: ")COMMIT_MESSAGE=$(echo "$COMMENT_LINE" | sed -r "s/^# Comment: (.*)$/\1/i")PARAMS_XML="$(idsvr -D)"VALUES_XML="$(idsvr -d)"fi
The idsvr -D command exports the latest configuration and maintains parameter placeholders whereas the idsvr -d command exports the latest configuration with the parameter values. After the script collects configuration data it can perform custom actions.
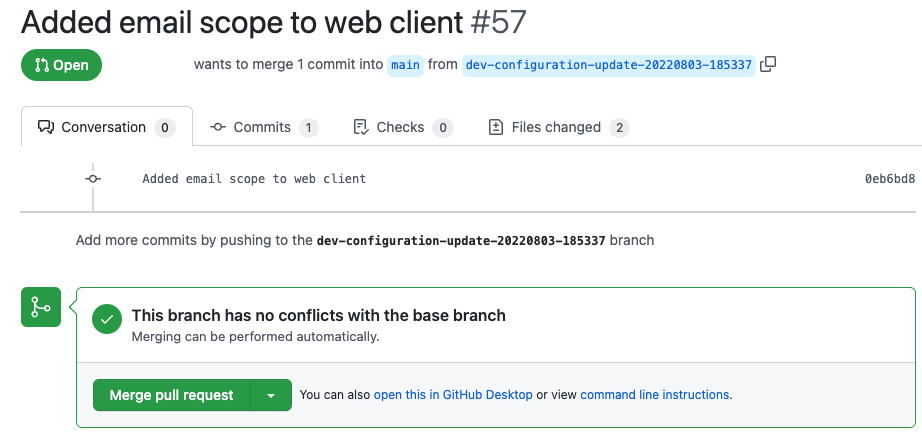
Run GitOps Deployments
A commit hook can post the configuration data to a utility API that integrates with source control. The utility API can create a branch, commit changes to it and then create a pull request. The following diagram illustrates such a flow when a Git repository stores the configuration.

To control behavior per environment, use a STAGE environment variable in the commit hook script. The script can use the variable's value to submit changes to correct branches or repositories. Such a process might enable both DevOps and test teams to make changes to shared configuration and submit them for review by an identity team.
A utility API can perform any custom logic, like splitting the received configuration into separate sections and updating the stage's parameter file. The API can then call a source control API to create a branch, commit configuration changes to it and add the pull request.
You can design CI/CD systems to run GitOps deployments in various ways, when configuration changes on the main branch. For example, after merging a pull request you might update a latest tag and push updates to all test environments.
Code Example
A detailed code example accompanies this tutorial, which you can run on a development computer to see a working solution. Follow the README instructions to create a configuration, parameterize it and protect secure values. The example also includes a Git integration API that you can configure to create automated pull requests when configuration changes:
Video
Watch the following video to understand how the end-to-end deployment architecture works:
Conclusion
The Curity Identity Server enables you to manage configuration as code, to avoid duplication in a deployment pipeline and to help derisk production upgrades. Store both the parameterized configuration and plaintext environment variables in a source control repository. Store secrets in a vault, such as that provided by your cloud platform. You can then design various ways to automate deployments.
Customer Stories
Learn how organizations run identity and API security at scale.
Read customer storiesWas this helpful?