Scope Authorization Manager
On this page
The Curity Identity Server provides SCIM and GraphQL API endpoints for managing customer user accounts. GraphQL can also be used to manage other identity resources, including OAuth database clients. The following tutorials introduce the endpoints. An organization can access these APIs using either a built-in client called the DevOps Dashboard, or from its own client applications.
Since the identity resources contain sensitive information, access must be authorized. The scope authorization manager can be used to quickly enable a basic level of authorization.
Authorization Best Practice
The scope authorization manager grants the same resource permissions to all users. Most real-world deployments will require user level access to identity resources for at least some clients. Therefore it is recommended to use a groups or attribute authorization manager instead.
High Level Authorization
The scope authorization manager uses OAuth scopes as a base "unit" for making access decisions. The base concept is rather simple and is probably familiar to most who have ever worked with OAuth scopes before. An OAuth client accesses protected resources by providing an access token, and this access token contains one or more granted scopes.
Client Configuration
The names of the scopes are chosen arbitrarily, but a good practice is to name them according to their intended use. For
authorization in the user management module this could be names like admin_read or admin_write. These names clearly
convey the purpose of the scopes. An example configuration is provided here, for the client configured in the
tutorial on client credentials:
<config xmlns="http://tail-f.com/ns/config/1.0"><profiles xmlns="https://curity.se/ns/conf/base"><profile><id>oauth</id><type xmlns:as="https://curity.se/ns/conf/profile/oauth">as:oauth-service</type><settings><authorization-server xmlns="https://curity.se/ns/conf/profile/oauth"><scopes><scope><id>admin_read</id><description>Admin read scope</description></scope><scope><id>admin_write</id><description>Admin write scope</description></scope></scopes><client-store><config-backed><client><id>server-client</id><scope>admin_read</scope><scope>admin_write</scope></client></config-backed></client-store></authorization-server></settings></profile></profiles></config>
The above scopes are checked by the authorization manager when certain actions are triggered. Actions are events like "client with scope X is trying to read all users" or "client with scope Y is trying to update data on its authenticated subject (user)". When an action is triggered, the decision on whether to allow the action is decided by an authorization policy.
Authorization Policies
How does the scope authorization manager use these scopes to decide permissions for our configured clients? The answer to that is through policies. A policy consists of a "policy action", which is similar to the action described as an event above. However, while user actions like "client presenting a token with scope X is trying to read all users" is always concrete, an action specified on a policy is allowed to be more broad, like "a client is trying to do a read operation on a user management endpoint". While this might seem a little confusing at first, it provides some flexibility and can be configured quickly.
Configuring a Policy
Consider a requirement where any client with scope admin_read should be allowed to read any data on the /Users endpoint. This would translate to this concrete action, which is triggered each time a client tries to read the /Users endpoint
by sending a GET request:
um:authorization-actions.user-management.users.admin.read
We could now setup a policy with an action matching the exact path, or we could define a broader policy like "any read
operation on the user management profile, regardless of endpoint". This policy action would look like this. By removing "users"
from the action, any requirements (such as scopes) will now be in effect for all read operations, not just on /Users.
um:authorization-actions.user-management.admin.read
To configure a scope authorization manager and policy, run the Admin UI and navigate to System → Authorization.
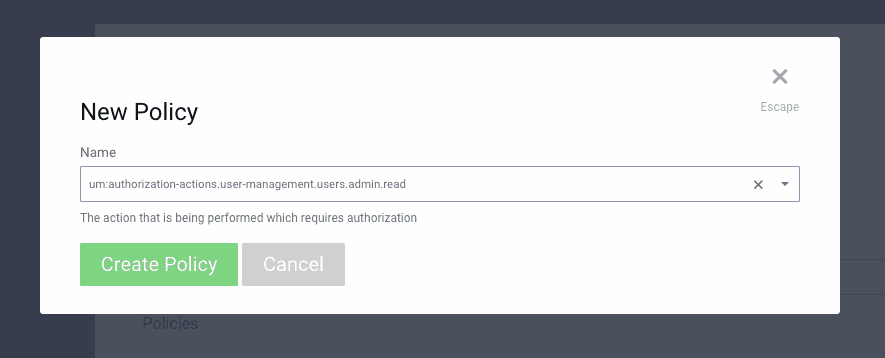
Click New Authorization and create a policy named test-authorization. Then set its type to scopes and press the
Add Policy button. Immediately you will be asked for the name of the policy. This name is the "policy action" discussed above,
and that value can be selected from the drop down menu:

Configuring a Rule
Unless a policy has rules, the authorization manager won't know what to do, and will by default deny authorization.
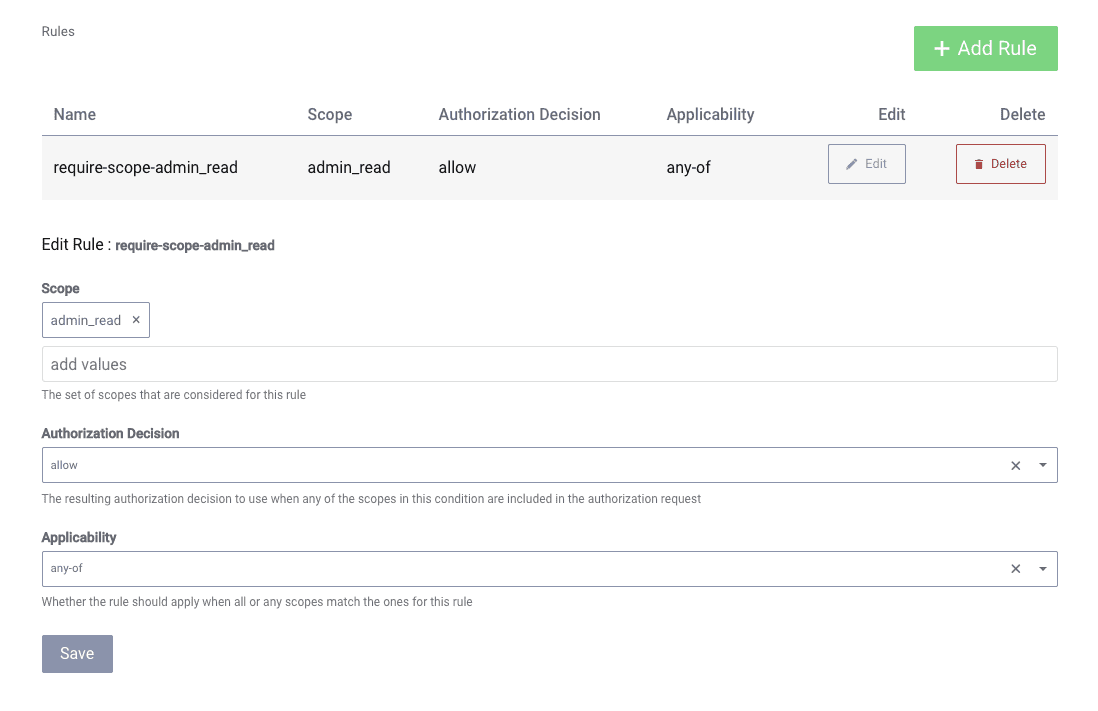
An effective policy therefore requires a rule or two, which is configured by selecting the Add Rule option.
Name the rule require-scope-admin_read. In the next step, the rule will mandate that any client with
the admin_read scope is allowed access to the action the policy has defined:

Other Authorization Options
The client is now able to successfully access user information from the SCIM or GraphQL endpoints that were referenced at the start of this tutorial. Once you are up and running it is straightforward to upgrade to the Groups Authorization Manager. This combines use of client scopes with a runtime groups claim, to enable different permissions to be granted to different types of user within a client application.
Conclusion
Authorization via scopes provides a basic way to authorize requests for identity resources, from the Curity Identity Server's SCIM and GraphQL endpoints. This is done by designing scopes, which can then be assigned to one or more clients. During requests for identity resouces, authorization is allowed or denied based on the configured policy and its rules.

Join our Newsletter
Get the latest on identity management, API Security and authentication straight to your inbox.

Start Free Trial
Try the Curity Identity Server for Free. Get up and running in 10 minutes.
Start Free Trial


