User Consent
On this page
User consent gathering with Curity
The process where a user is asked to confirm the release of the scopes and claims that a client requests, is called user consent gathering. Once agreed, the scopes and claims can be bound to the delegation when issuing token. In case the user decides that the requested scopes and claims are invalid, you can enable the option to let a user select which requested scopes and claims are allowed before giving its permission to proceed with issuing the token.
In this tutorial, you will be guided through the process of setting up Curity for user consent gathering. This includes creating new and required scopes and make requests like a client would to see the user experience. Finally we'll look at customizing the template that renders the form that the user interacts with, as well as internationalizing the scope and claim names that are presented to the user.
We'll be using the Admin UI to make small configuration updates, but will also use the CLI so you can copy/paste configuration commands from the tutorial directly.
Pre-requisites
This tutorial builds on the configuration setup described in the steps First Configuration and Configure an Authenticator under the menu Getting Started. If you have not gone through those steps yet, you can visit the guides by clicking on the links.
You may run this tutorial on a custom setup also, but keep in mind that names and URLs may be different, as well as the capabilities configured in the profiles.
You will also need a client capable of user interaction. If you follow the code flow tutorial, you will have a client called www that will use clone in this example.
Setup in Curity
Duplicate the www client
The first step is to clone the www client from the code flow tutorial. You can also setup a new client if you prefer.
Visit the Profiles screen and click the Token Service. On the right select Clients.
Find the www client and click Duplicate in the edit menu. Name the new client third-party.

Add scopes
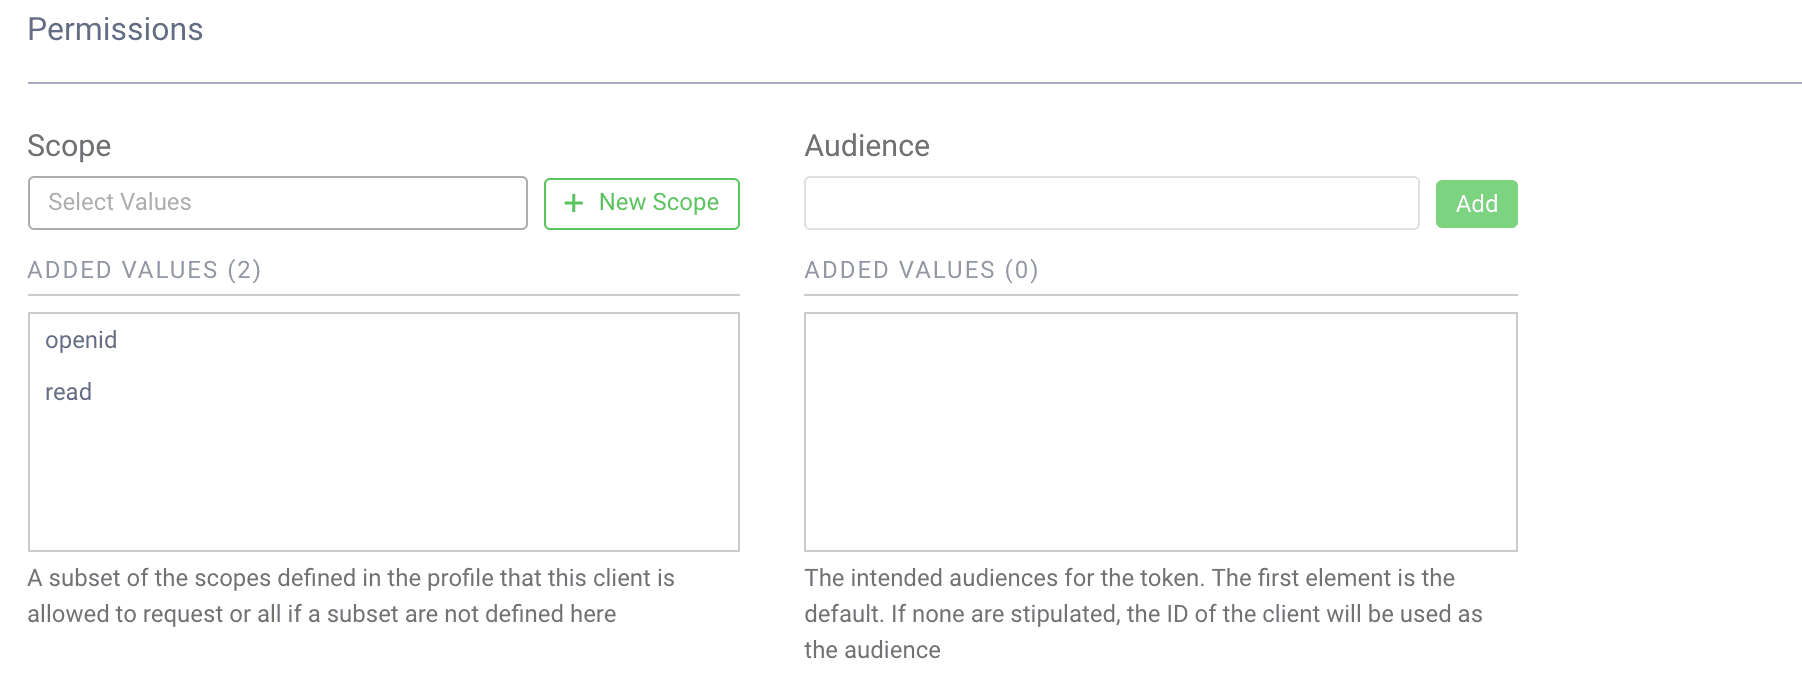
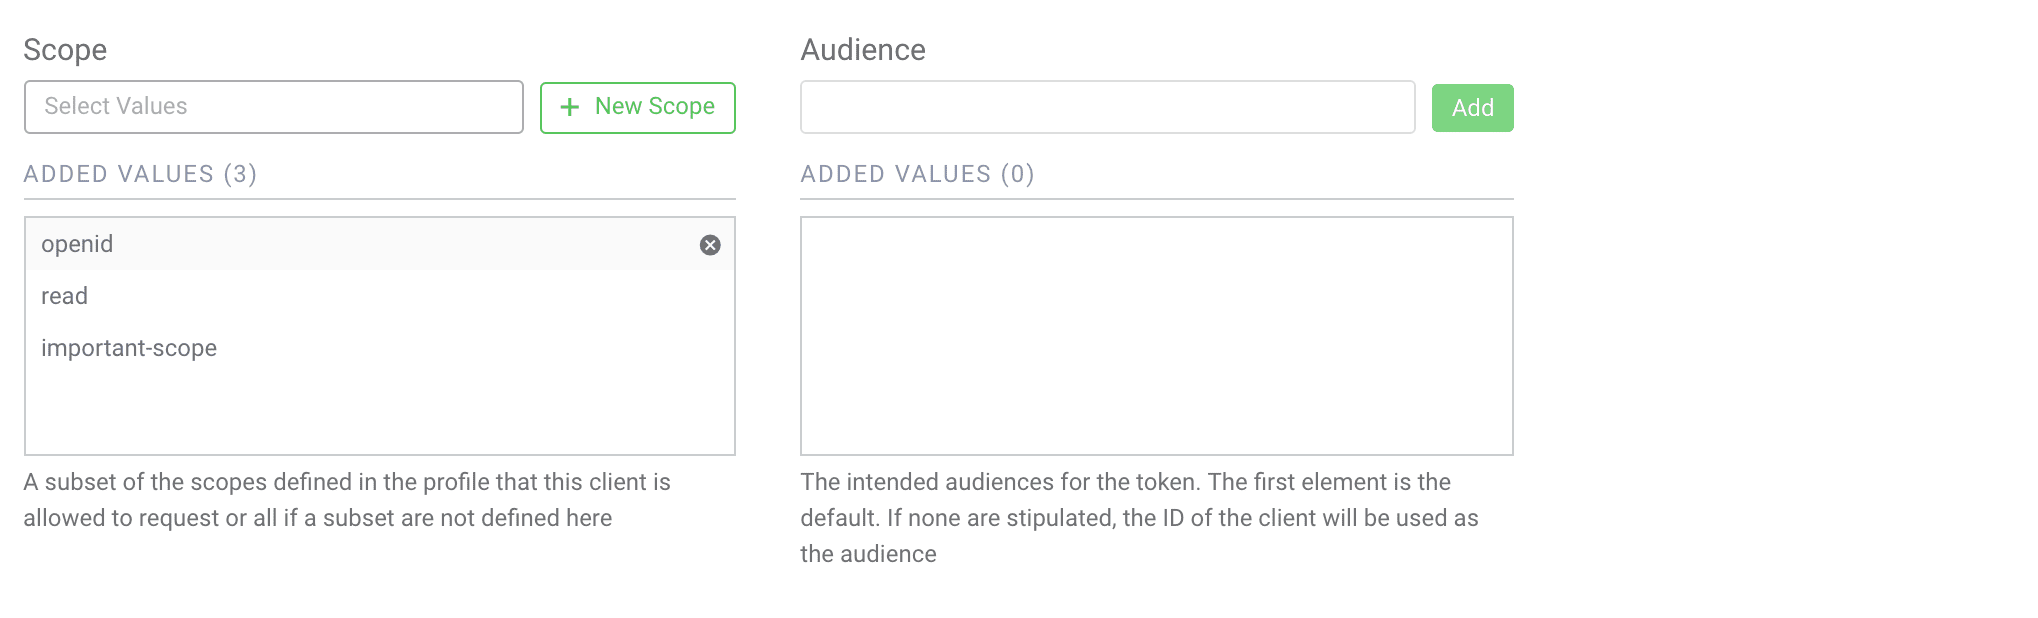
We want two scopes in this example. openid and read. Make sure both are configured on the client by scrolling down to OAuth/OpenID Settings.
If you don't have a read scope, you can create it by clicking New Scope.
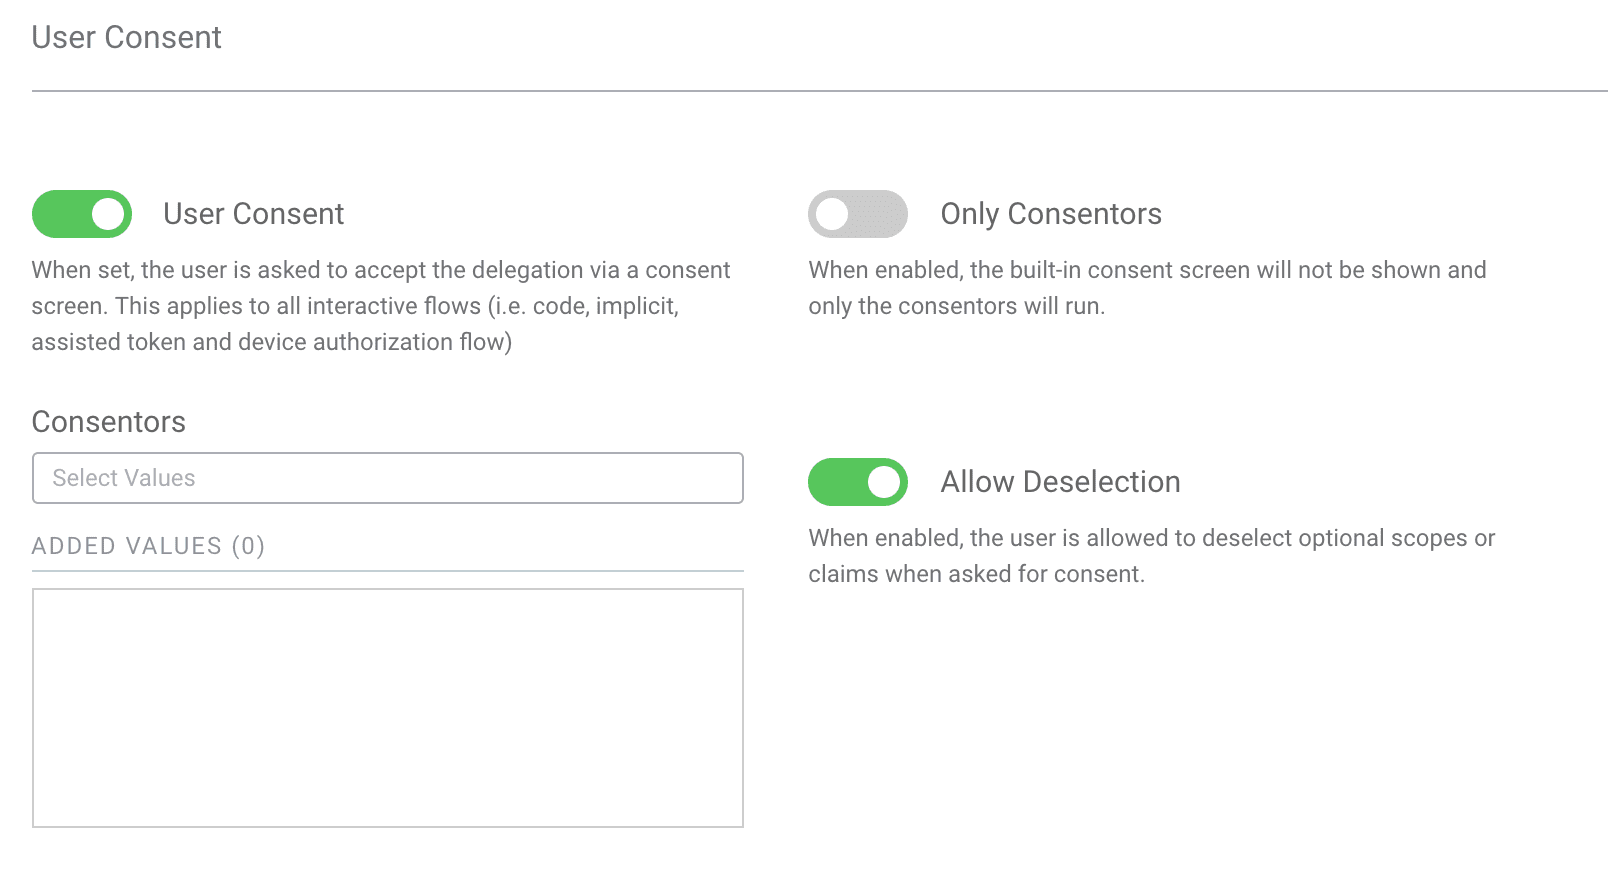
Enable User Consent
Scroll down to the User Consent section and enable User Consent. If you want the user to be able to deselect scopes while consenting, go ahead and also enable Allow Deselection. Note however that the client may get fewer scopes and claims than it requested.
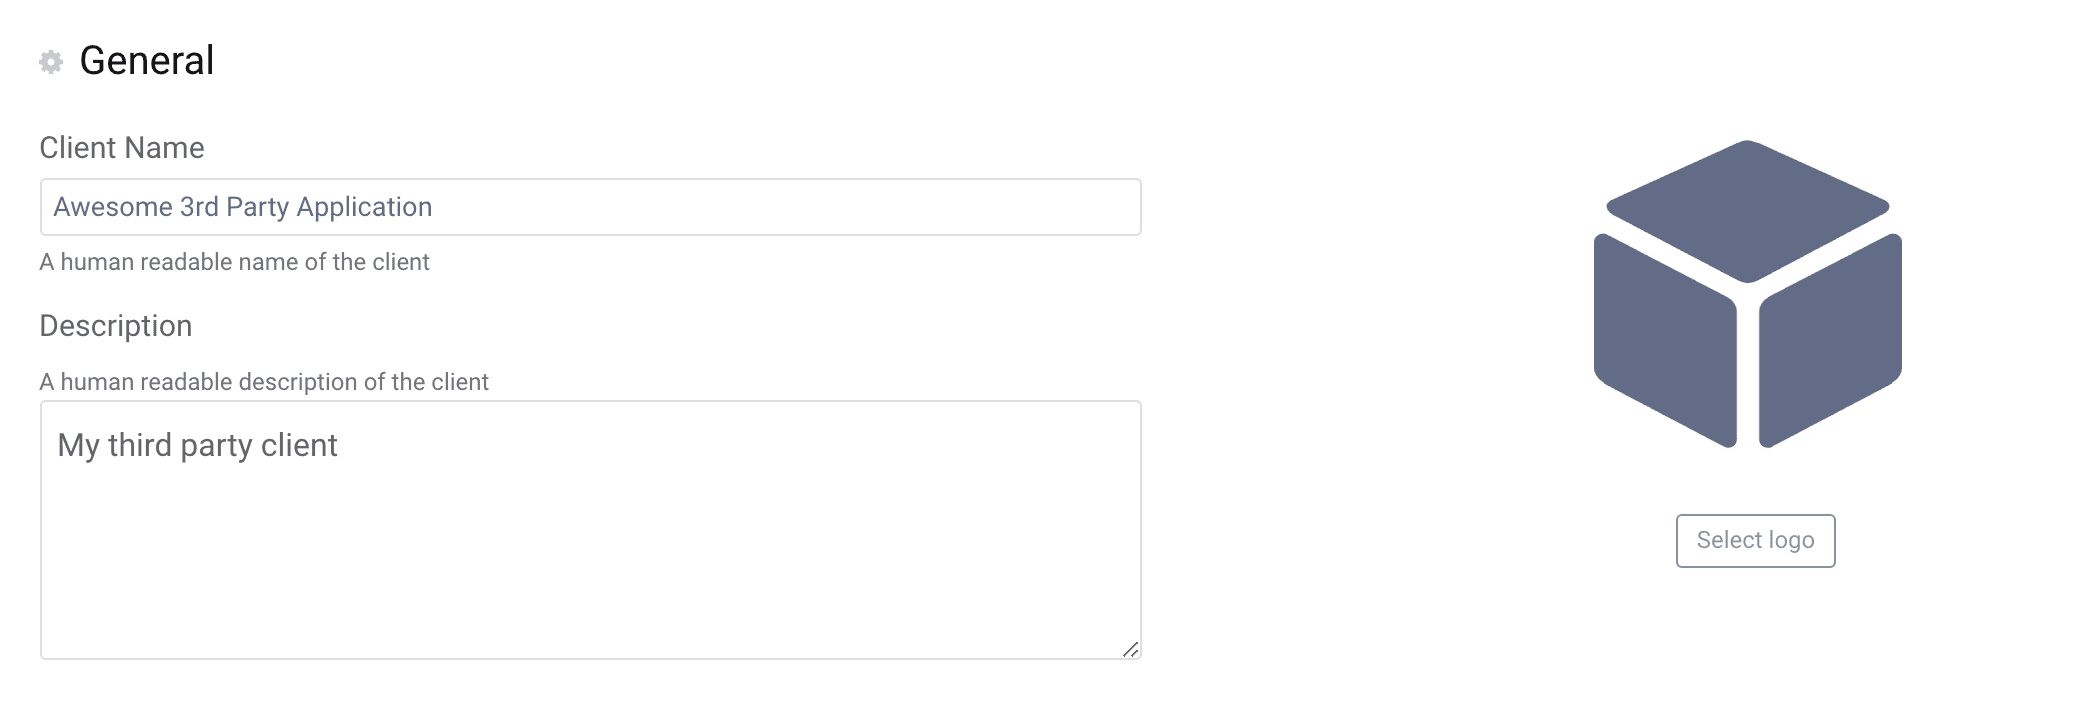
Set a Logo and Description (Optional)
During the consent process the user will be presented with a consent screen. It is possible to set the logo, name and description for the application on the client. This can be helpful to show the user what it is consenting to. These options are found in the top of the client configuration page.
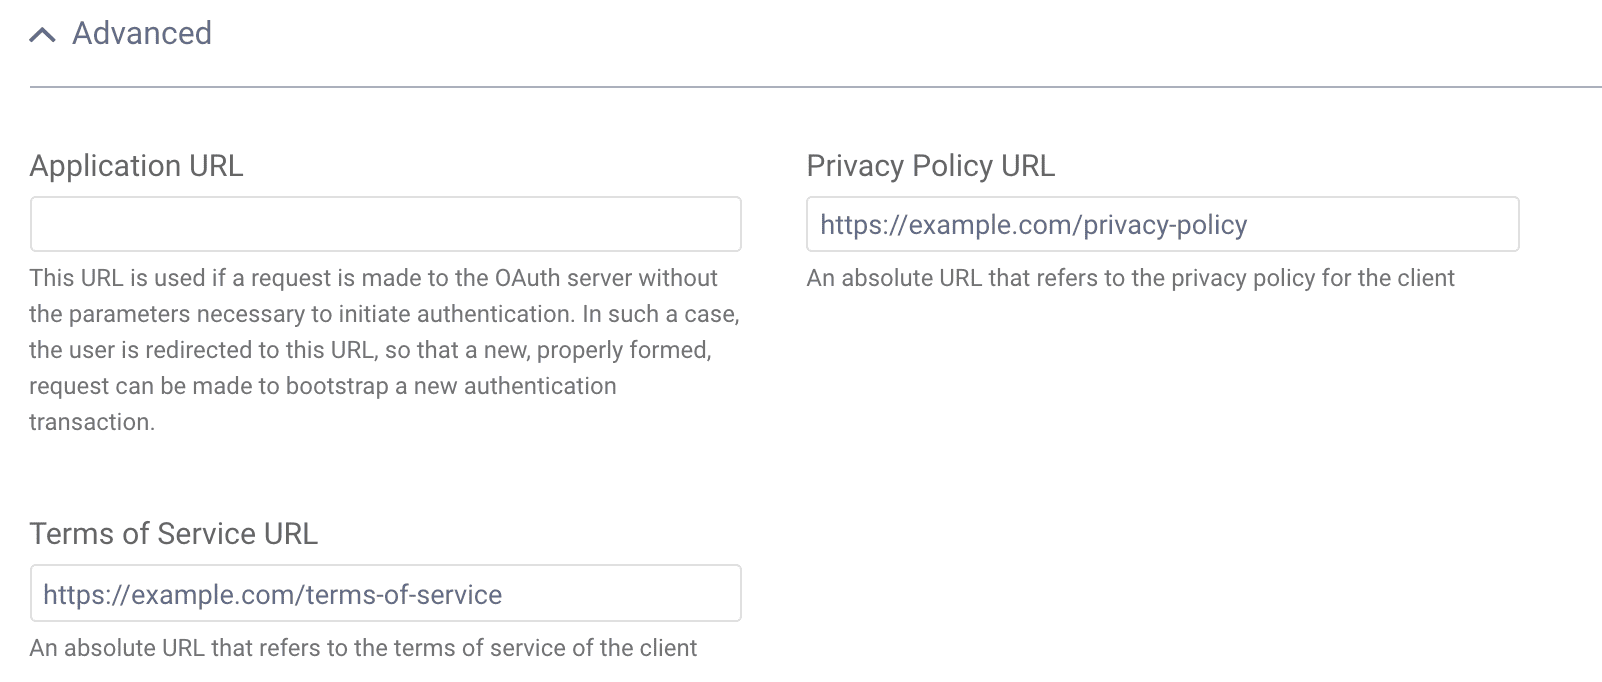
Set Terms of Service URL and Privacy Policy URL (Optional)
It is also possible to set links to the 3rd party app's terms of service and privacy policy. This is always recommended.
Navigate to the Application tab and expand Application Settings to find these settings.
Commit
Make sure to remember to commit the changes in the Changes -> Commit menu.
Making Requests
Now, with the client configured with user consent enabled, you can make a request using the Code Flow to ask for tokens. We include the openid+read scope to have a consentable scope.
To start the flow enter the following URL in a browser:
https://localhost:8443/oauth/v2/oauth-authorize?response_type=code&client_id=third-party&scope=openid+read&state=abc123&redirect_uri=https://localhost/callback
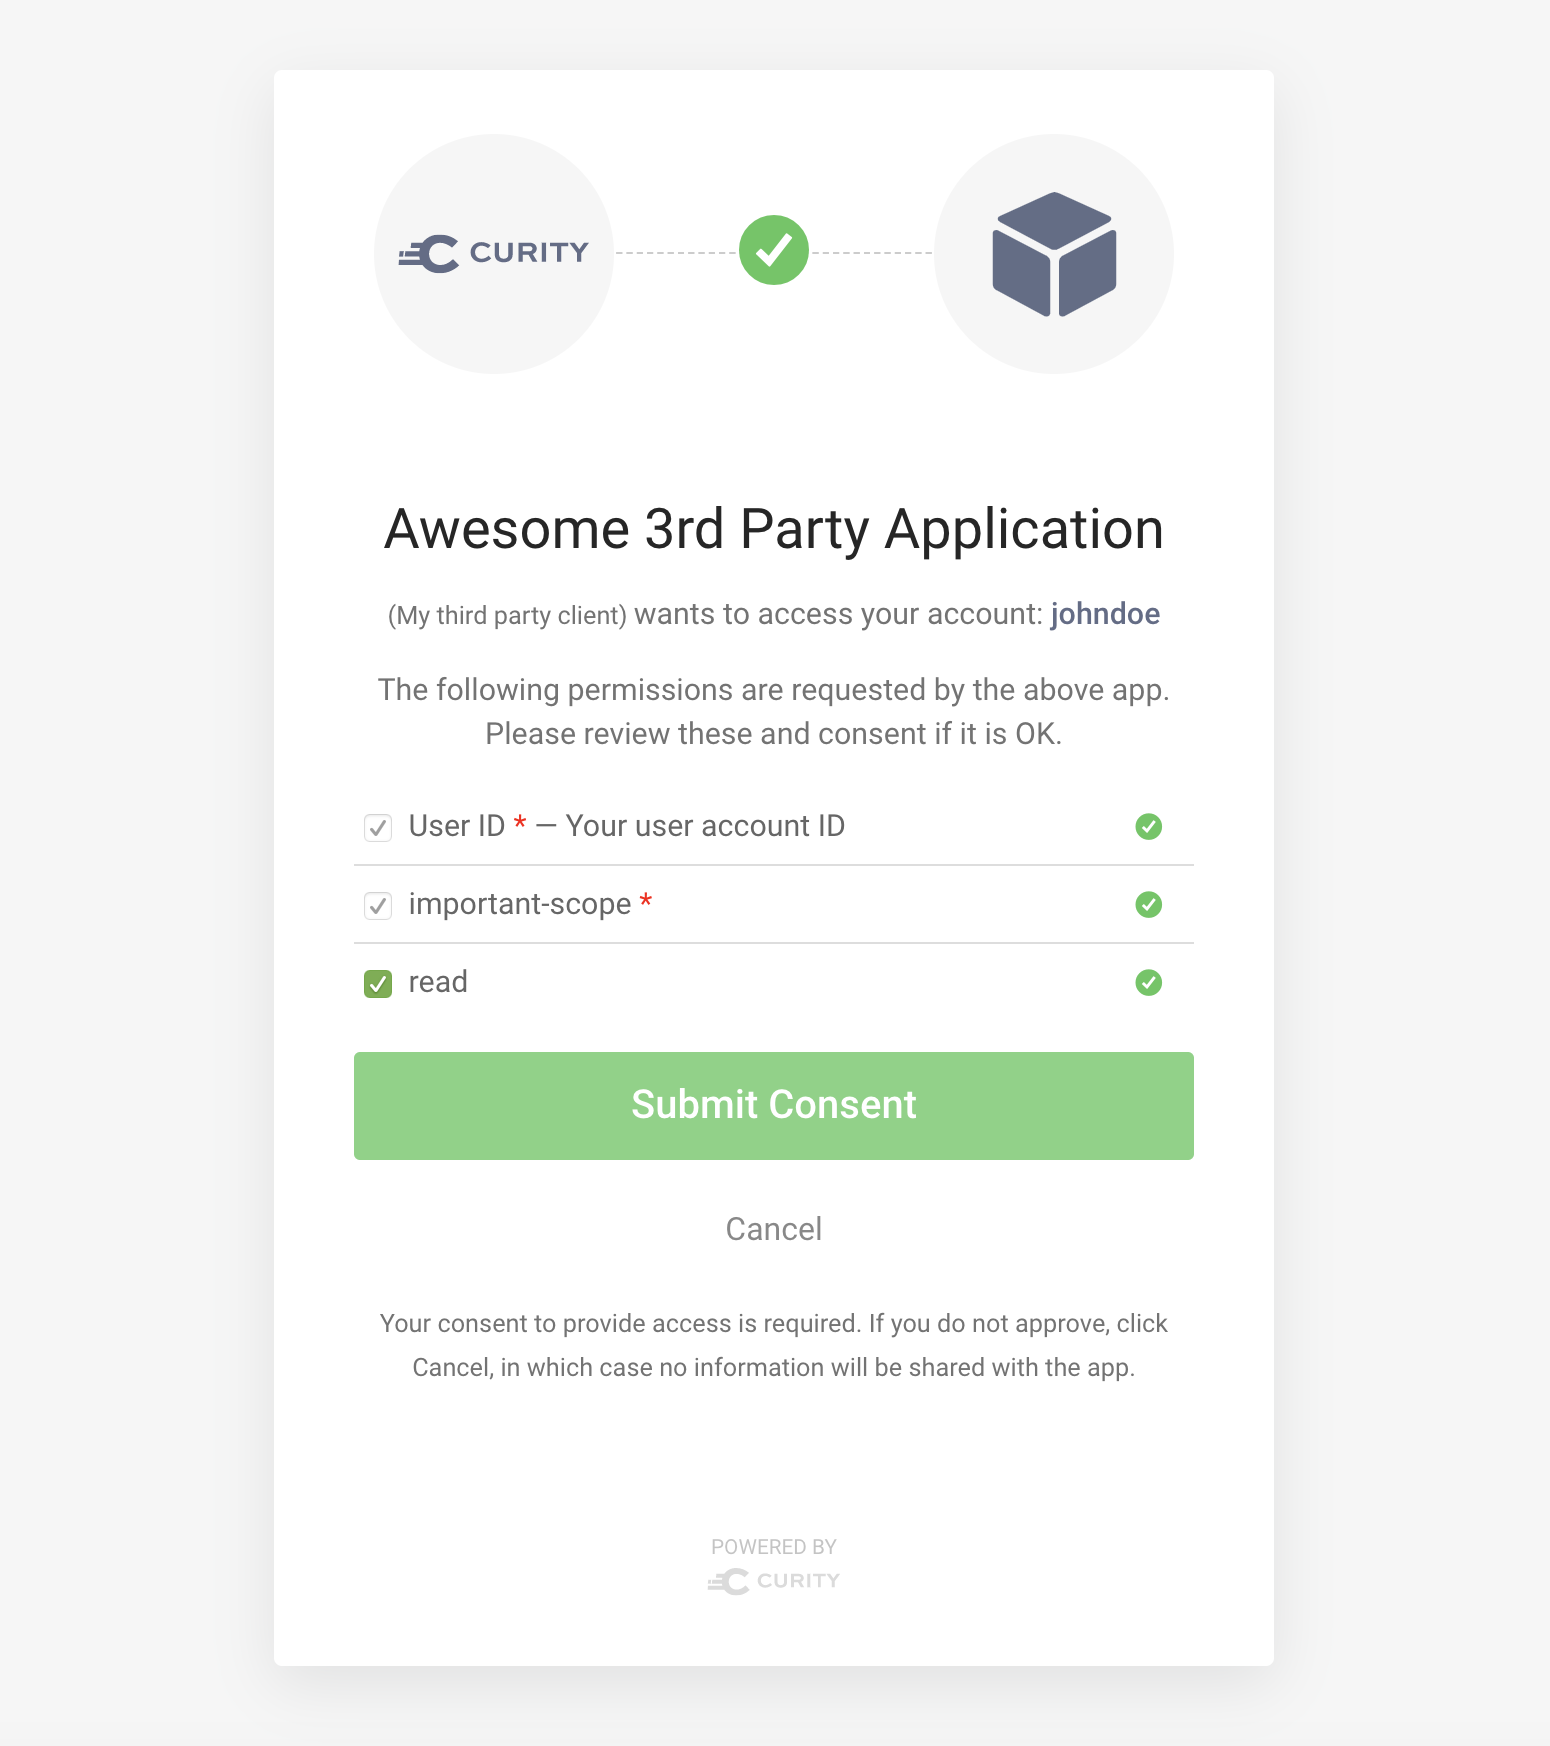
After authenticating, the following screen will be shown, where the user is asked to provide its consent to authorizing the client to get a token on its behalf:

Go ahead, allow the tokens to be issued, and you will be redirected back to the client's redirect uri with the authorization code as usual. To get the tokens continue with the second part of the code flow.
curl -X POST \https://localhost:8443/oauth/v2/oauth-token \-H 'Content-Type: application/x-www-form-urlencoded' \-d 'grant_type=authorization_code&client_id=third-party&client_secret=THE_SECRET&code=THE_AUTHORIZATION_CODE&redirect_uri=https%3A%2F%2Flocalhost%2Fcallback'
Complete the flow
The code flow will not persist the consented scopes until the second part of the flow has executed.
Re-Use of Active User Consent
Now that a delegation that is bound to the user as well as to the consented-to scope openid is issued, it will be
known to the Curity Identity Server that the user has consented to releasing access to this scope. Given the previous step has resulted
in the issuance of a token after you consented to the request, try to make a new request for a token by the client for
the same scope. You can use the exact same url to initiate the second request (remember it's good practice to make the
value for state unique for each request)
https://localhost:8443/oauth/v2/oauth-authorize?response_type=code&client_id=third-party&scope=openid+read&state=cde456&redirect_uri=https://localhost/callback
You can see now that both SSO and re-use of user consent kicks in, and the response to this request will be a newly issued code.
Controlling Consent
If the admin doesn't configure the client to force consent as we did above, the client can still tell the server to show the consent screen using the prompt parameter.
Make a Client Request with prompt=consent, prompt=allow_scope_deselection
In case you want the user to consent to requested claims, regardless of pre-existing delegations, you can make that
same request, but include the parameter prompt=consent in the querystring, like:
https://localhost:8443/oauth/v2/oauth-authorize?response_type=code&client_id=third-party&scope=openid+read&state=efg789&prompt=consent&redirect_uri=https://localhost/callback
Notice how, after authenticating, possibly through SSO, the consent screen is being shown as a result of this request.
Try and hit Cancel. The response will now be a redirect back to the client that includes an error in the fragment.
This will inform the client with the reason why the response did not contain a token, as was requested.
Allow Consent Deselection
When a request to authorize a token is being made, the client typically includes scopes or claims, to represent the type of
access it desires. It is good practice to ask for the minimal set of scopes, in which case the client needs all scopes
to be able to perform the tasks it intends to perform using the token. Some scopes or claims can be optional however.
An example would be the firstname claim - a client would like to know this, but if it does not have access to it, it
might still be able to carry on with its work. In this case, the user may be given the choice to deselect access to
particular requested claims.
We configured the client to allow scope deselection, but alternatively, the client can indicate on a per-request basis whether scope deselection is allowed.
If you make the request again, and deselect the read scope the client will now be issued a code that when exchanged for tokens will contain only the openid scope. Try it out by browsing to the following URL:
https://localhost:8443/oauth/v2/oauth-authorize?response_type=code&client_id=third-party&scope=openid+read&state=efg789&prompt=consent&redirect_uri=https://localhost/callback
Consent Deselection per Request
If the client doesn't have Allow Deselection enabled, it can still enable it on its own. This is done using the prompt parameter again with the value consent_allow_deselection.
"prompt=consent_allow_deselection"
Scopes and Consent
Required Scopes
So far, we've been making requests using the scopes openid and read, both of which are configured as non-required
scopes. Sometimes we have scopes we know the client will always need in order to be able to call the APIs.
Let's add a new scope, and enable it on the client. This scope should be marked as required which will enforce that the client must request it and get it for a successful flow.
Create New Scope
Visit the Scopes page in the Token Service and click Add Scope.
Give it the name important-scope and slide the Required toggle to on.

Add the Scope to the Client
Visit the Clients page and edit the third-party client. Scroll down to the OAuth / OpenID Settings and add the scope important-scope from the list.
Commit
Make sure to remember to commit the changes in the Changes -> Commit menu.
Request New Tokens
Now send a new request with the important-scope included. This time you can notice that the new scope is present but is not de-selectable. In fact, if the client makes a request without this scope, the request will fail. Enter the following URL in your browser to try it out:
https://localhost:8443/oauth/v2/oauth-authorize?response_type=code&client_id=third-party&scope=openid+read+important-scope&state=efg789&prompt=consent&redirect_uri=https://localhost/callback
The resulting screen will have the important-scope enforced:
Extra
Deleting Delegations from the Database
To perform simple database management, you can use the hsqltool that is included in the bin/ directory of the
installation directory. In case the server is running, connect to the database as a server (instead of pointing to the
files and requiring a lock on them). Delete all issued tokens and delegations by issuing the following command from
the commandline:
bin/hsqltool --inlineRc=url=jdbc:hsqldb:hsql://localhost:9001/db,user=sa,password= --sql "DELETE FROM \"tokens\"; DELETE FROM \"delegations\";"
Customer Stories
Learn how organizations run identity and API security at scale.
Read customer storiesWas this helpful?