Testing the Curity Identity Server
On this page
When building OAuth secured software, companies often perform end-to-end tests to verify that authentication works in apps and that they then receive the correct tokens. When you want to test only the Curity Identity Server, it can be more productive to test it in isolation. This tutorial shows how this can be done. It also shows an example implementation of a testing workflow using GitHub Actions.
When and What to Test
Obviously, there is no need to cover all features of the Curity Identity Server with tests, as this has already been taken care of by Curity. Still, there are scenarios in which you will want to set up your own testing pipeline for the Curity Identity Server. Here are some examples.
-
Test whether the Curity Identity Server correctly starts up after changes to configuration are made. This can also be used to verify that your current configuration works fine with a new version of the Curity Identity Server. This is the easiest scenario to test, as all you need to verify is whether the instance starts up.
-
Verify whether the Curity Identity Server works as expected with your version of the configuration, especially when changes are introduced to the configuration. Some scenarios where you would want to run such tests might include:
- Verify that the chain of actions in an authentication flow works as expected. Verify that concrete action results are applied and concrete authenticators are called when expected.
- Verify that claim mappers work as expected and produce tokens with correct claim values.
- Verify whether any scripted procedures produce the expected outcome to an OAuth flow.
These tests will also prove useful when verifying whether the configuration works as expected with a new version of the Curity Identity Server.
-
If you write your own SDK plugins you might want to create end-to-end tests that utilize all components and thus create additional level of automated testing. This will compliment any unit tests or functional tests that you might write for the plugin itself. Again, an automated end-to-end test will help you make sure that your plugin works with new versions of the Curity Identity Server.
Steps of an End-to-End Test
Wherever you decide to run your automated end-to-end tests, there are some steps that you have to follow. Below you will find outlined the usual steps that you will need in order to run a test of the Curity Identity Server (or of a larger system that uses the Curity Identity Server as its component). In the next part you will see how these steps are implemented as a GitHub Actions workflow.
Get a License
In order to run an instance of the Curity Identity Server you will need a license. Make sure that the license is available in an environment variable of the environment that will be running the test suite.
Prepare the Config File
You will need a configuration file that the Curity Identity Server will use. If you want to run tests of your production instance then the simplest way is to dump your current configuration. You can either do it with a command $IDSVR_HOME/bin/idsvr -d > config.xml, or use the Changes -> Download menu option from the admin UI.
In the dumped configuration file make sure that you have an environment variable reference to the license, not the actual license embedded. E.g. if your environment variable is called TEST_LICENSE, then make sure you have this entry in the config file:
<config xmlns="http://tail-f.com/ns/config/1.0">...<processing xmlns="https://curity.se/ns/conf/base"><license-key>#{TEST_LICENSE}</license-key>...</processing></config>
You can skip this and the previous step if you run the tests in a private environment, where it's fine to have the license embedded in the config file. Make sure though, that no one unauthorized has access to the license.
Make sure to also configure other settings that are relevant to the environment where the tests will run. E.g. if during the test the Curity Identity Server is supposed to contact any external services, make sure that proper addresses are used, like the database host, etc. You can use parametrized configuration entries as shown in the license example to externalize any values.
By using configuration parametrized with variables, the same configuration XML file can be used for all stages of your pipeline. If you're able to use the same configuration for all your environments, we recommend using parameters, as once your automated tests pass for an early test stage, you will then have confidence that all other stages are working.
If you only want to test some parts of your setup, e.g. just the plugin you wrote, or an authentication flow, etc. you might want to simplify the configuration. For example, if your production setup runs in a cluster, you might want to switch to a single instance. Or instead of using an external database, you might want to use the built-in SQLite option, etc.
Prepare Database and Additional Services
If your instance of the Curity Identity Server needs it, prepare instances or containers for the database and any other services that will be needed to run an end-to-end test.
Prepare the Plugin JAR
If you're testing an SDK plugin, make sure to make the JAR available to your instance of the Curity Identity Server. This might involve building the plugin (usually with the command mvn package) and mounting the JAR files as a volume on the Docker container that will run the Curity Identity Server. If you are running the Server directly in an environment (not in a container), then the plugin JAR files have to be copied to the $IDSVR_HOME/usr/share/plugins/plugin_name folder (plugin_name can be any arbitrary name). Make sure to copy all the dependency JARs together with the plugin JAR.
Start the Curity Identity Server (Container)
The simplest way to run an end-to-end test with the Curity Identity Server is to run the Server in a docker container. You can do it with a command similar to this:
docker run -d --rm -e PASSWORD=Password1 -e TEST_LICENSE=$TEST_LICENSE -v /path/to/plugin-jars:/opt/idsvr/usr/share/plugins/my-plugin -v /path/to/config.xml:/opt/idsvr/etc/init/config.xml -p 6749:6749 -p 8443:8443 curity.azurecr.io/curity/idsvr:latest
- Environment variables are passed using the
-eparameter. Make sure that you pass all environment variables that are used as parameters in the config file. path/to/plugin-jarsis the absolute path to the folder containing the plugin JARs.path/to/config.xmlis the absolute path to the config file.
Alternatively, you can run the Curity Identity Server directly from the environment where you run your tests. To make that work you will have to copy the contents of the downloaded archive containing the Curity Identity Server runtime. Then, copy the license file to $IDSVR_HOME/etc/init/license and the config file to $IDSVR_HOME/etc/init. You will also have to copy the plugin files as noted in the previous section.
Verify That the Curity Identity Server has Started
Before you run any tests, you need to make sure that the Curity Identity Server has started and is ready to serve traffic. In some scenarios this will be all you want to test, so it will be the last step in the workflow. There is a convenience script provided by Curity that is able to check whether the Curity Identity Server is ready to accept connections. You can find the script in this GitHub repository. The script assumes that restconf is enabled in the system and that the Admin Service's base URL is the default https://localhost:6749. The script needs these three environment variables to run:
- ADMIN_USER - the username of the admin user
- ADMIN_PASSWORD - the password of the admin user
- WAIT_TIMEOUT - how many seconds should the script wait for the Curity Identity Server to start
Start Additional Services
Make sure that you start any services that your instance of the Curity Identity Server needs for the tests. Things like databases or external services that authentication actions call, etc. At this point you might also need to configure the testing environment — maybe an entry needs to be added to /etc/hosts so that a service is reachable through a domain, etc. A more sophisticated test suite might use a simple frontend page that will make requests to the Curity Identity Server, exchange code for tokens, print token claims, etc. Such a frontend app should be started up at this stage.
Run Test Suite
Run the test suite of your choice. At Curity we use the Cypress framework to create end-to-end tests which rely on a browser. Cypress is able to run in any major browser, open pages, click on buttons and links, fill forms, etc. It makes a good choice for testing authentication flows of the Curity Identity Server.
One example of a test is where an OpenID Connect hybrid flow is started by navigating to the authorization URL. The test will then follow the authentication flow and then inspect the resulting ID token to verify concrete claims. E.g. claims set by a transformation procedure. This can be easily extended to verify claims of an access token or refresh token. The test could also use the obtained access token to call an API, etc.
Note that you will need a client to run an OAuth/OIDC flow. This can be a client that is already present in your configuration, or you will need to add a new one.
If you decide to go with Cypress, there is simple library which adds some convenience Cypress commands that facilitate starting an authorization flow and verifying incoming tokens. You can find the library on npm: @curity/cypress-commands.
Setting up a GitHub Actions Workflow
Curity's Open Source plugins that you can find on GitHub use the GitHub Actions workflows to run end-to-end tests. You can have a look at these two examples to see how the workflows are configured. In the repositories you will also find the Curity Identity Server's configuration files, and you can study the Cypress test files to see how the tests are written.
See the workflow in action
If you want to check out how these workflows work in action the simplest way is to clone one of the repositories. You will then be able to run the tests manually from the Actions menu of your forked repo. Remember to set any environment variables used by the workflow.
It's also possible to run the workflow locally, using the act tool. See this README to learn how to run our workflows with act.
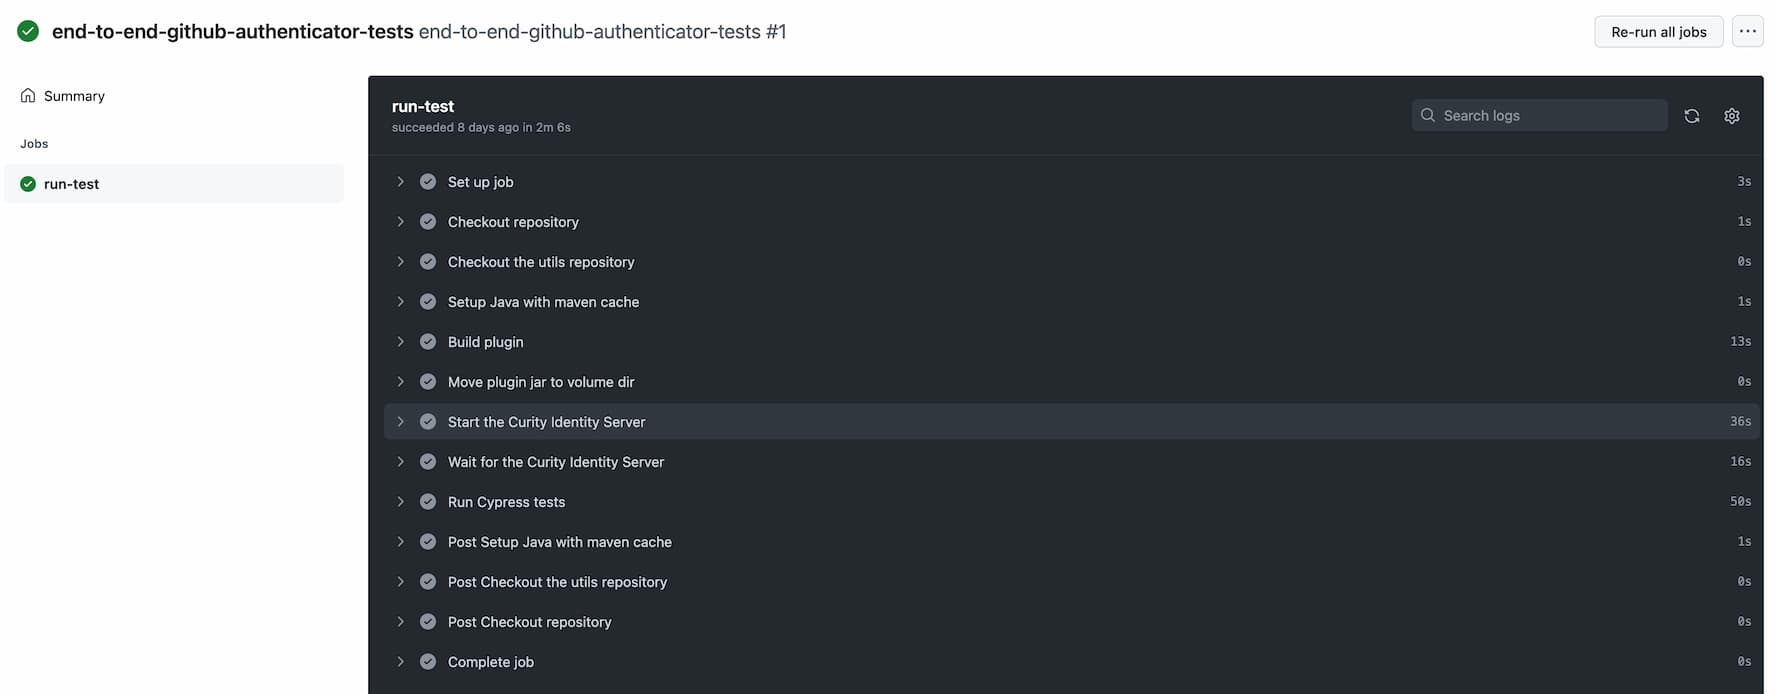
Below is the workflow file from the Redirect Authentication Action repository. To test the action, the example API is spun up together with the Curity Identity Server. Then a Cypress test is run, that performs a hybrid OIDC flow and verifies that the resulting ID Token contains claims with values set by the authentication action. See the comments in each step to learn what each concrete step does.
name: end-to-end-github-authenticator-testson: workflow_dispatchjobs:run-test:runs-on: ubuntu-lateststeps:# A domain needs to be set up at the virtual machine which runs the workflow. The domain is used by the example API.- name: Configure domain for example redirect servicerun: echo "127.0.0.1 redirect.example.com" >> /etc/hosts# The usual checkout of the tested repository is done in this step.- name: Checkout repository with pluginuses: actions/checkout@v3# The workflow also checks out the utility repository to use the healthcheck script.- name: Checkout the utils repositoryuses: actions/checkout@v3with:repository: curityio/github-actions-utilitiespath: utils# Java is required in order to build the plugin.- name: Setup Java with maven cacheif: ${{ !env.ACT }} # Run only in GitHub - see readme in curityio/github-actions-utilities to learn how to run GitHub Actions workflows on a dev machine.uses: actions/setup-java@v3with:distribution: 'temurin'java-version: '17'cache: maven# The plugin JAR is built.- name: Build pluginrun: cd identityserver.plugins.authenticationactions.redirect-action && mvn package# The plugin JAR is moved to a folder that will be mounted in the docker container.- name: Move plugin jar to volume dirrun: mv identityserver.plugins.authenticationactions.redirect-action/target/*.jar plugin/# The Curity Identity Server is started with all the necessary volumes and environment variables. The license is kept in a GitHub Actions secret.- name: Start the Curity Identity Serverenv:TEST_LICENSE: ${{ secrets.idsvr_license }}run: docker run -d --rm --add-host=redirect.example.com:host-gateway -e PASSWORD=Password1 -e TEST_LICENSE=$TEST_LICENSE -v $GITHUB_WORKSPACE/plugin:/opt/idsvr/usr/share/plugins/redirect-action -v $GITHUB_WORKSPACE/tests/idsvr/config.xml:/opt/idsvr/etc/init/config.xml -p 6749:6749 -p 8443:8443 curity.azurecr.io/curity/idsvr:latest# The Curity Identity Server healthcheck script is called.- name: Wait for the Curity Identity Serverrun: ./utils/scripts/healthCheckIdsvr.shenv:ADMIN_USER: adminADMIN_PASSWORD: Password1WAIT_TIMEOUT: 60# The example API is built and started, using Maven.- name: Build the example apprun: cd example && mvn install- name: Start the example apprun: cd example && mvn spring-boot:start# Finally, the end-to-end tests are run.- name: Run Cypress testsuses: cypress-io/github-action@v4with:working-directory: testswaitOn: http://localhost:8080
The workflow is run manually, and GitHub shows a summary result each time the job is run.
Conclusion
Creating end-to-end tests that use the Curity Identity Server can be done in a few simple steps, and is a great way to ensure that your configuration remains reliable over time. These tests can run whenever you commit code changes, including when you upgrade to new versions. With the help of tools like Cypress, Docker or bash it's simple to create automated tests that help increase the stability of your system.
Customer Stories
Learn how organizations run identity and API security at scale.
Read customer storiesWas this helpful?