Fast Look and Feel Customization with the Admin UI
On this page
When you get started with the Curity Identity Server, use the Admin UI of either a local or deployed system to quickly customize the look and feel of customer-facing identity screens. You can create a global look and feel, or multiple themes that you apply to sets of particular clients. Typically, those clients initiate logins using either the OAuth or SAML protocols.
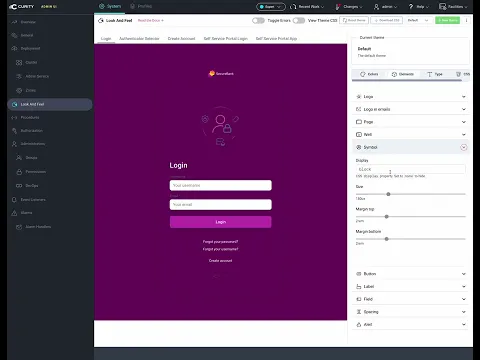
In the Admin UI, navigate to System → Look and Feel. That page presents a visual editor where you can quickly change visual elements and get fast feedback for a set of example login screens. Admin UI changes update the look and feel for HTML login screens, the HAAPI React App's API-driven login screens, and the User Self-Service Portal.
Look and Feel Customizations
A common early task is to add your company logo to customer-facing identity screens. When doing so, you can remove the default symbol and the Powered by Curity logo, by setting their Display property to a value of none.
Make simple global customizations with the Admin UI controls, to update settings like colors, spacing and rounding of corners. Use the example screens until you achieve your preferred appearance. Then, use the Changes → Commit menu item and changes will immediately come into effect for all runtime nodes of the Curity Identity Server.
Every customization you make is mapped to a CSS custom property. You can switch to the raw mode by clicking View Theme CSS in the toolbar. The CSS tab of the right hand pane enables you to insert custom CSS.
The default global look and feel results in a theme with a fixed name that is applied system wide. During customization you can revert edits to a previous saved configuration, or reset all theme values to their defaults.
Custom Themes
The Admin UI allows creation of multiple custom themes, each with their own name and an optional description. To create a custom theme, click the "+ New theme" option in the toolbar. You can also duplicate an existing theme. Click the trash icon to remove a custom theme. Modify custom themes in the same ways as for the default theme.
Once you have a custom theme, you can assign it to a client. To do so, navigate to Profiles → Token Service → Clients in the Admin UI and edit the client. On the User Authentication tab, assign the theme to the client. The following example assigns a particular theme to a client, to provide it with a branded login user experience.
Alternatively, you can assign a custom theme to an instance of any form-based authenticator or authentication action. To do so, navigate to Profiles → Authentication Service and edit the instance. Select the More tab for authenticators or the Advanced tab for authentication actions, and then choose your preferred theme from the dropdown. Commit changes to activate the theme for all clients that use the authenticator or authentication action.
Video Walkthrough
The following short video shows the approach to quickly implement a preferred look and feel, to enable branded login screens:
Deploying Changes
After you commit changes in the Admin UI, back up themes with your other identity settings. The following snippets show some example themes created in the Admin UI, which are saved in a Base64 encoded format.
<config xmlns="http://tail-f.com/ns/config/1.0"><environments xmlns="https://curity.se/ns/conf/base"><environment><themes><default-theme><theme-css-properties>Cjpyb290IHsKICAtLWJ1dHRvbi1iYWNrZ3JvdW5kLWNvbG9yOiAjM2M1MzMyOwogIC0tZm9ybS1sYWJlbC1saW5lLWhlaWdodDogMS41cmVtOwogIC0tZm9ybS1maWVsZC1jb2xvcjogIzgxNWY1ZjsKICAtLWZvcm0tbGFiZWwtY29sb3I6ICNkYjQ4NDg7Cn0=</theme-css-properties></default-theme><custom-themes><custom-theme><name>brand1</name><theme-css-properties>Cjpyb290IHsKICAtLWZvcm0tbGFiZWwtY29sb3I6ICNkMWRkMmM7CiAgLS1mb3JtLWZpZWxkLWJhY2tncm91bmQtY29sb3I6ICNlOTJiMmI7Cn0=</theme-css-properties></custom-theme><custom-theme><name>brand2</name></custom-theme></custom-themes></themes></environment></environments></config>
When the Curity Identity Server deploys themes, they get served to the browser during HTML downloads. During HTML processing, velocity templates use the ${_configured_ui_theme_css_path} variable to reference the Admin UI default theme and the ${_configured_ui_custom_theme_css_path} variable to reference the configured Admin UI custom theme (when applicable).
#if ($_configured_ui_theme_css_path)<link rel="stylesheet" href="${_configured_ui_theme_css_path}"/>#end#if ($_configured_ui_custom_theme_css_path)<link rel="stylesheet" href="${_configured_ui_custom_theme_css_path}">#end
Detailed CSS Customization
The Curity Identity Server also supports advanced customization, including the use of third party CSS frameworks. Start with the Admin UI's visual editor and save themes to XML configuration. To make deeper customizations, use an online Base64 decoder to export themes to CSS files, and then implement Extended Look and Feel Customization with UI Kit.
Even if you do not plan to implement detailed CSS customizations, read that tutorial to learn how to customize labels, and to understand the templating system and delivery mechanisms that overrides and template areas enable. You can then use those mechansims for HTML login screens, API-driven login screens and the User Self-Service Portal.
Conclusion
You can quickly customize the look and feel of customer-facing screens using the Admin UI for the Curity Identity Server. If this does not meet your needs then UI Kit enables you to make more advanced customizations. Read much more about theming in the Customize Branding per Application docs.
Customer Stories
Learn how organizations run identity and API security at scale.
Read customer storiesWas this helpful?