Import and Export Configurations
On this page
There are several ways to manage configurations in the Curity Identity Server. This article outlines different options to import and export configurations. It exemplifies how to use configuration snippets that can be imported and merged with the running configuration of an instance.
Example Configuration
Working example configurations for different versions of the Curity Identity Server are available through the Developer Portal.
Import
Importing a configuration, complete or partial, is very straightforward using the Admin UI. Simply navigate to Changes → Upload, then select or drag & drop a file to the Upload Configuration area.
The Curity Identity Server provided CLI idsh can be used to import both complete and partial configurations. Whether to fully overwrite the existing configuration or merging with the existing configuration is specified when running the load command. Example commands to import and merge a configuration using idsh:
idshconfigureload merge ./my-config.xmlcommitexitexit
Replace or Override
There are two options for importing a full configuration using idsh, replace or override.
replacewill fully replace the configuration parts that are in the file that is being loaded.overridewill first delete the currently running configuration and then load the configuration from the file.
Refer to the Introduction to the CLI article for an overview of the CLI.
The idsvr command can be used to import a complete configuration.
Configuration will be replaced
Using this option to import the configuration will effectively replace the existing running configuration. It is not possible to merge a configuration using idsvr.
idsvr --load-config backup.xml
The Curity Identity Server exposes a RESTCONF API for configuration management. Two media types are supported, application/yang-data+xml and application/yang-data+json. For consistency the application/yang-data+xml media type will be used in examples below.
Full configuration
A full configuration can be uploaded and either fully replace the running configuration or the configuration uploaded can be merged with the running configuration. This is achieved by using either the PUT or PATCH method.
PATCHmerges the configuration but will not delete an existing configuration element if it does not exist in the configuration that is being uploaded.PUThowever merges the config and does remove a configuration element if it does not exist in the configuration that is being uploaded.
XML root element
Note that when a configuration is exported using any of the other methods (Admin UI, CLI or idsvr), the configuration will have the config xmlns="http://tail-f.com/ns/config/1.0"> root element. The RESTCONF API however requires that the root element is <data xmlns="urn:ietf:params:xml:ns:yang:ietf-restconf">.
The full configuration can be uploaded to the base path of the RESTCONF API that is /admin/api/restconf/data.
curl -k --request PUT \--url 'https://localhost:6749/admin/api/restconf/data' \--header 'Authorization: Bearer _0XBPWQQ_48025ef1-b9b1-4b90-a590-6db51c330671' \--header 'Content-Type: application/yang-data+xml' \--data @example-config.xml
Merge a new Partial Configuration
The example creates a new client by merging a client configuration snippet with the existing configuration. In this example the configuration is held in a file (client-config.xml) just as an example. The configuration is POSTed to the client specific path of the RESTCONF API. Review the Introduction to the RESTCONF Admin API recording to learn how to determine the path for a given resource.
curl --request POST \--url 'https://localhost:6749/admin/api/restconf/data/base:profiles/base:profile=token-service,oauth-service/base:settings/profile-oauth:authorization-server/profile-oauth:client-store/profile-oauth:config-backed' \--header 'Authorization: Bearer _0XBPWQQ_1deb9b87-347b-4323-9bca-e1597174b8c7' \--header 'Content-Type: application/yang-data+xml' \--data @client-config.xml
The contents of the file (client-config.xml) in this example is:
<client xmlns="https://curity.se/ns/conf/profile/oauth"><id>my-client</id><secret>$5$4lzvhAxAUwHG4osE$2vrfdfssj3ZIT3kXrfksdfsfxvv/FhK94i5gmJBLdr8bH5</secret><redirect-uris>https://localhost/callback</redirect-uris><scope>email</scope><user-authentication><allowed-authenticators>Yubikey</allowed-authenticators></user-authentication><capabilities><code/></capabilities></client>
Update an existing configuration
A given existing configuration can also be updated by merging a new configuration. Here the data is passed as part of the curl command instead of in a file just to showcase a different method. Note that a new redirect URI is added.
curl --request PUT \--url 'https://localhost:6749/admin/api/restconf/data/base:profiles/base:profile=token-service,oauth-service/base:settings/profile-oauth:authorization-server/profile-oauth:client-store/profile-oauth:config-backed/profile-oauth:client=my-client' \--header 'Authorization: Bearer _0XBPWQQ_1deb9b87-347b-4323-9bca-e1597174b8c7' \--header 'Content-Type: application/yang-data+xml' \--data '<clientxmlns="https://curity.se/ns/conf/profile/oauth"xmlns:as="https://curity.se/ns/conf/profile/oauth"xmlns:base="https://curity.se/ns/conf/base"><id>my-client</id><secret>$5$4lzvhAxAUwHG4osE$2vmgyfA8j3ZIT3kXrfkk8xvv/FhK94i5gmJBLdr8bH5</secret><redirect-uris>https://localhost/callback</redirect-uris><redirect-uris>https://localhost/callback-new</redirect-uris><scope>email</scope><user-authentication><allowed-authenticators>Yubikey</allowed-authenticators></user-authentication><capabilities><code></code></capabilities></client>'
Difference between PATCH and PUT
PATCHmerges the configuration but will not delete an existing configuration element if it does not exist in the configuration that is being uploaded.PUThowever merges the config and does remove a configuration element if it does not exist in the configuration that is being uploaded.
Merge or Replace
When importing a configuration, using the Admin UI, CLI or RESTCONF, it is possible to either fully replace the existing configuration or merging what's being imported with the current configuration.
Merge
Merging a configuration that is uploaded will combine the currently running configuration with the one being imported. This is a very useful option if, for example, a complete client configuration or an authenticator configuration is held in its own separate configuration file.
Replace
Choosing to replace the configuration will fully overwrite the configuration in place with the one held in the file selected for import. The option is straight forward. However, take into account that replacing the full configuration may change the running configuration and have immediate effect on the accessibility of the Admin UI.
This option also allows for parts of the configuration to be deleted. Deleting parts of the configuration is not possible when merging the configuration.
Configuration will be replaced
Using this option to import the configuration will replace the existing configuration and typically only make sense when being replaced with a complete configuration and not a partial configuration.
Export
Both the full configuration of a system or a partial configuration can be exported using various methods.
Full Configuration
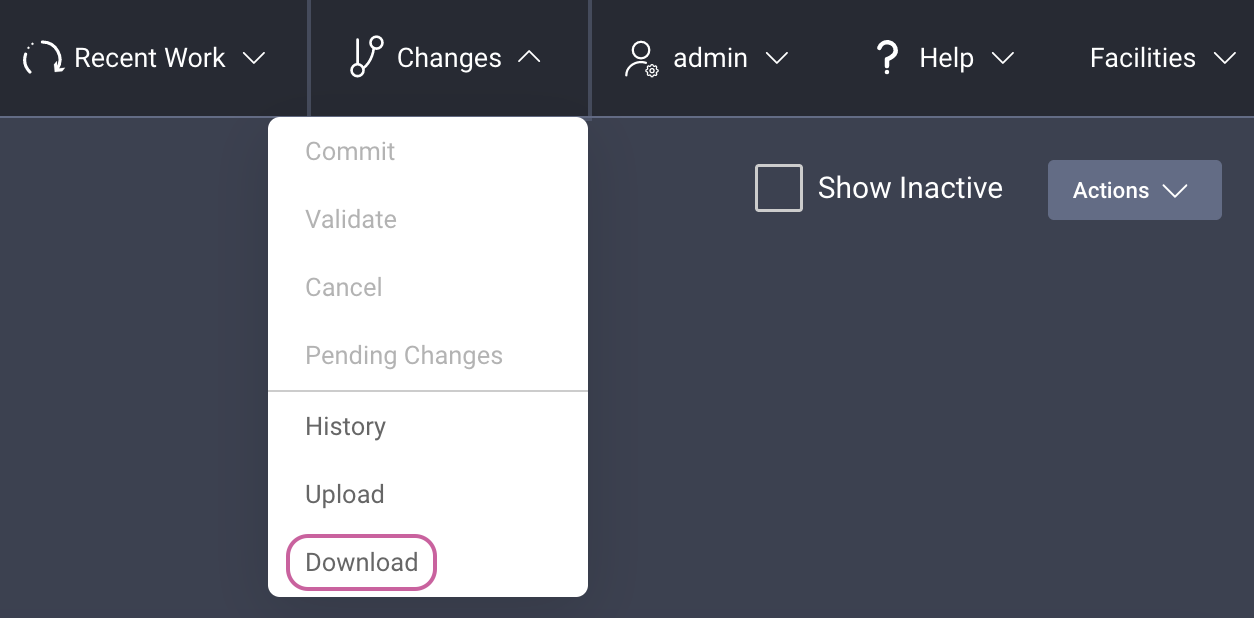
To export the full configuration, navigate to Changes → Download. This will download the full configuration as a file with the name curity-config.xml.
Partial Configuration
It is possible to download a partial configuration throughout the Admin UI. Below is an example of an Authenticator configuration. Note the Download as XML button that will download only the specific configuration in view (the Authenticator).
For some views in the Admin UI this option is accessible via the 3-dot menu.
The format of the configuration export using the CLI can vary. However, the system in many cases expects XML and therefore this is the recommended format.
Full Configuration
Example commands to export the full configuration as XML to a file with the name backup.xml:
idshshow configuration | display xml | save ./backup.xmlexit
Partial Configuration
It is also possible to export only a part of the configuration using the CLI. Example commands to export the configuration of an authenticator (MyWebAuthnAuthenticator):
idshshow configuration profiles profile authentication-service authentication-service settings authentication-service authenticators authenticator MyWebAuthnAuthenticator | display xml | save ./my_webauthn_authenticator_config.xmlexit
The idsvr binary can be used to export the full configuration as well as a partial configuration.
Full Configuration
To export the full configuration to a file named backup.xml:
idsvr --dump-config >> backup.xml
Partial Configuration
A <CONFIG_PATH> can be used with the --dump-config parameter to export a partial configuration. The following command provides a <CONFIG_PATH> to export only the MyWebAuthnAuthenticator authenticator config:
idsvr --dump-config "/profiles/profile{authentication-service auth:authentication-service}/settings/auth:authentication-service/authenticators/authenticator{MyWebAuthnAuthenticator}/webauthn:webauthn" >> my_webauthn_authenticator_config.xml
The below command shows how idsh can be used to determine what the <CONFIG_PATH> for a given part of the configuration is:
./idsh <<< "show configuration profiles profile authentication-service authentication-service settings authentication-service authenticators authenticator webauthn | display keypath" | head -n 1
Full Configuration
The full configuration of a running system can be exported using the RESTCONF API with the following GET request. This downloads the config to a file with the name complete-config.xml.
curl --request GET \--url 'https://localhost:6749/admin/api/restconf/data?content=config' \--output complete-config.xml \--header 'Authorization: Bearer _0XBPWQQ_ccd1bc8f-9631-43ce-9a32-0439a5e3a9ab' \--header 'Content-Type: application/yang-data+xml'
Partial Configuration
A partial configuration can be downloaded through a GET request to the specific configuration path. Review the Introduction to the RESTCONF Admin API recording to learn how to determine the path for a given resource.
curl --request GET \--url 'https://localhost:6749/admin/api/restconf/data/base:profiles/base:profile=token-service,oauth-service/base:settings/profile-oauth:authorization-server/profile-oauth:client-store/profile-oauth:config-backed/profile-oauth:client=my-client' \--output client-config.xml \--header 'Authorization: Bearer _0XBPWQQ_1deb9b87-347b-4323-9bca-e1597174b8c7' \--header 'Content-Type: application/yang-data+xml'
Commit Hooks
It is possible to leverage Commit Hooks to execute scripts when a configuration is committed using the CLI. This could for example be used to push the configuration to an alternative storage at every commit.
Helm Backup Config
When deploying using the Curity Helm Chart, it is possible to set a configuration flag so that the configuration is written to a Secret when committed.Load on First Startup
The Curity Identity Server has the capability to load configuration at startup. Configurations placed in $IDSVR_HOME/etc/init will load the first time the server starts. For a more streamlined configuration management, the configuration placed here can be broken up into separate files if needed. When multiple files are used, they will be merged together and not replaced to overwrite each other.
It is possible to trigger the configuration to be read (in addition to first startup) by running idsvr --force-reload when the server is running. This will replace the currently loaded configuration with the configuration that is in $IDSVR_HOME/etc/init.
In addition, idsvr --reload can be used to merge the configuration that is in $IDSVR_HOME/etc/init with the configuration the server is currently using.
Parameterized configuration
When loading configuration through $IDSVR_HOME/etc/init it is possible to make use of parameters in the configuration. This is very useful to maintain the same configuration across different environments where the parameter loads different values. The value that replaces the parameter in the configuration can be picked up either from a properties file, $IDSVR_HOME/etc/startup.properties, or from an ENV variable of the system.
A part of the configuration could look like this:
<base-url>https://idsvr-dev.example.com</base-url>
Leveraging a parameter, it could be changed to:
<base-url>https://idsvr-#{CURITY_ENVIRONMENT}.example.com</base-url>
It is also possible to set a parameter in the configuration coupled with a default value that is used if the parameter has not been set. In the example below, DEV will be the default value if CURITY_ENVIRONMENT is not set.
<base-url>https://idsvr-#{CURITY_ENVIRONMENT | DEV}.example.com</base-url>
Exporting config with parameters
As described above in the Export section, idsvr can be used to export the full configuration or a partial configuration. When using the --dump-config flag the configuration (or partial configuration if a CONFIG_PATH is provided) is exported with the actual values that was picked up when the configuration was imported. It is also possible to export the parameters by instead using the --dump-config-with-params flag.
Refer to the Parameterized XML Configuration of the product documentation for further details.
Encryption and Crypto
Parts of the configuration can be encrypted, and by default a known key is used. For each deployed system, you should replace this, by setting a unique CONFIG_ENCRYPTION_KEY as an environment variable. More details in the Encrypted Configuration section of the product documentation. Other unique crypto keys for each deployment of the Curity Identity Server also needs to be configured. For more on these topics, see the Configuration as Code tutorial.
Summary
The Curity Identity Server supports several ways of exporting and importing complete or partial configurations. The different alternatives available should be able to cater for many different scenarios.
Customer Stories
Learn how organizations run identity and API security at scale.
Read customer storiesWas this helpful?