Authenticate Using Sign in With Apple
On this page
Intro
Sign in with Apple provides a way for end users to authenticate using familiar credentials. In this article we will show how to integrate Sign in with Apple into one or more apps without requiring code changes. The overall architecture is summarized below and includes use of OAuth tokens after login:

The roles are summarized below, and this provides the preferred architecture, where there is full control over tokens issued to clients and APIs:
- Apple acts as an OpenID Provider and authenticates the user
- The Curity Identity Server acts as a client of Apple for authentication purposes
- The Curity Identity Server issues tokens for use by the client and the APIs it calls
Base Configuration
The Sign in with Apple Developer Article provides step by step instructions on the base setup, which first involves creating these Apple resources:
| Resource | Description |
|---|---|
| Application Id | The application using Sign in with Apple, which in our case is the Curity Identity Server |
| Service Id | The OAuth client details, including the authenticator's Redirect URI |
| Signing Key | Used to digitally sign requests sent to Apple, so that Apple can verify them using the public key |
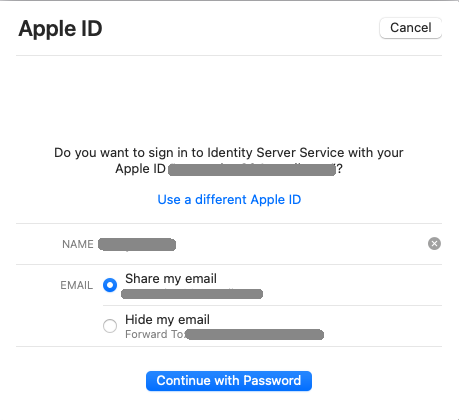
Apple identifiers are then configured in the Curity Identity Server, after which Sign in with Apple is ready to use. A web or mobile client that uses the Apple Authenticator will then be able to sign users in via the Apple ID website, and will not have to enter a password if a compliant browser such as Safari is used:
Testing Sign in with Apple
Once the configuration is complete, you can get Sign in with Apple quickly working using a Web Client, and this can be done without writing any code, via OAuth Tools.
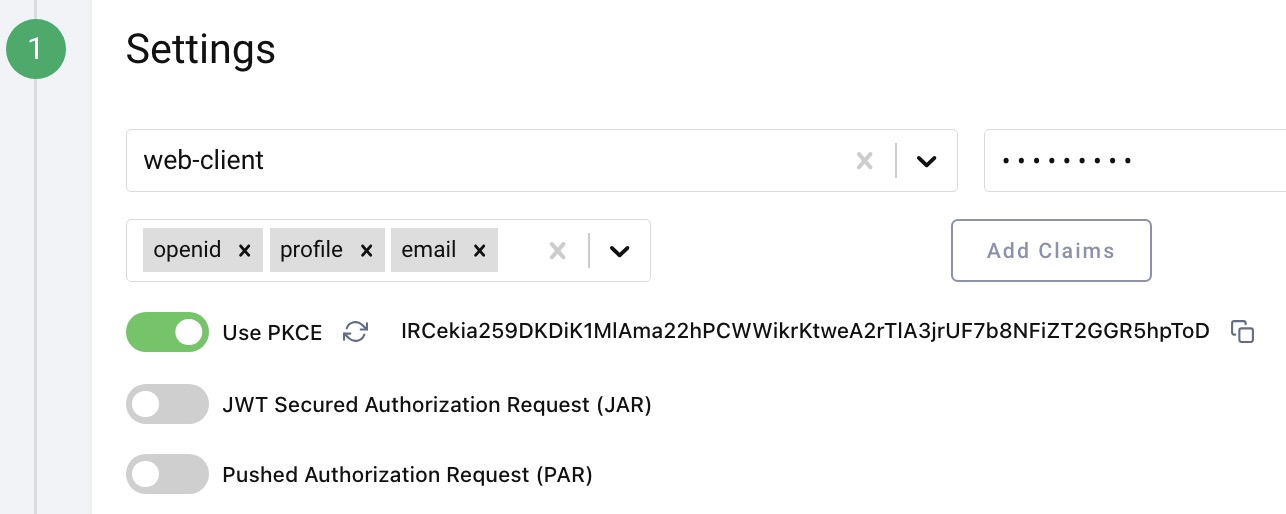
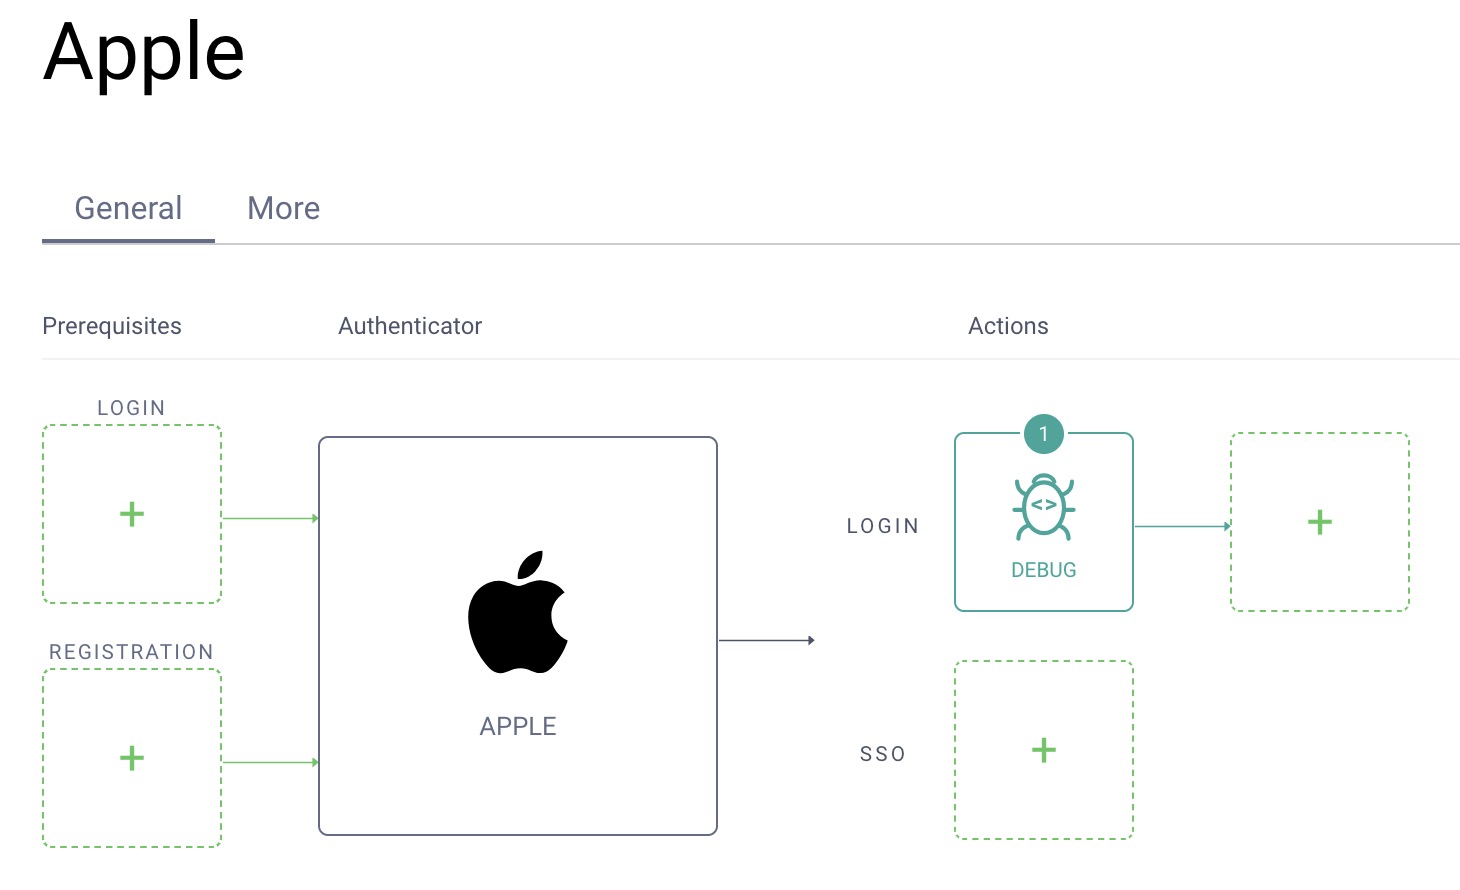
Start by adding the Debug Action to the Apple authenticator, which will enable us to see user attributes returned from Apple during development:
Apple User Attributes
After a user's initial Apple Sign In with the Curity Identity Server, the debug action will show the following data, including a user object with name details:
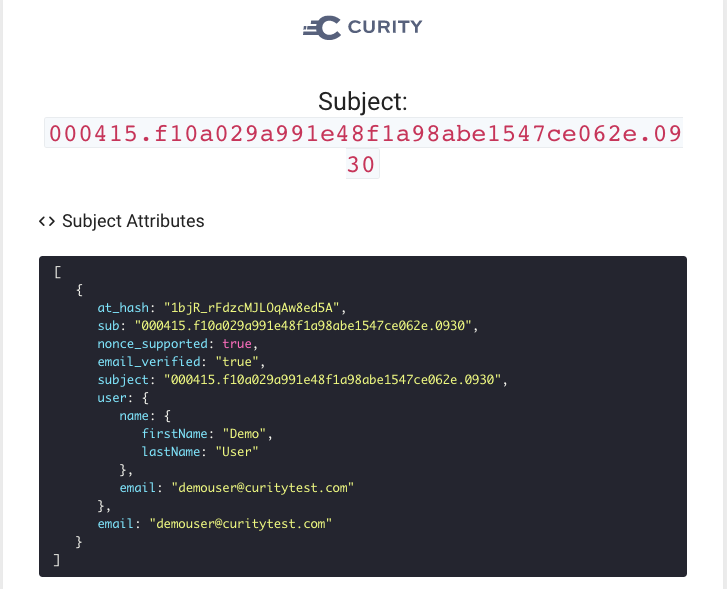
On subsequent logins however, a reduced payload is received, without the name details. To deal with this we will need to persist the Apple user attributes after the initial login, so that they can be looked up on subsequent logins by the same user.
We will show how to make the Curity Identity Server issue the following Apple user attributes as claims for both the initial and subsequent logins. Results will be issued as claims in ID tokens, then returned to OAuth Tools for viewing.
| Claim | Included in Scope | Description |
|---|---|---|
| given_name | profile | The user's first name(s), which applications often want to display |
| family_name | profile | The user's surname, which applications often want to display |
| The user's email, which applications sometimes want to use |
Apple also include their own subject claim that uniquely identifies the Apple user and which remains the same on all subsequent logins.
Saving and Loading Users
The core behavior will be implemented by a Switch Authentication Action that is configured to check for the presence of the user object. When the user object is present, the data it contains will be persisted:
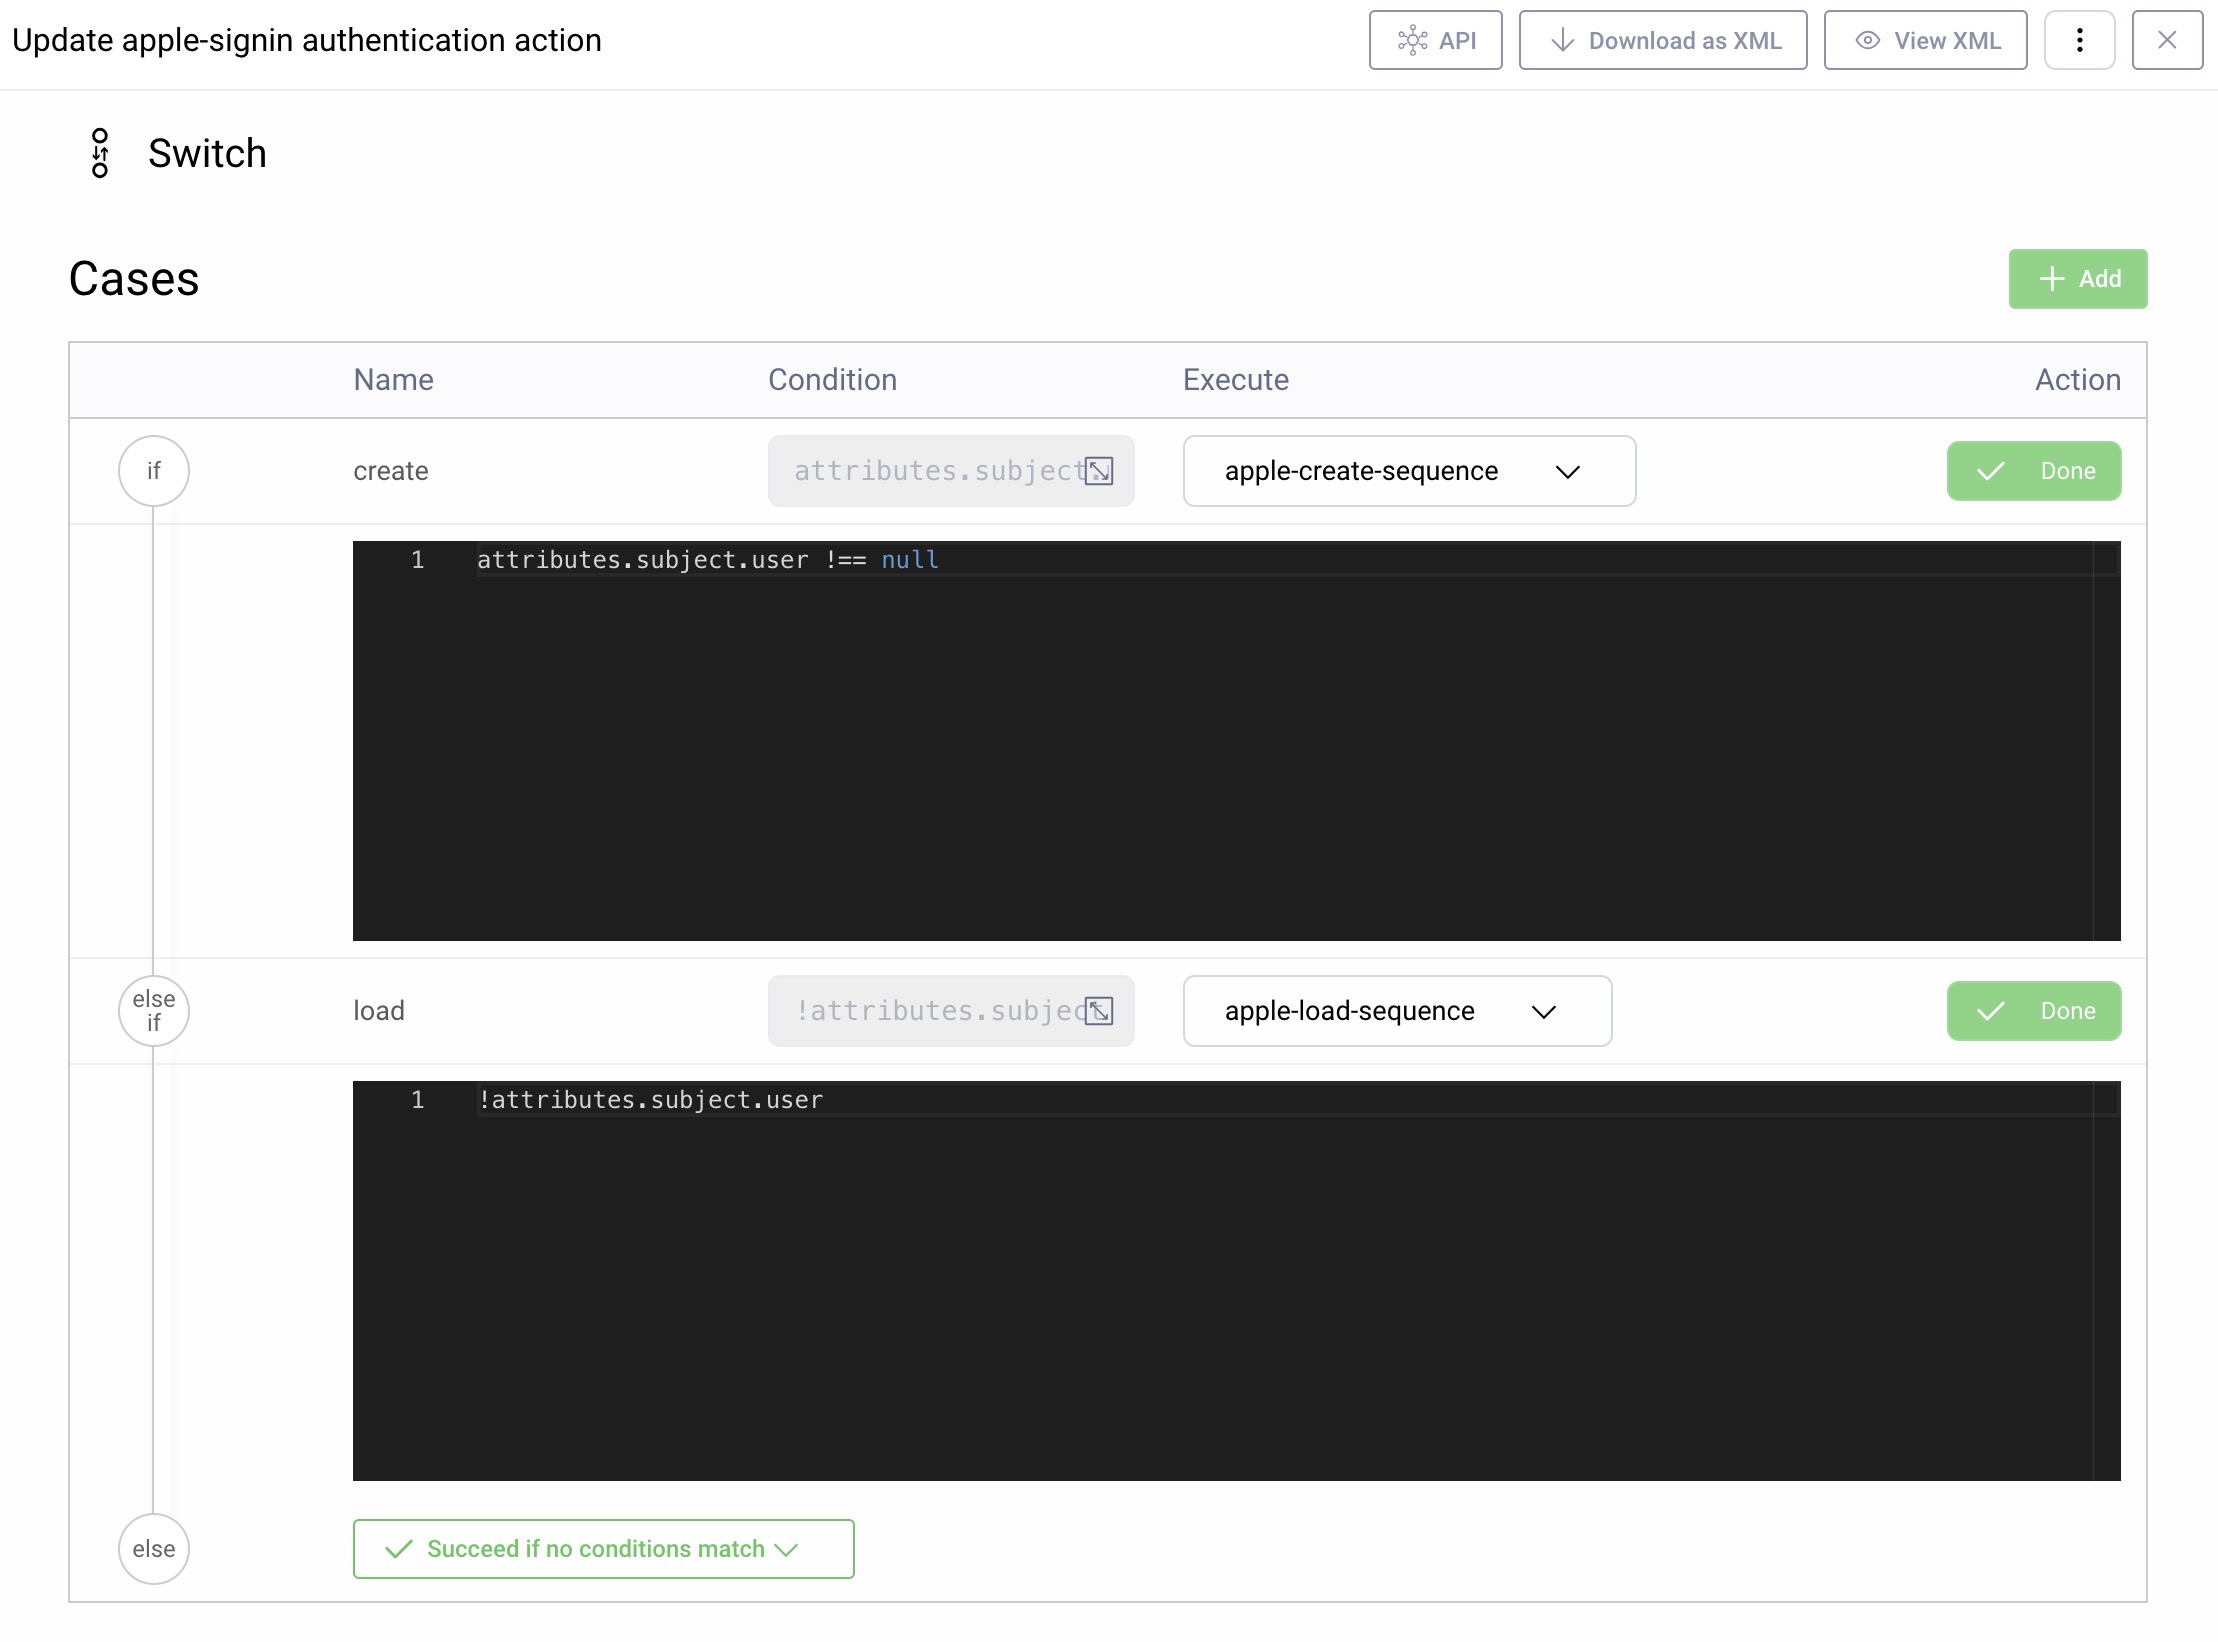
The overall actions involved are summarized in the below diagram, where the two main actions are shown in blue. The load sequence and debug actions only exist for visualization and would be removed once development is complete.

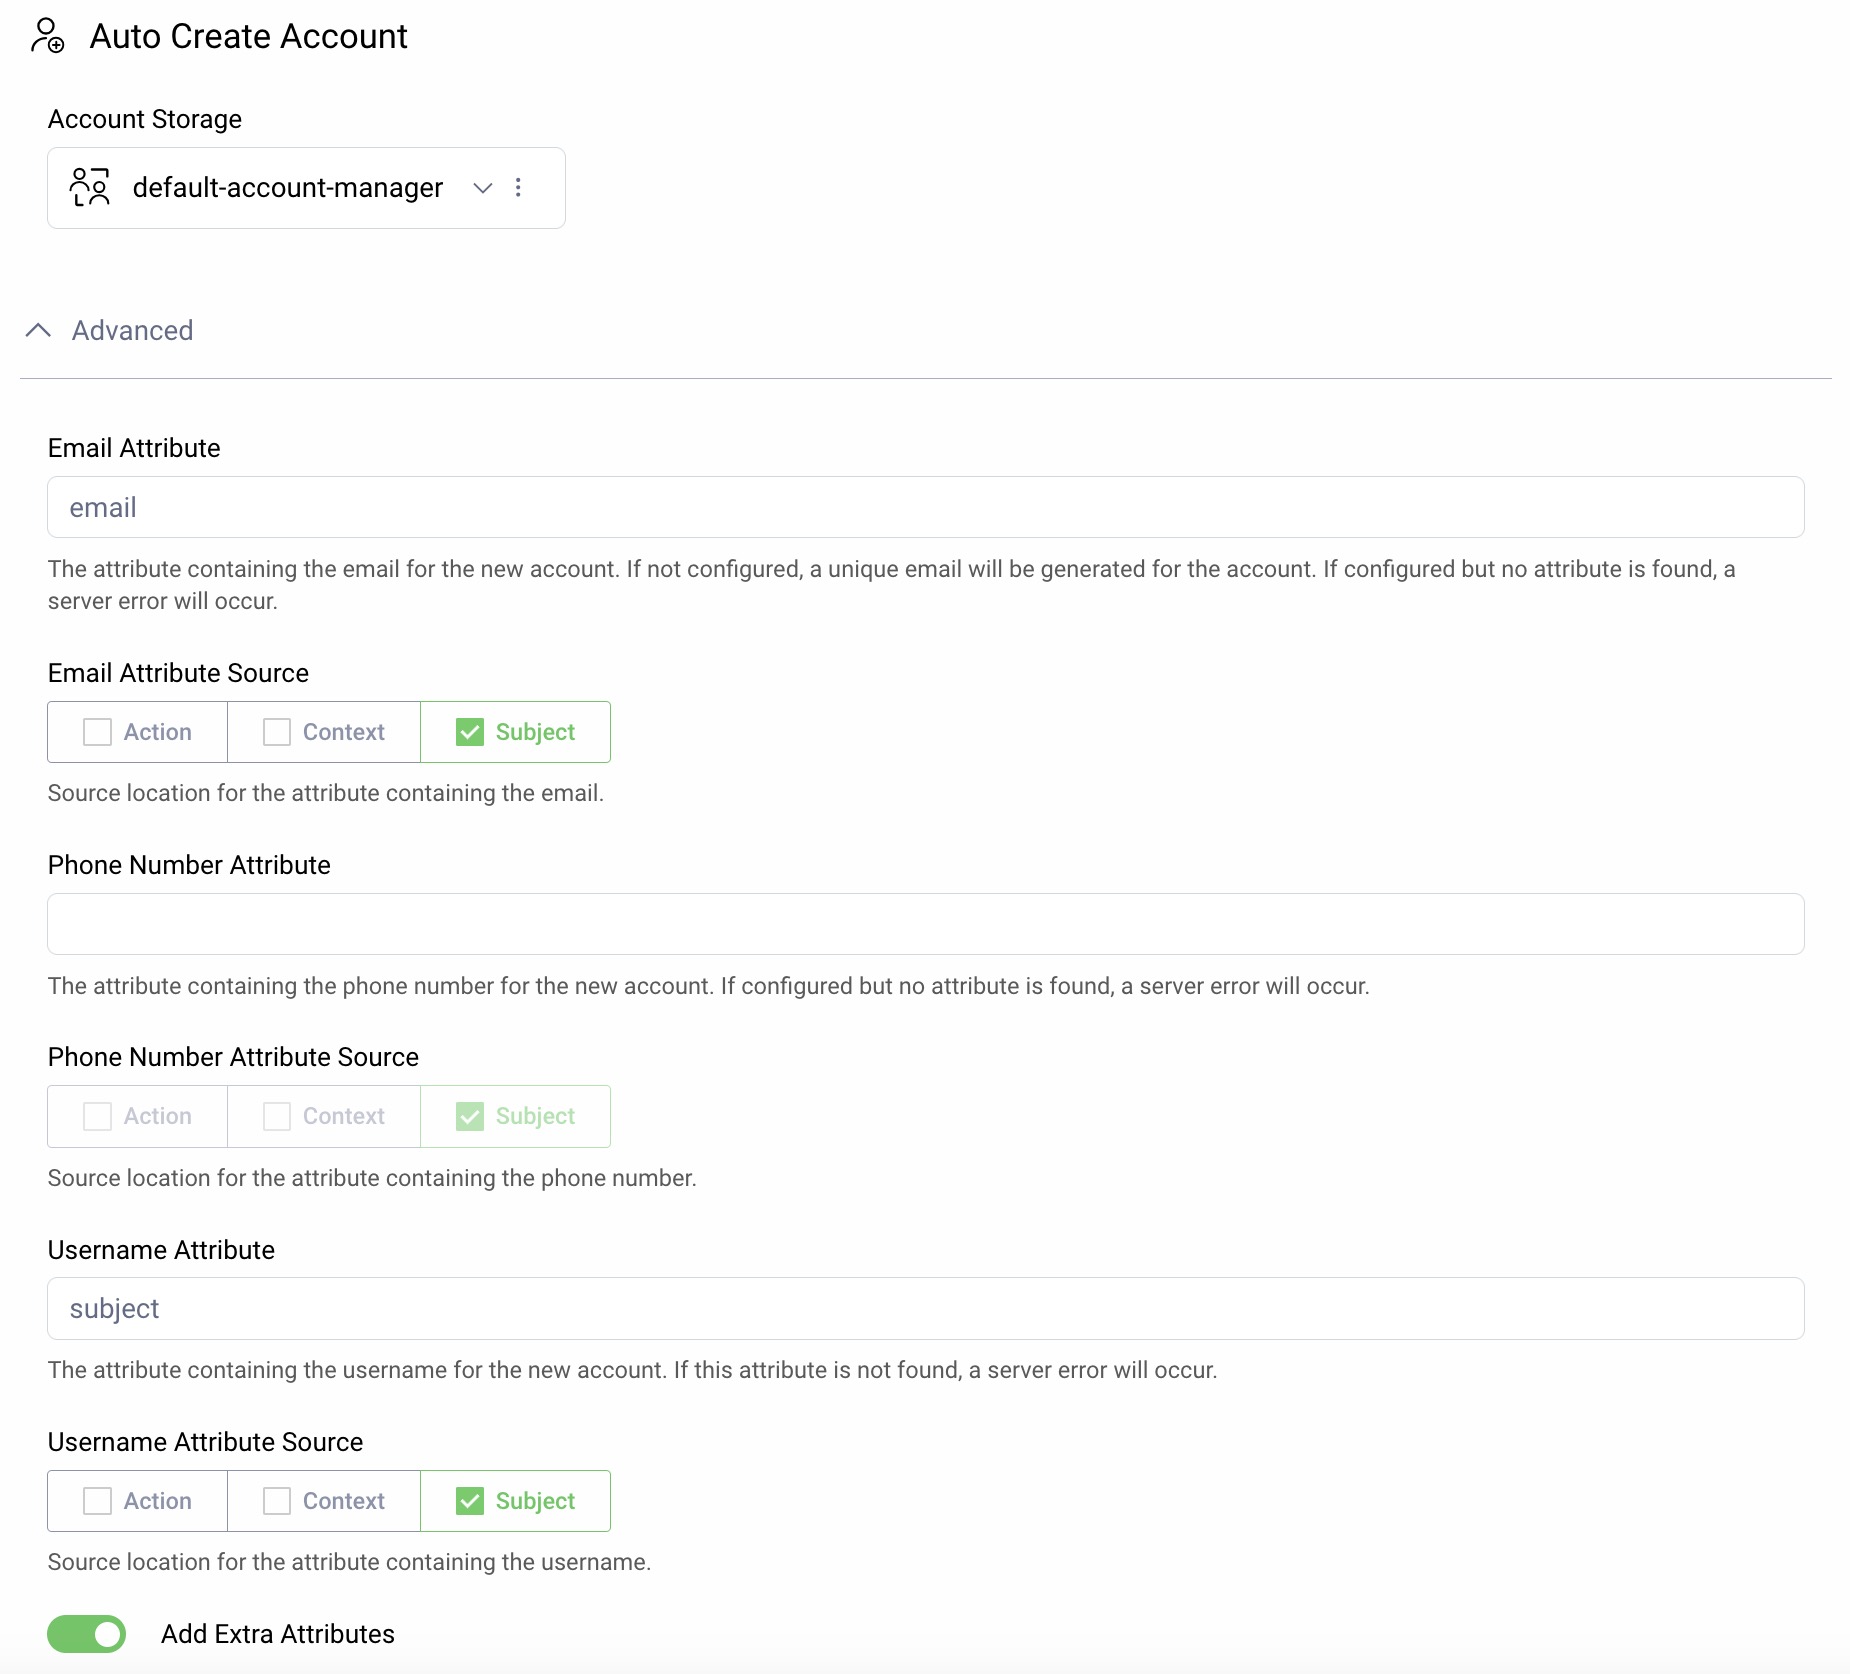
The Auto Create Account action is responsible for saving the user data to accounts data storage, and the 'Add Extra Attributes' option should also be selected:
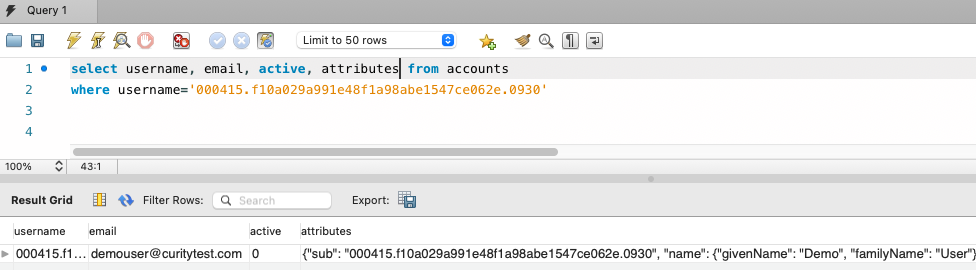
This article will use a SQL database for account storage, and the Apple user object can then be found in the attributes column of the accounts table:
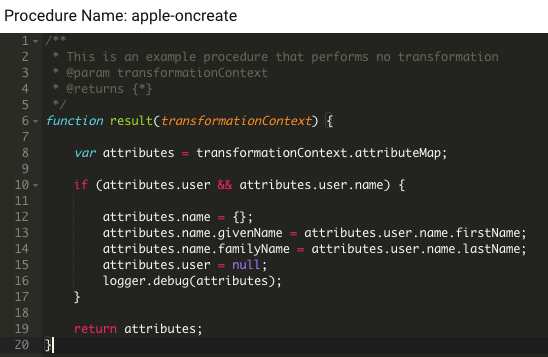
Transforming Data on the Initial Login
We need to transform the Apple user object into the standard accounts schema used by the SCIM User Management system. This involves some simple transformation between the source and destination formats shown below:
{email: 'demouser@curitytest.com',user: {name: {firstName: "Demo",lastName: "User"}}}
{email: 'demouser@curitytest.com',name: {givenName: "Demo",familyName: "User"}}
The transformation is done via a Script Action, which uses the following simple Javascript. The attributes column of the accounts table will then contain the name fields in the standard format, ready to be served as claims:
Issuing Claims
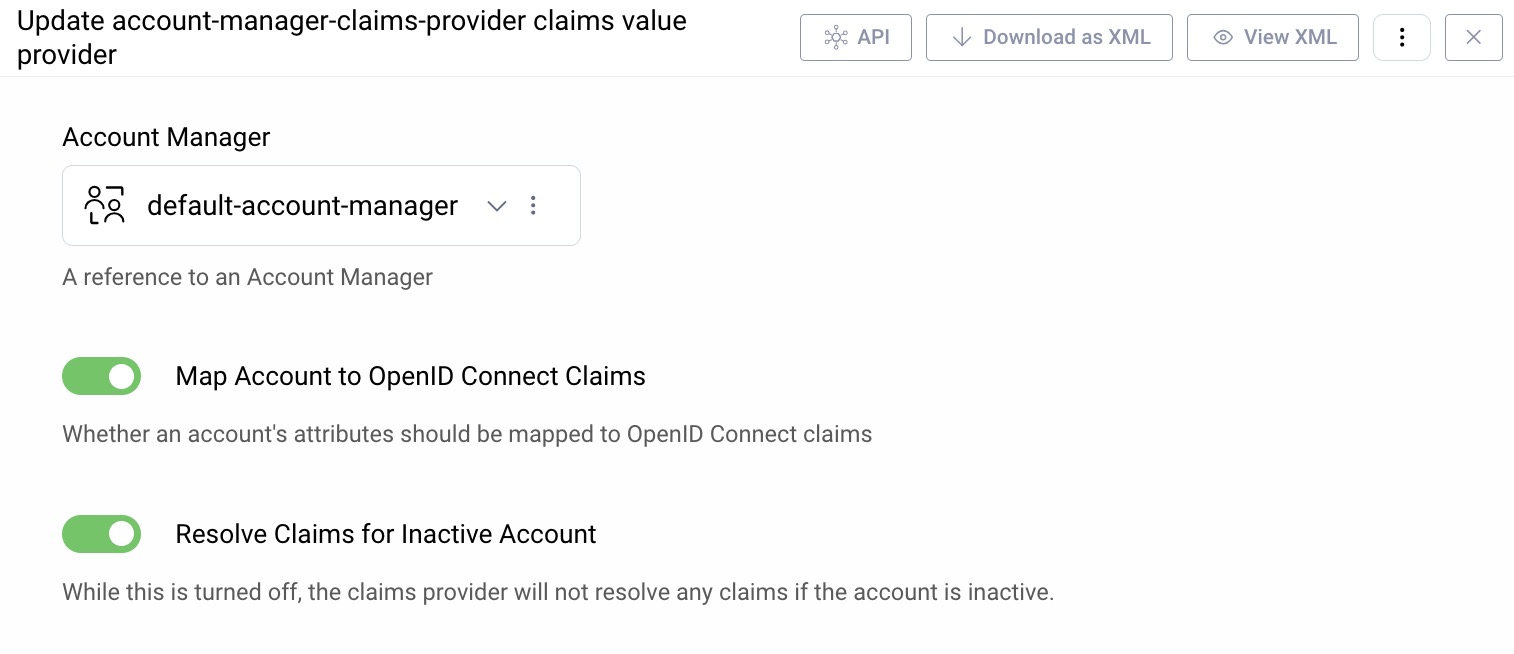
The Apple user attributes will by default be issued by the Account Manager Claims Values Provider, used by the Token Service. If the Account Manager requires verification, users from Apple will initially be created in an inactive state, in which case the option to 'Resolve Claims for Inactive Account' must also be selected:
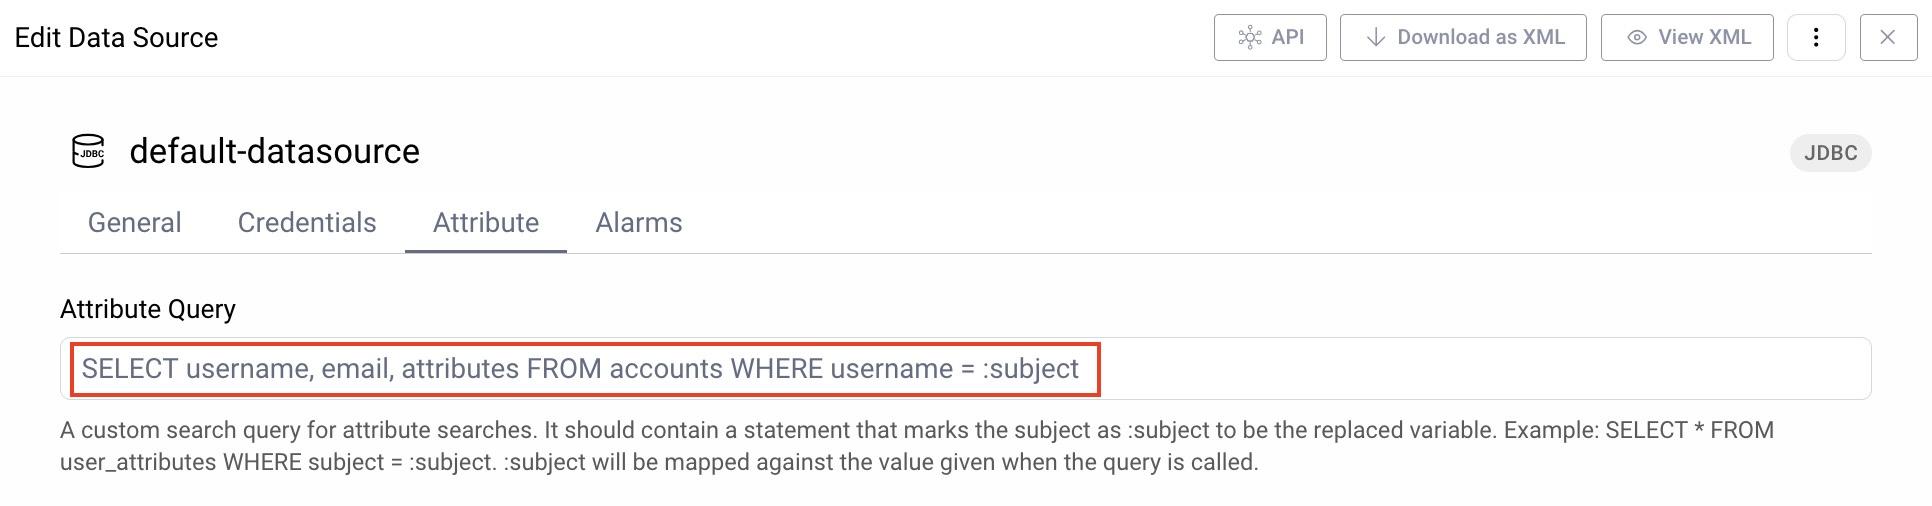
The account manager gets claims using an attribute query, and we need to ensure that its query will read the transformed Apple user attributes, as in the following example:
Final Apple Attributes
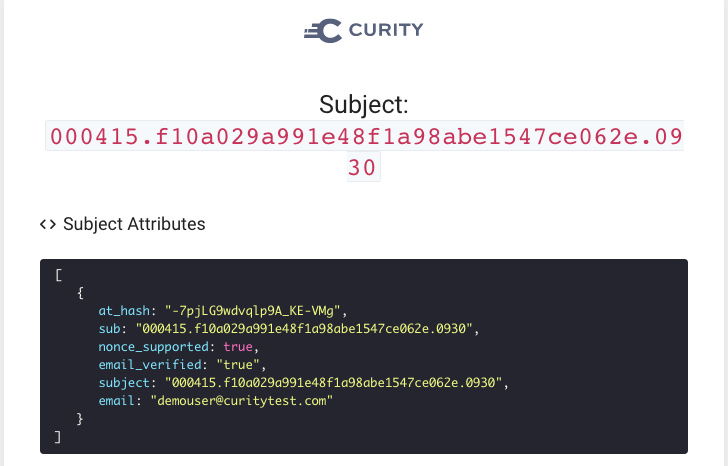
Finally, once we have made the above changes, the following attributes will be seen on the initial login. Here we have transformed the name fields and removed the Apple user object.
On subsequent logins the attributes at the end of the authentication phase are no different. However, the Apple user attributes are retrieved from the database in the claims attribute query, and will therefore be included in tokens:

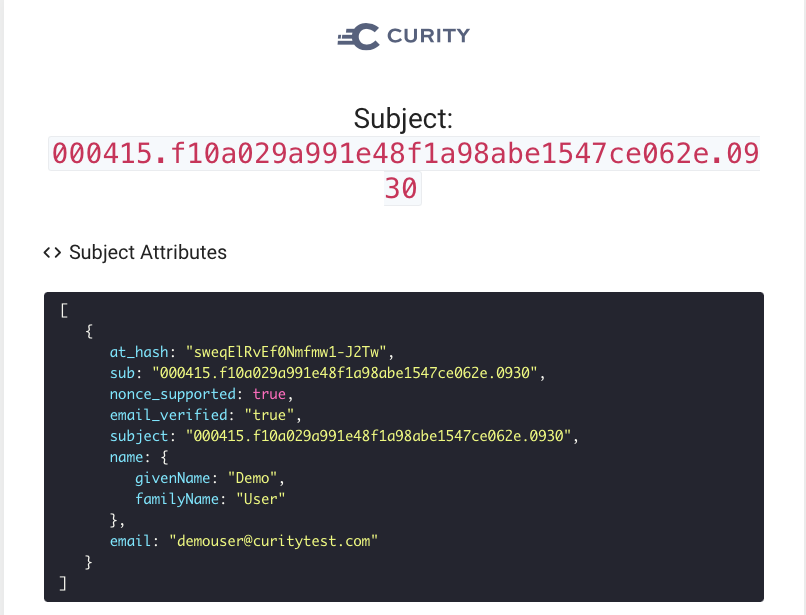
Claims Issued
Finally we can see the resulting Apple user attributes included in OAuth tokens issued by the Curity Identity Server, and the mechanism works both for the initial login and for all subsequent logins. The following screenshot shows an ID token returned to OAuth Tools:

Revoking Access
If the user's initial Apple login used a compliant browser such as Safari, the user can then manage their apps from System Preferences / Apple ID on their iOS device or MacBook. This can include revoking access to the app, which in our case is the Curity Identity Server.
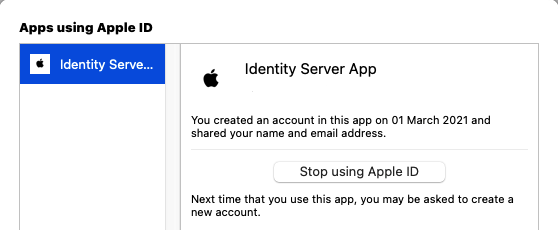
This can be used as a mechanism to force all user attributes to be resent from Apple. In the event of the Curity Identity Server receiving data for the same user twice, the Apple User Id will remain the same and the existing record will be updated.
Conclusion
The Curity Identity Server supports Sign in with Apple as one of many authenticators. This is done while also enabling you to retain full control over claims and scopes issued in tokens, including Apple user attributes.
Customer Stories
Learn how organizations run identity and API security at scale.
Read customer storiesWas this helpful?