Integrating with Microsoft Entra ID
On this page
This tutorial explains how to setup the Curity Identity Server and Microsoft Entra ID to use the Curity Identity Server as the Identity Provider.
This covers the use case where there is a domain myorganization.tld in Microsoft Entra ID that we want federated with the Curity Identity Server at login.myorganization.tld. This means that all users with an email address that matches *@myorganization.tld will be federated using the authentication methods available from login.myorganization.tld.
Settings in Microsoft Entra ID
In Microsoft Entra ID, you’ll need to add the custom domain that should be federated to your Curity Identity Server.
How the domain is added and verified is not covered by this tutorial, you should instead use the Microsoft Entra ID documentation for the current procedure. When added, the domain will be marked as a managed domain, the part this tutorial covers is how that is turned into federated.
The Curity Identity Server Settings
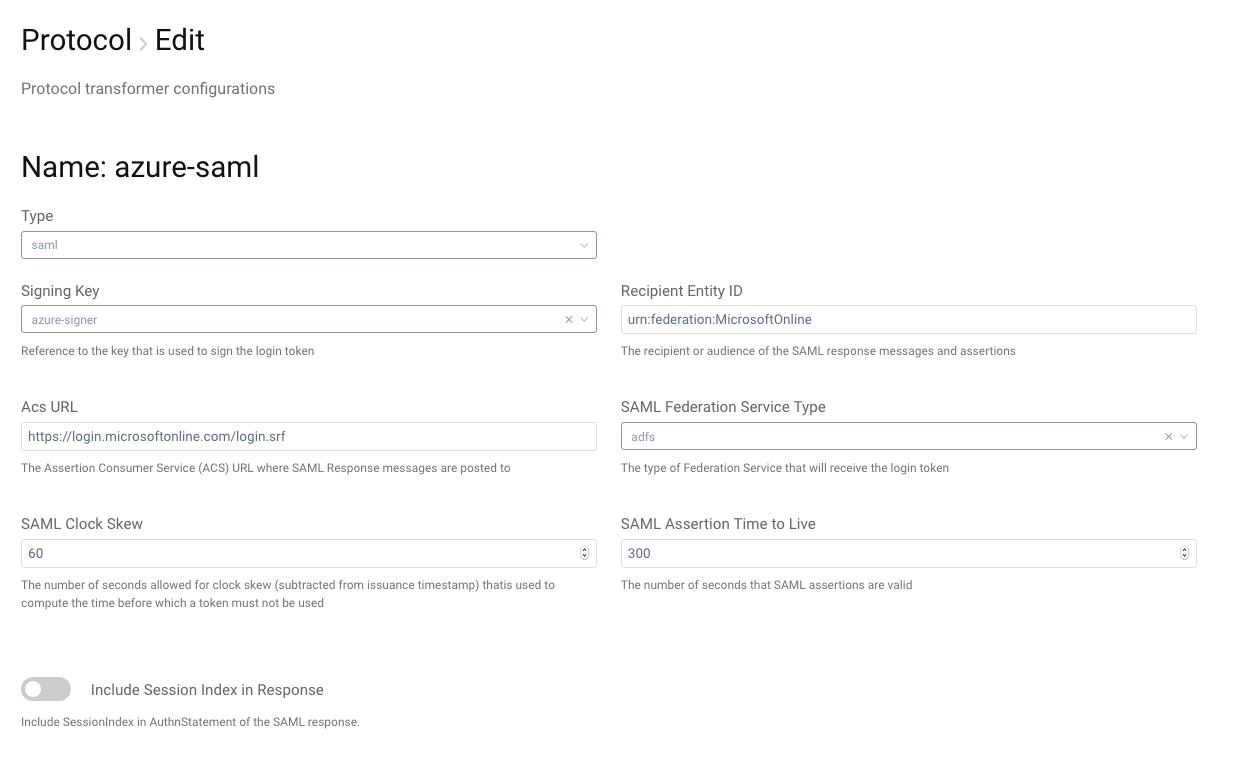
In the Curity Identity Server, you’ll need to setup a SAML protocol. This make it aware of incoming SAML AuthNRequest, and able to respond with the authentication result in a SAMLResponse.
To setup the protocol, first we need a key to use when signing the responses. In the Admin UI, that is accomplished in the Facilities menu:
Facilities → Keys and Cryptography → Signing → Signing Keys → +
A dialog opens where you can choose to generate a new key. When all the mandatory fields are filled, close and commit the new key.
Using the CLI, issue a key using the following command:
request facilities crypto generate-signing-key-keystore key-type rsa key-size 2048
Preparing Certificate For Microsoft Entra ID
Microsoft Entra ID will need the certificate we just created to be able to validate the responses sent from the Curity Identity Server. In the Admin UI, download the signing key from the Facilities menu. Facilities → Keys and Cryptography → Signing → Signing Keys → Key Name → View and press Download PEM.
This downloads a PEM formatted certificate that we need to configure with Microsoft Entra ID. Microsoft Entra ID can't accept the PEM format of the certificate so we'll need to reformat it. Microsoft Entra ID wants the certificate as a Base64 encoded DER string. To convert your PEM certificate, open the file up with a text editor, remove the BEGIN/END CERTIFICATE and all the newlines. Or, if you have openssl available, issue this command.
openssl x509 -in <path-to.pem> -inform PEM -outform DER | openssl enc -base64 -A
The output is what we need to configure for the Microsoft Entra ID trust. Copy the outputs and store it for later. Examples of input/output below.
Example PEM
-----BEGIN CERTIFICATE-----MIICqjCCAZKgAwIBAgIEKeFOrTANBgkqhkiG9w0BAQsFADAXMRUwEwYDVQQDEwxhenVyZS1zaWduZXIwHhcNMTkxMDExMDkxNjE0WhcNMjAxMDEwMDkxNjE0WjAXMRUwEwYDVQQDEwxhenVyZS1zaWduZXIwggEiMA0GCSqGSIb3DQEBAQUAA4IBDwAwggEKAoIBAQCSU7FqGW1jKs+0Plx6oKgzpcrEeYcjVenR/yYbaO2V7XLCh8jFg5h5ShZCSc/yYmOHnPB6BaJHH98hf5UMGPayYERTdGa52DOk5Myuk0pmpGyRQjdwaWAdR76tzpDyp9oRSx6b3uy+ZIc+rJo06iEJrDSLv8XOQXdejCbXLolS5lL2+XnmsT6TYAYAA9H+NkpvtyaxJzblC/Av0FSvl+U3nSqtixow+rovqheSGVkoMDfmqoUhBkCeDqggSxfrwEaEvKQBrfPi2arom2Tbiqw/AowEeWNrTumDoCFoCgE4Gi3lVfTJiY3w5rCH6qGeLKq6ARikHAwM9HVlvxul2pqFAgMBAAEwDQYJKoZIhvcNAQELBQADggEBAI/mz5uKZvW/3MXmAWHePLZfU2DUYD89Lv9EWn0ATwLoPMEAsjSV/uLvxCVJwAbcutLMvbzW4zhi9+iYugYk8VEwC2zFh384q45i4zvoBcxaAxVl622UJ2KTb/7N1SHXPmXXdKTPhpnn+WsPakleQZXo7qBzcVdG/dmzzw2QxEFZM6zip+Vln1moJoBz9lwry3MVESjASoSajhlaroi5ODp+gEaU1YHZyy4ad/cpmiQABjZFgFC55XWjI5J5syv98zgHPuL36RkTHE6Sgrzh3ikpIUy36dOi7zgValxCIICg+XTokyR9K8XbzeoM2nOg2ZGo1Bk4yPuwQnhUkkUNZiA=-----END CERTIFICATE-----
Example Base64-encoded DER
MIICqjCCAZKgAwIBAgIEKeFOrTANBgkqhkiG9w0BAQsFADAXMRUwEwYDVQQDEwxhenVyZS1zaWduZXIwHhcNMTkxMDExMDkxNjE0WhcNMjAxMDEwMDkxNjE0WjAXMRUwEwYDVQQDEwxhenVyZS1zaWduZXIwggEiMA0GCSqGSIb3DQEBAQUAA4IBDwAwggEKAoIBAQCSU7FqGW1jKs+0Plx6oKgzpcrEeYcjVenR/yYbaO2V7XLCh8jFg5h5ShZCSc/yYmOHnPB6BaJHH98hf5UMGPayYERTdGa52DOk5Myuk0pmpGyRQjdwaWAdR76tzpDyp9oRSx6b3uy+ZIc+rJo06iEJrDSLv8XOQXdejCbXLolS5lL2+XnmsT6TYAYAA9H+NkpvtyaxJzblC/Av0FSvl+U3nSqtixow+rovqheSGVkoMDfmqoUhBkCeDqggSxfrwEaEvKQBrfPi2arom2Tbiqw/AowEeWNrTumDoCFoCgE4Gi3lVfTJiY3w5rCH6qGeLKq6ARikHAwM9HVlvxul2pqFAgMBAAEwDQYJKoZIhvcNAQELBQADggEBAI/mz5uKZvW/3MXmAWHePLZfU2DUYD89Lv9EWn0ATwLoPMEAsjSV/uLvxCVJwAbcutLMvbzW4zhi9+iYugYk8VEwC2zFh384q45i4zvoBcxaAxVl622UJ2KTb/7N1SHXPmXXdKTPhpnn+WsPakleQZXo7qBzcVdG/dmzzw2QxEFZM6zip+Vln1moJoBz9lwry3MVESjASoSajhlaroi5ODp+gEaU1YHZyy4ad/cpmiQABjZFgFC55XWjI5J5syv98zgHPuL36RkTHE6Sgrzh3ikpIUy36dOi7zgValxCIICg+XTokyR9K8XbzeoM2nOg2ZGo1Bk4yPuwQnhUkkUNZiA=
Converting the Microsoft Entra ID Domain to be Federated
You will need a Windows computer with PowerShell and AD Connect libraries installed for the next step. The Mac and Linux version of PowerShell does not support this yet, so a Windows machine is required. Microsoft Entra Connect
Install-Module MSOnlineConnect-MsolService
A dialog will open where you get the possibility to login using an account that has administrator privileges for the domain.
When logged in, set these variables in the shell:
$signingCertificate = "MII…rKlQ=="; # Abbreviated for visual purposes$authenticationEndpoint = "https://<hostname>:8443/authn/authenticate"; # The authentication endoint of the the Curity Identity Server's Authentication Profile$serverName = "https://id.curity.se"; # The Curity Identity Server name (i.e., entity ID) on the System → General page of the UI$domainName = "<federated-domainname>"; # login.myorganization.tld
Convert the domain with the following command. Be aware that issuing this command will make all users in $domainName redirect to $authenticationEndpoint for authentication.
Set-MsolDomainAuthentication -DomainName "$domainName" -Authentication Federated -IssuerUri "$serverName" -SigningCertificate "$signingCertificate" -LogOffUri "$authenticationEndpoint/logout" -FederationBrandName Curity -PreferredAuthenticationProtocol Samlp -PassiveLogOnUri "$authenticationEndpoint"
Creating the Curity Identity Server's Authentication Protocol
Now we have the prerequisites in place for creating the protocol. Adding this configuration enables the Curity Identity Server to respond to the Entra ID AuthNRequest with a SAML 2.0 SAMLResponse.
Profiles → Authentication profile → Protocols → New Protocol
ImmutableID
Microsoft Entra ID expects the response to come back with the NameID to be the ImmutableID of the authenticated user. This ImmutableID cannot be created by a third party, so we need to look the user up in either the local Active Directory thats synced with Entra ID, or directly using LDAPS with Entra Domain Services.
LDAP Datasource
To configure this, we first need a data source with the attributes configuration that we can use in an action.
Create a new data source. Navigate to Facilities → Data Sources and click + next to it.
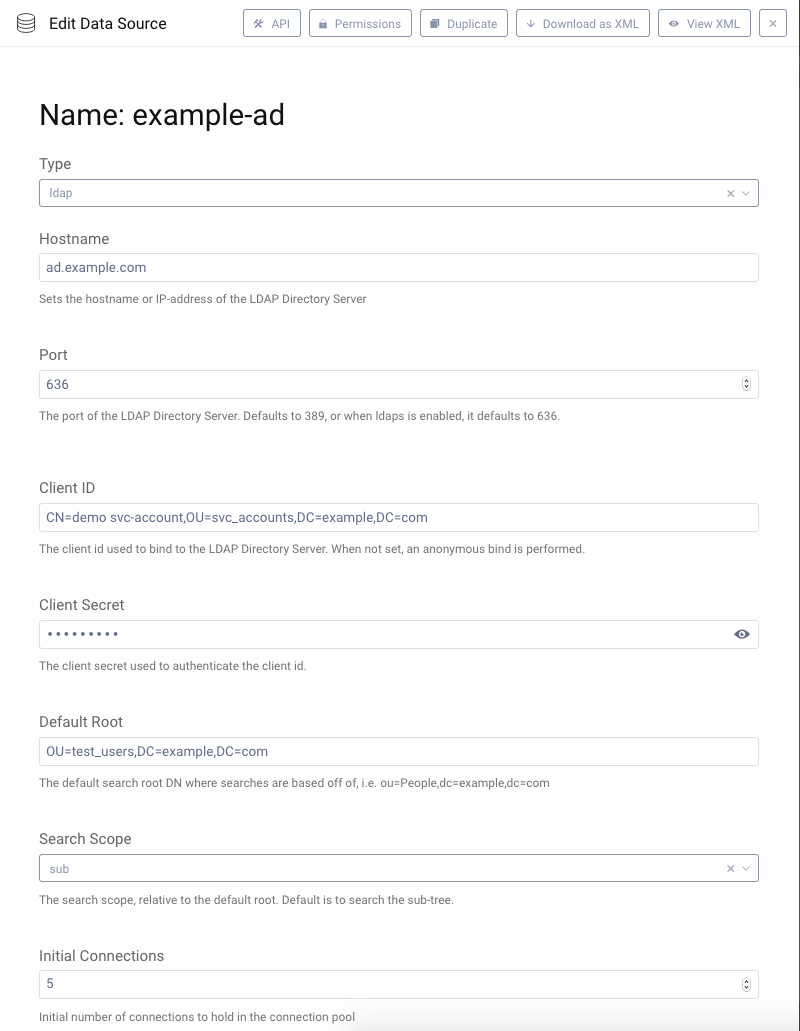
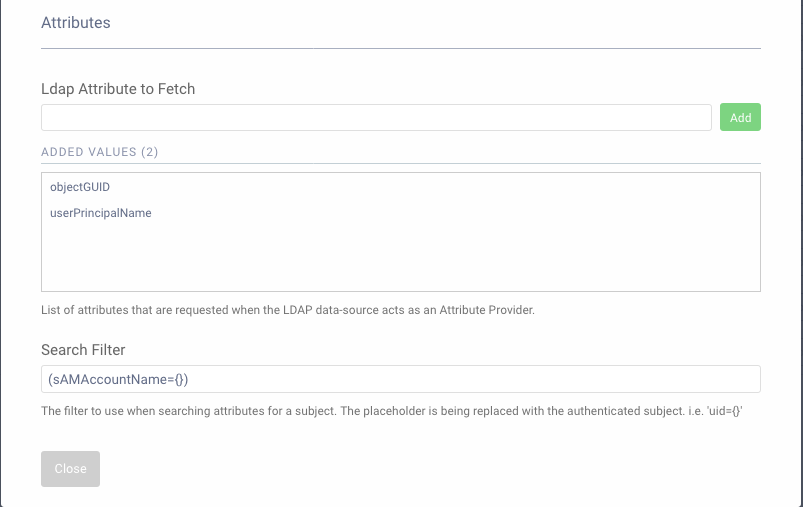
This configuration searches for an account with the sAMAccountName matching the authenticated subject. Make sure to tweak this for your needs.
Data Source Authentication Action
Next, we will use this data source to perform a lookup in Microsoft Entra ID.
In your authenticator, configure an action of type Data Source, and select your Microsoft Entra ID data source. This will perform a lookup after authentication, to collect the attributes from the account.
Transforming the Subject
Last in the authentication chain, we need to set the objectGUID to be the subject. This will make the resulting SAMLResponse have the objectGUID as the NameID, which is required for Microsoft Entra ID.
To add this transformation, add a action to the authenticator, with type Script. You'll get to add a new procedure to use with the action. Add this content to it:
function result(transformationContext) {var attributes = transformationContext.attributeMap;attributes.subject = attributes.objectGUID;attributes.IDPEmail = attributes.userPrincipalName;return attributes;}
This procedure will copy the objectGUID to the subject, and userPrincipalName to IDPEmail which is mandatory for some Microsoft Entra ID services.
Testing the Federation
To test that everything is correctly set up, go to Portal Azure and login using an email address matching the domain we just setup. You should be federated to your Curity Identity Server, and get to login with the authentication method you just setup.
Summary
In this tutorial we managed to configure Microsoft Entra ID to use a different Authentication Service than their own. This could be useful to provide authentication methods that Microsoft Entra ID doesn't provide, such as national E-IDs or other 2-Factor methods. Since Microsoft Entra ID is limited to allowing only known accounts to login, we setup an attribute lookup towards the Microsoft Entra ID, to get the account we were trying to login with. We could also have done a provisioning flow, were we create the account in Microsoft Entra ID if it's not there yet, using other Authentication Actions.
Customer Stories
Learn how organizations run identity and API security at scale.
Read customer storiesWas this helpful?