Configuring Curity Identity Server as an Identity Provider in Salesforce
On this page
Salesforce provides one of the most popular CRM systems on the market. Its customers have the option to leverage an external Identity Provider (IDP). This article serves as a guide on how to configure a Salesforce environment to use the Curity Identity Server as its IDP.
Curity Setup
Create a client or use an existing one. Follow these instructions to configure a client that enables the Code Flow.
Important configurations
- Make sure that the
openid,emailandprofilescopes are provided by the client. - The callback URL will have to be aligned with the configuration in Salesforce, see below.
Configuring Salesforce
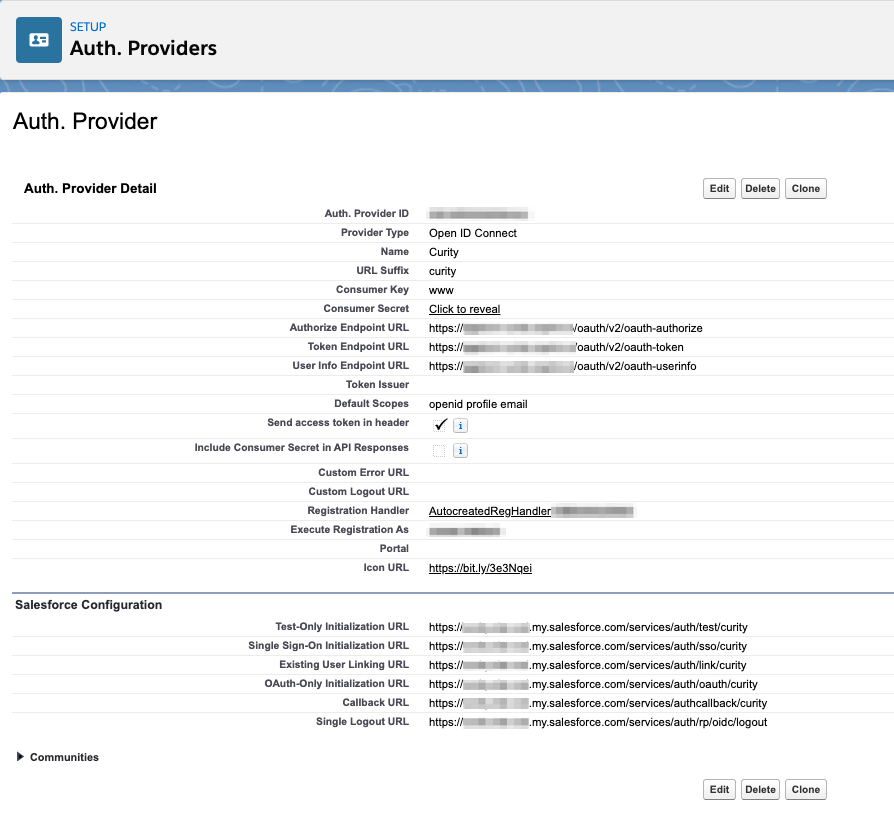
Configuring the Auth. Provider
- In Salesforce Setup, Settings -> Identity, choose Auth. Providers, then click New.
- Select
Open ID Connectas the Provider Type - Enter a name. Ex.
Curity - Enter a URL Suffix. Ex.
curity - Enter the name of the Client configured in the Curity Setup section above. Ex.
www - Enter the Secret of the Client configured in the Curity Setup section above. Ex.
Secr3t! - Add the Authorize Endpoint URL. This depends how the Curity Identity Server is configured. The Default URL for a host with the name
idsvr.example.comwould behttps://idsvr.example.com/oauth/v2/oauth-authorize - Add the Token Endpoint URL. This depends on how the Curity Identity Server is configured. The Default URL for a host with the name
idsvr.example.comwould behttps://idsvr.example.com/oauth/v2/oauth-token - Add the User Info Endpoint URL. This depends on how the Curity Identity Server is configured. The Default URL for a host with the name
idsvr.example.comwould behttps://idsvr.example.com/oauth/v2/oauth-userinfo - In Default Scopes, enter
openid profile email. - Check the box for Send access token in header
- Check the box for Send client credentials in header
- Uncheck Include Consumer Secret in API Responses
- Click Automatically create a registration handler template
- For Execute Registration As, select a user with
Manage Userspermission. This is the user that will run the Apex handler class. - For Icon URL, point to the Curity YouTube Logo
https://bit.ly/3e3Nqeior any other suitable logo. - Click Save
The Auth. Provider should now be saved, and a set of URLs should be displayed at the bottom. Take note of the Callback URL as this needs to be added to the Client in the Curity Identity Server that Salesforce is using, i.e. www defined in step 5 above. Example of the Callback URL, https://example-dev-ed.my.salesforce.com/services/authcallback/curity
Also take note of the automatically created Registration Handler name, ex AutocreatedRegHandler1586547920428. The Registration Handler might have to be modified, this is described in a later section.

Configuring a Domain
In order to apply an Auth. Provider, a Domain Name needs to be set. If it is not yet configured make sure to follow these instructions
- Go to Settings -> Company Settings -> My Domain
- Enter an available Domain name and register that domain
- When the domain is ready, go back to Settings -> Company Settings -> My Domain
- Click Log in and then Deploy to Users to deploy the domain.
Changed Domain Name
Changing the Domain Name will change the Callback URL. Go to Settings -> Identity, choose Auth. Providers, then click the created Auth. Provider, Ex. Curity and verify the Callback URL.
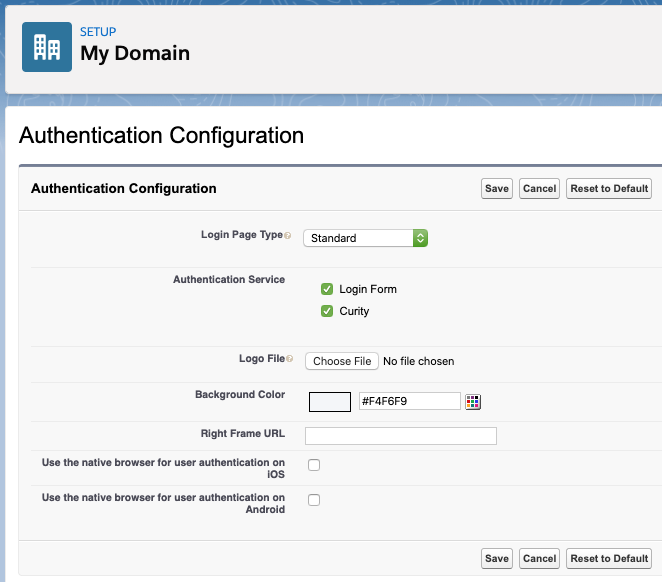
Enable the Curity Auth. Provider for the Domain
When the Domain is enabled and deployed it is possible to enable the previously created Curity Auth. Provider for the Domain.
- Go to Settings -> Company Settings -> My Domain -> Authentication Configuration, click Edit
- In the section Authentication Service make sure
Curityis selected - Click Save

Optional Configurations
Provision Salesforce Accounts
If the accounts used to log in to Curity should be automatically provisioned into Salesforce the Registration Handler created for the Curity Auth. Provider should be modified to allow for account creation. The first step of this is to make sure that the canCreateUser method in the Registration Handler returns true.
- Go to Settings -> Custom Code -> Apex Classes
- In the list of classes find the automatically created one (Ex.
AutocreatedRegHandler1234567890123) and click Edit - Edit the
canCreateUsermethod starting on row 6 accordingly. - Also review the
createUsermethod starting on row 16 according to your own environment.
Link already existing Salesforce Accounts with Curity
If the accounts are already provisioned in Salesforce linking them with the accounts used for authentication with Curity is needed. This can be achieved by visiting the Existing User Linking URL.
This URL can be found in Settings -> Identity, choose Auth. Providers, then click the created Auth. Provider, Ex. Curity. The Existing User Linking URL is listed in the Salesforce Configuration section.
A user needs to visit this URL and follow the instructions to first log in with the external IDP (Curity) and then log in with the already existing Salesforce account in order to link the two.
Conclusion
Salesforce has out-of-the-box capabilities to leverage an external IDP. With a few simple configuration steps, it is possible to make full use of the capabilities that the Curity Identity Server has to offer for authentication and authorization. The Curity Identity Server can enhance the authentication of Salesforce by:
- Providing many more mechanisms for authentication such as BankID, SMS, social, WebAuthn and many more authenticators
- Allowing for Multi-Factor and Conditional Multi-Factor Authentication scenarios
- Applying advanced post-authentication workflows without user interactions
Resources
- Configure a client in Curity. Outlined in this article about the Code Flow
- Configure an OpenID Connect Authentication Provider in Salesforce
- Configure a Subdomain in Salesforce

Join our Newsletter
Get the latest on identity management, API Security and authentication straight to your inbox.

Start Free Trial
Try the Curity Identity Server for Free. Get up and running in 10 minutes.
Start Free Trial


