Mutual TLS Secured API
On this page
Overview
This tutorial shows how to combine OAuth API security with mutual TLS using X509 client certificates. The GitHub repository enables an end-to-end API focused solution to be quickly run on a development computer.
Note
The example uses the Curity Identity Server, but you can run the code against any standards-based authorization server.
B2B Security
Mutual TLS is a standard security solution for API links between companies, and this can be combined with Certificate Bound Access Tokens to improve upon the strength of normal bearer tokens, to ensure that if an access token is somehow stolen it cannot be replayed by a malicious party.
In some industry sectors mutual TLS is a regulatory requirement, where high worth assets must be protected according to specifications such as the Open Banking Security Profile and the Financial-grade API (FAPI) Security Profile.
Components
The code example will demonstrate the following flow, where two requests are made from a client, and HTTPS traffic is routed via a reverse proxy to both the Identity Server and the API:

The flow consists of the following main steps, which ensure that only the party that owns the client certificate and key can access API resources:
| Step | Description |
|---|---|
| Client Authentication | The client authenticates over a mutual TLS channel by sending proof of a client certificate and key |
| Sender Constrained Access Tokens Issued | The Authorization Server issues a client certificate claim and returns an opaque access token to the client |
| Client Calls API | The client sends the access token to the API in the standard way, but again sends proof of the client certificate and key |
| Client TLS Verification | The API verifies mutual TLS to ensure that only calls from trusted clients are accepted |
| Client Token Verification | The API verifies that the client is supplying the same client certificate that was used at the time of authentication |
Running the Example
The example first requires the following prerequisites to be installed:
| Prerequisite | Description |
|---|---|
| OpenSSL | This will be used to create some certificates for development purposes |
| Docker Desktop | The system will be deployed as a simple Docker compose network |
| Node.js | A simple API is provided, with some extra mutual TLS related code |
Get the Code
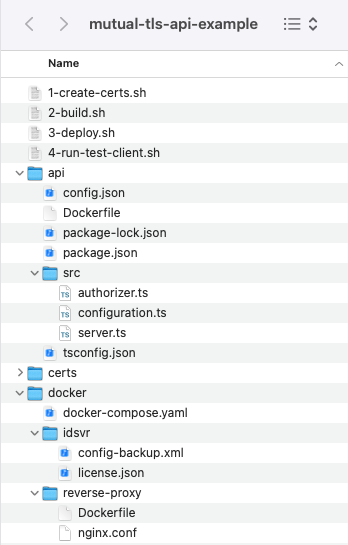
Clone the GitHub repository and inspect the files, which consist primarily of a very simple API and some deployment resources:
Create Development certificates
The example uses certificates that are created by running the following script. In a real world setup these would be issued by a trusted third party authority. The What is Open Banking? article describes how eIDAS certicates are required in European Open Banking.
./1-create-certs.sh
To keep the infrastructure fairly simple, only three certificates and keys are created:
| Certificate | File Name | Description |
|---|---|---|
| Root Authority | root.pem | A single self signed certificate authority is created and used to issue both client and server certificates |
| Server Certificate | example.tls.p12 | A single wildcard TLS certificate and key is used by all back end hosts in the Docker network |
| Client Certificate | example.client.p12 | A client certificate and key for an example business partner is created |
Configure URLs
Next add the following entries to your hosts file, to represent public URLs used by the business partner client:
127.0.0.1 localhost api.example.com login.example.com:1 localhost
The following URLs are used, so that there is only a single external port of 443, which is usually the case in production API setups:
| Base URL | Description |
|---|---|
https://login.example.com | The external URL used by the client to access the Curity Identity Server |
https://api.example.com | The external URL used by the client to access the API |
https://login-internal.example.com:8443 | The internal URL of the Curity Identity Server within the Docker compose network |
https://api-internal.example.com:3000 | The internal URL of the API within the Docker compose network |
Build Code
Next build the code and Docker containers via the following script:
./2-build.sh
Deploy the System
Before deploying the system, ensure that you have a valid license file for the Curity Identity Server, and copy it into the docker/idsvr folder, then run the deployment script:
./3-deploy.sh
Run the Partner Client
The example client is a very simple bash script that runs curl commands, to authenticate, then to call the API, with all requests using mutual TLS:
./4-run-test-client.sh
The test client simply makes secure connections and outputs the following text, though there is some complexity in the infrastructure setup, which is described in the following sections:
Client is authenticating with the Identity Server via mutual TLS ...Client successfully authenticated and received an opaque access tokenClient is creating a transaction at the API using mutual TLS and the opaque access token ...Client successfully created the API transaction using mutual TLS
Identity Server Configuration
Open a browser and enter https://localhost:6749/admin to access the Admin UI of the Curity Identity Server and sign in with admin / Password1. Then navigate to Profiles / Token Service / Clients and note that there are two OAuth clients configured:
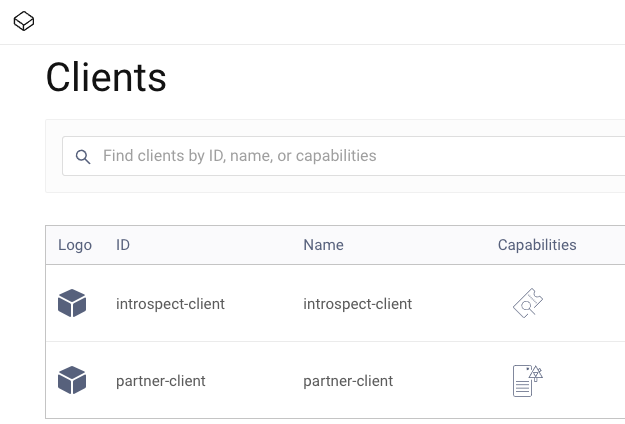
The first of these is an introspection client used by the reverse proxy to implement the Phantom Token Pattern, to swap opaque access tokens from the client for JWT access tokens to forward to the API.
The second client is more interesting, since it uses the Client Credentials Flow with a client certificate as the client secret, meaning that the sender needs to provide proof of the private key in order to authenticate:
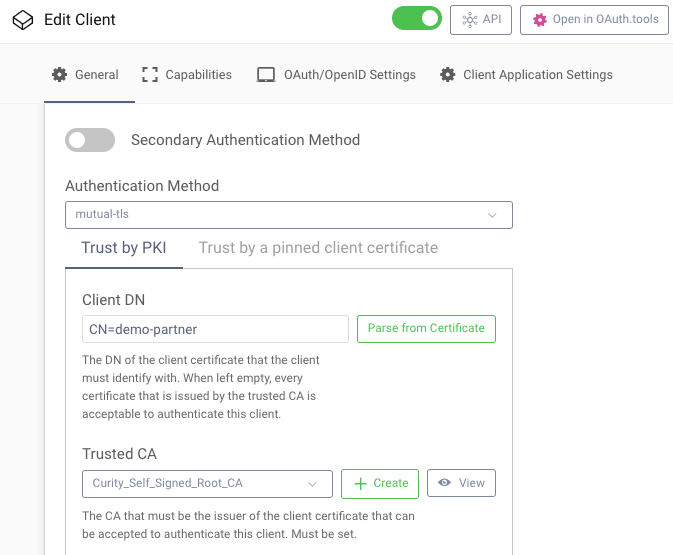
The Curity Identity Server will only accept client certificates from the trusted issuer and will also verify that the client certificate received has the distinguished name configured.
In order to authenticate and get an access token, the partner client will call a token endpoint where mutual TLS is used, and in a curl request this contains the following parameters:
curl -s -X POST "https://login.example.com/oauth/v2/oauth-token-mutual-tls" \--cert ./certs/example.client.p12:Password1 \--cert-type P12 \--cacert ./certs/root.pem \-H "Content-Type: application/x-www-form-urlencoded" \-d "client_id=partner-client" \-d "grant_type=client_credentials" \-d "scope=transactions"
Companies will want to ensure that mutual TLS clients do not cause any problems for web or mobile clients that need to interact with a token endpoint. The example setup manages this by configuring a second token endpoint with a different path:
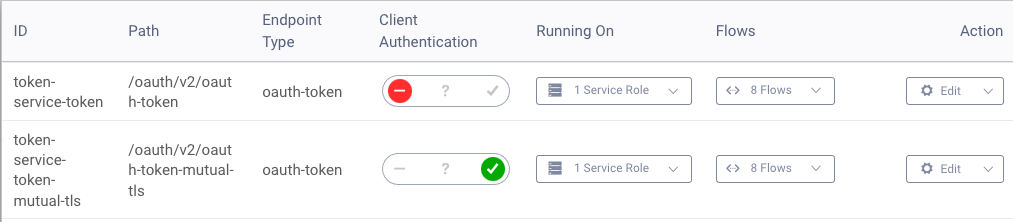
The Curity Identity Server supports multiple ways to configure mutual TLS and validate client certificates. These include terminating TLS at the reverse proxy or using a dedicated port for mutual TLS. See the product documentation onMutual TLS Client Authentication for full details on supported configurations.
Reverse Proxy Mutual TLS Verification
The code example uses OpenResty as an open source NGINX based reverse proxy, with good scripting capabilities. The code example uses the NGINX features to demonstrate a setup where mutual TLS is terminated in two different ways:
| Request Type | Reverse Proxy Behavior |
|---|---|
| Authentication | The reverse proxy does not decrypt the request and passes it straight through to the Identity Server, which verifies the client certificate |
| API | The reverse proxy verifies the client certificate, performs token introspection, then verifies the certificate in the token, then forwards a JWT to the API |
For authentication requests, NGINX is configured to receive requests at the transport layer, using the NGINX Stream Module. This means requests are not decrypted and that TLS is terminated at the Curity Identity Server, which will verify the client certificate.
stream {server {listen 3000;resolver 127.0.0.11;proxy_pass login-internal.example.com:8443;ssl_preread on;}}
For API requests, the reverse proxy manages SSL termination and verifying the client certificate, which is done using the NGINX HTTP SSL Module via the ssl_verify_client and ssl_trusted_certificate directives.
http {server {server_name api.example.com;listen 3001 ssl;ssl_certificate /usr/local/openresty/certs/example.tls.pem;ssl_certificate_key /usr/local/openresty/certs/example.tls.key;ssl_trusted_certificate /usr/local/openresty/certs/root.pem;ssl_client_certificate /usr/local/openresty/certs/root.pem;lua_ssl_trusted_certificate /usr/local/openresty/certs/root.pem;ssl_verify_client on;location ~ ^/ {set $internal_api_hostname 'api-internal.example.com:3000';proxy_pass https://$internal_api_hostname$uri$is_args$args;}
Reverse Proxy Token Verification
After the client has authenticated it will call the API, providing both an opaque access token and proof of ownership of the client certificate and key:
curl -s -X POST "https://api.example.com/api/transactions" \--cert ./certs/example.client.p12:Password1 \--cert-type P12 \--cacert ./certs/root.pem \-H "Authorization: Bearer 42fb44ec-4d96-4f5a-ac48-abbd7e004a2a" \-H "Content-Type: application/json"
The reverse proxy is also configured to use two small LUA plugins that address cross cutting concerns:
| Plugin | Role |
|---|---|
| Phantom Token Plugin | A LUA implementation of the phantom token pattern, which performs introspection and result caching |
| Sender Constrained Token Plugin | A LUA plugin to compare the client certificate thumbprint in the JWT with the client certificate of the API request |
These are configured as follows and run in this sequence, so that the JWT is produced by the first plugin and then used by the second plugin:
rewrite_by_lua_block {local phantomTokenConfig = {introspection_endpoint = 'https://login-internal.example.com:8443/oauth/v2/oauth-introspect',client_id = 'introspect-client',client_secret = 'Password1'}local phantomTokenPlugin = require 'phantom-token-plugin'phantomTokenPlugin.execute(phantomTokenConfig)local tokenConfig = {type = 'certificate-bound'}local senderConstrainedTokenPlugin = require 'sender-constrained-token-plugin'senderConstrainedTokenPlugin.execute(tokenConfig)}
The JWT returned after introspection is a certificate bound access token due to its cnf/x5t#S256 claim, which contains the thumbprint of the client certificate used at the time of authentication. The mutual TLS secured API also uses JWTs signed with a PS256 algorithm, since this is a recommended algorithm from FAPI Specifications:
{"kid": "431674655","alg": "PS256"}{"jti": "9837c9ba-8ddc-40b7-9c5c-f1ccb5bfcd9d","delegationId": "17d3f7ed-1c40-4b1f-99f7-861afec31d45","exp": 1632241215,"nbf": 1632240915,"scope": "transactions","iss": "https://login.example.com/oauth/v2/oauth-anonymous","sub": "c48945efa68b9fc8a448cbd61ddb2dcfe3669b805e3faf7f625db49d27704e2f","aud": "api.example.com","iat": 1632240915,"purpose": "access_token","cnf": {"x5t#S256": "ls2Lhy1SwH4o1F_sU40C66HWfjQ-49Iz8w7_-gii6wU"}}
The sender constrained token plugin then calculates the thumbprint of the client certificate in the current API request and compares it to the JWT value. If these do not match a 401 unauthorized response is returned:
local jwtThumbprint = read_token_thumbprint(access_token)if jwtThumbprint == nil thenngx.log(ngx.WARN, 'Unable to parse the x5t#S256 from the received JWT access token')unauthorized_error_response()endlocal certThumbprint = get_sha256_thumbprint(ngx.var.ssl_client_raw_cert)if certThumbprint ~= jwtThumbprint thenngx.log(ngx.WARN, 'The client certificate details of the request and the JWT do not match')unauthorized_error_response()end
API Security Handling
Due to the work of the reverse proxy, the security code in the example API is very simple and just involves standard verification of the JWT. The code example uses the JOSE library, so that only a few lines of code are needed, after which the claims can be trusted for authorization:
const accessToken = this.readAccessToken(request);if (!accessToken) {throw new Error('No access token was received in the incoming request')}const remoteKeySet = jose.createRemoteJWKSet(new URL(this.configuration.jwksUrl))const options = {algorithms: [this.configuration.algorithm],issuer: this.configuration.issuer,audience: this.configuration.audience,};const result = await jose.jwtVerify(accessToken, remoteKeySet, options);response.locals.claims = result.payload;
In some setups you may prefer to verify the token's certificate details in the API rather than in the reverse proxy. To enable this for our example setup the nginx.conf file would be updated to forward the client certificate to the API via an HTTP header, using NGINX's ssl_client_escaped_cert variable:
proxy_set_header x-example-client-public-key $ssl_client_escaped_cert;set $internal_api_hostname 'api-internal.example.com:3000';proxy_pass https://$internal_api_hostname$uri$is_args$args;
The API itself would then need to use crypto libraries to calculate the SHA256 thumbprint field of the certificate according to RFC8705. The code example uses Node.js so it could achieve this via libraries such as Forge and base64url:
import base64url from 'base64url';import {asn1, md, pki} from 'node-forge';private publicKeyCertToThumbprint() {const header = request.header('x-example-client-public-key');if (header) {const publicKey = decodeURIComponent(header);const cert = pki.certificateFromPem(publicKey);const derBytes = asn1.toDer(pki.certificateToAsn1(cert)).getBytes();const hashBytes = md.sha256.create().update(derBytes).digest().getBytes();const thumbprint = base64url.encode(hashBytes);}}
Conclusion
The code example provides a fast working setup to enable higher security APIs, using mutual TLS and sender constrained tokens. The following related resources provide further information, and include links to mutual TLS tutorials for client applications:
- Mutual TLS Sender Constrained Access Tokens
- Mutual TLS Client Authentication
- OIDC Web Client with Mutual TLS Client Authentication
Customer Stories
Learn how organizations run identity and API security at scale.
Read customer storiesWas this helpful?