Securing a Spring Boot API with JWTs
On this page
Spring Security has built-in support for implementing an OAuth 2.0 resource server. This tutorial shows how to let the framework validate a JWT and make use of claims in your API. Spring will validate the token and enforce the correct scope for specific endpoints. The API can also use the claims in the JWT to implement its business authorization.
Note
The example uses the Curity Identity Server, but you can run the code against any standards-based authorization server.
Prerequisites
This tutorial covers the API side, meaning that how to obtain a JWT is out of scope. Please look at the separate tutorial OIDC Client with Spring Security for information how to create a client using Spring Boot. This tutorial assumes that the JWT contains the following scope, services:read and the following claim, role=developer or role=something else.
Create a Spring Boot API
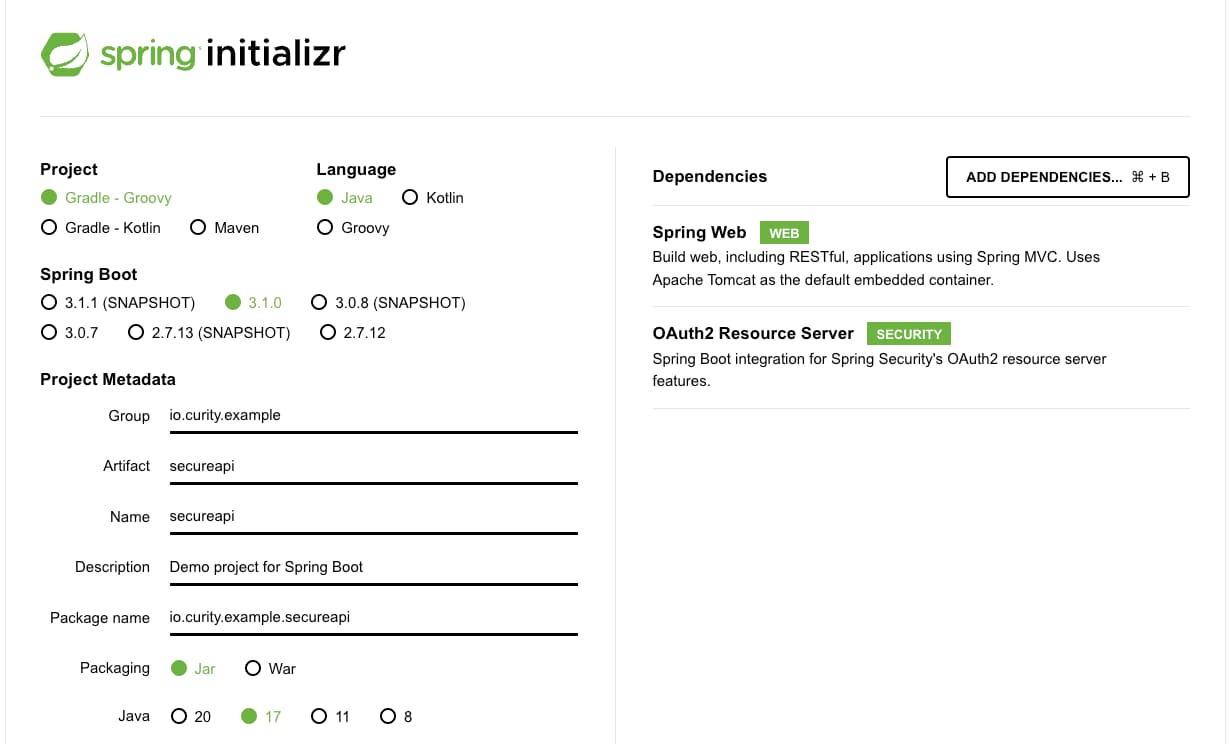
You can create a simple Spring Boot application from scratch using the Spring Initialzr website, which will also include the necessary dependencies. Open start.spring.io in your browser to access Spring Initialzr. In the configuration window that opens, select gradle, enter io.curity.example for the name of the group and call the artifact secureapi. Search for and add the following dependencies:
- Spring Web
- OAuth2 Resource Server
Generate the application. Spring Initializr creates an archive with a bootstrap application that includes the selected dependencies. Download and extract the archive, and import the project in an IDE of your choice.
Add a REST Controller
Next, create a class at src/main/java/io/curity/example/secureapi/ExampleController.java and paste in the following source code:
package io.curity.example.secureapi;import java.util.ArrayList;import java.util.List;import org.springframework.security.core.annotation.AuthenticationPrincipal;import org.springframework.security.oauth2.jwt.Jwt;import org.springframework.web.bind.annotation.GetMapping;import org.springframework.web.bind.annotation.RestController;@RestControllerpublic class ExampleController {@GetMapping("/services")public List<String> jwtProtected(@AuthenticationPrincipal Jwt jwt) {String role = jwt.getClaimAsString("role");return getServices("developer".equals(role));}private List<String> getServices(boolean developer) {List<String> services = new ArrayList<>();services.add("https://localhost/service/email");services.add("https://localhost/service/support");if (developer) {services.add("https://localhost/service/devportal");}return services;}}
This creates an endpoint /services that returns a list of URLs. If your JWT has a claim role set to developer, an extra URL is returned.
Integrate Spring Security
For this tutorial, the OpenID Connect metadata of the Curity Identity Server must be published. The Spring API will connect to the metadata endpoint at {issuerUri}/.well-known/openid-configuration. In the Spring project, rename src/main/resources/application.properties to application.yml and paste in the following issuer URI. Update the value to match your own instance of the Curity Identity Server.
spring:security:oauth2:resourceserver:jwt:issuer-uri: https://idsvr.example.com/oauth/v2/oauth-anonymous
The issuer URI is used by Spring Security to locate the Json Web Key Set (JWKS) endpoint of the Curity Identity Server. Token signing public keys are then downloaded, so that Spring can validate any JWT access tokens received.
Make sure Curity Identity Server is up and running
Your Spring application will fetch the public key when starting up and will fail if the endpoint is not reachable.
Next, create a class at src/main/java/io/curity/example/secureapi/SecurityConfiguration.java and paste in the following contents, to configure Spring as an OAuth resource server:
package io.curity.example.secureapi;import org.springframework.beans.factory.annotation.Value;import org.springframework.context.annotation.Bean;import org.springframework.context.annotation.Configuration;import org.springframework.security.config.annotation.web.builders.HttpSecurity;import org.springframework.security.oauth2.jwt.JwtDecoders;import org.springframework.security.web.SecurityFilterChain;@Configurationpublic class SecurityConfiguration {@Value("${spring.security.oauth2.resourceserver.jwt.issuer-uri}")String issuerUri;@Beanpublic SecurityFilterChain filterChain(final HttpSecurity http) throws Exception {return http.authorizeHttpRequests(authorizeRequests ->authorizeRequests.requestMatchers("/services").hasAuthority("SCOPE_services:read").anyRequest().authenticated()).oauth2ResourceServer(oauth2ResourceServer ->oauth2ResourceServer.jwt(jwt ->jwt.decoder(JwtDecoders.fromIssuerLocation(issuerUri)))).build();}}
This will ensure that all requests are authenticated. It will also verify that any calls to /services have the scope services:read. Spring appends SCOPE_ to all scopes and adds them as an authority.
Run the Demo API
Start the application in your IDE or by running ./gradlew bootRun. The default configuration will start a listener on localhost:8080.
Truststore Issues
The Curity Identity Server ssl certificate must be trusted, otherwise your API will fail to introspect the token. Look at the jvm arguments -Djavax.net.ssl.trustStore and -Djavax.net.ssl.trustStorePassword on how to configure your trust store.
Call the Demo API
Clients will call the API using HTTP requests, with an access token in the Authorization header. The way a client calls the API can be simulated using a cURL request:
curl -i 'http://localhost:8080/services' -H 'Authorization: Bearer eyJraWQiOi...Gba'
If you fail to provide a valid JWT access token, a 401 unauthorized error response is returned in the www-authenticate header:
WWW-Authenticate: Bearer error="invalid_token", error_description="An error occurred while attempting to decode the Jwt: Jwt expired at 2023-06-13T14:16:00Z", error_uri="https://tools.ietf.org/html/rfc6750#section-3.1"
If you fail to provide a JWT with a valid scope of services:read, a 403 forbidden error response is instead returned:
WWW-Authenticate: Bearer error="insufficient_scope", error_description="The request requires higher privileges than provided by the access token.", error_uri="https://tools.ietf.org/html/rfc6750#section-3.1"
Otherwise, if you provide a valid JWT and scope, an array of URLs will be returned, with two elements. If the access token incluides a claim of role=developer, you will receive a third URL, for a developer portal. This demonstrates how dynamic access per user can be granted to your data, using claims:
["https://localhost/service/email","https://localhost/service/support","https://localhost/service/devportal"]
Conclusion
Spring Security provides a productive way to add OAuth security to APIs. Coarse-grained authorization decisions can be made using scopes, which are fixed at design time. Fine-grained authorization decisions can be made using claims, which are assigned to users dynamically at runtime.
For further examples and help regarding OAuth2 and Spring Security, see the Spring Security Reference. See also the following Curity tutorials on implementing OpenID Connect security into Spring websites:
Customer Stories
Learn how organizations run identity and API security at scale.
Read customer storiesWas this helpful?