API Access via JWT Assertions
On this page
Note
The example uses the Curity Identity Server, but you can run the code against any standards-based authorization server.
Overview
The article on Client Assertions and the JWKS URI explained how strong API security can be implemented by requiring clients to authenticate using client assertions. One of the main use cases is when providing B2B APIs to business partners. This article will walk through a basic implementation, to show how to get the following flow working.

Most of the work for this type of solution is done by the company that owns the API. This involves designing the solution, integrating new components, and testing the end-to-end flow before real clients connect.
Since client assertions are used in high security solutions, the code example will use one of the recommended algorithms from the Financial-grade API Security Profile. Crypto details will be managed via a couple of security libraries, so that only high level application code is needed.
Get the Code Example
The code example consists of a few small components, to generate keys, serve a JWKS URI and authenticate via a client assertion, so that an end-to-end solution can be run. First though, ensure that these prerequisites are installed:
Deploy the Curity Identity Server
Next deploy the Curity Identity Server by running the following commands. Then login to the Admin UI at https://localhost:6749/admin with the default credentials of admin / Password1. Run the initial wizard and import a license file when prompted.
cd ../idsvrdocker compose up
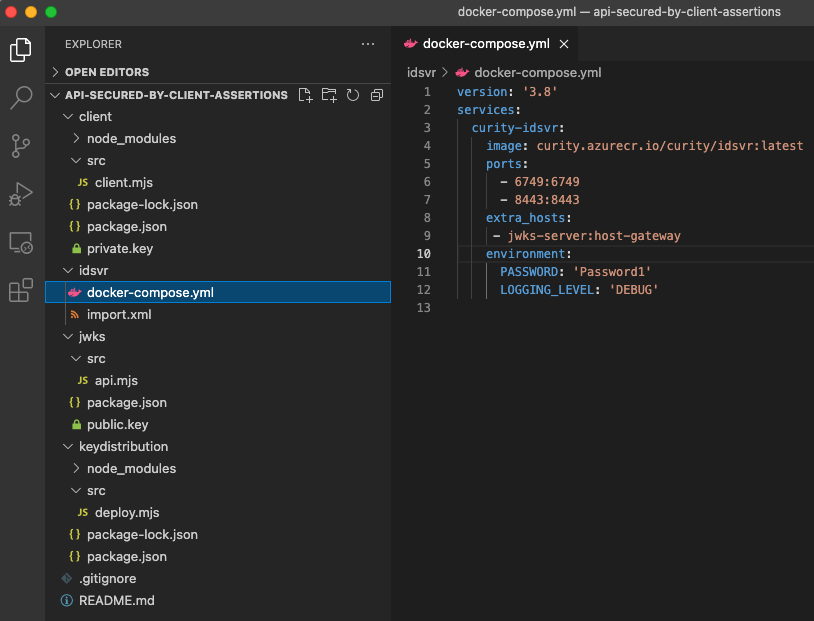
The Docker Compose file uses an extra-hosts parameter that points back to the host computer, so that the Identity Server sees the JWKS URI as http://jwks-server:3000/.well-known/jwks:
version: '3.8'services:curity-idsvr:image: curity.azurecr.io/curity/idsvr:latestports:- 6749:6749- 8443:8443extra_hosts:- jwks-server:host-gatewayenvironment:PASSWORD: 'Password1'
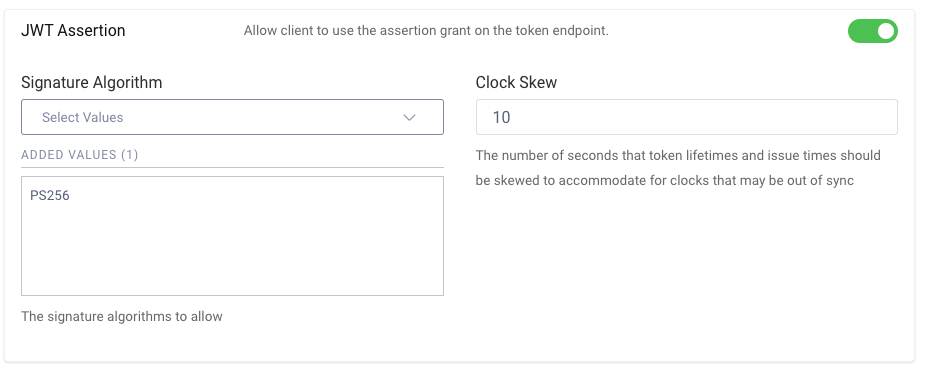
To enable the use of client assertions, navigate to Token Service / Client Settings, and enable the options for JWT Assertions and Asymmetrically Signed JWTs. Then include the PS256 algorithm for both of them:
An OAuth client must also be configured, with the Client Credentials capability and a custom read scope. The client uses an authentication method of jwks-uri, which indicates that the client must use JWT client assertions to authenticate and get an access token before it can call APIs. It also means the Curity Identity Server will call an external trusted URL to download public keys, when validating JWT assertions received from this client.

To configure all settings you can simply select Upload from the Changes menu and import the following XML, using the merge option in the wizard:
<config xmlns="http://tail-f.com/ns/config/1.0"><profiles xmlns="https://curity.se/ns/conf/base"><profile><id>token-service</id><type xmlns:as="https://curity.se/ns/conf/profile/oauth">as:oauth-service</type><settings><authorization-server xmlns="https://curity.se/ns/conf/profile/oauth"><client-authentication><asymmetrically-signed-jwt><signature-algorithm>PS256</signature-algorithm></asymmetrically-signed-jwt></client-authentication><client-capabilities><assertion><asymmetrically-signed-jwt><signature-algorithm>PS256</signature-algorithm></asymmetrically-signed-jwt></assertion></client-capabilities><scopes><scope><id>read</id></scope></scopes><client-store><config-backed><client><id>partner-api-client</id><client-name>partner-api-client</client-name><jwks-uri><uri>http:/jwks-server:3000/.well-known/jwks</uri></jwks-uri><scope>read</scope><capabilities><client-credentials/></capabilities></client></config-backed></client-store></authorization-server></settings></profile></profiles></config>
Distribute JSON Web Keys
Client key management is the most critical part of client assertion solutions. The code example provides a demo level solution, to show the main concepts. Run a terminal window in the code example root folder, then generate some keys via the following commands:
cd keydistributionnpm installnpm start
The code example uses Node.js crypto libraries to generate an asymmetric key pair. The public key is saved to a file in the JWKS folder in JWK format. The private key is saved as a password protected keystore in the client folder:
const algorithm = 'PS256';var keyPair = await generateKeyPair(algorithm);var privateKey = await exportPKCS8(keyPair.privateKey);var keystore = KEYUTIL.getPEM(KEYUTIL.getKey(privateKey), 'PKCS8PRV', 'top secret', 'AES-256-CBC');fs.writeFileSync('../client/private.key', keystore);var publicJwk = await exportJWK(keyPair.publicKey);publicJwk.alg = algorithm;publicJwk.kid = '1';fs.writeFileSync('../jwks/public.key', JSON.stringify(publicJwk, null, 2));
Keys can be distributed in multiple ways, but the party that distributes keys will also provide a JWKS URI endpoint. For B2B APIs, a convenient option is to allow each client to issue its own keys. The data owner then just needs to configure OAuth clients to point to a trusted client URL.
Host a JWKS URI
Next run a simple Node.js API that provides a JWKS URI endpoint, via the following commands:
cd ../jwksnpm installnpm start
Open another terminal window and call the API with the following command, to see the JSON Web Key Set (JWKS) payload, which contains public keys in a JSON format:
curl http://localhost:3000/.well-known/jwks
The Node.js API uses very simple code, to read the public key from the local file and serve it over HTTP in the standard format. In a real setup the trusted public keys would be stored securely, such as in a database.
const server = http.createServer((req, res) => {const json = fs.readFileSync('./public.key', 'ascii');const publicJwk = JSON.parse(json);const keyset = {keys: [publicJwk,],};res.writeHead(200, { 'Content-Type': 'application/json' });res.end(JSON.stringify(keyset));});const port = 3000;server.listen(port, () => {console.log(`JWKS URI is hosted at http://localhost:${port}/.well-known/jwks`);});
Client Authentication
The client will need to be provided with the URL of the token endpoint and the client ID registered in the Authorization Server. The client code will also need to reference the private key with which the assertion is signed, and to supply the corresponding key identifier within the JWKS.
const assertion = await new SignJWT({sub: clientID,iss: clientID,aud: 'http://localhost:8443/oauth/v2/oauth-token',jti: Guid.create().toString(),scope: 'read',}).setProtectedHeader( {kid: keyId, alg: algorithm} ).setIssuedAt(Date.now() - 30000).setExpirationTime(Date.now() + 30000).sign(privateJwk);
Next a simple HTTP POST is performed, to send the client assertion in an advanced form of the client credentials flow, which requires some extended form URL encoded parameters. The demo client then receives back an access token with the read scope configured. The client can then call the API with this access token in the standard way.
const formData = new URLSearchParams();formData.append('grant_type', 'client_credentials');formData.append('client_assertion', assertion);formData.append('client_assertion_type', 'urn:ietf:params:oauth:client-assertion-type:jwt-bearer');const response = await fetch('http://localhost:8443/oauth/v2/oauth-token', {method: 'POST',headers: {'content-type': 'application/x-www-form-urlencoded','accept': 'application/json',},body: formData,});if (response.status === 200) {const data = await response.json();console.log(data.access_token);}
API Access
In most cases, no code needs to change in the actual API as the result of requiring clients to use assertions. On each request, the API simply validates the JWT access token it receives, then authorizes using Scopes and Claims.
It is possible though to include custom claims from authentication in the final JWT access token. This would enable the API to authorize access to particular operations based on the authentication strength of the client.
Finishing Touches
A real world solution would require more thought related to key distribution, threats and people processes. Some code would be needed to add secured administrative endpoints to the JWKS URI utility API, to support adding new keys and removing old ones.
Conclusion
Security for B2B APIs can be strengthened by requiring clients to authenticate via a JWT client assertion, before they can get an access token with which to call the API. Since message level security is used, no special infrastructure is needed, and the solution is easy to manage operationally. This tutorial has shown that only simple code is required.
Customer Stories
Learn how organizations run identity and API security at scale.
Read customer storiesWas this helpful?