Securing a Serverless API with JWTs
On this page
Overview
This code example shows how an API can use Self Contained JWTs, where token signing details are included in the JWT itself. The API's token validation then needs to be updated to verify the token signing certificate trust chain.
Code is written in Node.js, though the pattern can be applied in any API technology. The Serverless Framework is used to deploy the API as lambdas, with no infrastructure to manage. A new lambda function is created for every API request, and the API is unable to cache JSON Web Keys.
Note
The example uses the Curity Identity Server, but you can run the code against any standards-based authorization server.
Curity Identity Server
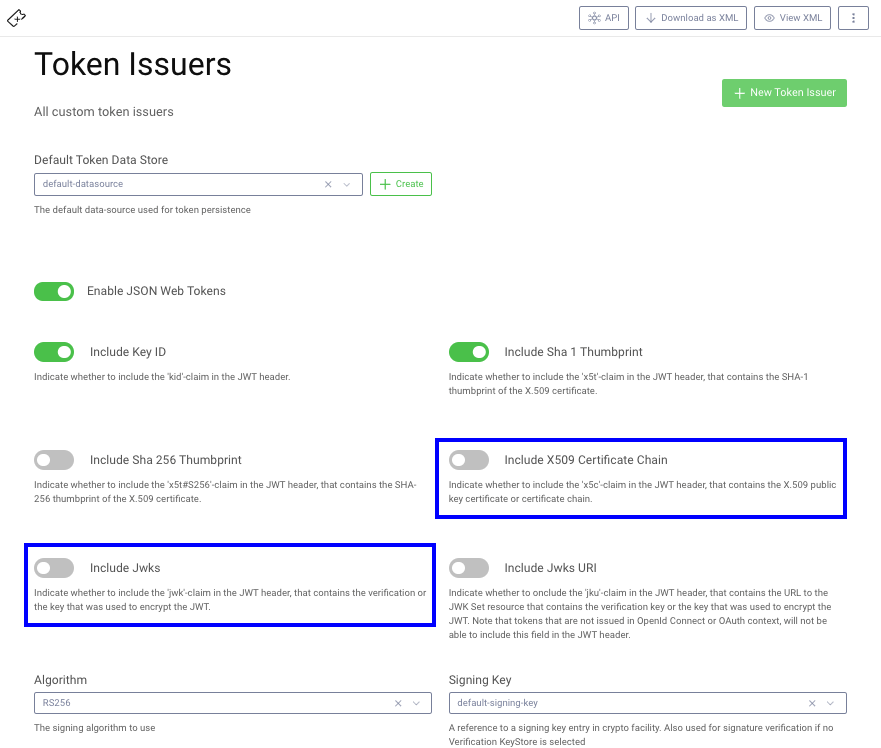
Starting from release 6.4 of the Curity Identity Server, additional JWT options are available under Token Issuers. Either of the two highlighted options enable the token signing key details to be included within the JWT:
Get the Code
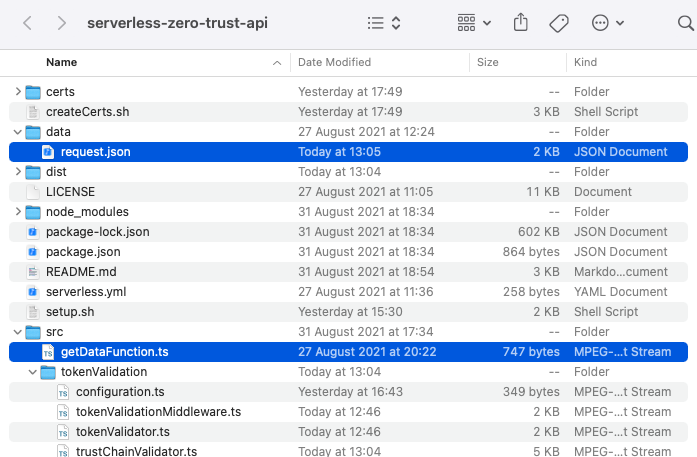
First clone the GitHub repository and browse the code, which consists of a number of classes, and the main security work is in the TrustChainValidator and TokenValidator source files, which are coded as plain classes:
The serverless.yml file contains a very simple API consisting of a single lambda function that could be exposed via an HTTPS endpoint:
service: demofunctions:getDataFunction:handler: dist/getDataFunction.handlerevents:- http:path: /datamethod: get
The lambda function itself, in the getDataFunction source file, just uses claims that are available after the security work is complete, and returns a hard coded message to the caller. A middleware class runs before the actual API logic, to perform the security work:
const lambda = async (event: any, context: any) => {console.log(event.claims);return {status: 200,body: JSON.stringify({message: `API successfully validated the JWT and verified its trust chain`}),};};const handler = middy(lambda).use(new TokenValidationMiddleware(new Configuration()))export {handler};
Run the Code
We can install dependencies and run the code via the following standard Node.js commands:
npm installnpm start
Initially this will fail verification, and the API writes a log line with the cause, then returns a 401 JSON response to the caller:
SERVER-ERROR-LOG: x5c certificate chain verification failed : forge.pki.UnknownCertificateAuthority : Certificate is not trusted.{"status": 401,"body": "{\"code\":\"unauthorized\",\"message\":\"Missing, invalid or expired access token\"}"}
The call to npm start translates into a Serverless call that references a JSON file:
sls invoke local -f getDataFunction -p data/request.json`
The JSON file contains the event context, including an HTTP authorization header containing a stored JWT access token. In a deployed setup this data would derive from the incoming HTTP request:
{"httpMethod": "GET","headers": {"Authorization": "Bearer eyJraWQiOi ..."}}
Create Certificates
Next ensure that the OpenSSL Tool is installed, which is available by default on some operating systems, then run the createCerts.sh script. This will create a number of self signed certificate files for demo purposes, to simulate a Public Key Infrastructure (PKI) on a development computer:
| Certificate | Description | Lifetime |
|---|---|---|
| signing.p12 | A token signing key + certificate file, with the password from the createCerts.sh script | 6 months |
| intermediate.pem | The public key of the intermediate key + certificate used to issue the signing certificate | 10 years |
| root.pem | The public key of the root key + certificate used to issue the intermediate certificate | 10 years |
The signing certificate will be imported into the Curity Identity Server, and the intermediate and root certificates will be deployed with the API, which will use a Public Key Infrastructure library to verify the trust chain of received tokens.
Configure Token Signing
In the Curity Identity Server Admin UI, open the Facilities menu and navigate to Keys and Cryptography → Signing. Import the key by clicking on the + next to Signing Keys.
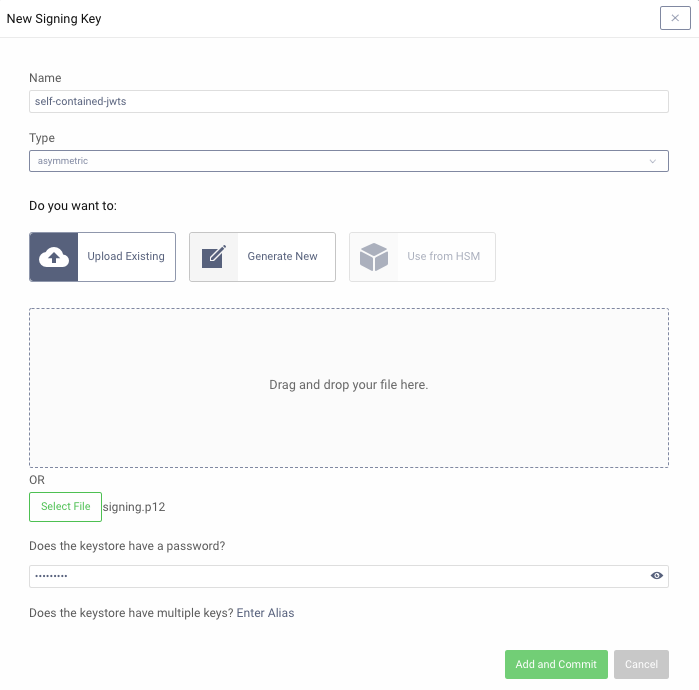
Then view the signing key details and notice that it contains a full certificate chain that will be included in JWTs issued:

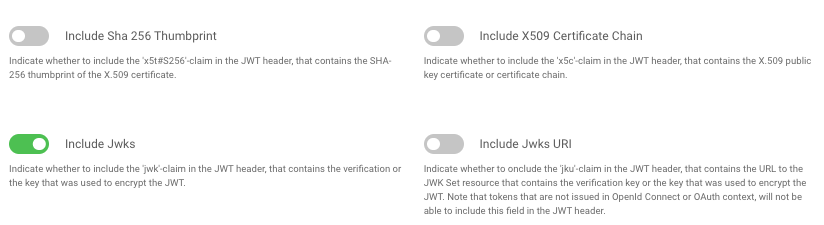
Finally, navigate to Profiles → Token Service → Token Issuers and select the imported signing certificate, and either activate the Include X509 Certificate Chain or the Include Jwks option:
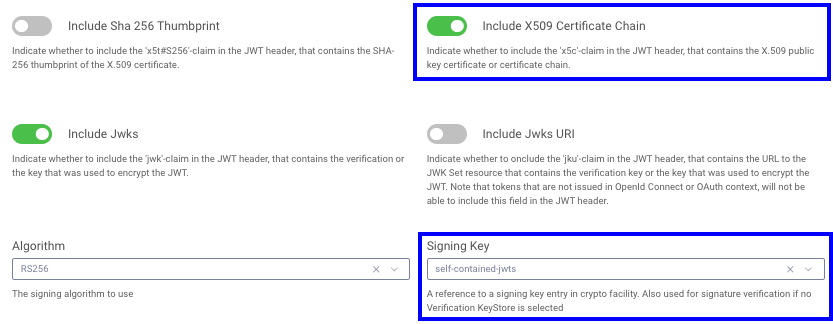
This will result in the JWT header of access tokens being updated with the certificate chain:
{kid: '-1614245140',x5t: 'lDdNIsb3FxulMcYdAXxYJ_Z5950',x5c: ['MIIDqjCCApKgAwIBAgIESLNEvDA ...','MIICwzCCAasCCQCKVy9eKjvi+jA ...','MIIDTDCCAjSgAwIBAgIJAPlnQYH...'],alg: 'RS256'}
Configure Clients
Configure two clients with the following names:
| Client | Description |
|---|---|
| test-client | Will get an opaque access token using the client credentials grant, to send to the Serverless API |
| introspect-client | Will swap the opaque access token for a self contained JWT containing token signing certificate details |
The XML for these clients is very standard and is included below:
<client><id>test-client</id><client-name>test-client</client-name><secret>Password1</secret><audience>api.example.com</audience><scope>read</scope><capabilities><client-credentials/></capabilities></client><client><id>introspect-client</id><client-name>introspect-client</client-name><secret>Password1</secret><capabilities><introspection/></capabilities></client>
Next edit the setup.sh script, to match the URL and client details from your system. Then run the script, which will get the above tokens and update the data/request.json with a JWT issued by your own identity server.
Call the API Successfully
Next update the code example's Configuration class to match the details from your system:
export class Configuration {public issuer = 'https://locahost:8443/oauth/v2/oauth-anonymous';public audience = 'api.example.com';public algorithm = 'RS256';public deployedCertificatesLocation = './certs';}
Then run npm run build and npm start again to call the API with the JWT access token. The lambda will verify the trust chain of the JWT's embedded certificate details, perform standard JWT verification, output claims received, then return a success response to the caller:
{jti: 'a9be6c57-88a1-4ba2-ac7e-7292a7fd8aff',delegationId: '4592296b-4b29-43ec-82b6-c4b41534ee12',exp: 1630428061,nbf: 1630427761,scope: 'read',iss: 'https://login.curity.local/oauth/v2/oauth-anonymous',sub: '5618181005e8afaea290576cbf7e83094e8c9a1d034209b0d6eedb82cbe18b65',aud: 'api.example.com',iat: 1630427761,purpose: 'access_token'}{"status": 200,"body": "{\"message\":\"API successfully validated the JWT and verified its x5c trust chain\"}"}
A real API would then continue by using the claims to implement its authorization, as described in the Claims Best Practices article.
Whitelisted Token Issuers
When token signing details are included in the JWT itself, extra checks are needed to ensure that the certificate in the token can be trusted. This is done by deploying a set of whitelisted certificate authorities (CA) with the API. Note that CAs are typically very long lived, whereas the token signing certificate itself is shorter lived. This means that renewing the token signing certificate has no impact on the API's reliability.
Verifying an x5c Field
The example API uses the Node Forge PKI Library to implement PKI related checks and deploys its CAs as separate files. When tokens are validated, the API loads this data into a trust store:
const trustStore = await this.getWhitelistedCertificateIssuers();
The x5c field has a format described in RFC7515, and it is parsed into a certificate chain:
const pemCerts = this.getReceivedCertChain(jwtHeader.x5c);const receivedCertChain = pemCerts.map((pem) => pki.certificateFromPem(pem));
Next the received certificate details undergo PKI checks according to RFC5280. Once this check completes, the API trusts that the token has been issued by its Authorization Server:
pki.verifyCertificateChain(trustStore, receivedCertChain);
Finally the first certificate in the chain is the token signing public key, and this is converted into a crypto object to use for the JWT validation:
const publicKey = crypto.createPublicKey(pemCerts[0]);
Standard JWT Validation
The example API uses the Jose Library to perform the actual JWT validation, to verify the following aspects:
- The token is signed with the verified token signing certificate, and has not been tampered with
- The token is from the expected issuer
- The audience of the token matches that of this API
- The token is valid at this time and not expired
The token signing certificate is the first certificate in the chain, and this value is used during the token's signature validation:
const tokenSigningPublicKey = crypto.createPublicKey(certChain[0]);const options = {algorithms: [this._configuration.algorithm],issuer: this._configuration.issuer,audience: this._configuration.audience,};const result = await jwtVerify(accessTokenJwt, tokenSigningPublicKey, options);return result.payload;
Verifying a jwk Field
An alternative option that may work better in some API technology stacks is to select the JWK option in the Curity Identity Server:
This results in a full jwk field being received in the JWT header, which also includes an x5c field:
{kid: '-1614245140',x5t: 'lDdNIsb3FxulMcYdAXxYJ_Z5950',jwk: {kty: 'RSA',alg: 'RSA',n: 'hLjc255V6xkm3zBhh1tlTj14B ...',e: 'AQAB',x5c: ['MIIDqjCCApKgAwIBAgIESLNEvDA ...','MIICwzCCAasCCQCKVy9eKjvi+jA ...','MIIDTDCCAjSgAwIBAgIJAPlnQYH...'],x5t: 'lDdNIsb3FxulMcYdAXxYJ_Z5950'},alg: 'RS256'}
In this case the only difference to the trust chain validation is to extract the x5c field differently:
const x5c = jwtHeader.jwk.x5c;
The trust chain is then verified in the same way, after which the JWK is supplied to the JWT validation library via a different type of crypto object:
const jsonWebKey = parseJwk(jwk)await jwtVerify(accessTokenJwt, jsonWebKey, options);
Conclusion
JWTs can be configured to contain embedded public key details, and this can be useful if JWKs cannot be cached, or in order to make additional Public Key Infrastructure checks against received JWTs.
The API must then verify the trust chain of the received token signing certificate, and this can be done in any programming language by plugging in a PKI library. This code example showed how to do this for Serverless lambdas, as part of a Zero Trust Architecture.
Customer Stories
Learn how organizations run identity and API security at scale.
Read customer storiesWas this helpful?