
Non-Templatized Dynamic Client Registration
On this page
Non-Templatized Dynamic Client Registration
This tutorial shows step by step how to enable Dynamic Client Registration with non-templatized clients in the Curity Identity Server. Before you continue, make sure you are familiar with how DCR works by reading Dynamic Client Registration Explained and Using Dynamic Client Registration.
Pre-requisites
This tutorial builds on the configuration setup described in the steps First Configuration and Configure an Authenticator under the menu Getting Started. If you have not gone through those steps yet, you can visit the guides by clicking on the links.
You may run this tutorial on a custom setup also, but keep in mind that names and URLs may be different, as well as the capabilities configured in the profiles.
You also need the client from the Client Credentials Tutorial.
Overview
Non-templatized DCR allows a registering client to define all parameters of the new client, in contrast to Templatized DCR where the client instantiates a clone of a pre-defined template in the Curity Identity Server.
To be able to register a new client, the registering client first needs to obtain an initial access token. This is a token with the scope dcr. During the setup, you specify which clients you allow to obtain the initial access token to register new clients.
Setup in Curity
Visit the Profiles screen and click the Token Service.
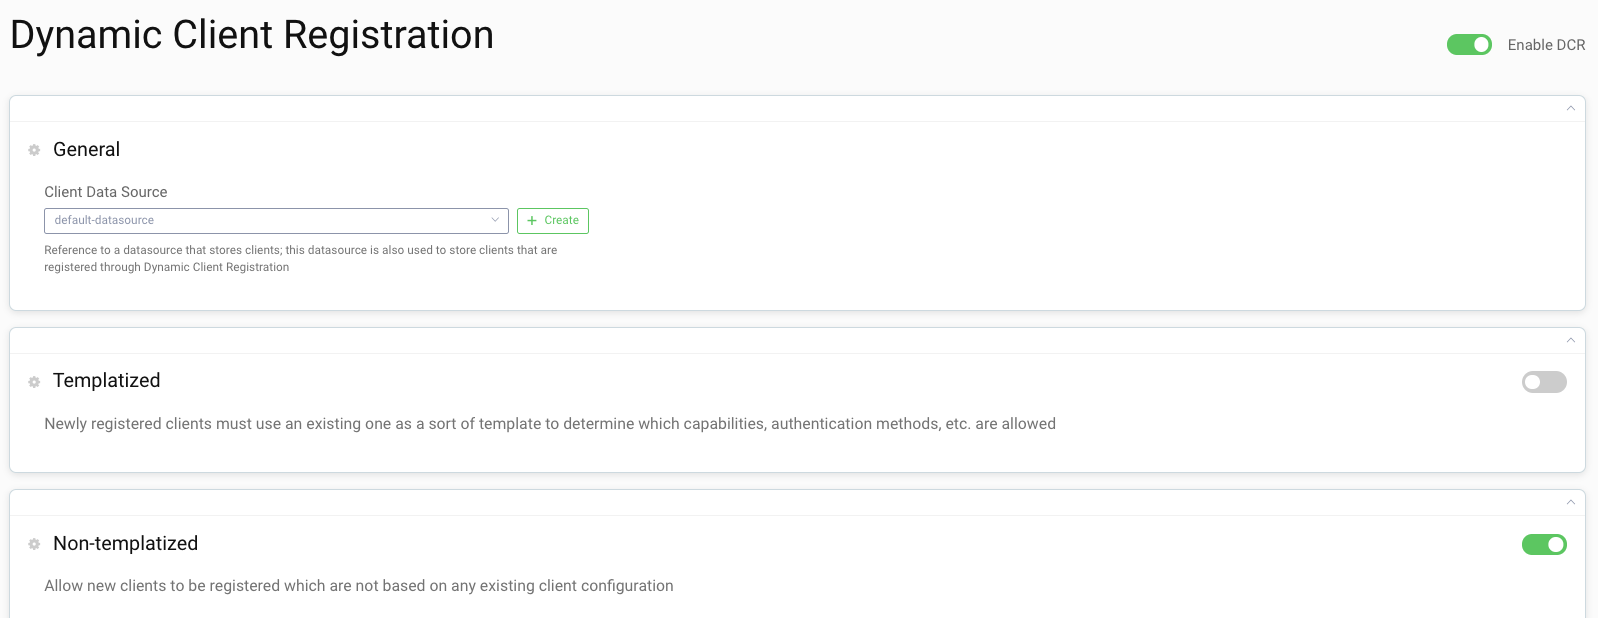
Enable Non Templatized DCR
In the menu on the left side, navigate to General → Dynamic Registration
-
Click Enable Dynamic Client Registration.
-
Toggle on Non Templatized. You can leave Templatized enabled as both methods can be used at the same time.
-
Click Next.
-
Select the
token-datasourceordefault-datasourceas the Client Data Source depending on what you select in the initial wizard. -
Select
authenticate-client-byin the dropdown for Authentication Method. -
Select
serverfrom the list of available clients. -
Click Next.
-
Mark Select All to deploy the DCR endpoint to all nodes.
-
Click Commit to commit the changes.
Authentication Method
This tutorial uses the authenticate-client-by authentication method which requires a registering client that supports the Client Credentials flow to obtain the initial access token.
The Curity Identity Server also supports a user interactive flow, where the user needs to authenticate in order to register a new client. It is also possible to register clients without any form of authentication. However, these are out of scope of this tutorial.
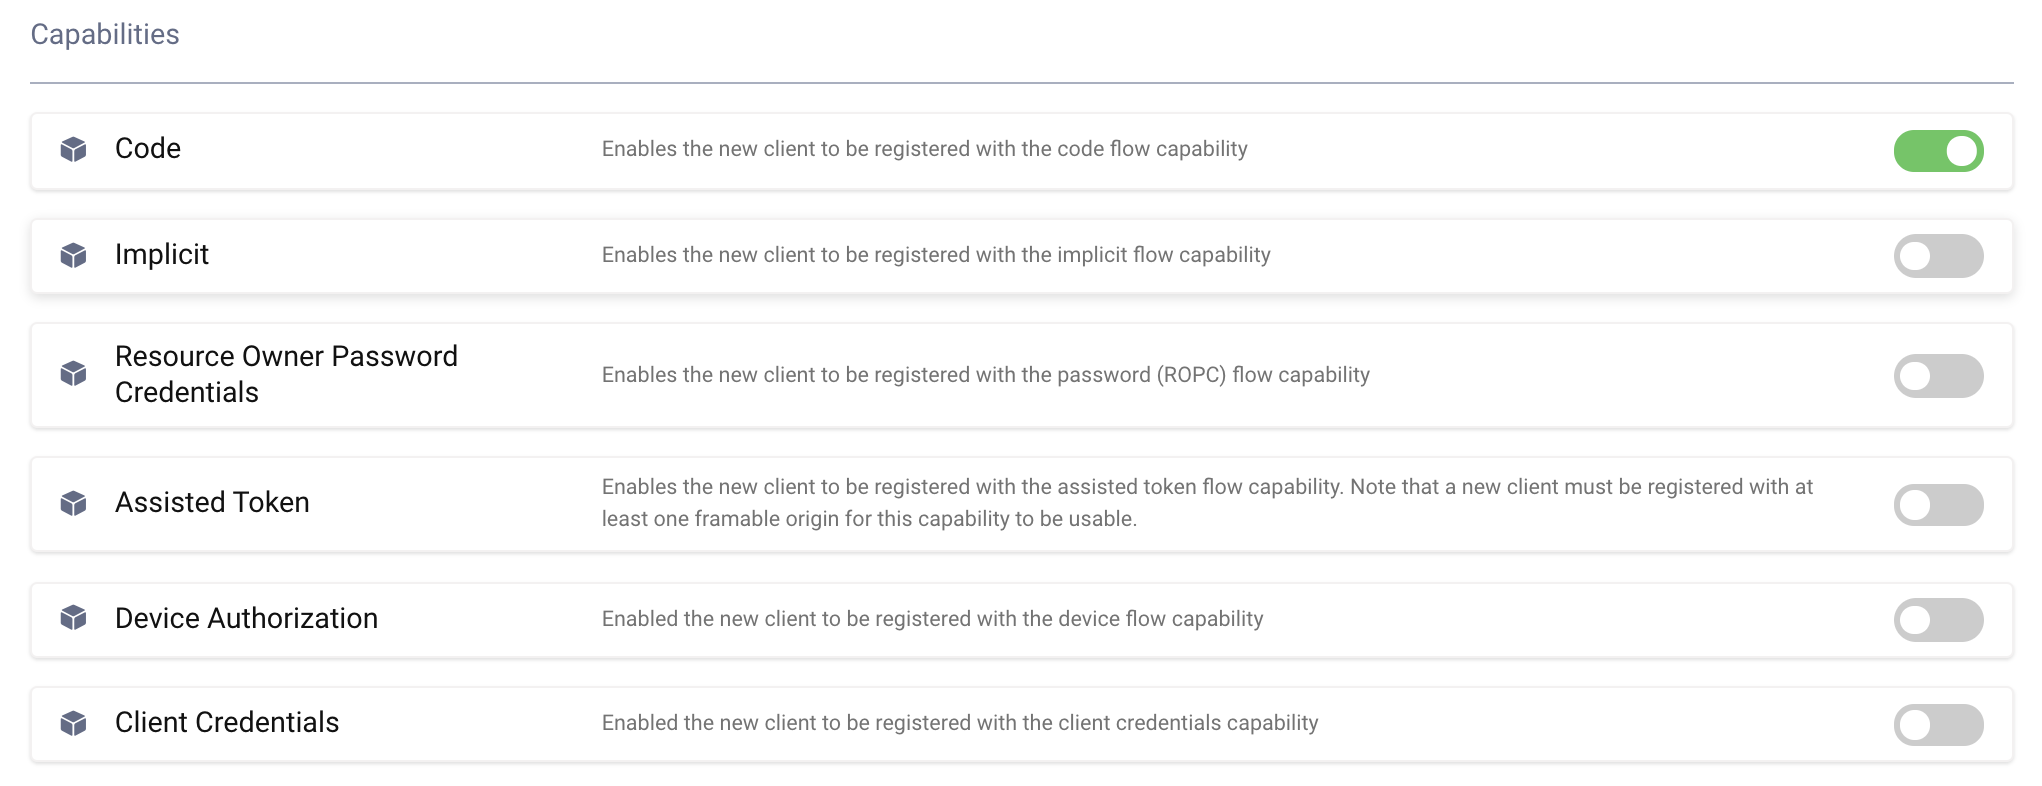
Allowed Capabilities
This section defines what types of new clients that may register. The example of this tutorial makes use of the code capability.
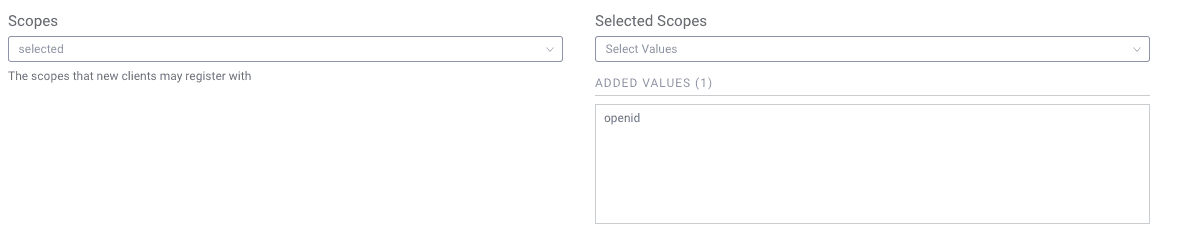
Select Allowed Scopes
Select the scopes the client should be allowed to register for. This can either be all or selected. Go ahead and use selected and add the scope openid
User Authentication
Select the allowed authenticators that these clients can use. Either all or selected. The client can restrict this further during registration, but if nothing is done, the user is presented with a choice of authenticators when logging in.
Keep all.

Commit
Make sure to remember to commit the changes in the Changes → Commit menu.
Registering a new Client
Now that you have configured the setup, you can register a new client.
First, obtain an initial access token. To do so, use the server client. The only scope you should request is dcr. This scope is not visible in the configuration and the Curity Identity Server added it to that client automatically when you selected it to be used with the authenticate-client-by method.
Obtain Initial Access Token
curl -X POST \https://localhost:8443/oauth/v2/oauth-token \-H 'Content-Type: application/x-www-form-urlencoded' \-d 'grant_type=client_credentials&client_id=server&client_secret=THE_SECRET&scope=dcr'
The response looks similar to the following example:
{"access_token": "87f72f27-67a5-4bdd-b878-615b958c50b0","scope": "dcr","token_type": "bearer","expires_in": 300}
One time token
The initial access token with the dcr scope can only be used once. If your request fails for some reason, you need to request a new access token before trying again.
Register a Client
Now use the token from the previous request to register a new client.
You need to provide some parameters to mark for the Curity Identity Server what capabilities the registering client supports. The following command registers a code flow client. Since code flow is the default if you omit the grant_types parameter, it's enough to specify the additions to that.
redirect_uri: where the callback of the client isscope: what scopes the client should be able to request
curl -X POST \https://localhost:8443/oauth/v2/oauth-dynamic-client-registration \-H 'Authorization: Bearer 87f72f27-67a5-4bdd-b878-615b958c50b0' \-H 'Content-Type: application/json' \-d '{"redirect_uris": ["https://localhost/callback"],"scope" : "openid"}'
The response is a json document similar to the following:
{"grant_types": ["authorization_code","refresh_token"],"subject_type": "public","default_acr_values": ["urn:se:curity:authentication:html-form:username-password"],"redirect_uris": ["https://localhost/callback"],"client_id": "9806e2ff-60e6-4e83-96c6-4c4814b244c3","token_endpoint_auth_method": "client_secret_basic","client_secret_expires_at": 0,"scope": "openid","client_id_issued_at": 1560330939,"client_secret": "rUgOmkacJZDvkAB00XO9G07UsszntRt5YipAU4QTn_E","id_token_signed_response_alg": "RS256","response_types": ["code","id_token"],"refresh_token_ttl": 3600}
The response contains all the necessary metadata the client needs in order to start making requests.
The important fields are the client_id and client_secret.
Run The Code Flow with The New Client
Call the authorize endpoint. Open a browser and enter the following URL (adapt the client_id parameter with the value that you received from the registration):
https://localhost:8443/oauth/v2/oauth-authorize?response_type=code&client_id=9806e2ff-60e6-4e83-96c6-4c4814b244c3&scope=openid&redirect_uri=https://localhost/callback`
With the resulting code call the token endpoint. Adapt the parameters accordingly.
curl -X POST \https://localhost:8443/oauth/v2/oauth-token \-H 'Content-Type: application/x-www-form-urlencoded' \-d 'grant_type=authorization_code&client_id=9806e2ff-60e6-4e83-96c6-4c4814b244c3&client_secret=rUgOmkacJZDvkAB00XO9G07UsszntRt5YipAU4QTn_E&code=gPsQ97Al9K5vsVdlc7JRK2DbbwDKVNR2&redirect_uri=https%3A%2F%2Flocalhost%2Fcallback'
If you need to refresh you know-how of the code flow study the Code Flow Overview or the Code Flow Tutorial.
Conclusion
Using non-templatized clients gives you more fine grained control of what to register. However, it also means that as an application developer you need to know more details such as the grant_type, redirect_uri and scopes.

Join our Newsletter
Get the latest on identity management, API Security and authentication straight to your inbox.

Start Free Trial
Try the Curity Identity Server for Free. Get up and running in 10 minutes.
Start Free TrialWas this helpful?