
iOS Integration of the HAAPI Mobile UI SDK
On this page
The UI SDK for the Hypermedia Authentication API (HAAPI) enables you to quickly implement a security hardened OAuth or OpenID Connect flow for a mobile app. This tutorial demonstrates a fast implementation in a brand new mobile app. For an introduction to HAAPI concepts, see the overview article, or browse the HAAPI Whitepaper for details on the security design.
An end-to-end solution involves calls from the SDK to the HAAPI endpoints of the Curity Identity Server. The SDK first uses attestation to provide proof of the app's identity, then sends an OpenID Connect authentication request. The login flow is then dictated by responses from the API, and the SDK implements many frontend behaviors, which can include navigation, waiting for user input, invoking an external browser, polling, and responding to invalid input.
Provide an Application
Start by opening Xcode, then create a new iOS app. Set Swift as the development language and use SwiftUI as the user interface technology.
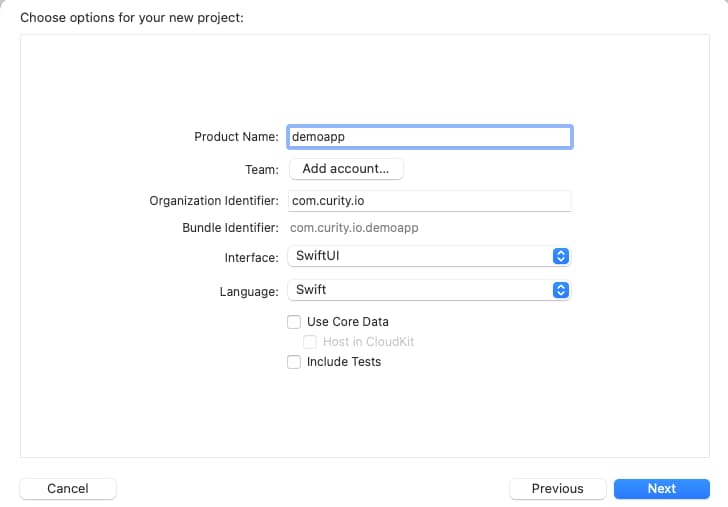
Ensure that the project's deployment target is 14.0 or later, then replace the contents of the ContentView source file with the following basic elements:
import SwiftUIstruct ContentView: View {@State private var isLoggingIn: Bool = falsevar body: some View {VStack {Text("HAAPI iOS Demo App").font(.system(size: 20)).fontWeight(.bold).frame(width: UIScreen.main.bounds.size.width * 1.0, height: 50, alignment: .leading).padding(.leading, 20).background(Color.black).foregroundColor(Color.white)Text("Unauthenticated View").font(.system(size: 20)).fontWeight(.bold).padding(.top, 10).padding(.bottom, 20)Button {isLoggingIn = true} label: {Text("Start HAAPI Login")}.frame(width: UIScreen.main.bounds.size.width * 0.8, height: 40).background(Color.blue).foregroundColor(Color.white).cornerRadius(5)Spacer()}.padding(10)}}
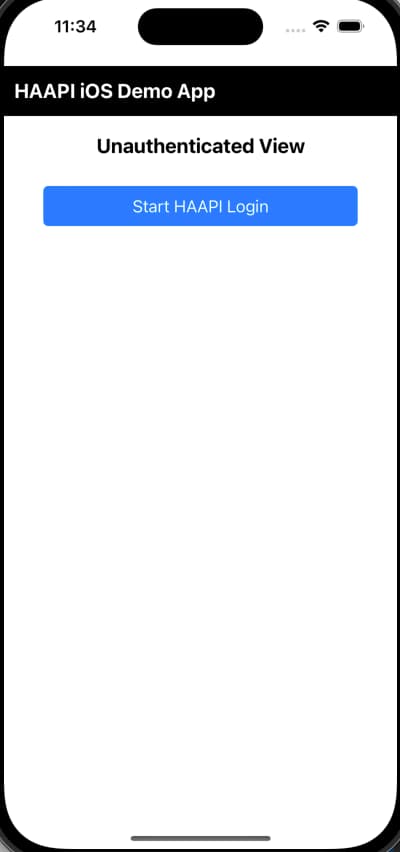
Run the Initial App
Next, run the minimal app, to show the initial screen with the basic theme provided above:
Integrate the HAAPI SDK
You can obtain the SDK from the Curity GitHub repository, and add the SDK to your project either by using the Swift Package Manager or through CocoaPods.
You can add the following to your Package.swift file:
.package(url: "https://github.com/curityio/ios-idsvr-haapi-ui-kit-dist")
If you're not using the Package.swift file, and you prefer to add the dependencies directly in Xcode, follow these steps:
- In Xcode choose File → Add Packages... from the menu.
- Enter
https://github.com/curityio/ios-idsvr-haapi-uikit-distto the search field. - Choose the desired version policy (you can leave the default settings).
- Click Add Package to add the dependency.
To use the SDK classes, start by replacing the ContentView file with the following code, to implement the HaapiFlowResult protocol. This code can be added wherever you would like within your mobile app:
import SwiftUIimport IdsvrHaapiUIKitstruct ContentView: View, HaapiFlowResult {let haapiApplication: HaapiUIKitApplication@State private var tokens: OAuthTokenModel? = nil@State private var isLoggingIn: Bool = falsevar body: some View {VStack {Text("HAAPI iOS Demo App").font(.system(size: 20)).fontWeight(.bold).frame(width: UIScreen.main.bounds.size.width * 1.0, height: 50, alignment: .leading).padding(.leading, 20).background(Color.black).foregroundColor(Color.white)Text("Unauthenticated View").font(.system(size: 20)).fontWeight(.bold).padding(.top, 10).padding(.bottom, 20)Button {isLoggingIn = true} label: {Text("Start HAAPI Login")}.frame(width: UIScreen.main.bounds.size.width * 0.8, height: 40).background(Color.blue).foregroundColor(Color.white).cornerRadius(5)Spacer()}.padding(10).sheet(isPresented: $isLoggingIn) {HaapiFlow.start(self,haapiUIKitApplication: haapiApplication,haapiDeepLinkManageable: HaapiDeepLinkManager.shared)}.alert("Login completed and tokens received", isPresented: Binding<Bool>.constant(oAuthTokenModel != nil)) {} message: {Text(oAuthTokenModel?.accessToken ?? "")}}func didReceiveOAuthModel(_ tokens: OAuthModel) {guard let model = tokens as? OAuthTokenModel else {return}self.tokens = modelself.isLoggingIn = false}func didReceiveError(_ error: Error) {self.tokens = nilself.isLoggingIn = false}}
Update the application class to reference an app delegate class, to pass the application instance to the content view. Optionally, you can also add support for any authentication methods that use deep linking:
import SwiftUIimport IdsvrHaapiUIKit@mainstruct DemoApp: App {@UIApplicationDelegateAdaptor(DemoAppDelegate.self) var appDelegatevar body: some Scene {WindowGroup {ContentView(haapiApplication: appDelegate.haapiUIKitApplication).onOpenURL(perform: handleUrl(url:))}}func handleUrl(url: URL) {if HaapiDeepLinkManager.shared.canHandleUrl(url) {HaapiDeepLinkManager.shared.handleUrl(url)}}}
Next, provide an AppDelegate class that configures the HAAPI SDK with your OAuth settings, to point the app to your instance of the Curity Identity Server. The objects created here are used throughout the lifetime of your app, as the user signs in and out:
import SwiftUIimport IdsvrHaapiUIKitclass DemoAppDelegate: NSObject, UIApplicationDelegate {private enum Constants {static let clientId = "haapi-ios-client"static let redirectUri = "haapi:start"static let scopes = ["openid", "profile"]static let baseURL = URL(string: "https://login.example.com")!static let tokenEndpointURL = URL(string: "/oauth/v2/oauth-token", relativeTo: baseURL)!static let authorizationEndpointURL = URL(string: "/oauth/v2/oauth-authorize", relativeTo: baseURL)!}var haapiUIKitConfiguration = HaapiUIKitConfigurationBuilder(clientId: Constants.clientId,baseUrl: Constants.baseURL,tokenEndpointUrl: Constants.tokenEndpointURL,authorizationEndpointUrl: Constants.authorizationEndpointURL,appRedirect: Constants.redirectUri).setOauthAuthorizationParamsProvider { OAuthAuthorizationParameters(scopes: Constants.scopes) }.setTokenBoundConfiguration(configuration: BoundedTokenConfiguration()).setPresentationMode(mode: PresentationMode.modal).setShouldAutoHandleFlowErrorFeedback(value: true).build()var haapiUIKitApplication: HaapiUIKitApplication!func application(_ application: UIApplication, didFinishLaunchingWithOptions launchOptions: [UIApplication.LaunchOptionsKey: Any]?) -> Bool {HaapiLogger.followUpTags = DriverFollowUpTag.allCases + SdkFollowUpTag.allCases + UIKitFollowUpTag.allCasesHaapiLogger.enabled = truehaapiUIKitApplication = HaapiUIKitApplicationBuilder(haapiUIKitConfiguration: haapiUIKitConfiguration).build()return true}}
The iOS UI SDK Documentation provides further details on options or you can use the HAAPI code example as a guide. Configure a TokenBoundConfiguration object so that DPoP proofs protect requests for OAuth tokens. Read more about protected token requests in the Security Lifecycle tutorial.
If required, additional authentication request parameters, such as prompt and max_age can be included in the extraRequestParameters field of the OAuthAuthorizationParams object. To support different languages, the HAAPI SDK enables you to specify a custom Accept/Language header. The following example forces a login on every authentication request, and also uses Portuguese translations for login screens:
var haapiUIKitConfiguration = HaapiUIKitConfigurationBuilder(clientId: Constants.clientId,baseUrl: Constants.baseURL,tokenEndpointUrl: Constants.tokenEndpointURL,authorizationEndpointUrl: Constants.authorizationEndpointURL,appRedirect: Constants.redirectUri).setOauthAuthorizationParamsProvider { OAuthAuthorizationParameters(scopes: Constants.scopes,extraRequestParameters: ["prompt": "login"]) }.setTokenBoundConfiguration(configuration: BoundedTokenConfiguration()).setHttpHeadersProvider(provider: { ["Accept-Language": "pt"] }).setPresentationMode(mode: PresentationMode.modal).setShouldAutoHandleFlowErrorFeedback(value: true).build()
If you need to support devices without hardware attestation support, you can do so by configuring attestation fallback, though you can ignore those options when getting started.
Authenticate a User
When you click the app's Start HAAPI Login button, the SDK will read the configuration details from the application class, then run the HAAPI login flow. This triggers a code flow, so the user can authenticate in many ways. All authentication requests are sent in an API driven manner.
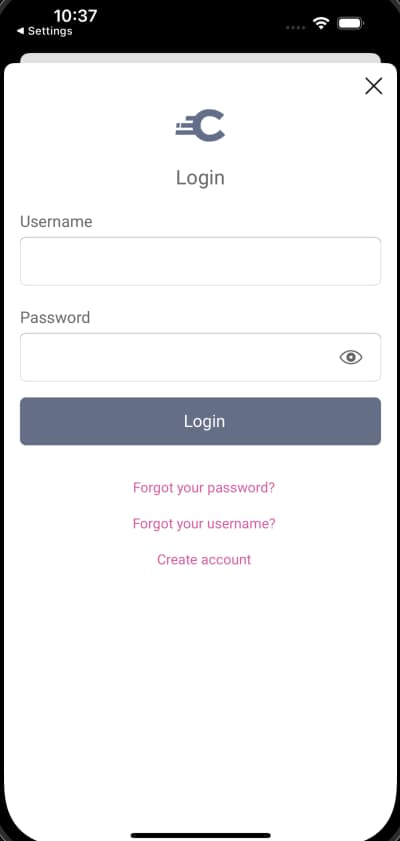
The following example uses a simple username and password authenticator, with the default look and feel. A modal window can be used, which enables you to implement authentication without impacting the main app's navigation.
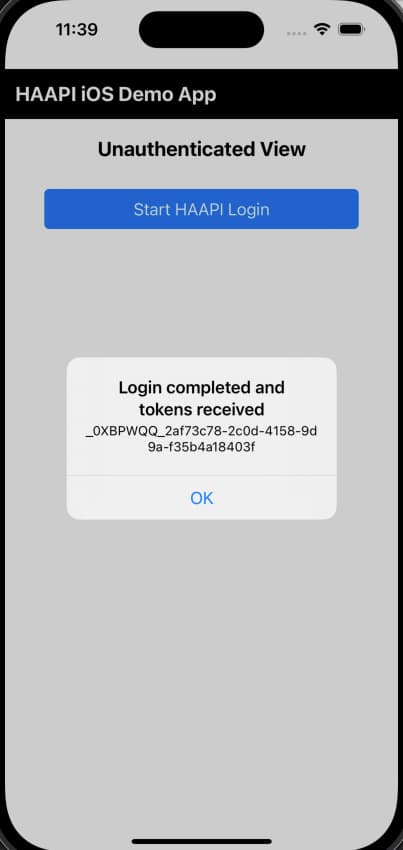
Once authentication is complete, the app receives a token response. This consists of an access token, and a refresh token if enabled. When the openid scope is used, an ID token is also received. A real app would then store tokens in memory or secure storage, then use them to call APIs, in the standard way.
Handle Error Responses
Authentication can fail for various reasons, such as invalid input, invalid credentials or misconfiguration of the security settings. The UI SDK handles error responses for you, and provides default presentation. Ths error look and feel is shown in the username password screenshots.
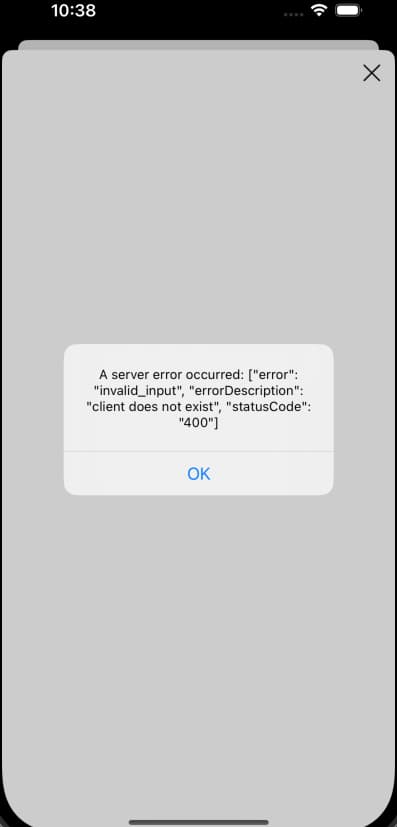
In the event of technical errors where HAAPI cannot continue, the UI SDK presents an alert dialog. The following unexpected error was simulated by configuring an invalid client ID. An error_description is returned if expose detailed error messages is enabled against the token service of the Curity Identity Server (you should disable that option for production environments).
Usually a mobile app has its own error handling policies and displays. To prevent the default popup, set setShouldAutoHandleFlowErrorFeedback(value: false) on the configuration builder. You can then use the didReceiveError handler to extract error details from HAAPI errors.
The following example shows the approach, where the two main error types are HaapiError for backend errors like rejected OAuth requests, or HaapiUIKitError for frontend errors like mobile connectivity failures. Read more about error handling in the SDK documentation.
func didReceiveError(_ error: Error) {self.oauthState.isLoggingIn = falseif let backendError = error as? HaapiError {self.error = ApplicationError(title: "HAAPI Server Error",description: getBackendErrorDescription(error: backendError))} else if let frontendError = error as? HaapiUIKitError {self.error = ApplicationError(title: "HAAPI Client Error",description: getFrontendErrorDescription(error: frontendError))} else {self.error = ApplicationError(title: "HAAPI Error",description: error.localizedDescription)}}static func getBackendErrorDescription(error: HaapiError) -> String {var code = ""var description = ""switch error{case .attestationFailure(let cause): description = cause!.localizedDescriptioncase .serverError(let error, let errorDescription, _): code = error; description = errorDescriptioncase .communication(let message, _): code = "http_error"; description = messagedefault: description = error.failureReason}var parts: [String] = []parts.append("code: \(code)")parts.append(description)return parts.joined(separator: ", ")}static func getFrontendErrorDescription(error: HaapiUIKitError) -> String {var code = ""var description = ""switch error{case .illegalState(let reason): code = "illegal_state"; description = reasoncase .other(let error): code = "general_error"; description = error.localizedDescriptiondefault: code = error.error; description = error.failureReason}var parts: [String] = []parts.append("code: \(code)")parts.append(description)return parts.joined(separator: ", ")}
Use SDK Logging
During development, you can enable logger classes in the UI SDK to get further information on technical behavior. When getting integrated, add the following code to your application's startup code to get full log information.
HaapiLogger.isInfoEnabled = trueHaapiLogger.isDebugEnabled = trueHaapiLogger.isSensitiveValueMasked = falseHaapiLogger.followUpTags = DriverFollowUpTag.allCases + SdkFollowUpTag.allCases + UIKitFollowUpTag.allCases
You can then view output in Xcode's output window, to see information that includes both API JSON responses and details of models that the SDK uses. Later, when you produce production builds, disable HAAPI logging.
2023-07-06 09:35:57.252770+0200 demoapp[36935:644803] [HAAPI_SDK_HTTP] [DEBUG] HaapiManager.334 : Received representation data: {"links":[{"href":"/authn/authentication/Username-Password/forgot-password","rel":"forgot-password","title":"Forgot your password?"},{"href":"/authn/authentication/Username-Password/forgot-account-id","rel":"forgot-account-id","title":"Forgot your username?"},{"href":"/authn/registration/Username-Password","rel":"register-create","title":"Create account"}],"metadata":{"viewName":"authenticator/html-form/authenticate/get"},"type":"authentication-step","actions":[{"template":"form","kind":"login","title":"Login","model":{"href":"/authn/authentication/Username-Password","method":"POST","type":"application/x-www-form-urlencoded","actionTitle":"Login","fields":[{"name":"userName","type":"username","label":"Username","value":"demouser"},{"name":"password","type":"password","label":"Password"}]}}]}2023-07-06 09:35:57.254300+0200 demoapp[36935:642276] [HAAPI_UI_FLOW] [DEBUG] HaapiFlowViewController.199 : isLoading did change to false2023-07-06 09:35:57.259376+0200 demoapp[36935:644803] [HAAPI_UI_DATA] [DEBUG] DataMapper.108 : HaapiRepresentation cannot be mapped to UIOperation InteractiveFormStep(actions: [IdsvrHaapiUIKit.FormAction], type: IdsvrHaapiUIKit.RepresentationType.authenticationStep, metadata: Optional(IdsvrHaapiUIKit.Metadata(templateArea: nil, viewName: Optional("authenticator/html-form/authenticate/get"))), messages: [], links: [IdsvrHaapiUIKit.Link(href: "/authn/authentication/Username-Password/forgot-password", rel: "forgot-password", title: Optional(Forgot your password?), type: nil), IdsvrHaapiUIKit.Link(href: "/authn/authentication/Username-Password/forgot-account-id", rel: "forgot-account-id", title: Optional(Forgot your username?), type: nil), IdsvrHaapiUIKit.Link(href: "/authn/registration/Username-Password", rel: "register-create", title: Optional(Create account), type: nil)], properties: nil)2023-07-06 09:35:57.266021+0200 demoapp[36935:642276] [HAAPI_UI_FLOW] [DEBUG] HaapiFlowViewController.208 : uiModel did change to Optional(IdsvrHaapiUIKit.FormModelImpl(messageItems: [], interactionItems: [IdsvrHaapiUIKit.InteractionItemSection(key: "login", label: "Login"), IdsvrHaapiUIKit.InteractionItemText, IdsvrHaapiUIKit.InteractionItemPassword, IdsvrHaapiUIKit.InteractionItemButton], linkItems: [IdsvrHaapiUIKit.LinkItemModelImpl(text: Optional("Forgot your password?"), href: "/authn/authentication/Username-Password/forgot-password", type: nil, action: IdsvrHaapiUIKit.Link(href: "/authn/authentication/Username-Password/forgot-password", rel: "forgot-password", title: Optional(Forgot your password?), type: nil)), IdsvrHaapiUIKit.LinkItemModelImpl(text: Optional("Forgot your username?"), href: "/authn/authentication/Username-Password/forgot-account-id", type: nil, action: IdsvrHaapiUIKit.Link(href: "/authn/authentication/Username-Password/forgot-account-id", rel: "forgot-account-id", title: Optional(Forgot your username?), type: nil)), IdsvrHaapiUIKit.LinkItemModelImpl(text: Optional("Create account"), href: "/authn/registration/Username-Password", type: nil, action: IdsvrHaapiUIKit.Link(href: "/authn/registration/Username-Password", rel: "register-create", title: Optional(Create account), type: nil))], templateArea: nil, viewName: Optional("authenticator/html-form/authenticate/get")))
Code Example
If you run into any problems with the technical setup, take a look at the HAAPI iOS code example, which provides a working end-to-end setup for developers. This app also demonstrates various customization techniques, for controlling the login user experience.
Conclusion
At this stage, the mobile app's security implementation is complete. The next tutorial focuses on the default look and feel for username and password flows.

Join our Newsletter
Get the latest on identity management, API Security and authentication straight to your inbox.

Start Free Trial
Try the Curity Identity Server for Free. Get up and running in 10 minutes.
Start Free TrialWas this helpful?