
Android Client Setup for the Hypermedia Authentication API
On this page

What Is the Hypermedia Authentication API?
The Hypermedia Authentication API is a feature of the Curity Identity Server. It enables clients to leverage OAuth and OpenID Connect and the Curity Identity Server's powerful authentication engine straight from client applications — without the need of a browser. If you want to learn more about the Hypermedia Authentication API, check out the overview article.
It's All About Security
The browser plays a vital role in OAuth and OIDC flows — it makes them more secure. Browser redirects ensure that the Authorization Server delivers data to the proper client, and not to an impersonator. Thus, removing the browser from OAuth and OIDC flows may at first seem a bit reckless. As we now use an API to fulfill a vulnerable authentication and authorization flow, we require another method to make sure that the client calling the API is indeed allowed to do so.
Two security features of the Curity Identity Server ensure that the Authentication API process is just as secure as browser flows:
- client attestation
- proof of possession tokens
Client Attestation
Client attestation is done by verifying the running application's package ID and the signing credentials. This is processed by the Android Operation System or iOS and bound to a cryptographic key pair. After a positive attestation, the client (the mobile app) is issued a Client Attestation Token (CAT) in the form of a JWT. The concrete implementation of the attestation is out of the scope of this article, but what is important to note, is that client attestation asserts a few things about the calling client application:
- The app was correctly signed with the credentials configured in the Curity Identity Server for the associated OAuth client. This means that the app has not been tampered with. For example, it hasn't been decompiled, had its code changed, and recompiled into a malicious client. When using these features, decompilation cannot provide any information that could help create an impersonated client.
- The app runs in a safe environment, that is, on a system that has not been rooted. Otherwise, it wouldn't be possible to securely perform the verification described above.
Demonstrating Proof of Possession
Proof-of-Possession tokens are another way to use access tokens. The most common way used in APIs is using Bearer tokens. Bearer tokens work a bit like cash — any client who possesses a Bearer access token can successfully call an API. Proof-of-Possession tokens behave more like credit cards — only legitimate owners of these tokens can use them to access the API. This further increases the security of the communication. Even if the access token is stolen, another party can't use it.
The Hypermedia Authentication API uses a standard for Demonstrating Proof of Possession. By adopting this standard, access tokens used to access the Authentication API are bound to a private key that only the legitimate client possesses.
Roles of HAAPI SDKs
To facilitate the usage of these crucial security components, Curity has released SDKs to help you leverage the Hypermedia API:
| Library | Responsibilities |
|---|---|
| UI SDK | A HAAPI client that receives API responses and renders views. It manages valid and invalid input, redirects, navigation, polling, and many other behaviors. The default look and feel can be customized. All of this means you can implement a HAAPI flow with only a couple of lines of code. |
| Model SDK | The model SDK introduces classes representing possible responses from the authentication API. The model SDK uses the driver SDK to handle communication, then processes responses into models. These represent the instructions the API is issuing to the mobile client. |
| Driver SDK | Obtaining CATs and using DPoP to secure requests to the API is a security-sensitive process. Obtaining a CAT requires a few different steps, and the DPoP standard requires the client to generate correct headers for every request. The driver SDK is responsible for handling these low-level security concerns. |
It is only necessary to use the UI SDK, which provides a high level interface, to get up and running with a HAAPI secured mobile app. The SDK performs generic rendering of API responses, using Hypermedia API responses. An alternative approach, which currently gives you greater control over custom rendering, is to instead use the model SDK directly.
Prerequisite Setup
To call the API from an Android app, you must register a client that uses an Android attestation policy. This can be configured using the admin UI (described below in each tab), but you can also use the following XML file to merge it with your server's configuration. Make sure to adjust values in the XML below to conform with your environment:
You can use this version of configuration to ease development and allow emulator usage. It has some relaxed requirements for validation. Remember that these options shouldn't be used in production unless necessary to support special devices.
- In line 16, change the Token Service's name, if you don't use the default.
- In line 23, set the proper client name.
- In line 26, set the package name your app uses.
- In line 27, enter the digest of the credentials used to sign your app. (Read below to learn how to get the digest.)
<config xmlns="http://tail-f.com/ns/config/1.0"><facilities xmlns="https://curity.se/ns/conf/base"><client-attestation><android-policy xmlns="https://curity.se/ns/conf/client-attestation"><id>emulator-policy</id><verify-boot-state>false</verify-boot-state><minimum-security-level>software</minimum-security-level><override-certificate-chain-validation><do-not-validate-certificate-chain/></override-certificate-chain-validation></android-policy></client-attestation></facilities><profiles xmlns="https://curity.se/ns/conf/base"><profile><id>token-service</id><type xmlns:as="https://curity.se/ns/conf/profile/oauth">as:oauth-service</type><settings><authorization-server xmlns="https://curity.se/ns/conf/profile/oauth"><client-store><config-backed><client><id>client-name</id><attestation><android><package-name>com.example.yourpackage</package-name><signature-digest>A3...4=</signature-digest><android-policy>emulator-policy</android-policy></android></attestation></client></config-backed></client-store></authorization-server></settings></profile></profiles></config>
The configuration above can also be set using the admin UI.
- Create an attestation policy under the Facilities menu (scroll all the way to the bottom).
- Disable Verify Boot State, set Minimum Security Level to
softwareand disable Override Certificate Chain Validation
- In the public client configured to be used with the API, enable the Hypermedia Authentication API capability.

- Scroll down and enable Attestation and configure according to the screenshot below. Here you can point to the attestation policy that was just created. Make sure to set the Package Name and Signature Digest accordingly. (Read below to learn how to get the digest.)

Remember, you can also use the configuration CLI or RESTCONF API to configure these settings.
Obtain a Signing Key Digest
You can use the gradle task signingReport to obtain hashes of your signing keys. If you use the admin UI, you can paste the generated SHA-256 there. If you import configuration from XML or use CLI or RESTCONF API, you must first base64-encode the SHA-256 hash. Here's how to do it from the terminal:
$ ./gradlew signingReport...SHA-256: 67:60:CA:11:93:...:4A:7E:A0:A4...$ echo "67:60:CA:11:93:...:4A:7E:A0:A4" | xxd -r -p | base64Z2DKE...9oKQ=
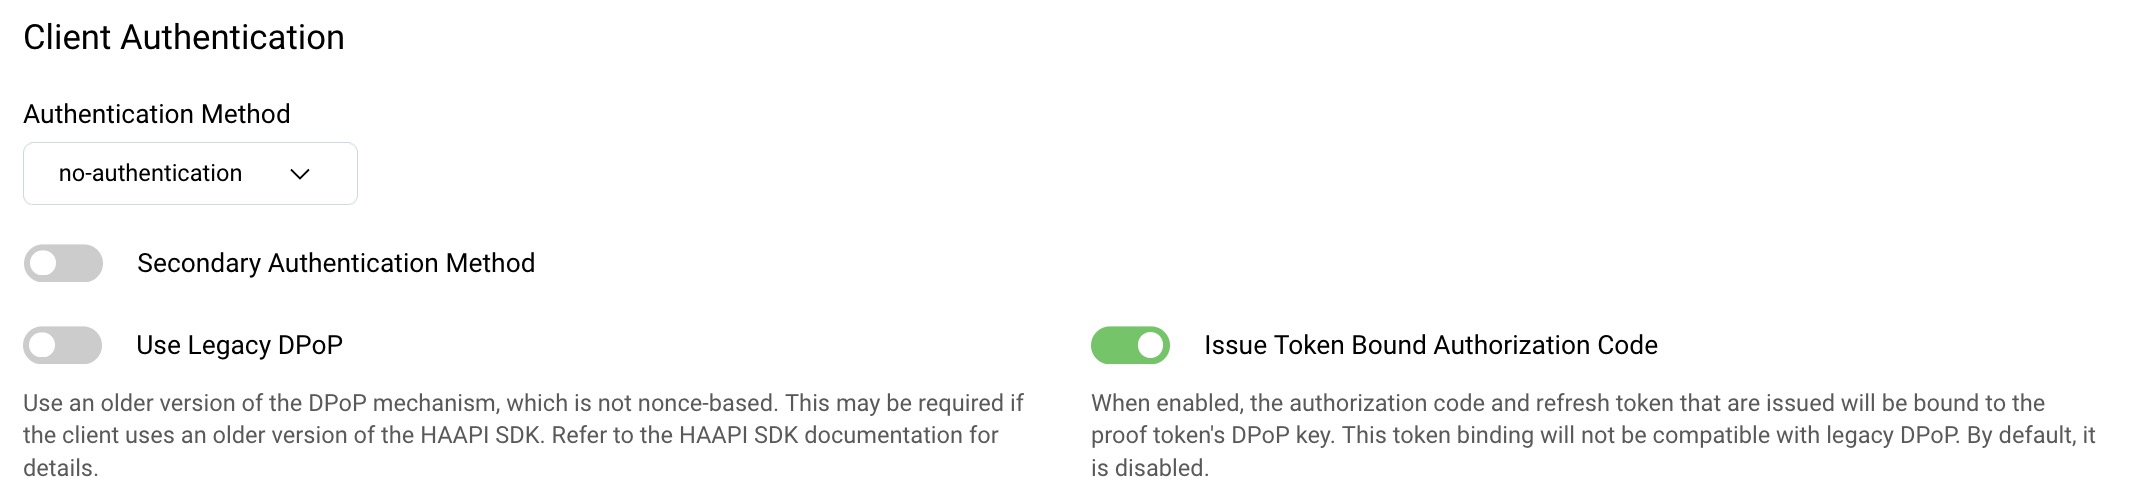
Configure Client Settings
Leave the Use Legacy DPoP setting deselected to prevent potential clock synchronization issues during HAAPI flows. The Issue Token Bound Authorization Code setting should also be enabled, if you are using version 4.0 or higher of the Android HAAPI UI SDK and version 8.7 or higher of the Curity Identity Server. The token bound setting provides additional security for token requests. You can read more about it in the HAAPI Mobile Security Lifecycle tutorial.
Integrate HAAPI into a Mobile App
Now that the security setup is done, you can quickly integrate mobile security into your app, by following the Android integration tutorial. Also checkout the Android Kotlin HAAPI Code Example, which provides an automated setup and demonstrates some customization techniques.
Conclusion
To use the hypermedia authentication API in a mobile app you first must do some prerequisite setup and integrate the Curity SDKs. You can then quickly integrate a hardened OpenID Connect flow into your mobile app.
For further details on the API, have a look at the Authentication API documentation. If you need help setting up the API or SDK, or have any other questions or comments, please do not hesitate to contact us.

Join our Newsletter
Get the latest on identity management, API Security and authentication straight to your inbox.

Start Free Trial
Try the Curity Identity Server for Free. Get up and running in 10 minutes.
Start Free TrialWas this helpful?