JWT Assertions
On this page
Client and User Authentication using JWTs
There is an extension to the OAuth standard defined in RFC 7523, that specifies how JSON Web Tokens (JWTs) can be used to authenticate users and clients. This spec is based on RFC 7521, more general, one for using assertions of various kinds. It is also profiled (i.e., further specified) by OpenID Connect. All this makes it very confusing to understand, so this tutorial seeks to clarify how JWTs can be used according to these standards. For the purpose of this tutorial it's important to see clearly how these specs fit together:

Then, it is important to realize that the OAuth JWT profile addresses two different use cases:
- User authentication
- Client authentication
The OpenID Connect profile only refines how client authentication is done; it does not address user authentication using JWTs. Also, these two cases can be used together or independently. Both of these take place at the OAuth server's token endpoint, but the latter can occur at other endpoint (e.g., introspection). If both are used in tandem, the browser-based exchanges that flow through the authorization endpoint are completely unused. This means that a couple of JWTs can be sent to the token endpoint to perform both user and client authentication. If a JWT is only used for authenticating the client though, the browser-based redirection will still be used to obtain user authentication and authorization. If the client authenticates with some other kind of credential, the request will only contain a JWT that authenticates the user. Allowing all these permutations requires various parameters to be provided in requests made to Curity. The details are described in the next subsections.
Client Authentication using JWTs
Clients must authenticate to Curity before they are allowed to perform certain requests. For example, a client must prove its identity before it can exchange an authorization code at the token endpoint. Likewise, a client must authenticate before it can introspect a token. This is required to stifle multiple security threats. There are various ways a client may do this. The most common is a client ID and secret. These are passed either in the request body or an HTTP Authorization header using the "basic" authentication scheme defined in RFC 7617. Another mechanism is by using a JWT; the particulars of how this JWT is sent and what it must contain is what RFC 7521 and OpenID Connect define. To understand this clearly, one must first know a few things about JWTs, clients and the OAuth server.
JWT Format
Briefly, an unencrypted, signed JWT consists of three parts:
- The header;
- The body or payload; and
- A signature of the payload.
The header may include information about the key and algorithm used to sign the payload. This is needed unless the receiver has obtained this information through other means. As an example, a JWT used for client authentication may have a header and payload like this:
{"alg": "RS256","typ": "JWT"}
The associated payload may look like this:
{"aud": "https://localhost:8443/oauth/v2/oauth-token","iss": "client-one","sub": "client-one","nbf": 1535806905,"exp": 1535810505,"iat": 1535806905,"jti": "id123456"}
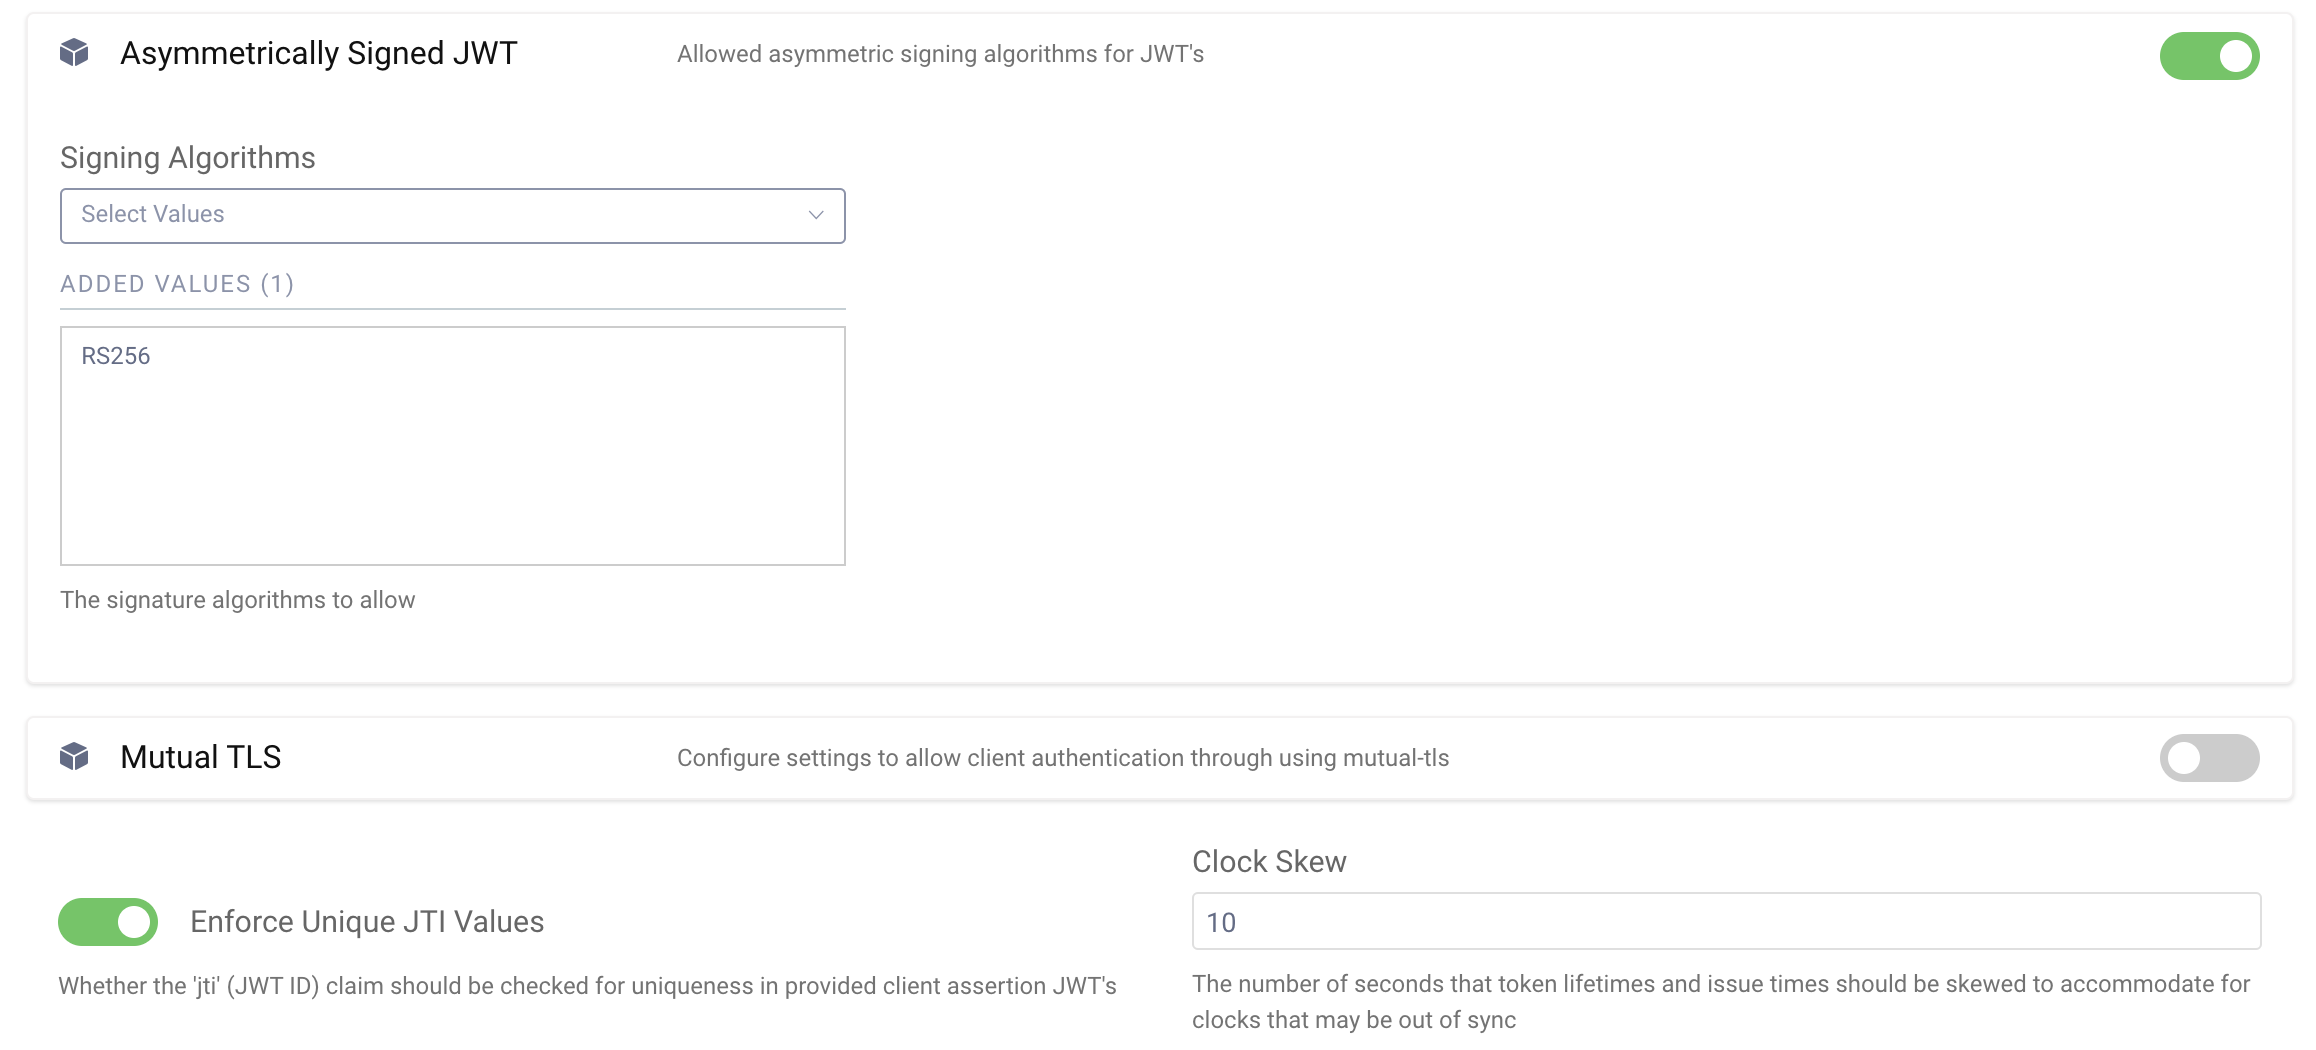
RFC 7521 doesn't dictate the value of the issuer (iss) claim, but it does require one. OpenID Connect does, however. It mandates that the issuer and subject (sub) are the client ID. For this reason, Curity requires both claims to be present with a value of the client ID. Both standards require an audience claims (aud); OpenID Connect says it should be the OAuth server's token endpoint, whereas RFC 7523 allows it to be any identifier that represents the OAuth server. Curity only allows the audience to be the token endpoint. Similarly, the OAuth spec does not require an expiration time (exp) claim, but OpenID Connect does. Therefore, Curity requires one. The issued at (iat) and not-before (nbf) claims are optional; if present, Curity will ensure that they are valid before accepting the JWT. Including these values is recommended. The last claim in the listing above, the JWT ID (jti), is required according to OpenID Connect, but it only needs to be unique if so configured in one of Curity's OAuth profiles. In the admin UI, this is set in the Client Settings section of the General page of each Token Service Profile. Enable Asymmetrically Signed JWT and at the bottom of the page enable Enforce Unique JTI Values.

Sending a JWT to the OAuth Server
The JWT is sent to the OAuth server is form data that has been encoded into URL parameter and is posted to an endpoint, like the token or revoke concepts. RFC 7523 stipulates how this should be done. Specifically, the client should include the following parameters:
| Parameter Name | Parameter Value |
|---|---|
client_assertion_type | urn:ietf:params:oauth:client-assertion-type:jwt-bearer |
client_assertion | A JWT that the client has signed |
Optionally, a client_id can also be included. If so, it should match the one in the JWT; otherwise, Curity will return a 400, bad request, error.
A sample request (with extra line breaks added for clarity only) to the revoke endpoint is shown in the following listing:
POST /oauth/v2/oauth-revoke HTTP/1.1Host: localhost:8443Content-Type: application/x-www-form-urlencodedtoken=71a337f2-6b36-4e72-bd14-dcb23a30207c&token_type_hint=refresh_token&client_assertion_type=urn%3Aietf%3Aparams%3Aoauth%3Aclient-assertion-type%3Ajwt-bearer&client_assertion=eyJhbGciOiJSUzI1NiIsInR5cCI6IkpXVCJ9.eyJhdWQiOiJodHRwczovL2xvY2FsaG9zdDo4NDQzL2Rldi9vYXV0aC9hbm9ueW1vdXMiLCJpc3MiOiJjbGllbnQtb25lIiwic3ViIjoiY2xpZW50LW9uZSIsImV4cCI6MTUzNTgxNjkzNiwianRpIjoiMTIzNDU2In0.RZF2y5CXNhogMaDqncfY9FNxG-ufZdHpKQ0Iyi1iyOrA-S_rZ3Ni_6hn2p1LgEDMNgTPMwOQrbaZinXqjus2onXF1fAYz_HR3F0TvyjrInGuekBnCZeULVKme6QmRGMz_6wji3nuL0OPfwmrUHki-W-c_PTVQz1rfh6S8z5UgH3KTInJsaECxayphYoXMw1wyAjp1cAE4jiv5z6uUZrp5dspwL5sLt1vZ-cqNQlNIJtAD3IEvZs7rllPle47s3Ld6EOWVL2gleePwGlwObweAdm15ZbPDSV_souznuCGf8U9nMIEwvR799Rh_uodmqxSvF-TX7L1C4UragTNuvybxQ
Similarly, a sample request to the token endpoint to redeem an authorization code is shown in the following listing:
POST /oauth/v2/oauth-token HTTP/1.1Host: localhost:8443Content-Type: application/x-www-form-urlencodedresponse_type=token&grant_type=authorization_code&code=hLlEHgINssCPamfHE6ua0llCMGwcdUib&redirect_uri=https%3A%2F%2Flocalhost%2Fclient-one%2Fcb1&client_assertion_type=urn%3Aietf%3Aparams%3Aoauth%3Aclient-assertion-type%3Ajwt-bearer&client_assertion=eyJhbGciOiJSUzI1NiIsInR5cCI6IkpXVCJ9.eyJhdWQiOiJodHRwczovL2xvY2FsaG9zdDo4NDQzL2Rldi9vYXV0aC9hbm9ueW1vdXMiLCJpc3MiOiJjbGllbnQtb25lIiwic3ViIjoiY2xpZW50LW9uZSIsImV4cCI6MTUzNTgxNjkzNiwianRpIjoiMTIzNDU2In0.RZF2y5CXNhogMaDqncfY9FNxG-ufZdHpKQ0Iyi1iyOrA-S_rZ3Ni_6hn2p1LgEDMNgTPMwOQrbaZinXqjus2onXF1fAYz_HR3F0TvyjrInGuekBnCZeULVKme6QmRGMz_6wji3nuL0OPfwmrUHki-W-c_PTVQz1rfh6S8z5UgH3KTInJsaECxayphYoXMw1wyAjp1cAE4jiv5z6uUZrp5dspwL5sLt1vZ-cqNQlNIJtAD3IEvZs7rllPle47s3Ld6EOWVL2gleePwGlwObweAdm15ZbPDSV_souznuCGf8U9nMIEwvR799Rh_uodmqxSvF-TX7L1C4UragTNuvybxQ
Note the last two lines of each of these listings. These include the two parameters from the table above and are what Curity looks for when authenticating the client using this protocol.
Authenticating the Client
To authenticate the client using a JWT, the third part mentioned above, the signature, is used. To this end, Curity obtains the iss claim from the payload of the JWT. If the value corresponds to a known client, it will determine if that client has been configured to allow authentication using a private key. If so, the corresponding public key will used to check the signature. To do this, the payload of the JWT will be signed using the client's public key and the algorithm provided in the header of the JWT. If the result matches the included signature, then the client will be authenticated.
To configure this in Curity using the admin UI, do the following:
- Upload the client's public key as a signature verification key.
- Select an OAuth profile from the
Token Servicetab. - From
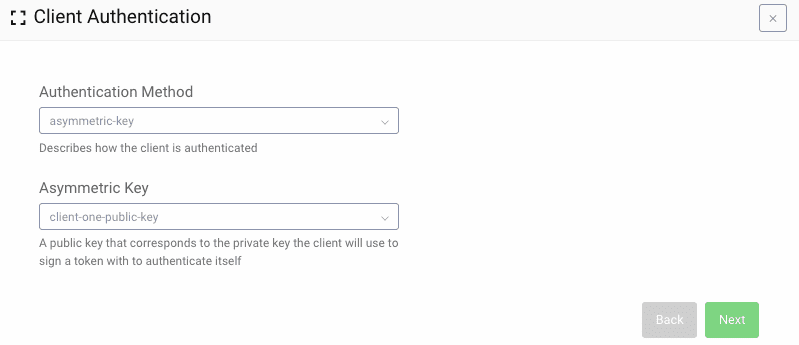
Clientslink on the sidebar, select the client to modify or add a new one. - After a capability has been added to the client that requires some form of authentication, you will be able to specify which type to use. Select
asymmetric-keyand specify the signature verification key (uploaded in step one) which the client will sign JWTs with.
When adding a capability that requires authentication for the first time, this option will be presented in a wizard:

Later, this setting can be modified in an existing client in the General configuration section at the top of the client settings page. With this configured, the client will be able to authenticate to any endpoint where authentication is required. Also, be aware that the client will not be able to authenticate using a client ID and secret; only JWTs will be accepted.
User Authentication using JWTs
The second use case that RFC 7523 addresses is user authentication. This scenario is not covered by the OpenID Connect profile, so requests that include scope values defined by that protocol (e.g., profile, email, etc.) are undefined. In Curity's implementation, requesting such scope values will result in a bad request error. Unlike client authentication, which can occur at various concepts, user authentication only takes place at the token endpoint. For these reasons, the protocol is a bit easier to understand than the previous one.
When following this part of the RFC, user authentication and consent are obtained by some other, undefined means. In such a case, the OAuth server receives a JWT asserting who the user is. As long as the OAuth server trusts the issuer of the JWT, it will respond with an access token. The reply will not, however, include a refresh token nor an ID token. The reason that the ID token will not be included is because OpenID Connect, which is where ID tokens are defined, is not in use. The refresh token is not needed either because the client is presumably able to send a new JWT whenever the access token expires. In effect, a client's ability to extend access is controlled by the entity that issues the user JWT grant. The implication is that the party asserting the JWTs must be very trustworthy and capable. Without such an entity, this flow should not be used.
When it is, the request sent to the token endpoint will look something like this:
POST /oauth/v2/oauth-token HTTP/1.1Host: localhost:8443Authorization: Basic Y2xpZW50LW9uZTowbmUhU2VjcmV0Content-Type: application/x-www-form-urlencodedgrant_type=urn%3Aietf%3Aparams%3Aoauth%3Agrant-type%3Ajwt-bearer&assertion=eyJhbGciOiJSUzI1NiIsInR5cCI6IkpXVCJ9.eyJhdWQiOiJodHRwczovL2xvY2FsaG9zdDo4NDQzL2Rldi9vYXV0aC9hbm9ueW1vdXMiLCJpc3MiOiJteS1nb29kLWlzc3VlciIsInN1YiI6ImpvaG5kb2VAZXhhbXBsZS5jb20iLCJleHAiOjE1MzU5NzA0MjgsImp0aSI6IjEyMzQ1NiJ9.M_L1-9YsKq0fOMNl3ECk8_oSfl1cJcJ3mUIk2E2WJ0SYvMD2XO79RqC8TWZ6ikNgkU5dhahBHqrYTSeb6PnMJKcfwjNg0ZEfTegLVBwfADi3UWi-VPnIiolOCfJyh59qkbkl9qBkH1f8sw0m-fXtq8m5LXrwmIamavmY5GicQkwAK38A0eOhMzvBcvHSxcH1_zU8nvZZOnJNhv_ifQr_twrJFZWglo8a5qn0yUcJlDJmM_SC_vGqgV1YkDzpyeniVdsyGA4WFTcmOCYR_iCDwrBnumyYtJd_CWaG_l8d3cT_K4ZR1gRfTM9Pe0cPTCJxnLO-r6JmJ0FVubHmxtoHug
As you can see from this, the client includes the following parameters:
| Parameter Name | Parameter Value |
|---|---|
grant_type | urn:ietf:params:oauth:grant-type:jwt-bearer |
assertion | A JWT that represents an end user |
These are similar, but different, from the parameters shown in the table above for client authentication (allowing them to be used together).
Authenticating the User
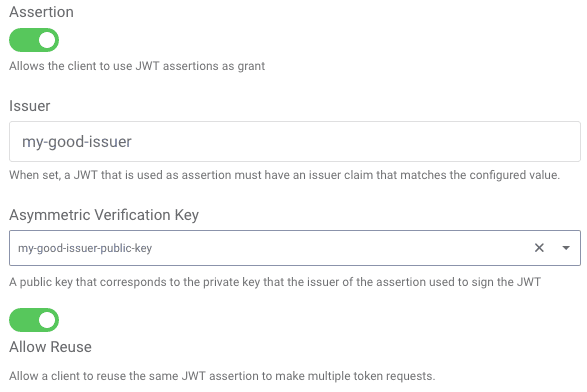
In a comparable manner, the OAuth server validates the JWT provided in the assertion request parameter. For it to be accepted, it must have a subject (sub) claim; however, the value will be accepted verbatim if the issuer is trusted. To determine this, the JWT must also have an issuer (iss) claim and its value must be the entity ID of the asserting party (i.e., the "identity provider"). Which entity a client trusts is configured for each one in Curity. When enabling the capability for a client, the issuer's ID and public key must be configured:

The entity ID can be any value; it is often a URL but need not be. The public key is uploaded in a similar manner as for verifying JWTs issued by the client. The XML configuration that corresponds to the screenshot above is shown in the following listing:
<client><capabilities><assertion><jwt><trust><issuer>my-good-issuer</issuer><asymmetric-signing-key>my-good-issuer-public-key</asymmetric-signing-key></trust><allow-reuse>true</allow-reuse></jwt></assertion></capabilities><!-- ... --></client>
Besides the verification of the signature and issuer, other claims in the JWT must also be verified. These checks are like JWTs used for client authentication. In particular, the JWT must contain an audience (aud) claim. The value must be the OAuth profile's token endpoint. The JWT must have an expiration time, indicated by the exp claim, which must be in the future; otherwise, the token will be expired and consequently rejected. It may also have a not before (nbf) and issued at (iat) claim. Neither of these are required, but, if present, they will be validated. Lastly, the JWT must have an ID (jti) claim. The uniqueness requirement of these IDs can be configured per client. It is recommended to ensure that the JWTs are unique and contain all of these claims.
Conclusion
Various OAuth-related standards define how JWTs can be used to authenticate users and clients. This allows for new use cases and security postures to be created. Instead of sending a shared secret over the wire, for example, public/private key cryptography can be used to limit access to sensitive key material. The authenticity of users and client apps can still be determined, however, and these apps can obtain access tokens. Thus, API security remains uniform and token-based. These standards also help in conforming to various regulations, including PSD2. Legacy federation services and Identity Providers can also be utilized as a Security Token Issuer (STS). Tokens from such services can be sent to the OAuth server to reuse existing authentication capabilities and Public Key Infrastructure (PKI).
Curity has had support for authenticating clients using JWTs since version 3.0. User authentication support using JWTs came later in 3.1. If you would like to learn more about these capabilities, give them a try. If you run into any problems or have any questions, do not hesitate to contact us.

Join our Newsletter
Get the latest on identity management, API Security and authentication straight to your inbox.

Start Free Trial
Try the Curity Identity Server for Free. Get up and running in 10 minutes.
Start Free TrialWas this helpful?


