HAAPI React App
On this page
Traditionally, the Curity Identity Server uses website technology for its login screens, where server-side templates get processed to HTML that the browser downloads. Starting in version 11.3 of the Curity Identity Server, you can use an out-of-the-box single page application (SPA) for login screens. The SPA enables web developers to use familiar technology to customize OAuth login user experiences.
This tutorial first explains how logins use single page application technology, and how to get up and running with SPA login screens. You can then use the styling capabilities of the Curity Identity Server to update the look and feel. If you want to go further, the tutorial explains how to make deeper customizations, to change, test and deploy SPA code.
HAAPI React App Usage
The Hypermedia Authentication API (HAAPI) enables the use of optimal single page application technology for OAuth logins. In a traditional OAuth code flow, the authorization server returns HTML to the browser, and every login screen needs to reload the entire browser page.
SPA architectures instead load web pages only once and then use fetch requests to get data. The frontend dynamically renders UI elements from API response data. HAAPI enables this approach for OAuth login screens. The Curity Identity Server returns JSON API responses to the browser, and the HAAPI React App processes them.
You can use the HAAPI React App for any type of frontend OAuth client, including web, console, desktop and mobile apps. Clients continue to use the code flow capability and do not need the Hypermedia Authentication API capability.
The Curity Identity Server implements the HAAPI processing, to externalize it from your applications. The client sends an authorization request and the Curity Identity Server then inspects the client and switches to SPA mode if required, before presenting login screens.
Supported Applications
You can currently only use the HAAPI React App for OAuth clients. It is not yet supported for websites that act as SAML service providers.
Video Overview
The following short video shows how to activate the HAAPI React App and summarizes how SPA technology can enable deeper customizations to your login user experiences.

Configure OAuth Clients
Start with a working OAuth client that uses HTML logins. In the Admin UI, navigate to Token Service → Clients and edit the client's User Authentication page. Set UI Experience=API Driven UI to activate the HAAPI React App for only that client.
Alternatively, you can activate the HAAPI React App for all clients globally or for all clients associated to an authentication profile. The API-Driven UI docs provide further details on configuration. The following example XML configuration is for a console client, that continues to use the code flow, but with the API-driven user experience.
<config xmlns="http://tail-f.com/ns/config/1.0"><profiles xmlns="https://curity.se/ns/conf/base"><profile><id>token-service</id><type xmlns:as="https://curity.se/ns/conf/profile/oauth">as:oauth-service</type><settings><authorization-server xmlns="https://curity.se/ns/conf/profile/oauth"><client-store><config-backed><client><id>test-client</id><no-authentication>true</no-authentication><redirect-uris>http://127.0.0.1/callback</redirect-uris><proof-key><require-proof-key>true</require-proof-key></proof-key><scope>openid</scope><user-authentication><ui-experience><api-driven/></ui-experience></user-authentication><capabilities><code></code></capabilities><validate-port-on-loopback-interfaces>false</validate-port-on-loopback-interfaces></client></config-backed></client-store></authorization-server></settings></profile></profiles></config>
View Login Form Representations
When you run a code flow for an OAuth client that uses the HAAPI React App, you can use browser tools to view hypermedia API responses from the Curity Identity Server. The following response body shows the JSON representation of a login form for an HTML form authenticator. A client-side SDK dynamically creates UI elements from the JSON data and styles them.
{"metadata": {"viewName": "views/select-authenticator/index"},"type": "authentication-step","actions": [{"template": "selector","kind": "authenticator-selector","title": "Login","model": {"options": [{"template": "form","kind": "select-authenticator","title": "htmlform","properties": {"authenticatorType": "html-form"},"model": {"href": "/authn/authentication/htmlform","method": "GET"}},{"template": "form","kind": "select-authenticator","title": "passkeys","properties": {"authenticatorType": "passkeys"},"model": {"href": "/authn/authentication/passkeys","method": "GET"}}]}}]}
Use the HAAPI React SDK Online Site
Use the interactive HAAPI React SDK Site to learn more about the HAAPI React core components. The site provides an online previewer with many login screens, extensive documentation and a catalogue of examples. You can change code interactively and see fast feedback in the browser.
Run a Local Previewer
To get started working on the HAAPI React App locally, start with the basic previewer. Navigate to the ui-kit root folder and run the following commands. For best version compatibility, you may need to run a command like git checkout version/11.3 to develop for the branch that matches your product version.
cd src/haapi-react-appnvm usenpm installnpm start
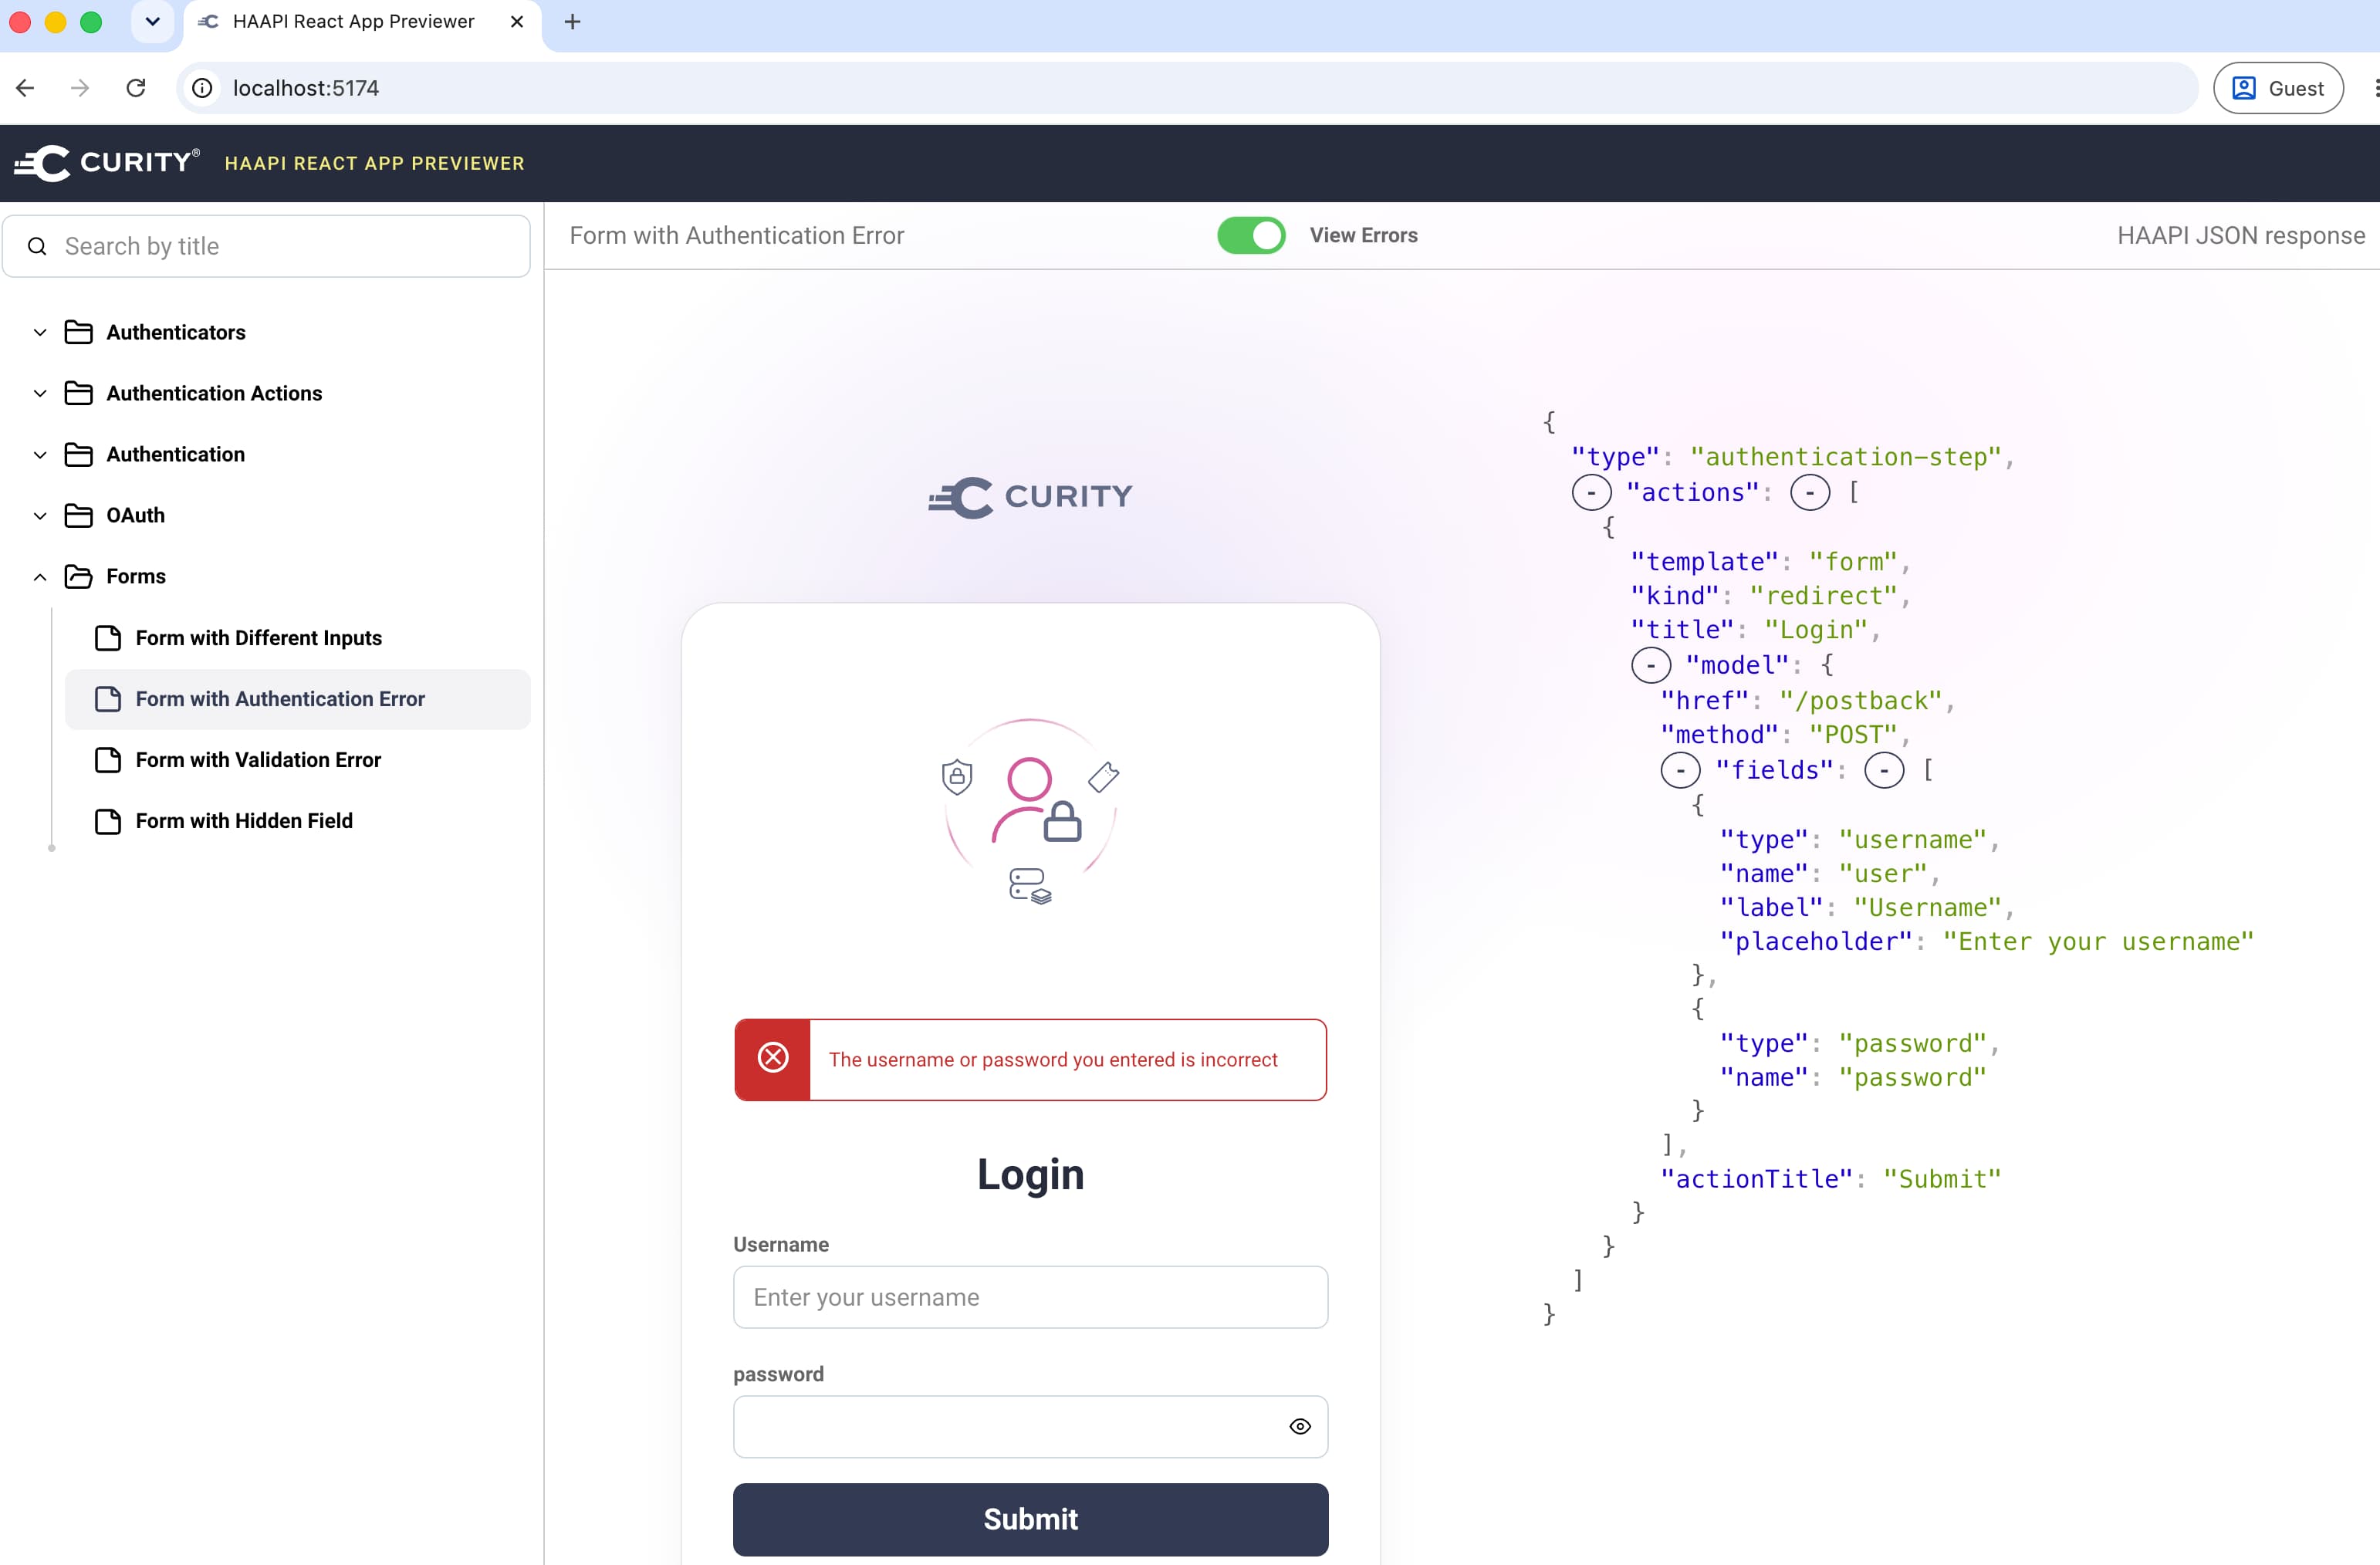
The npm start command runs a basic previewer application, which you can use to view and change the appearance of screens, and understand how to render HAAPI representations.
Run in Development Mode
You can run the HAAPI React App in development mode with the following commands.
cd src/haapi-react-appnpm run dev
The HAAPI React app uses TypeScript code, with JSX to enable HTML-like markup. Within the UI Kit monorepo, locate the entry point for the HAAPI React App at src/haapi-react-app/src/App.tsx. The main components are those prefixed with HaapiStepper, since they step through an authentication workflow driven by hypermedia API responses.
export function App() {return (<HaapiAppConfigProvider><ErrorBoundary><HaapiStepper><Layout><HaapiStepperErrorNotifier><HaapiStepperStepUI /></HaapiStepperErrorNotifier></Layout></HaapiStepper></ErrorBoundary></HaapiAppConfigProvider>);}
Run a Local Code Flow
To get fast feedback when running in development mode, you need to be able to run a code flow where the Curity Identity Server invokes your local HAAPI React App. One possible developer setup is to run the Curity Identity Server locally in Docker, using the following tutorials, so that the Curity Identity Server uses a runtime base URL of http://localhost:8443.
Next, run the Admin UI and navigate to System → Deployment → Service Roles → Default and change the port from the default value of 8443 to 9443. Then, adjust the Vite development server configuration at src/haapi-react-app/vite.config.ts, to use HTTP and to proxy OAuth requests to port 9443, as the following partial configuration shows.
export default defineConfig({plugins: [react()],server: {port: 8443,proxy: {'^/(?!($|@|\\?|src/|node_modules/|fonts/|images/|[^\\.]+\\.html))': {target: 'http://localhost:9443',changeOrigin: true,},},},})
You also need to copy the loader-dev.vm file to the Docker container for the Curity Identity Server. This file's logic redirects back to your local HAAPI React App when the Curity Identity Server switches to SPA mode, rather than serving the deployed version. Use commands similar to those below to deploy the development loader.
docker exec "$IDVSR_CONTAINER_ID" bash -c "mkdir -p /opt/idsvr/usr/share/templates/overrides/views/api-driven-ui"docker cp src/haapi-react-app/loader-dev.vm "$IDVSR_CONTAINER_ID:/opt/idsvr/usr/share/templates/overrides/views/api-driven-ui/index.vm"
You can then use an OAuth Client that uses the API-driven login user experience to run a code flow with an authorization request URL of http://localhost:8443/oauth/v2/oauth-authorize. For example, you could do so using the desktop version of OAuth Tools. Once you land on a particular login screen, you can make TypeScript code changes and the HAAPI React App uses live reloading to provide fast feedback.
Customize the SPA Logic
When you first customize the HAAPI React App's code, you may want to make small changes to particular screens. For that, use interceptors and apply them to the HaapiStepperStepUI component.
import { customFormRenderInterceptor } from './custom/customFormRenderInterceptor';import { customLinkRenderInterceptor } from './custom/customLinkRenderInterceptor';import { selectorActionRenderInterceptor } from './custom/selectorActionRenderInterceptor';<HaapiStepperStepUIformRenderInterceptor={customFormRenderInterceptor}linkRenderInterceptor={customLinkRenderInterceptor}selectorActionRenderInterceptor={customSelectorActionRenderInterceptor}>
First, learn how to locate particular forms and elements within those forms, so that you can update elements. The following example form action interceptor shows the approach. You can use TypeScript intellisense to understand the SDK objects.
import { HaapiStepperStepUIFormActionRenderInterceptor } from '@curity/haapi-react-sdk/haapi-stepper/feature';export const customFormActionRenderInterceptor: HaapiStepperStepUIFormActionRenderInterceptor = ({ action, currentStep, nextStep, error }) => {const views = ['authenticator/html-form/authenticate/get','authenticator/html-form/create-account/get','authenticator/html-form/reset-password/get',];const currentViewName = currentStep?.metadata?.viewName;if (currentViewName) {const matchingForm = views.find((view) => view === currentViewName);if (matchingForm) {const field = action.model.fields?.find((f) => f.name === 'userName');if (field) {field.label = '...';}}}}
The following example shows how to make a more generic change, that applies to all login steps that use form actions, and insert a custom banner that changes the vertical structure.
import { HaapiStepperFormUI, HaapiStepperStepUIFormActionRenderInterceptor } from '@curity/haapi-react-sdk/haapi-stepper/feature';import { HaapiStepperFormFieldUI } from '@curity/haapi-react-sdk/haapi-stepper/feature/actions/form/fields/HaapiStepperFormFieldUI';import { HaapiStepperFormSubmitButton } from '@curity/haapi-react-sdk/haapi-stepper/feature/actions/form/HaapiStepperFormSubmitButton';import { MyCustomBanner } from './myCustomBanner';export const customFormRenderInterceptor: HaapiStepperStepUIFormActionRenderInterceptor = ({ currentStep, nextStep, error }) => {return (<HaapiStepperFormUI action={action} onSubmit={nextStep}>{({ fields }) => (<><MyCustomBanner />{fields.map(field => (<HaapiStepperFormFieldUI key={field.name} field={field} />))}<HaapiStepperFormSubmitButton /></>)}</HaapiStepperFormUI>);}
Once you have finished any customizations, check them into source control. You will need to reapply them to future releases of the HAAPI React App. Use a convention such as a custom folder, so that you can manage future upgrades as a file copy operation.
Integrate with Plugins
The Curity Identity Server enables you to use a Java SDK to implement custom authentication methods using Authenticators and custom forms using Authentication Actions. To integrate with OAuth clients that use the HAAPI React App, plugins must return HAAPI representations. The following example is from the Getting Started with Authentication Plugins tutorial.
class UserDetailsRepresentationFunction : RepresentationFunction {override fun apply(model: RepresentationModel, factory: RepresentationFactory): Representation {val baseUrl = model.getString("_authUrl")val postbackUrl = "$baseUrl/userdetails"val socialSecurityNumberValue = ""val dateOfBirthValue = ""return factory.newAuthenticationStep { step: AuthenticationStepConfigurator ->step.addFormAction(HaapiContract.Actions.Kinds.CONTINUE,URI.create(postbackUrl),HttpMethod.POST,MediaType.X_WWW_FORM_URLENCODED,Message.ofKey("authenticator.example.authenticate.meta.title.userdetails"),Message.ofKey("authenticator.example.authenticate.view.next")) { fields ->fields.addTextField("socialSecurityNumber", Message.ofKey("authenticator.example.authenticate.view.social-security-number"), socialSecurityNumberValue)fields.addTextField("dateOfBirth", Message.ofKey("authenticator.example.authenticate.view.date-of-birth"), dateOfBirthValue)}}}}
If you implement plugins to create custom login screens, the HAAPI React App automatically processes login representations from plugin server endpoints. Backend code can use any logic or data to customize authentication, and the HAAPI React App can use any client-side logic to customize the plugin's frontend experience.
Customize the Look and Feel
Previewers and the HAAPI React App pick up styles from the src/common/css/lib/src/curity-theme.css file. For CSS customizations, you can override that file with CSS that you produce using either of the following techniques:
To customize styles during development, make a copy of the src/common/css/lib/src/curity-theme.css file and edit your development index.html fileso that it serves your styles. You will then receive fast feedback in the browser whenever you make CSS edits.
Build and Deploy Customizations
When you implement customizations you need to deploy them with the Curity Identity Server. Run the following commands to build the customized SPA in release mode, after which you will find its assets in the dist folder.
cd `src/haapi-react-app`npm run build
When you deploy customizations, your HAAPI React App's entry point is a velocity template whose default implementation is at the UI Kit location src/identity-server/templates/core/views/api-driven-ui/index.vm. This file serves as the SPA's index.html file and references a fragment at src/identity-server/templates/core/fragments/api-driven-ui/assets.vm.
Inspect the files to understand how the fragment triggers downloads of the HAAPI React App's specific JavaScript and CSS, and how the main index.vm file triggers the download of styling customizations.
#parse("fragments/api-driven-ui/assets")<script type="module" crossorigin src="$!_staticResourceRootPath/assets/js/api-driven-ui.js?v=${_cacheBustingHash}"></script><link rel="stylesheet" crossorigin href="$!_staticResourceRootPath/assets/css/api-driven-ui.css?v=${_cacheBustingHash}">#if ($theme_css_path)<link rel="stylesheet" type="text/css" href="${theme_css_path}$!_cacheBustingQuery" />#end#if ($_configured_ui_theme_css_path)<link rel="stylesheet" href="${_configured_ui_theme_css_path}"/>#end#if ($_configured_ui_custom_theme_css_path)<link rel="stylesheet" href="${_configured_ui_custom_theme_css_path}">#end
To finalize the deployment of web assets, use the instructions from the Building Custom UIs documentation. Produce a customized assets.vm file that replaces the default api-driven-ui.js and api-driven-ui.css files with the deployed locations of the built assets in the dist/assets folder.
To deliver a single customized SPA for all OAuth clients that use the HAAPI React App, deploy your assets.vm file to an overrides folder and also deploy web assets under the Curity Identity Server's /usr/share/webroot/assets folder.
cp assets.vm "$IDSVR_HOME/usr/share/templates/overrides/fragments/api-driven-ui/assets.vm"cp dist/assets/*.js "$IDSVR_HOME/usr/share/webroot/assets/js/
To deliver a customized SPA for a subset of OAuth clients that use the HAAPI React App, deploy the assets.vm file to a template-areas folder and also deploy web assets under the Curity Identity Server's /usr/share/webroot/assets folder.
cp assets.vm "$IDSVR_HOME/usr/share/templates/template-areas/area1/fragments/api-driven-ui/assets.vm"cp dist/assets/*.css "$IDSVR_HOME/usr/share/webroot/assets/css/
Summary
The Curity Identity Server provides the Hypermedia Authentication API as an authentication solution with multiple architectural benefits. One of these is the ability to use modern web technology for all of the Curity Identity Server's customer-facing login screens. That modernization separates concerns, so that web developers can customize the HAAPI React App to build login user experiences, while an identity team owns security policies.
Customer Stories
Learn how organizations run identity and API security at scale.
Read customer storiesWas this helpful?