Plugin SDK Coding Skill
On this page
Identity teams can develop plugins to extend the functionality of the Curity Identity Server in many potential ways. To do so, a developer writes Java or Kotlin code and uses objects from the Curity Identity Server's Java Plugin SDK. SDK objects often implement the lower-level security.
When a developer does not yet know these technologies, an AI coding assistant, like Claude Code or GitHub Copilot, provides a convenient way to learn. The developer sends natural language commands and the assistant generates plugin code. Curity provides skills, as text instructions, that improve the default accuracy of generated plugin code.
The developer inspects the generated logic, refines it, and then compiles the plugin to a JAR file. Typically, the developer deploys the JAR file using a local Docker deployment. Finally, the developer uses a test client like OAuth Tools to run end-to-end flows that test the plugin.
Get the Instructions
Clone the GitHub repository from the link at the top of this page, to get the skill resources. The Curity SDK plugin skill consists of text instructions that explain many concepts to agents, like the main plugin types, how to implement key interfaces, and commonly used recipes.
When building plugins, developers should also browse the instructions. The build and deployment instructions explain some setup aspects, and how to use Java build tools like Gradle. When required, you can refine Curity's instructions to get coding assistants to meet your precise needs.
Choose a Use Case
Use the Getting Started with Plugins tutorial to understand the most common use cases for writing plugins. The following use case categories provide common reasons to develop plugins.
- You need to integrate with existing identity infrastructure that is not standards-based.
- You have particular authentication or token requirements that requires custom code.
One common use case for plugins is user onboarding, where you may have particular Know Your Customer (KYC) requirements. For that, you typically need custom forms that run during user authentication, to collect custom attributes and apply custom logic to validate those attributes. All plugins contain backend code, whereas plugins that present user forms also contain frontend code.
Custom forms run as Authentication Actions that you visually configure in the Admin UI. There are some built-in options for creating forms with custom fields that the Administrator Training Course explains. When you have deeper requirements and these forms do not meet your needs, you can develop a custom form as an authentication action.
Integrate the Curity Skill
Follow the README instructions to integrate skills into your coding assistant. The following example copies skills into a folder named registration-form, to implement part of a KYC use case, and then runs Claude Code from within that folder.
mkdir -p registration-form/.claude/skills/cp -r curity-plugin-sdk-skill/skills/* registration-form/.claude/skills/cd registration-formclaude
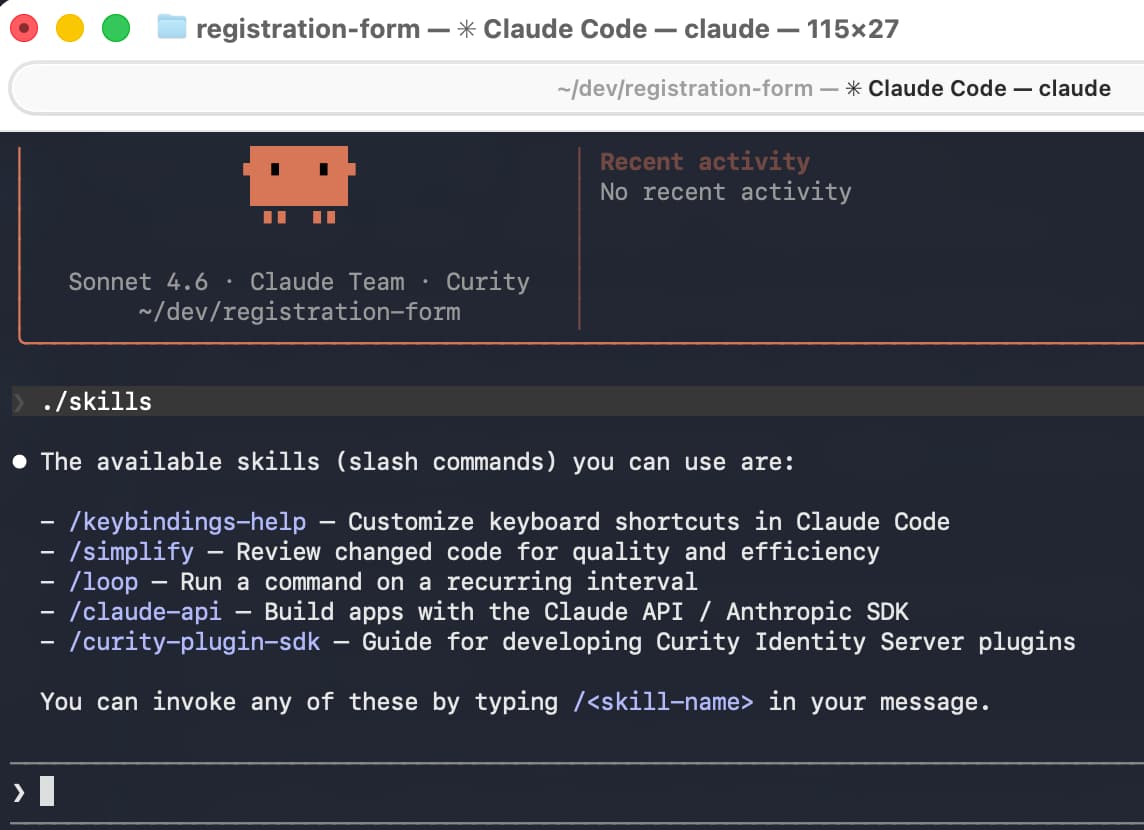
In the coding assistant you can use a command like /skills to see which skills are active. The following screenshot shows the Curity plugin SDK skill integrated into Claude Code.
Use Skills to Create a Plugin
Before generating code, make sure your local computer meets prerequisites. If required, install a Java SDK that matches the Java version of the Curity Identity Server.
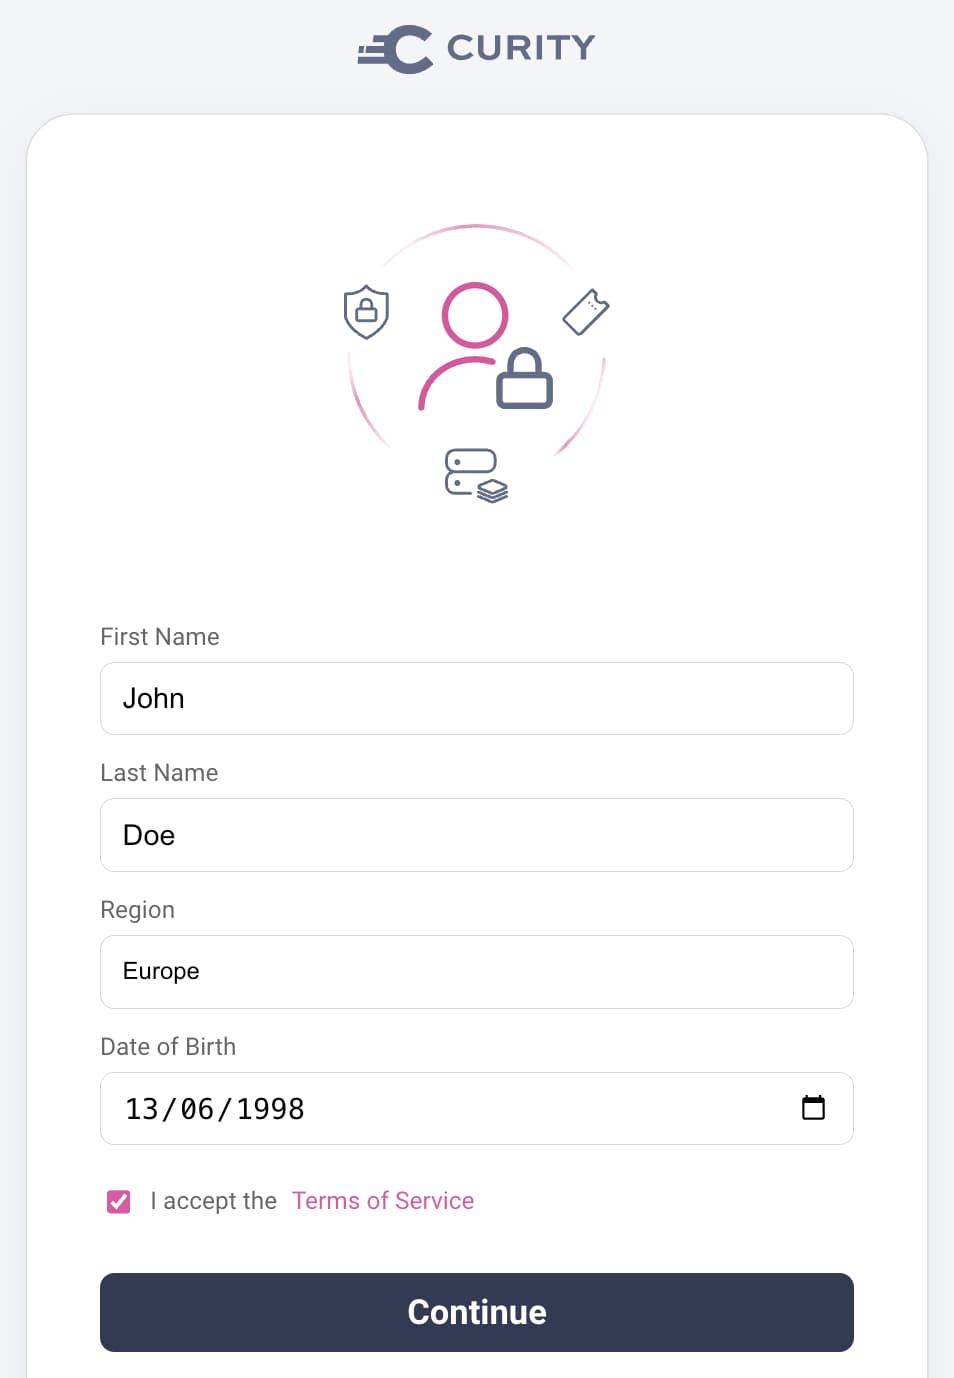
Next, ask a natural language command and the coding assistant will create a plugin for you. The following example question creates a registration form plugin and defines its logic in a single step.
Generate an authentication action for an input form with 5 rows of fields.The first row is a string field for the user's first name.The second row is a string field for the user's last name.The third row is a dropdown from which the user can select a region of Europe, Americas or Asia.The fourth row is the user's date of birth and uses a date selection control.The fifth row has a checkbox to accept legal terms and a link to /assets/terms-of-service.html
Alternatively, you can use maven archetypes or create a skeleton plugin project, and then ask the coding assistant to implement the plugin's logic.
View Generated Code
In this example, the generated code has a frontend HTML form in a get.vm velocity template file. The form uses the following HTML for the region field, which references strings from a messages.properties file.
<div class="form-field"><label for="region">#message("${_templatePrefix}.region.label")</label><selectid="region"name="region"class="block full-width mb1 field-light"><option value="" disabled #if(!$_region || $_region == "")selected#end>#message("${_templatePrefix}.region.placeholder")</option><option value="Europe" #if($_region == "Europe")selected#end>#message("${_templatePrefix}.region.europe")</option><option value="Americas" #if($_region == "Americas")selected#end>#message("${_templatePrefix}.region.americas")</option><option value="Asia" #if($_region == "Asia")selected#end>#message("${_templatePrefix}.region.asia")</option></select></div>
You can apply any of the techniques from the Branding and User Experience tutorials to plugin frontend forms. By default the plugin forms use your global styling preferences, so you should not usually need to do CSS work when creating plugins. If you need to implement custom JavaScript in the browser, you can use Custom JavaScript Event Handlers.
Next, view the backend code, whose main logic is in a handler object. The following generated code shows a handler whose POST method receives a model from request data. The model undergoes validation, and updates the Curity Identity Server's session data when model validation succeeds.
class RegistrationFormRequestHandler(private val config: RegistrationFormActionConfiguration) : ActionCompletionRequestHandler<RegistrationFormRequestModel> {override fun preProcess(request: Request, response: Response): RegistrationFormRequestModel {response.setResponseModel(templateResponseModel(emptyMap(),"index/get"), Response.ResponseModelScope.ANY)return RegistrationFormRequestModel(request)}override fun get(requestModel: RegistrationFormRequestModel, response: Response): Optional<ActionCompletionResult> {return Optional.empty()}override fun post(requestModel: RegistrationFormRequestModel, response: Response): Optional<ActionCompletionResult> {val model = requestModel.postRequestModel!!val session = config.getSessionManager()session.put(Attribute.of(SESSION_FIRST_NAME, model.firstName))session.put(Attribute.of(SESSION_LAST_NAME, model.lastName))session.put(Attribute.of(SESSION_REGION, model.region))session.put(Attribute.of(SESSION_DATE_OF_BIRTH, model.dateOfBirth))session.put(Attribute.of(SESSION_TERMS_ACCEPTED, model.termsAccepted))return Optional.of(ActionCompletionResult.complete())}}
The following generated model implements basic backend field validation to require the user to supply all fields. If you require more advanced multi-field validation logic, for example, to call an API, you could add extra logic to the handler's post method.
class RegistrationFormRequestModel(request: Request){@Validval postRequestModel: RegistrationFormPostRequestModel? = if (request.isPostRequest) RegistrationFormPostRequestModel(request) else null}class RegistrationFormPostRequestModel(request: Request) {@NotBlank(message = "validation.error.firstName.required")val firstName: String? = request.getFormParameterValueOrError("firstName")@NotBlank(message = "validation.error.lastName.required")val lastName: String? = request.getFormParameterValueOrError("lastName")@NotBlank(message = "validation.error.region.required")@Pattern(regexp = "Europe|Americas|Asia", message = "validation.error.region.invalid")val region: String? = request.getFormParameterValueOrError("region")@NotBlank(message = "validation.error.dateOfBirth.required")@Pattern(regexp = "\\d{4}-\\d{2}-\\d{2}", message = "validation.error.dateOfBirth.invalid")val dateOfBirth: String? = request.getFormParameterValueOrError("dateOfBirth")@NotBlank(message = "validation.error.terms.required")val termsAccepted: String? = request.getFormParameterValues("termsAccepted").firstOrNull()}
Troubleshoot
Once you understand the structure and intent of generated code, you can refine the code to meet your preferences. When the agent generates a new project it uses Gradle and you can force code to rebuild, even if you only change HTML assets, with the following command.
./gradlew build --rerun-tasks
However, agents can make mistakes and it is possible that builds will fail and you need to troubleshoot. In some cases, the agent may make assumptions about your computer setup or may omit a required technical dependency. Alternatively, the agent may interpret the SDK incorrectly. To begin troubleshooting, point the agent to its mistake and ask it to fix its own code.
The generated code does not compile and I get the following error message.The get method of RegistrationFormRequestHandler uses an incorrect return type.Please recheck instructions and fix the code.
If the agent cannot resolve its own problem, fix up the code manually. The intellisense features of a Java IDE such as Intellij can help you to understand the problem. For similar examples, with working code to compare against, browse the Authentication Action Plugin Code Examples and their GitHub repositories.
Eventually, once you have fixed up any code and setup issues, the built code will be available as a JAR file. In this tutorial's example, the project produces a single JAR file, with no dependencies, to a location such as the following path.
build/libs/registration-form-action-1.0.0.jar
Deploy and Test the Plugin
Next, use the techniques from the OAuth Customization using Plugins tutorial to deploy the JAR file with the Curity Identity Server and test the plugin. For the most basic way to invoke the registration form authentication action and test the form's user experience, add the action to a simple authenticator in the Admin UI, using the following steps.
- Navigate to System → Profiles → Authentication Service.
- Add a Username Authenticator.
- Add a Registration Form Action.
- Add the Registration Form Action to the Username Authenticator as a Login Action.
If you use the Admin UI to export configuration, you will notice how the Curity configuration system assigns the plugin its own XML namespace.
<config xmlns="http://tail-f.com/ns/config/1.0"><profiles xmlns="https://curity.se/ns/conf/base"><profile><id>authentication-service</id><type xmlns:auth="https://curity.se/ns/conf/profile/authentication">auth:authentication-service</type><settings><authentication-service xmlns="https://curity.se/ns/conf/profile/authentication"><authentication-actions><authentication-action><id>registration-form</id><registration-form xmlns="https://curity.se/ns/ext-conf/registration-form"/></authentication-action></authentication-actions><authenticators><authenticator><id>username</id><authentication-actions><login>registration-form</login></authentication-actions><username xmlns="https://curity.se/ns/ext-conf/username"></username></authenticator></authenticators></authentication-service></settings></profile></profiles></config>
Next, run a code flow for a client that uses the Username Authenticator. After entering a username you can complete the custom registration form:
Complete the Plugin
Once you have a working test setup, you need to ensure that the plugin works reliably and handles failure conditions in a user-friendly way. Handler logic works in the same way for authentication actions and authenticators. If the coding assistant does not generate fully working code, use the input validation techniques from the Getting Started with Authentication Plugins tutorial.
The Curity skills explain how authentication actions have three possible completion states, of successfulResult, failedResult, or pendingResult. When the authentication action first runs, there is no session data yet and it returns a pendingResult. The following example generated code shows how, once form validation succeeds and the post handler updates the session, the action returns a successfulResult.
class RegistrationFormAuthenticationAction(private val config: RegistrationFormActionConfiguration) : AuthenticationAction {override fun apply(context: AuthenticationActionContext): AuthenticationActionResult {val session = config.getSessionManager()val firstName = session.get(SESSION_FIRST_NAME)?.value?.toString() ?: ""val lastName = session.get(SESSION_LAST_NAME)?.value?.toString() ?: ""val region = session.get(SESSION_REGION)?.value?.toString() ?: ""val dateOfBirth = session.get(SESSION_DATE_OF_BIRTH)?.value?.toString() ?: ""val termsAccepted = session.get(SESSION_TERMS_ACCEPTED)?.value?.toString() ?: "false"if (firstName.isEmpty()) {return pendingResult(prompt())}session.remove(SESSION_FIRST_NAME)session.remove(SESSION_LAST_NAME)session.remove(SESSION_REGION)session.remove(SESSION_DATE_OF_BIRTH)session.remove(SESSION_TERMS_ACCEPTED)val enrichedAttributes = context.actionAttributes.with(Attributes.of(Attribute.of("firstName", firstName.value.toString()),Attribute.of("lastName", lastName),Attribute.of("region", region),Attribute.of("dateOfBirth", dateOfBirth),Attribute.of("termsAccepted", termsAccepted)))return successfulResult(context.authenticationAttributes, enrichedAttributes as AuthenticationActionAttributes)}
Integrate into an End-to-End Flow
Some types of plugins do not provide a full solution. For example, authentication actions get composed into flows that use authenticators and other actions. To implement a full registration flow you would typically first configure the following tasks:
- Run a username authenticator to identify the user without authenticating the user.
- Use an action to query a data source to see if the user exists.
- If the user does not exist, invoke the custom registration form.
Upon completion of the custom registration form you could configure additional tasks:
- Run scripted logic to finalize user attributes.
- Create the user account in a data source in an inactive state.
- Run an MFA action to trigger a registration authenticator, such as email verification, to activate the account.
The Authentication Actions tutorials provide a number of tutorials that show how to implement these steps and take full control over the orchestration of user authentication flows.
Conclusion
You can extend the behaviors of the Curity Identity Server in many areas. Plugins enable you to meet your deeper identity requirements, to avoid blocking issues, or to enable phased migrations. The Curity SDK plugin skill plays a useful role to help identity developers to learn.
Customer Stories
Learn how organizations run identity and API security at scale.
Read customer storiesWas this helpful?