Integrating with WSO2 API Manager
On this page
This tutorial describes how to integrate the WSO2 API Manager with the Curity Identity Server using a custom OSGi plugin that implements the Phantom Token Pattern.
The plugin intercepts incoming requests at the gateway, introspects opaque tokens with the Curity Identity Server, and forwards the resulting JWT to backend services. This means backends always receive a JWT in the Authorization header, regardless of what the client sent.
The details of the OAuth Introspection and Phantom Tokens flow is a useful read before diving into this integration.
Prerequisites
- Docker and Docker Compose
- Maven
- A valid Curity license
- WSO2 API Manager (this tutorial was tested with version 4.7.0)
How the Plugin Works
The plugin is deployed as a single OSGi bundle into WSO2's dropins directory. It provides three components that work together:
PhantomAuthorizationHeaderHandler — A global Synapse handler that runs before WSO2's authentication handler. It exchanges opaque tokens for JWTs via introspection and ensures the JWT is forwarded to the backend in the Authorization header.
CurityJwtValidator — A custom JWT validator that extracts the consumer key from the JWT's aud claim, enabling WSO2's subscription validation to work with tokens issued by the Curity Identity Server.
CurityPhantomKeyManager — A WSO2 Key Manager connector that holds the Curity Identity Server configuration entered via the Admin UI and makes it available to the handler at runtime.
Request Flow
If the token is expired or inactive, the gateway returns HTTP 401 with a WWW-Authenticate: Bearer error="invalid_token" header.
Build and Deploy
1. Build the Plugin
Clone the repository and build the OSGi bundle:
git clone https://github.com/curityio/wso2-phantom-token-plugin.gitcd wso2-phantom-token-pluginmvn -f wso2-phantom-token-key-manager/pom.xml clean package
2. Adjust environment settings
Copy .env.example to .env and update the URLs, client credentials, and expected audience to match your environment. The values are read by docker compose and passed to the setup container, which uses them to register the Curity Key Manager.
cp .env.example .env
3. Start the Stack
The repository includes a Docker Compose setup that builds a WSO2 APIM image with the plugin pre-installed and auto-configures a test API:
docker compose builddocker compose up -d
WSO2 starts on port 9443 (Admin/Publisher/DevPortal) and 8243 (HTTPS gateway). A setup container automatically creates the Key Manager, a test API, and the required subscription.
Trusting the Curity Identity Server's Self-Signed Certificate (Demo Only)
The Docker Compose stack runs the Curity Identity Server with its auto-generated self-signed certificate. To make the demo work end-to-end without committing pre-built certificates to the repository, the WSO2 container's entry-point script extracts the Curity Identity Server's certificate at startup and imports it into both trust stores used by WSO2:
client-truststore.jks— used by WSO2's internal HTTP client when fetching the JWKS for JWT signature validation.- The JDK's
cacerts— used by the plugin's HTTPS client when calling the introspection endpoint.
The same certificate is therefore trusted by both code paths. Because the auto-generated certificate's SAN does not include the Docker service name, hostname verification is also relaxed for outbound calls — cryptographic validation of the certificate itself is still performed.
In production, present the Curity Identity Server with a certificate whose SAN matches the gateway's view of it, signed by a CA that the API gateway already trusts.
Configure the Key Manager
If you prefer to configure the Key Manager manually instead of using the init script, open the WSO2 Admin UI at https://localhost:9443/admin.
1. Add a New Key Manager
Go to Key Managers and click Add Key Manager.
-
Select Curity Phantom Token as the Key Manager Type.
-
Enter a Name, for example
curity.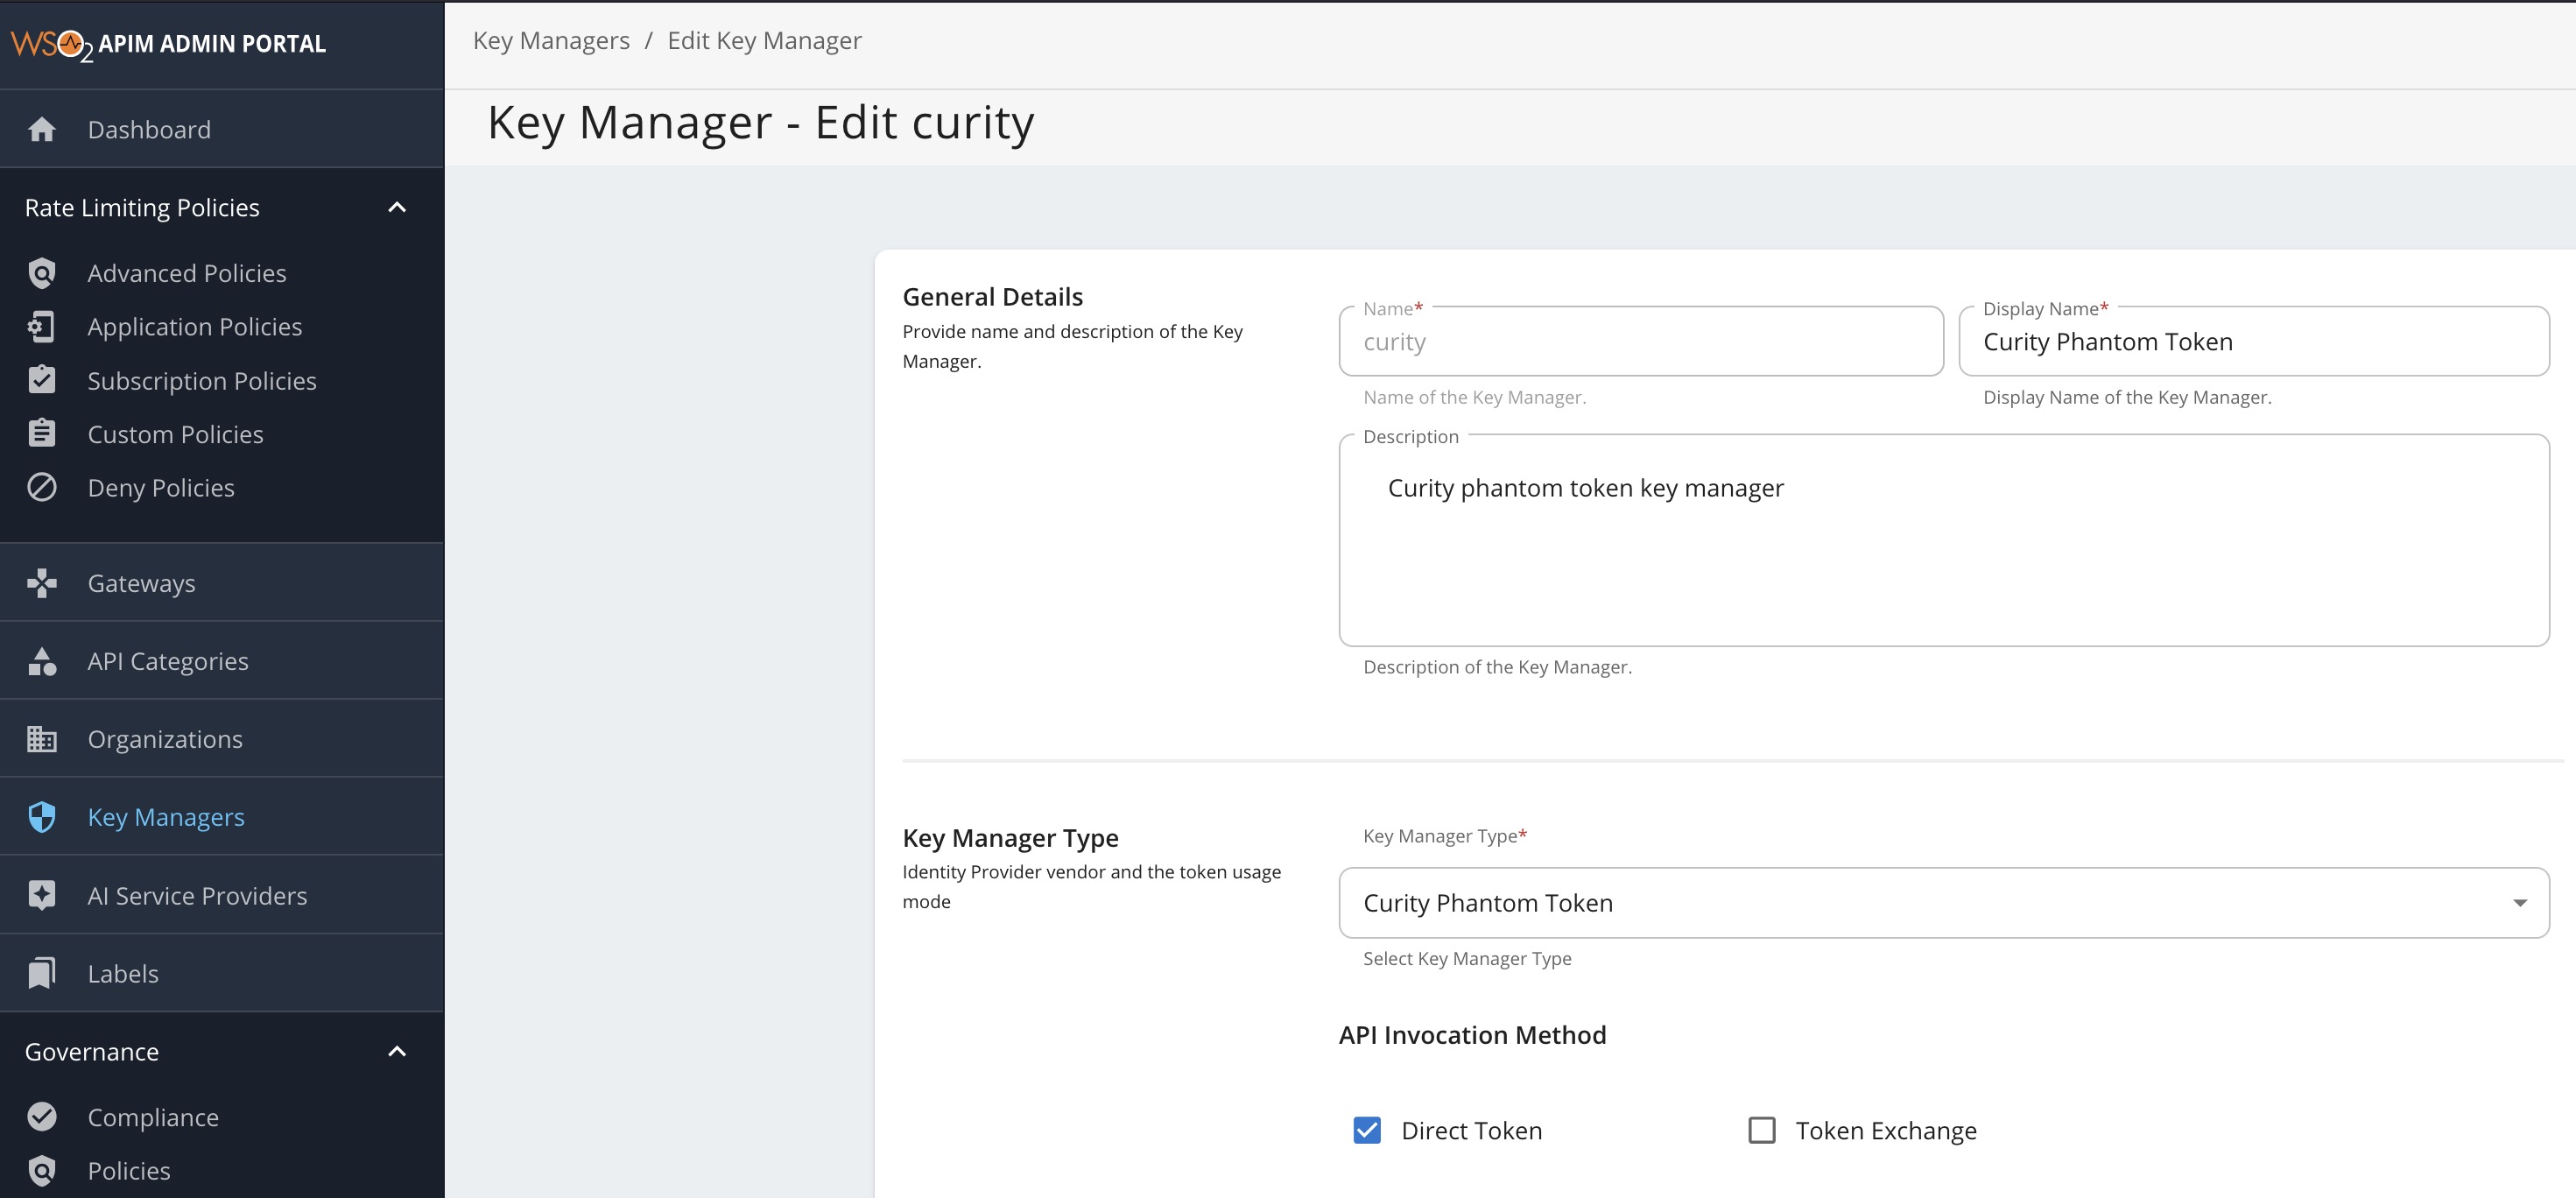
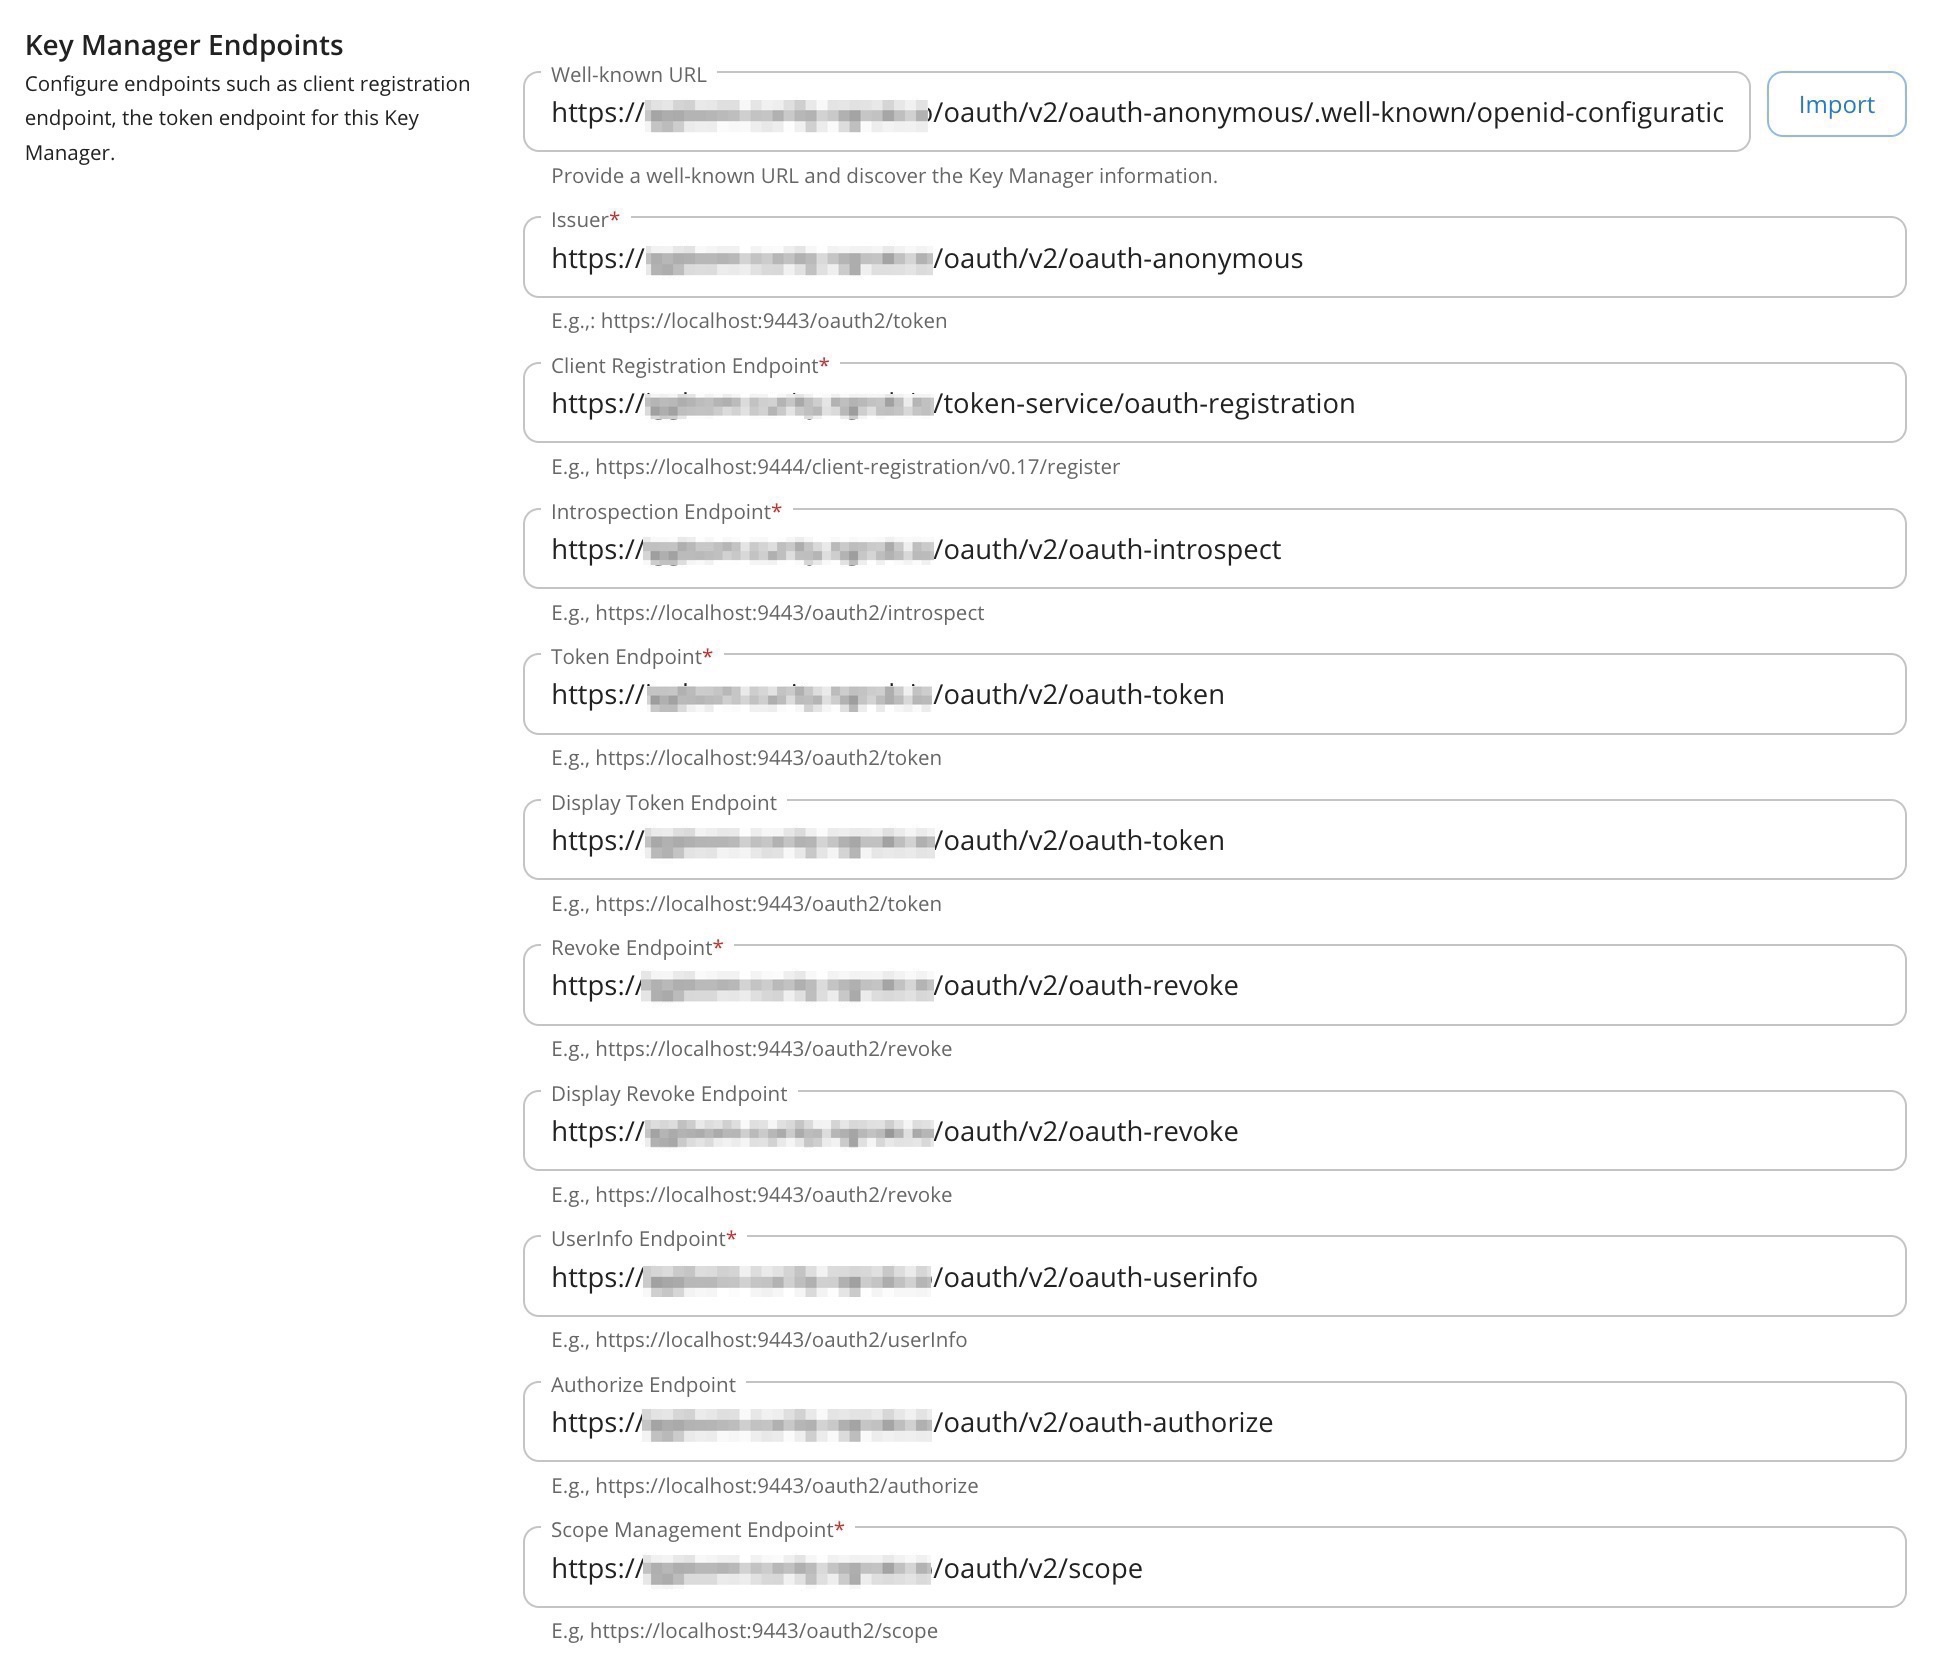
-
Enter the well-known OIDC configuration metadata URL for the Curity Identity Server and click Import. This populates the endpoint fields and the JWKS URI in the Certificates section.
2. Configure Connector Settings
Under Connector Configurations, set the following fields:
| Field | Description | Example | Required |
|---|---|---|---|
| Client ID | OAuth client with the introspection capability | api-gateway-client | Yes |
| Client Secret | OAuth client secret | Password1 | Yes |
| Expected Audience | The aud claim value expected in the JWT from introspection | client-one | Yes |
| Clock Skew | Allowed clock skew in seconds when validating JWT expiry | 60 | No |
| Cache Max Entries | Maximum number of cached tokens (default 50000) | 50000 | No |

3. Configure Advanced Settings
Set the Key Manager Permission to Public.
Under Advanced Configurations:
- Uncheck
Token Generation,Out of Band Provisioning, andOAuth App Creation. - Ensure
Self Validate JWTis enabled.
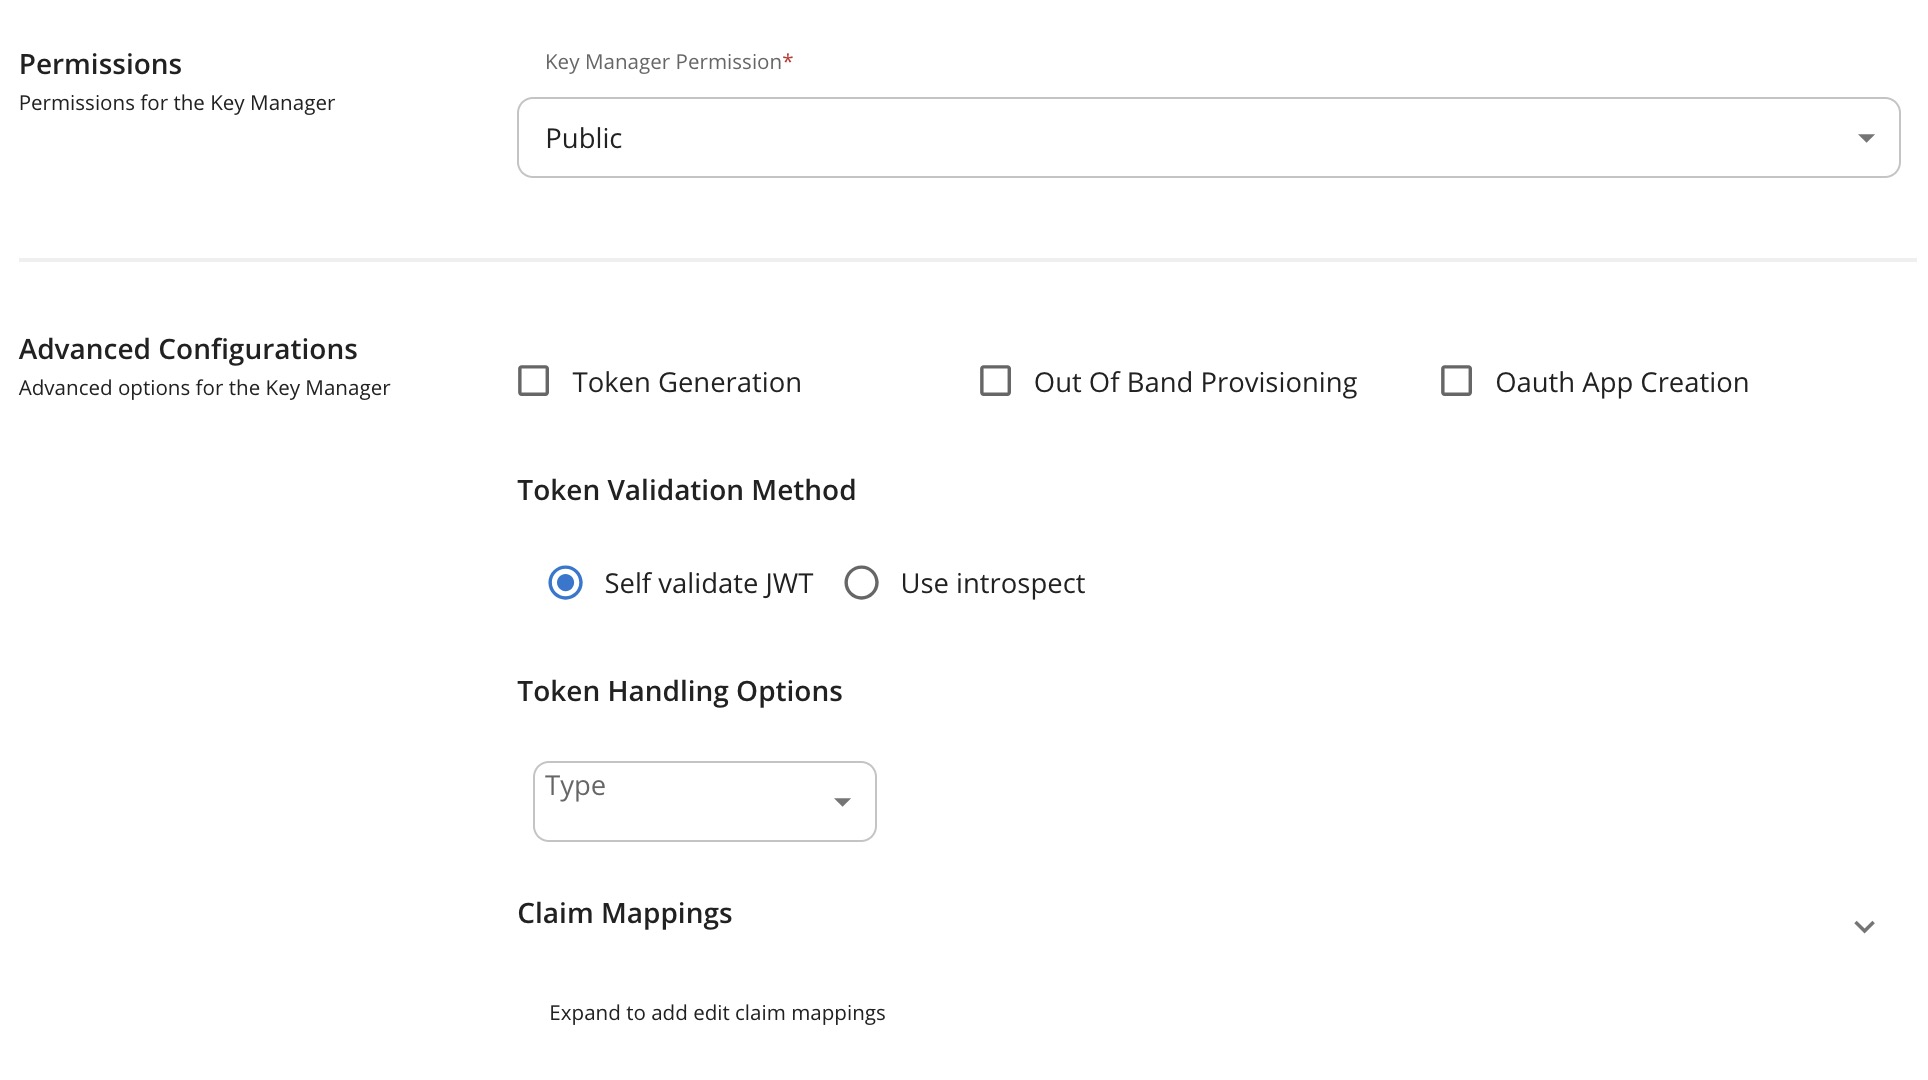
Click Save.
4. Create an Application and Subscription
WSO2 requires a subscription mapping for tokens issued by the Curity Identity Server. The consumer key mapping is not available through the DevPortal UI for this key manager type, so this step uses the WSO2 REST API.
First, create an application in the DevPortal (https://localhost:9443/devportal):
- Click Add New Application.
- Enter a name (e.g.,
CurityApp) and select a Shared Quota for Application Tokens. - Click Save.
Then map the external consumer key and subscribe via the REST API. First, obtain a WSO2 admin access token.
Register a temporary OAuth client and get an access token:
DCR=$(curl -sk -u admin:admin -H "Content-Type: application/json" \-d '{"clientName":"setup","owner":"admin","grantType":"password client_credentials","saasApp":true}' \"https://localhost:9443/client-registration/v0.17/register")CLIENT_ID=$(echo "$DCR" | grep -o '"clientId":"[^"]*"' | cut -d'"' -f4)CLIENT_SECRET=$(echo "$DCR" | grep -o '"clientSecret":"[^"]*"' | cut -d'"' -f4)TOKEN=$(curl -sk -u "${CLIENT_ID}:${CLIENT_SECRET}" \-d "grant_type=password&username=admin&password=admin" \--data-urlencode "scope=apim:subscribe apim:app_manage apim:sub_manage" \"https://localhost:9443/oauth2/token" \| grep -o '"access_token":"[^"]*"' | cut -d'"' -f4)
Then look up the application and API IDs:
APP_ID=$(curl -sk -H "Authorization: Bearer $TOKEN" \"https://localhost:9443/api/am/devportal/v3/applications?query=CurityApp" \| grep -o '"applicationId":"[^"]*"' | head -1 | cut -d'"' -f4)API_ID=$(curl -sk -H "Authorization: Bearer $TOKEN" \"https://localhost:9443/api/am/publisher/v4/apis?query=name:HttpBin" \| grep -o '"id":"[^"]*"' | head -1 | cut -d'"' -f4)
Then map the consumer key and subscribe:
curl -sk -X POST \-H "Authorization: Bearer $TOKEN" \-H "Content-Type: application/json" \"https://localhost:9443/api/am/devportal/v3/applications/$APP_ID/map-keys?keyType=PRODUCTION" \-d '{"consumerKey": "client-one","consumerSecret": "not-used","keyManager": "curity","keyType": "PRODUCTION"}'curl -sk -X POST \-H "Authorization: Bearer $TOKEN" \-H "Content-Type: application/json" \"https://localhost:9443/api/am/devportal/v3/subscriptions" \-d '{"applicationId": "'$APP_ID'","apiId": "'$API_ID'","throttlingPolicy": "Unlimited"}'
The consumerKey value must match the aud claim in the JWT returned by the Curity Identity Server.
Why Is a Subscription Needed?
WSO2 APIM always validates subscriptions for JWT-authenticated requests. The application mapping connects the aud claim from the JWT issued by the Curity Identity Server to a WSO2 application, and the subscription authorizes that application to access the API.
Using the Docker Compose Setup?
The docker/wso2/init-api.sh script included in the repository handles the application creation, key mapping, and subscription automatically. This manual step is only needed if you are configuring WSO2 without the init script.
Enable OAuth2 Security on the API
In the Publisher (https://localhost:9443/publisher):
-
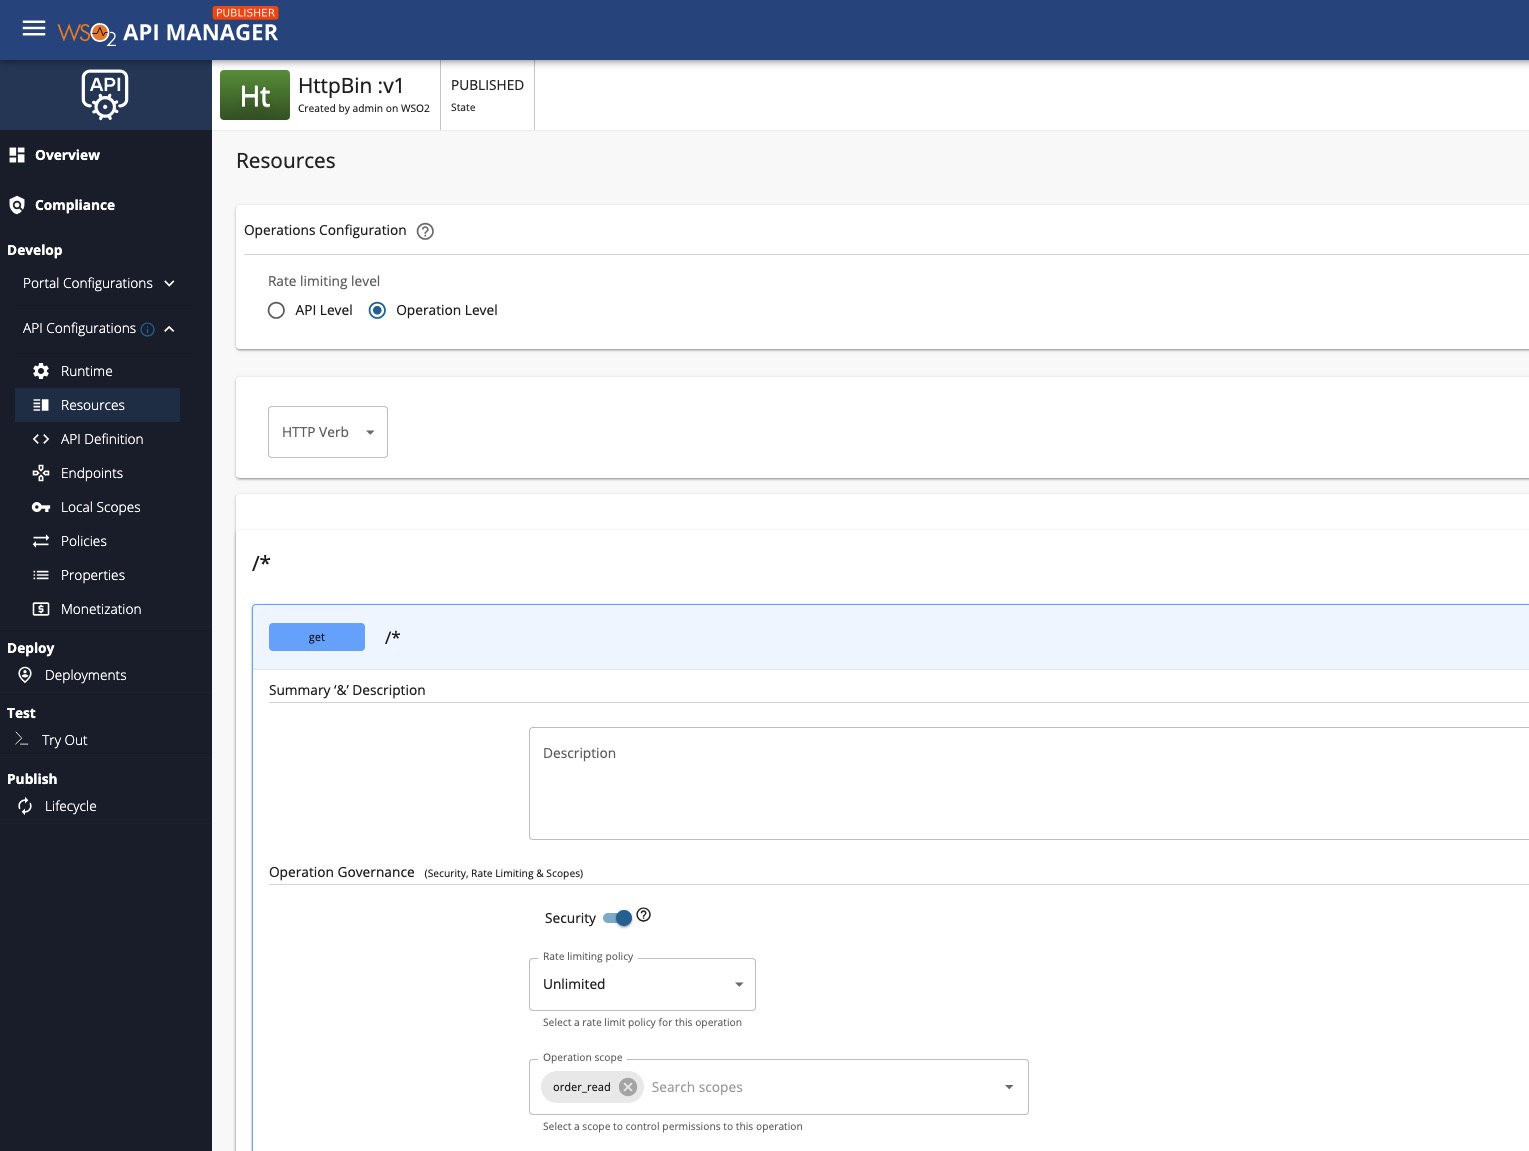
Open the API and go to Develop → API Configurations → Resources.
-
For the resources you want to protect, change the Security radio button to
enabled. This enables the Application Levels defined under Runtime -
Optionally, assign scopes to resources to configure access control.
-
Navigate to Runtime, make sure
OAuth2is checked and thatAllow allKey Manager Configurations is selected (or alternativelyAllow selectedand make sure thatCurity Phantom Tokenis selected).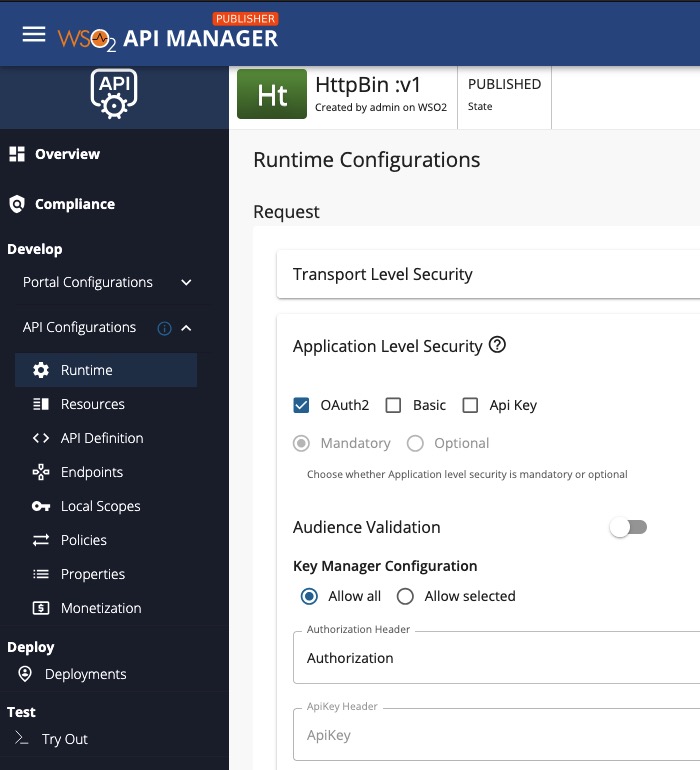
-
Save and Deploy a new revision.
Scope Enforcement
Scopes are enforced at the API resource level. Define scopes under Local Scopes, then assign them to operations. WSO2 checks that the JWT's scope claim includes the required scopes.
OIDC Scopes
Standard OIDC scopes like openid cannot be used as API resource scopes due to WSO2's separate OIDC and API scope registries. Use API-specific scope names that match between the Curity Identity Server and WSO2.
Test the Integration
1. Obtain an Opaque Token
Issue an opaque access token from the Curity Identity Server using any flow your client supports, for example, client credentials or an interactive code flow. The quickest way during development is to run the flow in OAuth Tools and copy the resulting access token.
The token must be issued with a matching aud claim to what's configured as Expected Audience on the Key Manager (client-one in this tutorial).
2. Call the API
Send a request with the opaque token:
curl -sk https://localhost:8243/httpbin/v1/get \-H "Authorization: Bearer <opaque-token-from-step-1>"
The response from httpbin echoes the headers the backend received. The Authorization header now contains the JWT from the Curity Identity Server:
{"headers": {"Authorization": "Bearer eyJraWQ..."}}
Sending an expired or invalid token returns a 401:
curl -sk -w "\nHTTP %{http_code}\n" https://localhost:8243/httpbin/v1/get \-H "Authorization: Bearer <expired-token>"HTTP 401
Resources
- An article on OAuth Introspection and Phantom Tokens
- Overview of the Phantom Token Pattern
- Installing the Curity Identity Server
Customer Stories
Learn how organizations run identity and API security at scale.
Read customer storiesWas this helpful?