
Advanced Login Customizations for HAAPI Mobile Apps
On this page
A mobile app that uses the HAAPI UI SDK can customize login screens in various ways. When getting started, use the basic customizations explained in the Android and iOS tutorials, to implement themes and change static text. This tutorial explains how to implement more advanced extensibility. These customizations usually fit into one of the following categories, to provide complete control over data, logic and presentation.
- Add or remove particular UI elements within a login screen.
- Replace an entire login screen.
- Implement login screens for a custom authenticator.
Before using advanced customizations, understand the stages of an end-to-end HAAPI flow. Authenticators in the Curity Identity Server can provide a HAAPI representation that mobile apps receive as a JSON API response. The UI SDK then deserializes response data to UI models, and uses model data to dynamically create login screens that contain UI elements.

HAAPI Representations
The mobile app receives Hypermedia Authentication API responses from the Curity Identity Server, where the response data expresses authentication steps. Authentication steps, in turn, represent an authenticator or an authentication action. Consequently, authenticators and authentication actions define the shape of the steps, the HAAPI representation.
When considering advanced customizations, it can be useful to learn how authenticators and authentication actions define the representation by studying the Server SDK. The following example representation is from the Username Password Authenticator, which you can use or adapt if the built-in HTML form authenticator's representation does not meet your needs.
public class AuthenticateGetRepresentationFunction implements RepresentationFunction{private static final Message MSG_TITLE = Message.ofKey("meta.title");private static final Message MSG_ACTION = Message.ofKey("view.authenticate");private static final Message MSG_HEADER = Message.ofKey("view.top-header");private static final Message MSG_USERNAME = Message.ofKey("view.username");private static final Message MSG_PASSWORD = Message.ofKey("view.password");private static final Message MSG_FORGOT_PASSWORD = Message.ofKey("view.forgot-password");private static final Message MSG_FORGOT_ACCOUNT_ID = Message.ofKey("view.forgot-account-id");private static final Message MSG_REGISTER = Message.ofKey("view.no-account");@Overridepublic Representation apply(RepresentationModel model, RepresentationFactory factory){String authUrl = model.getString("_authUrl");Optional<String> registerUrl = model.getOptionalString("_registerUrl");Optional<String> username = model.getOptionalString("_username");return factory.newAuthenticationStep(step -> {step.addMessage(MSG_HEADER, HaapiContract.MessageClasses.HEADING);step.addFormAction(HaapiContract.Actions.Kinds.LOGIN, URI.create(authUrl),HttpMethod.POST,MediaType.X_WWW_FORM_URLENCODED,MSG_TITLE,MSG_ACTION,fields -> {fields.addUsernameField("userName", MSG_USERNAME, username.orElse(""));fields.addPasswordField("password", MSG_PASSWORD);});step.addLink(URI.create(authUrl + "/forgot-password"),HaapiContract.Links.Relations.FORGOT_PASSWORD,MSG_FORGOT_PASSWORD);step.addLink(URI.create(authUrl + "/forgot-account-id"),FORGOT_ACCOUNT_ID,MSG_FORGOT_ACCOUNT_ID);registerUrl.ifPresent(regUrl -> step.addLink(URI.create(regUrl),HaapiContract.Links.Relations.REGISTER_CREATE,MSG_REGISTER));});}}
The server uses a Data Model to serialize HAAPI representations to a JSON hypermedia wire format and returns it to the mobile app. The data in the server's JSON responses includes static text from message files that you can customize. The HAAPI UI SDK dynamically builds login screens with UI elements from the server response. The user interacts with login screens to perform actions like navigation and entering data. Eventually, the user submits forms containing data that the view posts to the authenticator's HTTP Routes.
Hypermedia Authentication API Messages
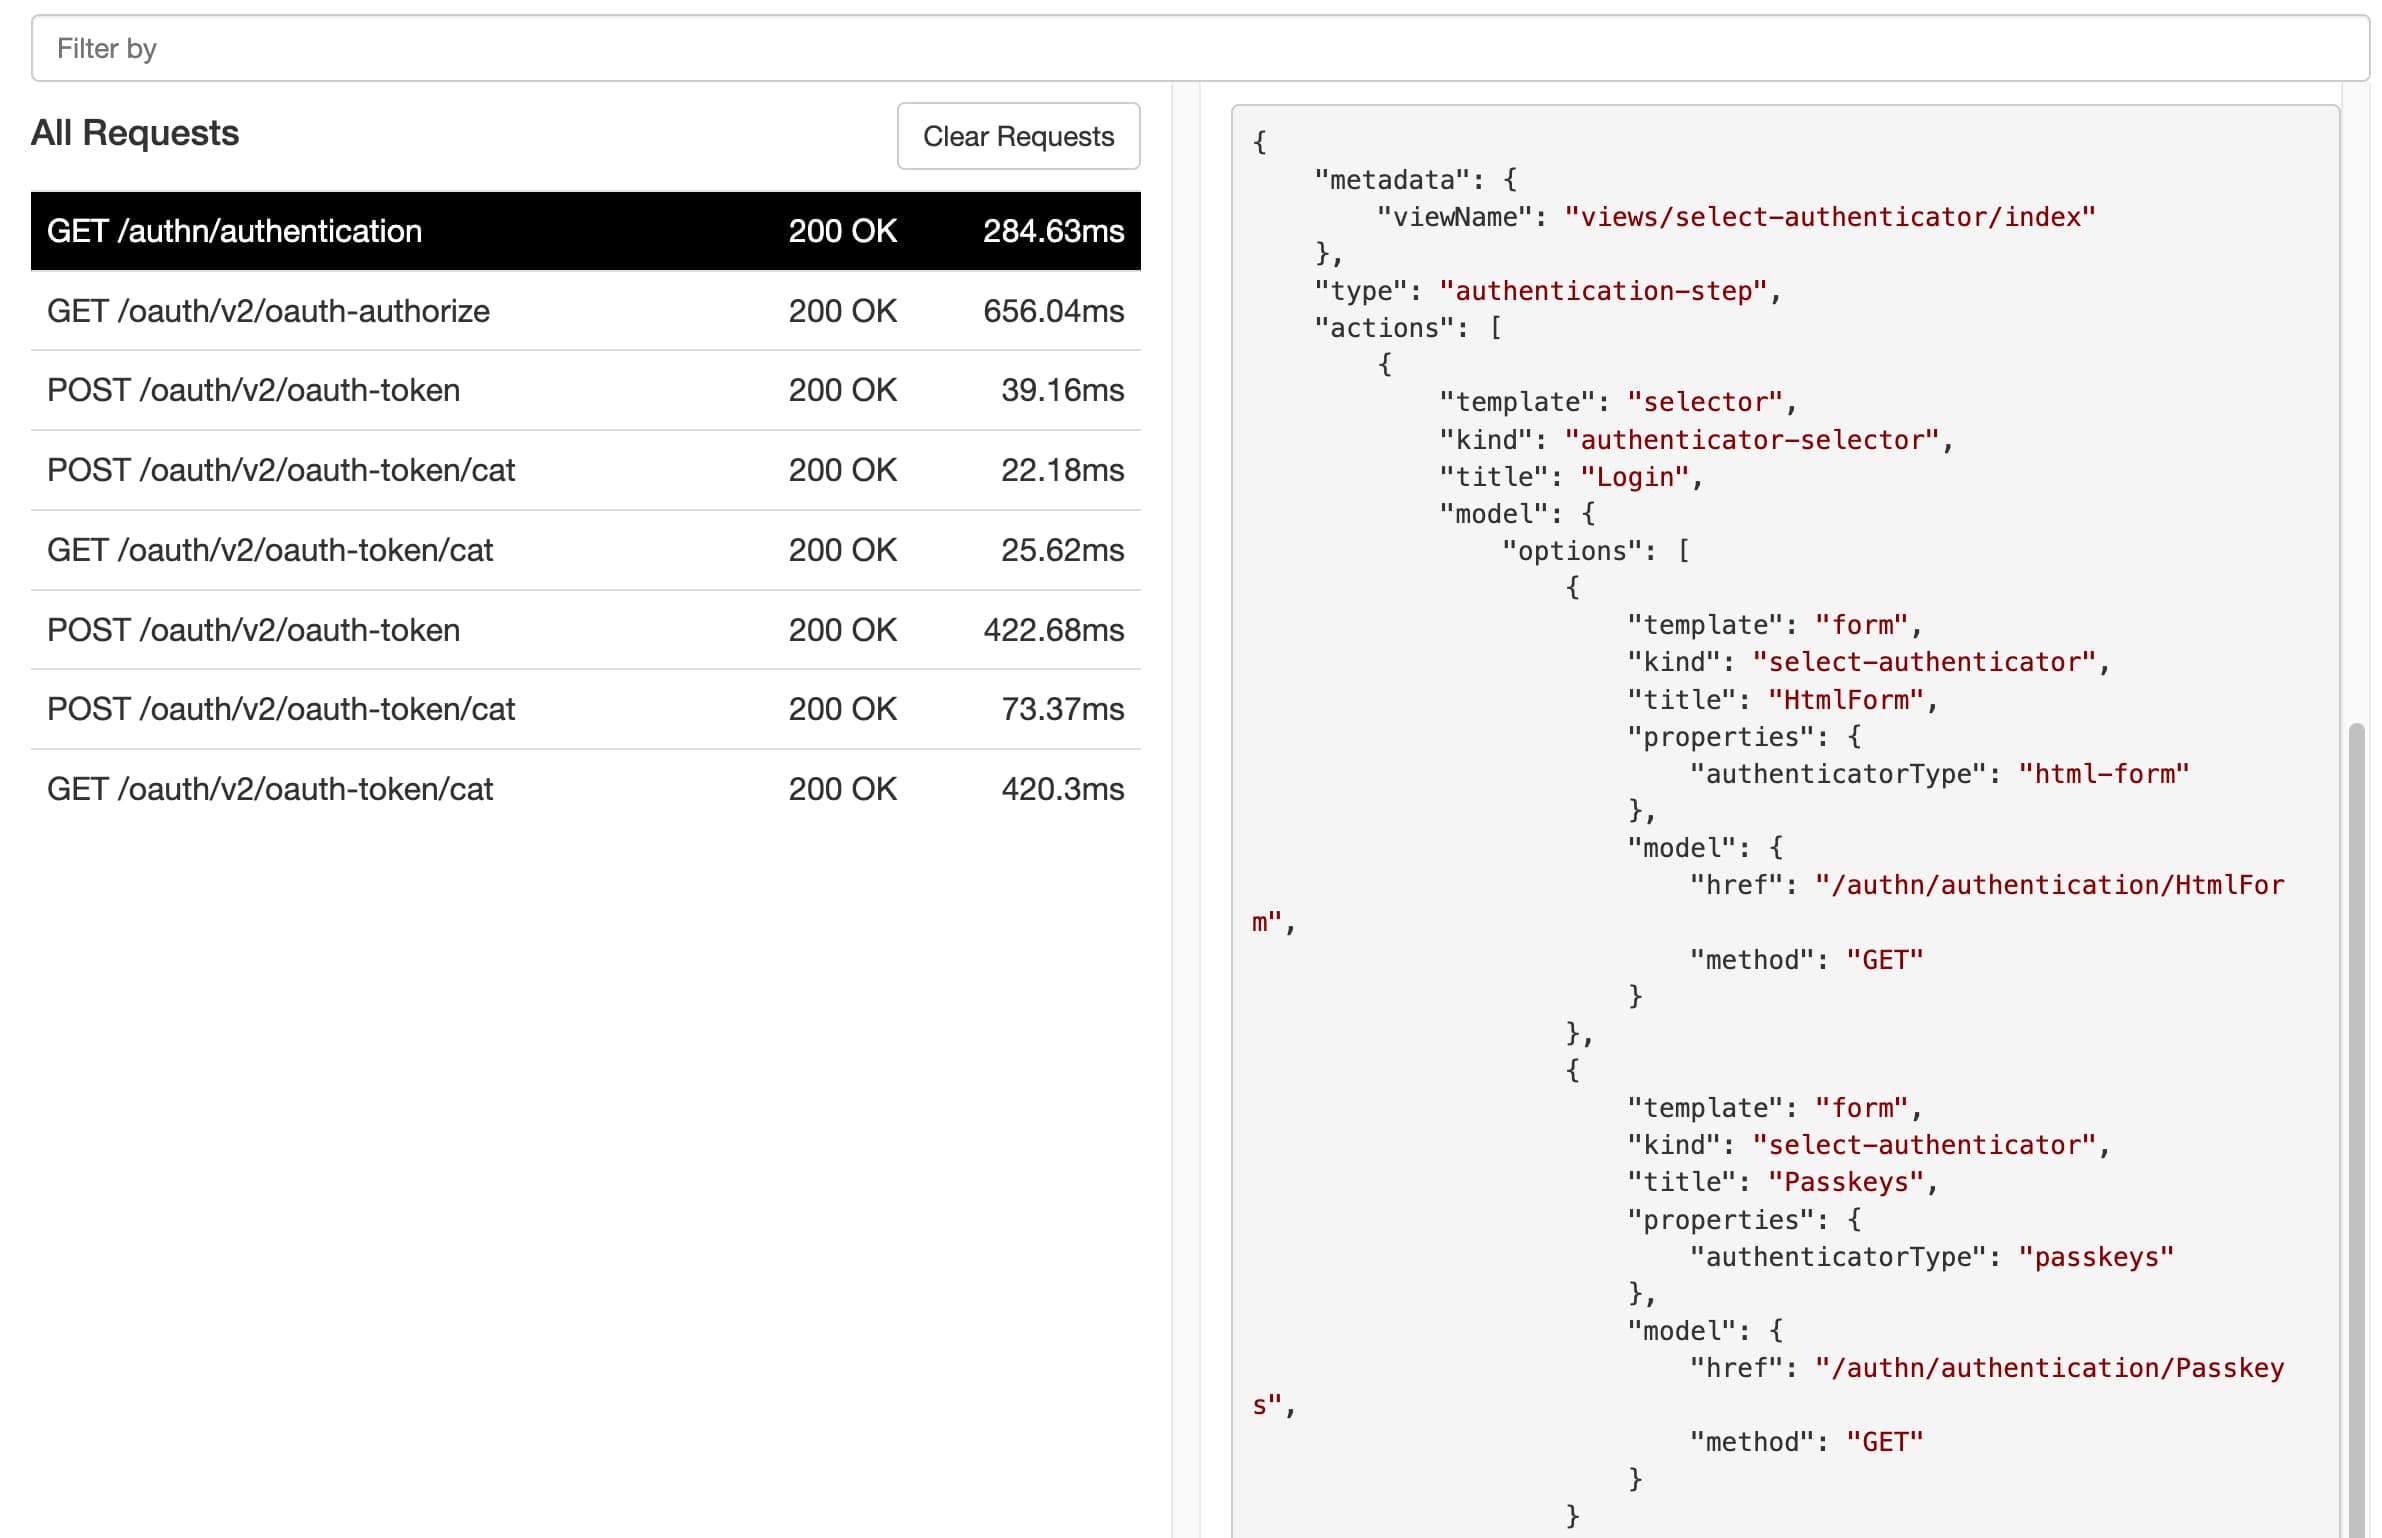
The UI SDK sends an HTTP GET request when it first triggers an authenticator, after which the UI SDK receives a hypermedia API response. When customizing behavior it is useful to view HAAPI messages and study the response data and its impact on the UI.
The following example response payload represents an HTML form (username and password) hypermedia API response returned to the mobile app. In this example, the UI SDK creates elements like labels, input fields, buttons and hyperlinks.
{"links": [{"href": "/authn/authentication/HtmlForm/forgot-password","rel": "forgot-password","title": "Forgot your password?"},{"href": "/authn/authentication/HtmlForm/forgot-account-id","rel": "forgot-account-id","title": "Forgot your username?"},{"href": "/authn/registration/HtmlForm","rel": "register-create","title": "Create account"}],"metadata": {"viewName": "authenticator/html-form/authenticate/get"},"type": "authentication-step","actions": [{"template": "form","kind": "login","title": "Login","model": {"href": "/authn/authentication/HtmlForm","method": "POST","type": "application/x-www-form-urlencoded","actionTitle": "Login","fields": [{"name": "userName","type": "username","label": "Username"},{"name": "password","type": "password","label": "Password"}]}}]}
When the user performs actions like navigation or submitting forms, the UI SDK sends a request to the server. In particular, the frontend sends authentication proofs to the server for validation. The following example shows username and password properties posted back to the server as form URL-encoded data.
POST /authn/authentication/HtmlForm HTTP/1.1Host: login.example.comUser-Agent: haapidemo/1 CFNetwork/3826.500.111.2.2 Darwin/24.4.0Content-Length: 36Accept: application/vnd.auth+jsonContent-Type: application/x-www-form-urlencodedAuthorization: DPoP eyJraWQiOiJkenMtZlEzZ...Dpop: eyJhbGciOiJF...userName=demouser&password=Password1
To gain a solid understanding of HAAPI messages, consider running a ngrok mobile setup so that you can easily view HAAPI messages sent between a mobile app and the Curity Identity Server.
From the server's viewpoint, only the input and output data matters. The mobile app can customize its data, logic and presentation however it likes, as long as it sends the user's input to the server with the expected parameters.
Customize Data with Model Transformations
The UI SDK deserializes HAAPI representations into a number of UI models. The following table summarizes the most commonly used UI model types. The Android and iOS reference documentation explains each UI model in further detail.
| UI Model Type | Behavior |
|---|---|
| FormModel | Presents a collection of interaction items to the user. |
| SelectorModel | Presents a list of selection items to the user. |
| GenericModel | Presents both interaction and selection items to the user. |
| PollingModel | Performs a timed, repeated action like polling the server to check for login completion outside of the app. |
| ProblemModel | Returns problem details to the mobile app if there is a server-side or client-side error. |
To work with UI models, start by creating a custom data mapper, which enables some types of model modifications before passing the UI model to views.
For Android, extend the HaapiUIWidgetApplication instance to override the dataMappersFactory method and return a data mapper object:
@OptIn(ExperimentalHaapiApi::class)override val dataMappersFactory: DataMappersFactoryget() = CustomDataMapper(redirectTo = configuration.redirectURI,autoPollingDuration = widgetConfiguration.autoPollingDuration,useDefaultExternalBrowser = widgetConfiguration.useDefaultExternalBrowser)
You can transform UI models based on their generic type, for example to apply the same customization to all views that use a FormModel. Alternatively, transform particular UI models using a property, such as a view name that identifies a particular login screen. The following example demonstrates the latter approach.
@OptIn(ExperimentalHaapiApi::class)class CustomDataMapper(redirectTo: String,autoPollingDuration: Duration,useDefaultExternalBrowser: Boolean) : HaapiDataMappersFactory(redirectTo, autoPollingDuration, useDefaultExternalBrowser) {override val mapHaapiResponseToModel: (se.curity.identityserver.haapi.android.sdk.models.HaapiResponse) -> UIModelget() = {val defaultModel = super.mapHaapiResponseToModel(it)val formModel = defaultModel as? FormModelif (formModel?.viewName == "authenticator/html-form/authenticate/get") {CustomHtmlFormLoginModel.create(formModel)} else {defaultModel}}...}
To transform UI models, first include the org.jetbrains.kotlin.plugin.parcelize plugin in your Android project. Then transform the UI model to provide a new UI model to the view. For example, the following code snippet removes the Forgot Username link from the password login screen. The code also removes the default login title and adds some extra data to the model.
@Parcelizedata class CustomHtmlFormLoginModel(val extraData: String,override val interactionItems: List<InteractionItem>,override val linkItems: List<LinkItemModel>,override val messageItems: List<InfoMessageModel>,override val templateArea: String?,override val viewName: String?) : FormModel {companion object {fun create(formModel: FormModel): CustomHtmlFormLoginModel {return CustomHtmlFormLoginModel(extraData = getExtraData(),interactionItems = formModel.interactionItems.filter { !it.key.contains("Login") },linkItems = formModel.linkItems.filter { !it.href.contains("forgot-account-id") },messageItems = formModel.messageItems,templateArea = formModel.templateArea,formModel.viewName)}}}
Customize Logic with Subclassed Views
For each UI model type, the UI SDK provides a corresponding view type whose name depends on the mobile platform. The following table provides a summary of the main view types and the UI model types that they process.
| UI Model Type | Android View Type | iOS View Type |
|---|---|---|
| FormModel | FormFragment | FormViewController |
| SelectorModel | SelectorFragment | SelectorViewController |
| GenericModel | GenericFragment | GenericViewController |
| PollingModel | PollingFragment | PollingViewController |
| ProblemModel | ProblemFragment | ProblemViewController |
In some cases, the default login screen may mostly meet your needs but require minor customizations to UI controls or frontend logic. To begin customizing views, create a custom resolver object that can selectively override view creation.
@OptIn(ExperimentalHaapiApi::class)override val customFragmentResolver: FragmentResolver = CustomFragmentResolver()
Within the custom resolver object, use UI model properties or the UI model type to override views. The following example overrides the view logic for the HTML form's login screen and the authentication selection screen:
@OptIn(ExperimentalHaapiApi::class)class CustomFragmentResolver : FragmentResolver {private val defaultResolver = HaapiFlowFragmentResolver.Builder().build()override fun <T : UIModel> getFragment(uiModel: T): HaapiFlowFragment<T> {if (uiModel is FormModel) {return createFormFragment(uiModel) as HaapiFlowFragment<T>}if (uiModel is SelectorModel) {return createSelectorFragment(uiModel) as HaapiFlowFragment<T>}return defaultResolver.getFragment(uiModel)}private fun createFormFragment(model: FormModel): HaapiFlowFragment<FormModel> {if (model is CustomHtmlFormLoginModel) {return CustomHtmlFormLoginFragment.newInstance(model)}return FormFragment.newInstance(model)}private fun createSelectorFragment(model: SelectorModel): HaapiFlowFragment<SelectorModel> {if (model.viewName == "views/select-authenticator/index") {return CustomAuthenticationSelectionFragment.newInstance(model)}return SelectorFragment.newInstance(model)}}
You can then implement overrides to inject custom logic. Most commonly, this involves adding UI elements to the view or writing additional client-side validation before allowing the submission of a login form. The following code shows how to get started with view overrides.
On Android, each view type renders a number of standard elements, summarized in the below table.
| Element Name | Description |
|---|---|
| hui_fragment_$VIEWTYPE_info_view | The main area for the view. |
| hui_fragment_$VIEWTYPE_recycler_view | Additional items, such as items to select in a selector view. |
| hui_fragment_$VIEWTYPE_bottom_space | Vertical spacing. |
| hui_fragment_$VIEWTYPE_links_recycler_view | Links that show at the end of the view. |
To partially customize a view, create a new XML layout file that includes the standard elements and also any custom elements. The following example first renders a banner at the top of the view and then renders standard elements below it.
<androidx.constraintlayout.widget.ConstraintLayout xmlns:android="http://schemas.android.com/apk/res/android"android:layout_width="match_parent"android:layout_height="match_parent"xmlns:app="http://schemas.android.com/apk/res-auto"><TextViewandroid:id="@+id/banner_text"android:layout_width="match_parent"android:layout_height="wrap_content"android:textColor="@color/primary"android:gravity="center"android:textStyle="bold"android:textSize="18sp"android:padding="20dp"app:layout_constraintEnd_toEndOf="parent"app:layout_constraintStart_toStartOf="parent"app:layout_constraintTop_toTopOf="parent" /><se.curity.identityserver.haapi.android.ui.widget.components.InfoViewandroid:id="@+id/hui_fragment_form_info_view"android:layout_width="match_parent"android:layout_height="wrap_content"app:layout_constraintStart_toStartOf="parent"app:layout_constraintTop_toBottomOf="@+id/banner_text"app:layout_constraintEnd_toEndOf="parent" />...</androidx.constraintlayout.widget.ConstraintLayout>
Then, reference the ID of the custom layout element in the view's code. The following example looks up a custom element for header banner text and sets its runtime value. When required, the view's code can use custom model data.
class CustomHtmlFormLoginFragment : FormFragment(layoutId = R.layout.haapi_html_login_form) {companion object {fun newInstance(uiModel: UIModel) : CustomHtmlFormLoginFragment {return CustomHtmlFormLoginFragment().apply {arguments = uiModelBundle(uiModel)}}}override fun preRender(uiModel: UIModel?, view: View, savedInstanceState: Bundle?) {super.preRender(uiModel, view, savedInstanceState)if (uiModel is CustomHtmlFormLoginModel) {val bannerView = view.findViewById<TextView>(R.id.banner_text)bannerView.text = getBannerTextFromExtraData(uiModel.extraData)}}override fun preSubmit(interactionAction: InteractionAction,keysValues: Map<String, Any>,block: (Boolean, Map<String, Any>) -> Unit) {super.preSubmit(interactionAction, keysValues, block)}}
Replace Whole Screens with Custom Views
In some cases, subclassed views may be insufficient to meet deeper requirements, like a precise layout or the use of custom UI elements. Therefore, the UI SDK allows you to completely replace entire screens.
The following snippet shows the main code to render a custom authentication selection screen that overrides the HaapiFlowFragment<SelectorModel> base class. The custom layout renders some header text and then a list of buttons and descriptive text for each authenticator. The custom view sorts the passkeys item first, to encourage users to select a modern and secure login method. Ultimately, the select base class method sends the correct data to the server.
class CustomAuthenticationSelectionFragment: HaapiFlowFragment<SelectorModel>(R.layout.haapi_authentication_selector) {companion object {fun newInstance(uiModel: UIModel) : CustomAuthenticationSelectionFragment {return CustomAuthenticationSelectionFragment().apply {arguments = uiModelBundle(uiModel)}}}override fun onViewCreated(view: View, savedInstanceState: Bundle?) {super.onViewCreated(view, savedInstanceState)val formModel = extractUIModelFromArguments<SelectorModel>()val selectorItems = formModel.selectorItems.map { it as SelectorItemModel }val sortedItems = selectorItems.sortedWith { first, second ->when {first.type == "passkeys" -> -1second.type == "passkeys" -> 1else -> first.title.compareTo(second.title)}}val recyclerView = view.findViewById(R.id.selector_items_recycler_view) as? RecyclerViewval viewModels = sortedItems.map { CustomAuthenticationSelectionItemViewModel(it) }recyclerView?.adapter = CustomAuthenticationSelectionArrayAdapter(viewModels, {select(it)})}}
Replacing an entire screen requires you to provide a custom XML layout file. This example uses the following XML, where an Android RecyclerView control presents the list of authenticators.
<?xml version="1.0" encoding="utf-8"?><androidx.constraintlayout.widget.ConstraintLayout xmlns:android="http://schemas.android.com/apk/res/android"android:layout_width="match_parent"android:layout_height="match_parent"xmlns:app="http://schemas.android.com/apk/res-auto"><TextViewandroid:id="@+id/header_text"android:layout_width="match_parent"android:layout_height="wrap_content"android:textColor="@color/primary"android:gravity="center"android:textStyle="bold"android:textSize="24dp"android:text="Choose a Login Method"app:layout_constraintEnd_toEndOf="parent"app:layout_constraintStart_toStartOf="parent"app:layout_constraintTop_toTopOf="parent" /><androidx.recyclerview.widget.RecyclerViewandroid:id="@+id/selector_items_recycler_view"android:layout_width="match_parent"android:layout_height="wrap_content"app:layout_constraintStart_toStartOf="parent"app:layout_constraintEnd_toEndOf="parent"app:layout_constraintTop_toBottomOf="@+id/header_text"app:layoutManager="androidx.recyclerview.widget.LinearLayoutManager"android:overScrollMode="never" /></androidx.constraintlayout.widget.ConstraintLayout>
Developer Resources
To implement advanced login customizations with HAAPI, follow this tutorial's approach to identify the extensibility points, gain a deeper understanding of HAAPI objects and gradually deliver your preferred login user experience. Read much more about extensibility techniques in the Android and iOS developer documentation.
Check out the Android HAAPI UI SDK and iOS HAAPI UI SDK code examples to see the extensibility use cases from this tutorial in action. The code examples also provide an ngrok setup to enable you to view and learn more about HAAPI messages. The deployments include working associated domains setups for development computers with trusted HTTPS internet URLs, to enable advanced logins, such as with native passkeys.
Summary
The Hypermedia Authentication API provides hardened OAuth security for mobile apps. The HAAPI UI SDK enables low code integrations with a native user experience. The SDK also provides extensibility so that you can control the login user experience. Each mobile team can make their own frontend customizations, without dependencies on an identity team that manages the Curity Identity Server.
With the HAAPI UI SDK and the Curity Identity Server's support for Authentication Plugins, you can even build bespoke authentication methods that use the native behaviors of a mobile device. For example, the device camera or addons like card readers could potentially capture proof of a user's identity in many possible ways. A server side plugin could then validate that proof to authenticate the user.

Join our Newsletter
Get the latest on identity management, API Security and authentication straight to your inbox.

Start Free Trial
Try the Curity Identity Server for Free. Get up and running in 10 minutes.
Start Free TrialWas this helpful?