
On this page
The OAuth Customization using Plugins tutorial explains the base development and deployment setup when working with plugins. Many plugins are relatively straightforward to develop, yet authentication plugins are more intricate, since they deal with frontend concerns like forms, user experience and navigation, and also backend concerns like account data, custom logic and proof validation.
When getting started with plugins, you first need to understand the following foundational techniques:
- How to create HTTP GET and POST endpoints used by login forms.
- How to create frontend forms for both browser-based and native login flows.
- How to collect data client-side, validate it server-side, and integrate custom data.
- How to manage navigation and session state during an authentication workflow.
Once you understand these core behaviors you will be well placed to develop any kind of custom authentication solution. You can also incorporate additional techniques from Curity's GitHub repositories. You use Kotlin or Java to develop an authentication plugin, but you do not need to be an expert in those technologies.
Wizard-Based Example
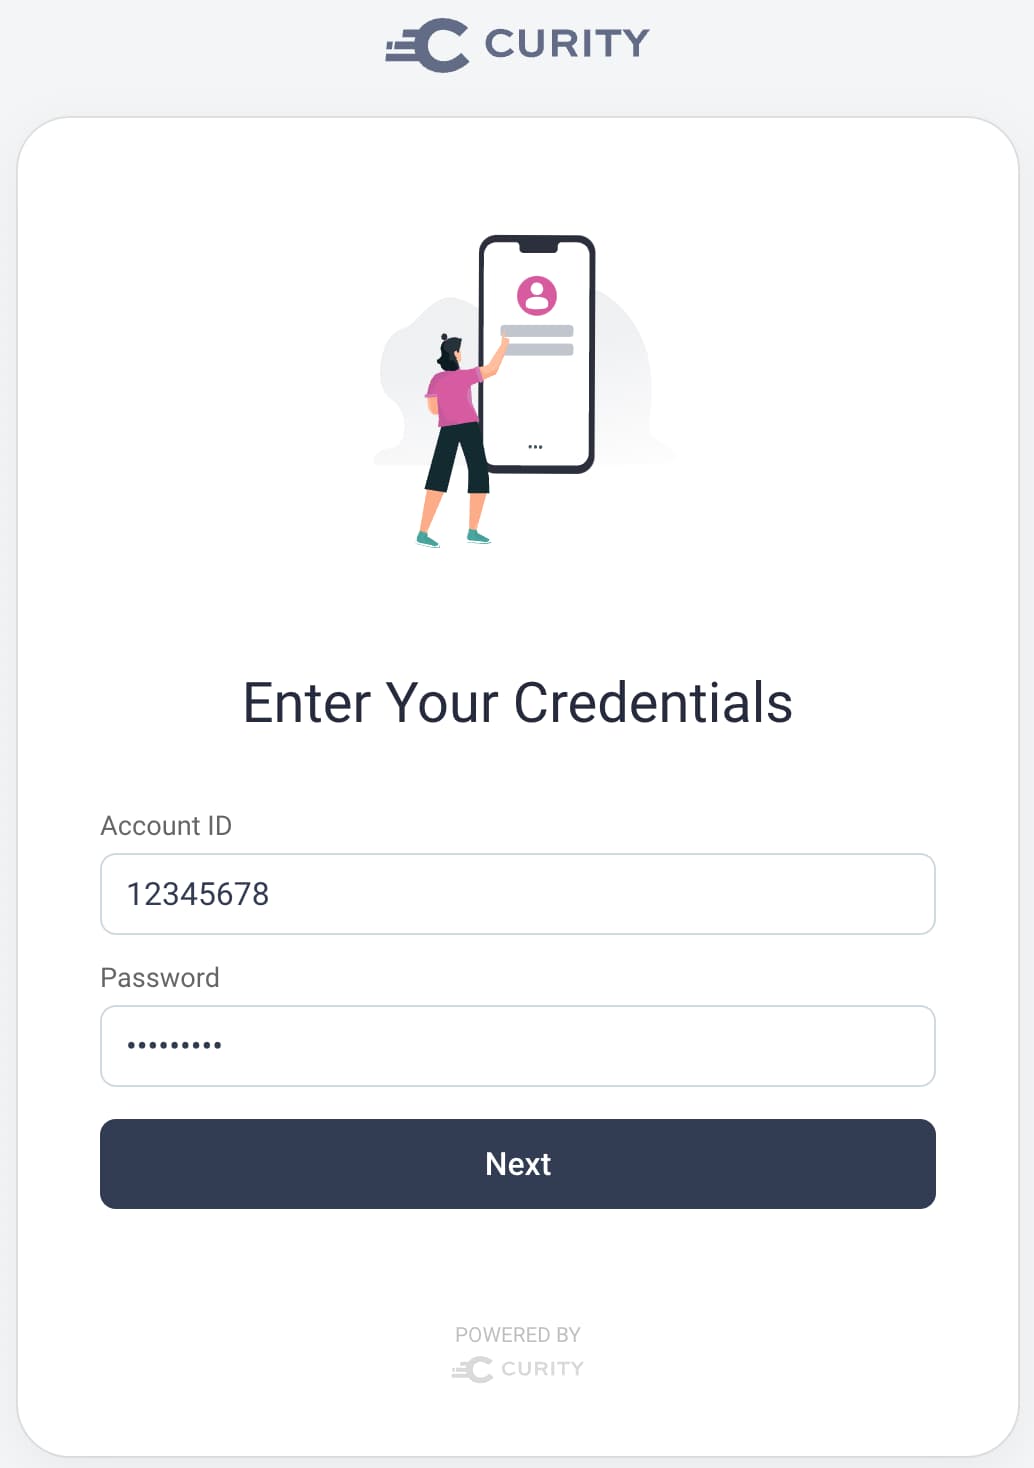
To explain the concepts, this tutorial uses a wizard-based authenticator. Some online authorities use this type of login user experience, to capture multiple proofs of the user identity one stage at a time. The wizard runs during an OpenID Connect code flow and presents a number of screens. First, a user credentials login form prompts the user to provide an account ID and password:
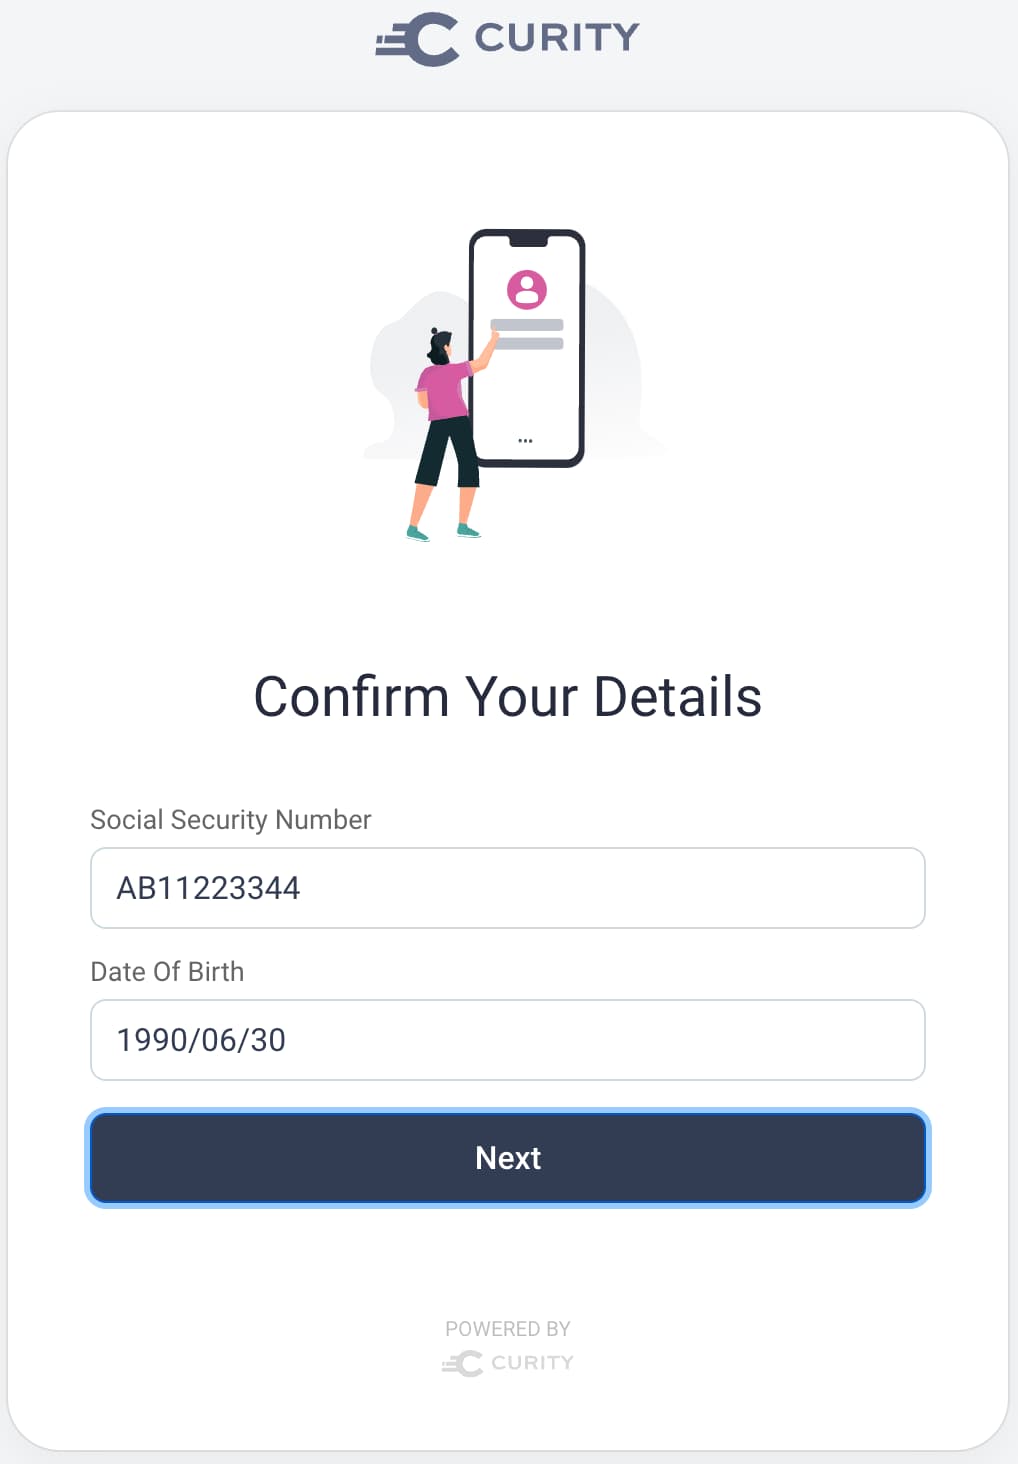
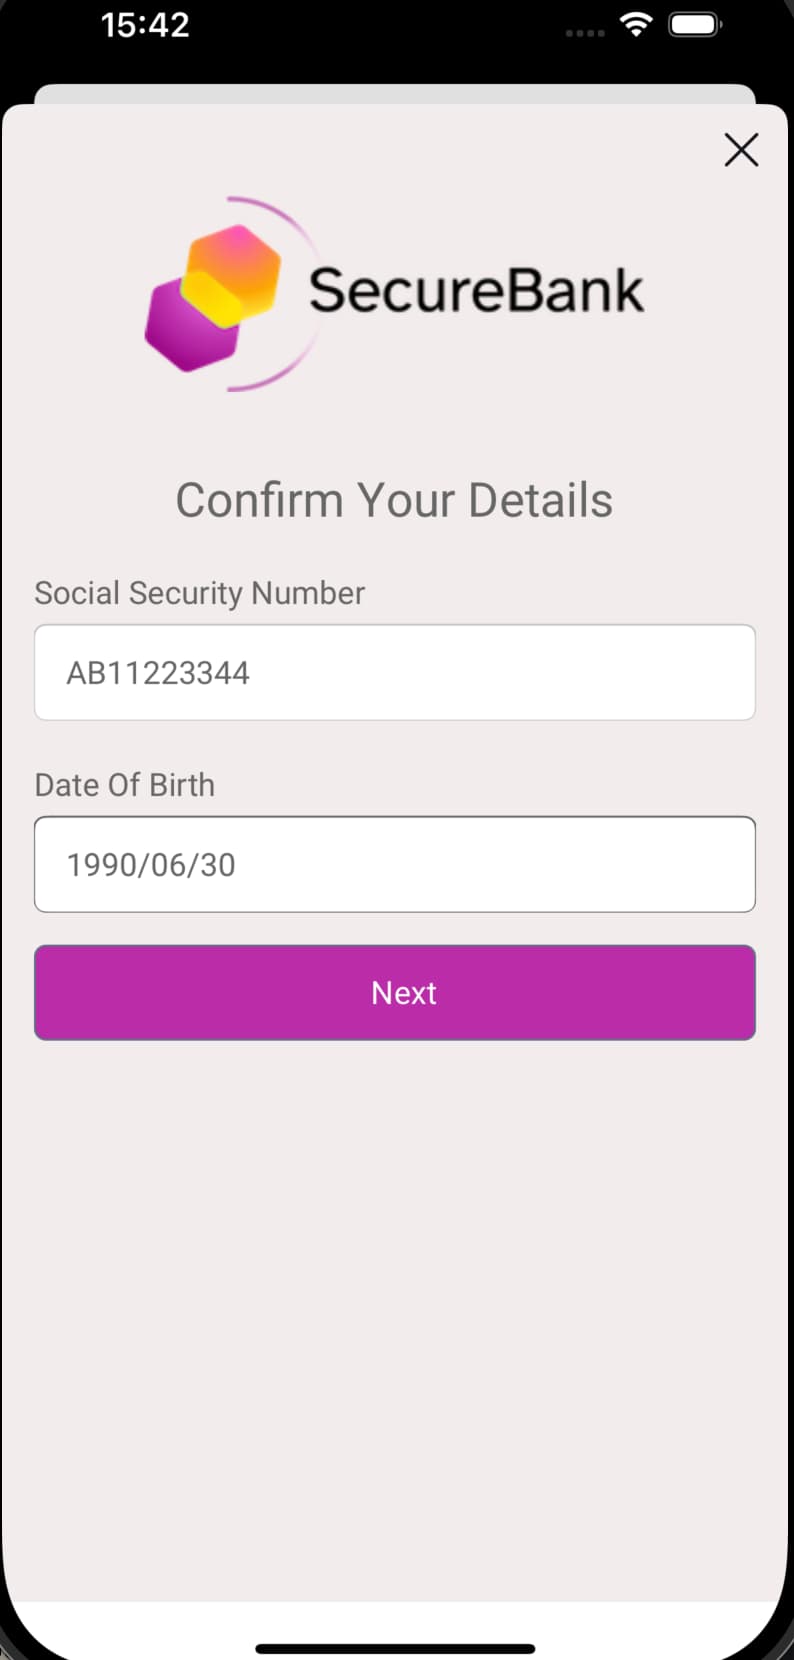
Next, a user details login form prompts the user for further proof of their identity. The user must provide their social security number and date of birth, to be verified using details stored against the user's account.
If required, you could add extra forms, like those that prove ownership of an email or phone. You could do so using SDK objects that send the user email or text (SMS) messages.
Finally, once the user has successfully proven their identity, a success login form is displayed, as an example of completing a wizard-based login user experience. Authentication completes when the user clicks the Continue button:

If you configure user consent for the client, the user interacts with consent screens, after which the client receives an authorization response. The client can then complete the code flow to get access tokens and send them to its APIs.
Designing Authentication Workflows
Usually, a better approach is to compose authenticators and authentication actions. This tutorial uses a wizard-based approach to teach navigation and demonstrate that an authenticator is not limited to a single form.
Code Layout
The following command generated the files for the initial Kotlin classes for this tutorial:
mvn -B archetype:generate \-DarchetypeArtifactId=identityserver.plugins.archetypes.kotlin-authenticator \-DarchetypeGroupId=io.curity \-DarchetypeVersion=3.0.0 \-DartifactId=example-authenticator \-DgroupId=com.example.plugins.exampleauthenticator \-DpluginName=Example \-Dversion=1.0.0-SNAPSHOT
The mvn archetype command produces the following Kotlin classes, which are the minimal files needed to develop an authenticator. By default there is no user interface, since an authenticator does not always need one.
├── authentication│ ├── ExampleAuthenticatorRequestHandler.kt│ ├── RequestModel├── config│ │ └── ExampleAuthenticatorPluginConfig.kt├── descriptor│ │ └── ExampleAuthenticatorPluginDescriptor.kt
Each authenticator can have multiple functional areas like authentication, account recovery and user registration. Each area's implementation can use multiple forms. The example authenticator only requires authentication behavior and uses an authentication wizard with three forms:
- The user credentials login form, where the account ID and password are entered
- The user details login form, where the social security number and date of birth are entered
- The success login form, that completes the authentication wizard
The example authenticator's file layout is therefore customized to use three forms and the following source files:
├── authenticate│ ├��── handlers│ │ └── UserCredentialsRequestHandler.kt│ │ └── UserDetailsRequestHandler.kt│ │ └── SuccessRequestHandler.kt│ ├── models│ │ └── UserCredentialsRequestModel.kt│ │ └── UserDetailsRequestModel.kt│ │ └── SuccessRequestModel.kt│ ├── representations│ │ └── UserCredentialsRepresentationFunction.kt│ │ └── UserDetailsRepresentationFunction.kt│ │ └── SuccessRepresentationFunction.kt├── config│ │ └── ExampleAuthenticatorPluginConfig.kt├── descriptor│ │ └── ExampleAuthenticatorPluginDescriptor.kt├── resources│ ├── messages.en.authenticator.example.authenticate│ │ └── messages│ ├── templates.authenticator.example.authenticate│ │ └── usercredentials.vm│ │ └── userdetails.vm│ │ └── success.vm
Each login form of the example authenticator uses multiple resources, summarized in the following table. The following sections of this tutorial further explain the behavior of each resource.
| Resource Type | Description |
|---|---|
| Request Handler | The login form's HTTP GET and POST endpoints and main backend logic |
| Request Model | The form data and its validation rules |
| HAAPI Representation | Representation functions provide data needed to render native login forms |
| HTML Form | The .vm files are downloaded by the browser as HTML login forms |
Frontend login forms use resource files to control their presentation, including a messages file that contains text values. Resource files are explained shortly, in the section on frontend form development.
Plugin Configuration
Plugins use a configuration interface, which can reference primitive values or system components represented as SDK objects. The example plugin uses a UserCredentialManager and an AccountManager. You configure specific instances of these objects, whereas utility objects like the SessionManager are simply injected:
interface ExampleAuthenticatorPluginConfig : Configuration{fun getCredentialManager(): UserCredentialManagerfun getAccountManager(): AccountManagerval sessionManager: SessionManagerval authenticatorInformationProvider: AuthenticatorInformationProviderval exceptionFactory: ExceptionFactory}
Later, when you deploy the plugin, you create one or more instances of it. You often first do so by running the Admin UI and navigating to System → Authentication Service → Authenticators. You then apply any non-optional configuration settings:
HTTP Routes
You declare HTTP routes for your plugin's forms using a plugin descriptor. By default, an authenticator called example uses an HTTP base path of /authentication/authn/example. The example authenticator uses the following routes, where the first login form uses an index route to match the base path:
| Form | Route | Full Path |
|---|---|---|
| User Credentials | index | /authentication/authn/example |
| User Details | userdetails | /authentication/authn/example/userdetails |
| Success | success | /authentication/authn/example/success |
To define routes, you implement the getAuthenticationRequestHandlerTypes method of the plugin descriptor class. The main part of the example authenticator's plugin descriptor is shown here:
class ExampleAuthenticatorPluginDescriptor : AuthenticatorPluginDescriptor<ExampleAuthenticatorPluginConfig>{override fun getConfigurationType(): Class<out ExampleAuthenticatorPluginConfig> =ExampleAuthenticatorPluginConfig::class.javaoverride fun getPluginImplementationType(): String = "example"override fun getAuthenticationRequestHandlerTypes(): Map<String, Class<out AuthenticatorRequestHandler<*>>> =mapOf("index" to UserCredentialsRequestHandler::class.java,"userdetails" to UserDetailsRequestHandler::class.java,"success" to SuccessRequestHandler::class.java)}
HTTP Route Implementations
You implement HTTP routes in your request handler classes by implementing preProcess, get and post methods. The following code provides a skeleton implementation of one of the example authenticator's login forms, where the preProcess method connects the handler to its form resource:
class UserDetailsRequestHandler(private val _config: ExampleAuthenticatorPluginConfig) :AuthenticatorRequestHandler<UserDetailsRequestModel>{override fun preProcess(request: Request, response: Response): UserDetailsRequestModel{response.setResponseModel(templateResponseModel(emptyMap(),"authenticate/userdetails"), ResponseModelScope.ANY)return UserDetailsRequestModel(request)}override fun get(requestModel: UserDetailsRequestModel, response: Response): Optional<AuthenticationResult>{return Optional.empty()}override fun post(requestModel: UserDetailsRequestModel, response: Response): Optional<AuthenticationResult>{return Optional.empty()}}
When users authenticate, login forms are downloaded using an HTTP GET request, which runs the preProcess and get methods. The user then enters data in the login form and submits the data to the server in an HTTP POST request, which runs the preProcess and post methods. This tutorial says more about request handlers and request models shortly, after showing how to implement your frontend login forms.
Frontend Form Development
There are two types of forms that an authenticator can present to users. Most commonly, an application runs a browser-based flow where a browser downloads HTML forms and renders them. You develop frontend HTML-based logic in .vm files, using web technologies. The .vm files are velocity templates which provide some extra programmatic convenience over raw HTML. The example authenticator uses the following HTML forms:
| Request Handler | HTML Form |
|---|---|
| UserCredentialsRequestHandler | usercredentials.vm |
| UserDetailsRequestHandler | userdetails.vm |
| SuccessRequestHandler | success.vm |
If you use the Hypermedia Authentication API (HAAPI), your clients can present native login forms rather than rendering HTML forms in the system browser. To enable this you provide HAAPI representations of each form, by mapping the name of each .vm file to a representation class.
To provide HAAPI representations, you implement the getRepresentationFunctions method of the plugin descriptor class. The example authenticator uses the following code to provide HAAPI representations for its login forms:
override fun getRepresentationFunctions(): Map<String, Class<out RepresentationFunction?>> =mapOf("authenticate/usercredentials" to UserCredentialsRepresentationFunction::class.java,"authenticate/userdetails" to UserDetailsRepresentationFunction::class.java,"authenticate/success" to SuccessRepresentationFunction::class.java,)
The frontend can then receive a JSON API response containing the form data, instead of an HTML response. The client can use a HAAPI SDK to dynamically render native forms from the API response.
HAAPI User Experience Benefits
When using native forms you can often implement authentication using a modal dialog, without users being redirected away from the app. You can also make frontend customizations per client without dependencies on a central identity team.
HTML Forms
To get an HTML form the browser sends an HTTP request with a default HTTP accept header, such as text/html. The server then translates the contents of a .vm file to an HTML response.
To define your HTML login forms you develop HTML markup in .vm files. When first using authentication plugins, start with simple labels and input controls, along with a submit button. The following example form represents the user details form of the example plugin. When the user submits the HTML form its values are posted to the server:
#define ($_body)<h2>#message("authenticator.example.authenticate.meta.title.userdetails")</h2><form method="post"><label for="socialSecurityNumber" class="$!_errorClass">#message("authenticator.example.authenticate.view.social-security-number")</label><input type="text" id="socialSecurityNumber" name="socialSecurityNumber" autocomplete="off" class="block full-width mb1 field-light" value="$!socialSecurityNumberValue"><label for="dateOfBirth">#message("authenticator.example.authenticate.view.date-of-birth")</label><input type="text" id="dateOfBirth" name="dateOfBirth" autocomplete="off" class="block full-width mb1 field-light" value="$!dateOfBirthValue"><button type="submit" class="button button-fullwidth button-primary">#message("authenticator.example.authenticate.view.next")</button></form>#end#parse("layouts/default")
Statements in the markup that begin with a # character occur server-side, before returning the final HTML to the browser. CSS styling and layout is applied, which you can customize in various ways, per client when required. See the branding customization tutorials to learn more.
You can also insert custom frontend logic into HTML forms. The following snippet shows an entry point, to which you could add event handlers to customize behaviors. For example you might override a particular input control's change event to restrict the characters accepted. When adding JavaScript, a nonce must be included, to comply with the content security policy (CSP) of the Curity Identity Server:
<form method="post">...#parse("fragments/jquery")<script type="text/javascript" $!nonceAttr>jQuery(document).ready(function() {// Add frontend logic here})</script></form>
Native Forms
To get a native form, the frontend sends an HTTP request with a custom HTTP accept header of accept=application/vnd.auth+json. The server then returns the HAAPI representation as a JSON API response.
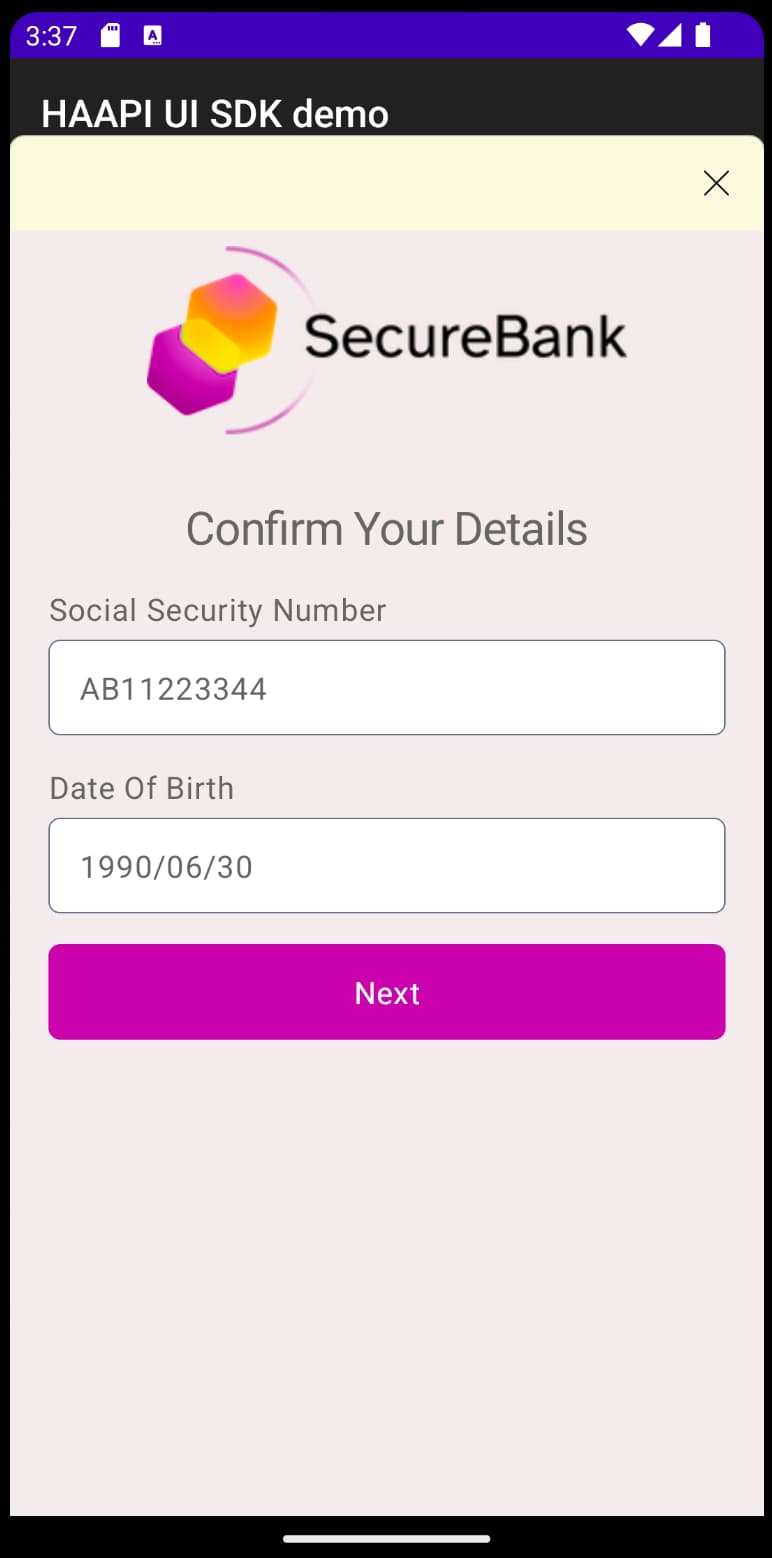
To define your native login forms you override the apply method of your RepresentationFunction classes. The following code shows a HAAPI representation for the example plugin's user details form. When first using HAAPI representations, start with simple labels and input controls, along with a submit button. When the user submits the native form its values are posted to the server:
class UserDetailsRepresentationFunction : RepresentationFunction {override fun apply(model: RepresentationModel, factory: RepresentationFactory): Representation {val baseUrl = model.getString("_authUrl")val postbackUrl = "$baseUrl/userdetails"val socialSecurityNumberValue = ""val dateOfBirthValue = ""return factory.newAuthenticationStep { step: AuthenticationStepConfigurator ->step.addFormAction(HaapiContract.Actions.Kinds.CONTINUE,URI.create(postbackUrl),HttpMethod.POST,MediaType.X_WWW_FORM_URLENCODED,Message.ofKey("authenticator.example.authenticate.meta.title.userdetails"),Message.ofKey("authenticator.example.authenticate.view.next")) { fields ->fields.addTextField("socialSecurityNumber", Message.ofKey("authenticator.example.authenticate.view.social-security-number"), socialSecurityNumberValue)fields.addTextField("dateOfBirth", Message.ofKey("authenticator.example.authenticate.view.date-of-birth"), dateOfBirthValue)}}}}
This HAAPI representation results in the server returning the following API response:
{"metadata": {"viewName": "authenticator/example/authenticate/userdetails"},"type": "authentication-step","actions": [{"template": "form","kind": "continue","title": "Confirm Your Details","model": {"href": "/authn/authentication/example/userdetails","method": "POST","type": "application/x-www-form-urlencoded","actionTitle": "Next","fields": [{"name": "socialSecurityNumber","type": "text","label": "Social Security Number"},{"name": "dateOfBirth","type": "text","label": "Date Of Birth"}]}}]}
The client, or an SDK that it uses, can render the response data as a native form. The HAAPI Android and iOS SDKs renders this payload as the following user interfaces. The user then provides values to populate the form:
To learn more about the options you can use in HAAPI representations and their meanings, you can browse the guide to the HAAPI Data Model. You can also apply frontend customizations to logic or styling using the SDK's extensibility features. See the following HAAPI mobile SDK guides for examples:
- Customizing the Android HAAPI Mobile Login User Experience
- Customizing the iOS HAAPI Mobile Login User Experience
Text Values
Both HTML and native forms can present the same text in login forms. To do so you use a messages file that defines string identifiers and values. You then use the same identifiers in both types of forms. You can use multiple message files to enable localization, which you can read more about in the branding customization tutorials. The example plugin uses a single messages file with the following content:
meta.title.usercredentials=Enter Your Credentialsmeta.title.userdetails=Confirm Your Detailsmeta.title.success=Authentication Successfulview.accountid=Account IDview.password=Passwordvalidation.error.accountid.format=The account ID must be 8 numeric digitsvalidation.error.password.required=Please enter your passwordvalidation.error.incorrect.credentials=The credentials entered were not validview.social-security-number=Social Security Numberview.date-of-birth=Date Of Birthvalidation.error.social-security-number.format=Please enter your social security numbervalidation.error.date-of-birth.format=Please enter your date of birth in the format YYYY/MM/DDvalidation.error.social-security-number.required=Please enter your social security numbervalidation.error.incorrect.social-security-number=The social security number does not match your accountvalidation.error.incorrect.date-of-birth=The date of birth does not match your accountview.next=Nextview.continue=Continue
Backend Form Logic
After the user provides input and clicks the Next button, the frontend sends the login form's data to the request handler's HTTP POST endpoint. User input is then validated. If any data is invalid, the backend returns a response containing error messages that the frontend renders.
Request Models
You define the data for a form in a RequestModel object. The user details form of the example plugin uses the following model. With a simple form you typically only need a POST request model.
class UserDetailsRequestModel(request: Request){@Validval postRequestModel: UserDetailsPost? = if (request.isPostRequest) UserDetailsPost(request) else null}class UserDetailsPost(request: Request){@NotBlank(message = "validation.error.social-security-number.required")val socialSecurityNumber: String? = request.getFormParameterValueOrError("socialSecurityNumber")@Pattern(regexp = "^[0-9]{4}/[0-9]{2}/[0-9]{2}$", message = "validation.error.date-of-birth.format")val dateOfBirth: String? = request.getFormParameterValueOrError("dateOfBirth")fun dataOnError(): Map<String, Any> {val data = HashMap<String, Any>(1)data["socialSecurityNumber"] = socialSecurityNumber ?: ""data["dateOfBirth"] = dateOfBirth ?: ""return data}}
You express simple field-level validation using Jakarta validation annotations. For example, the pattern annotation enables you to set a regular expression that the user input must match. When a user submits invalid data, the error message configured against the annotation is returned to the frontend and displayed to the user.
Data Validation
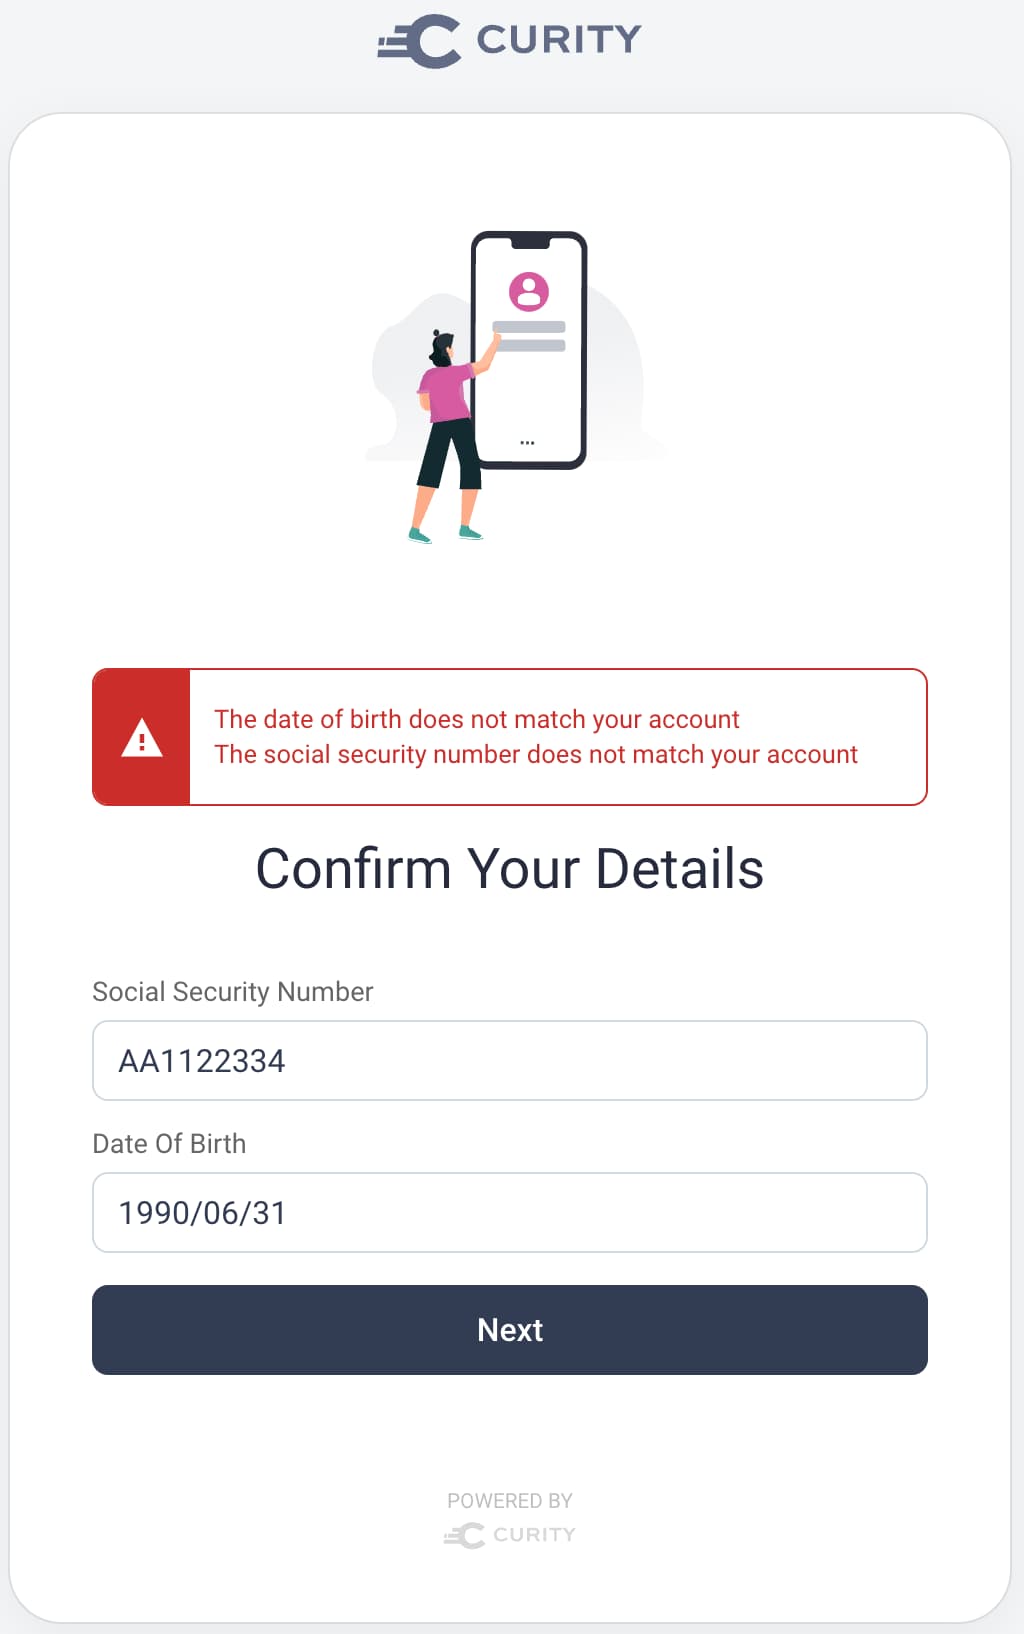
If a user submits invalid input that fails model validation, the user's HTML form input is lost by default. To maintain it, you override the onRequestModelValidationFailure method in your request handler class, to return postback data.
override fun onRequestModelValidationFailure(request: Request,response: Response,errorMessages: Set<ErrorMessage?>?) {if (request.isPostRequest) {val model = UserDetailsPost(request)response.putViewData("_postBack", model.dataOnError(), ResponseModelScope.FAILURE)}}
You must also use server logic in the .vm file to populate values before the frontend receives the HTML:
#if($_postBack)#if($_postBack.socialSecurityNumber)#set($socialSecurityNumberValue = $_postBack.socialSecurityNumber)#end#if($_postBack.dateOfBirth)#set($dateOfBirthValue = $_postBack.dateOfBirth)#end#end
This results in an experience where the user sees an error dialog but does not lose their existing input:
Once you understand the basics of HTTP routes, frontend forms and backend form processing, you can move on to the deeper identity logic.
Backend Identity Logic
For a simple form, you implement proof validation in the post method of the request handler class. You can implement proof validation in many possible ways. For example, you could connect to a legacy data source using custom code to validate passwords. Often, though, a better choice is to use SDK objects.
In the example plugin, the user credentials request handler validates an account ID and password using its credential manager. This shows how to run the same logic as the built-in HTML Form authenticator (which uses usernames and passwords) in your own forms, without needing to re-implement any low-level security.
override fun post(requestModel: UserCredentialsRequestModel, response: Response): Optional<AuthenticationResult>{val model = requestModel.postRequestModelval subjectAttributes = SubjectAttributes.of(model?.accountId)val result = _config.getCredentialManager().verify(subjectAttributes, model?.password)...}
If credential validation succeeds, the user credentials request handler saves the account ID to the session and redirects the user to the user details form:
override fun post(requestModel: UserCredentialsRequestModel, response: Response): Optional<AuthenticationResult>{...if (result is CredentialVerificationResult.Accepted){_config.sessionManager.put(Attribute.of("accountId", model?.accountId));throw _config.exceptionFactory.redirectException("${_config.authenticatorInformationProvider.fullyQualifiedAuthenticationUri}/userdetails",RedirectStatusCode.MOVED_TEMPORARILY)}...}
The user details request handler demonstrates one way to involve custom data in an authentication flow. Custom fields for social security number and date of birth are stored in the user account data. The user details request handler looks up these values using its account manager and verifies the values received in the model. If they match, the plugin navigates to the success form:
override fun post(requestModel: UserDetailsRequestModel, response: Response): Optional<AuthenticationResult>{...val user = _config.getAccountManager().getByUserName(accountId)if (validateSocialSecurityNumber(user, model) && validateDateOfBirth(user, model)){_config.sessionManager.put(Attribute.of("detailsVerified", true));throw _config.exceptionFactory.redirectException("${_config.authenticatorInformationProvider.fullyQualifiedAuthenticationUri}/success",RedirectStatusCode.MOVED_TEMPORARILY)}...}
The final request handler simply needs to retrieve values from the session and then set an authentication result whose authenticated subject is the account ID from the user credentials login form. After authentication completes, OAuth tokens issued include this user identity.
override fun post(requestModel: SuccessRequestModel, response: Response): Optional<AuthenticationResult> {val accountId = _config.sessionManager.get("accountId")?.attributeValue?.value as String??: throw _config.exceptionFactory.badRequestException(ErrorCode.MISSING_PARAMETERS,"The success form could not find the account ID field in the session")_config.sessionManager.get("detailsVerified")?.attributeValue?.value as Boolean??: throw _config.exceptionFactory.badRequestException(ErrorCode.MISSING_PARAMETERS,"The success form could not find the detailsVerified field in the session")return Optional.of(AuthenticationResult(accountId))}
Run the Example Plugin
You can clone the GitHub link at the top of this tutorial to run the example plugin on a development computer. The README document explains the prerequisites and commands to run, after which you can test the example plugin in both browser-based and native flows:
- To run the plugin in browser-based mode, use OAuth Tools as a client
- To run the plugin in native mode, use a HAAPI mobile code example as the client
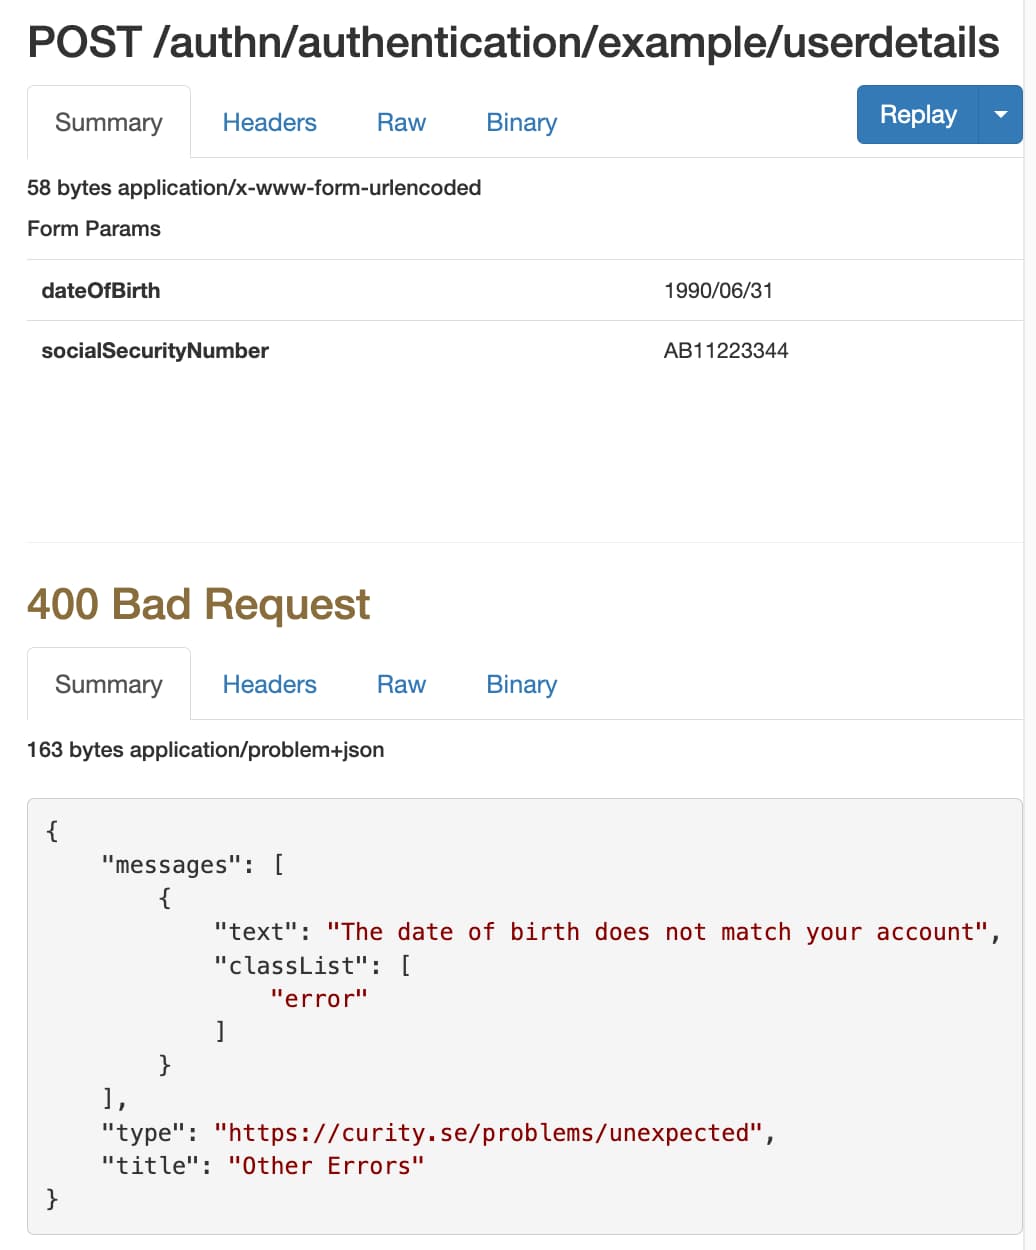
The GitHub repository also provides a development setup and an automated deployment. You can change the plugin code and redeploy to get fast feedback on your code changes. The deployment enables any mobile device or emulator to call the plugin's endpoints via an ngrok internet URL. You can also use the ngrok inspection feature to capture HAAPI requests and responses:
Additional Techniques
Once you understand the example plugin, there are a number of other behaviors that you can use. For example, you could use a composition-based approach to integrate features such as email or SMS verification. Or you can do more work to enrich frontend forms. Or you can integrate with external systems and use polling to wait for external operations to complete. To learn more, read the Authentication Plugin Techniques tutorial.
Conclusion
This tutorial explained how you can integrate custom authentication when using the Curity Identity Server. Any developer should be able to learn the techniques by following the tutorials and examples. It may require some work to implement your preferred solution, but you have complete control, as well as a toolbox of SDK objects.
By developing authentication in the authorization server you implement the responsibility in the correct place. Rather than adding complexity to your applications you produce a shareable component that can be reused across multiple clients. Once authentication completes, clients receive OAuth tokens correctly and can call their APIs.

Join our Newsletter
Get the latest on identity management, API Security and authentication straight to your inbox.

Start Free Trial
Try the Curity Identity Server for Free. Get up and running in 10 minutes.
Start Free TrialWas this helpful?