
Customizing User Consent
On this page
The User Consent tutorial explains how to configure user consent for clients in the Curity Identity Server. The goal of user consent is to provide an understandable experience to users when they can grant a third-party access to resources. There could be many use cases for user consent, like users granting access to their resources or employees granting access to their company's resources.
In the Curity Identity Server you can make basic color and image customizations in the Admin UI Visual Editor. For deeper customizations, the Curity Identity Server provides a templating system that enables customization with fast feedback. This tutorial explains some common ways to customize HTML and text to take closer control over the consent user experience.
Consent Form HTML Resources
The Extended Look and Feel Customization tutorial explains how to get template files to the local computer for editing. After doing so, locate the default consent HTML form at a path of views/oauth/consent.vm. Its text in English originates from the message file at messages/core/en/views/oauth/messages.
To customize consent you can update the HTML and text values, then deploy the customized files to an overrides folder that applies to all clients that use consent. Often, particular clients, or sets of clients, may need to use a bespoke consent form. To enable that, deploy customizations to a template area.
Consent Form Development
The following example demonstrates an example Docker Compose deployment that a developer could use. This example deploys backed up configuration that would include a test client with user consent activated. The files provide a bespoke consent form, limited to a particular client, and are deployed under the client's template area.
services:idsvr:image: curity.azurecr.io/curity/idsvr:latestvolumes:- ./curity-config.xml:/opt/idsvr/etc/init/curity-config.xml- ./consent.vm:/opt/idsvr/usr/share/templates/template-areas/myclient/views/oauth/consent.vm- ./messages:/opt/idsvr/usr/share/messages/template-areas/myclient/en/views/oauth/messages
After running docker compose up, a developer could use a test client like OAuth Tools to run a code flow with user authentication and consent. In this example deployment, HTML resources are shared from the local computer. Therefore, local edits come into effect immediately, without redeploying the system.
Default Rendering of Consent Entries
The consent.vm file is a velocity template that executes on the server to return HTML to the client. The form renders a collection of consent entries that the Curity Identity Server produces. The following snippet shows a reduced version of the form's basic rendering logic.
#** Parameters provided to this template, are:* _consentEntries : a map of entries that the used should be asked to consent for*#<form method="post" action="$!_target" class="consent-form center"><ul>#foreach ($entry in $_consentEntries.entrySet())<li>...</li>#end</ul></form>
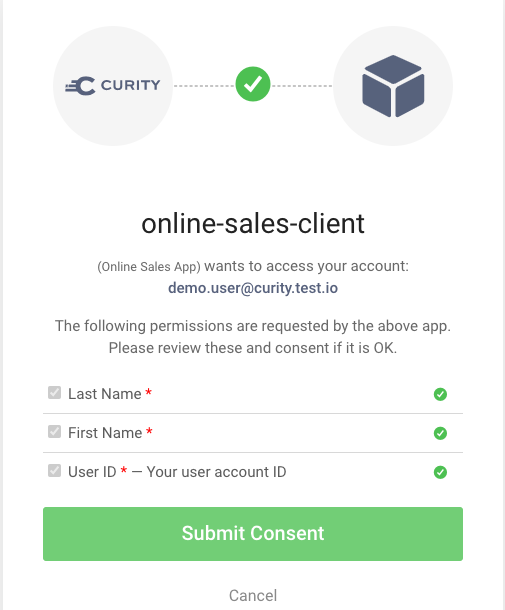
Each consent entry is a scope or claim. When a scope contains claims, there is a consent entry for each claim. The following screenshot shows a simple use of a consent form where the user consents to the use of personal name details. You can assign descriptions to scopes and claims in the Token Designer.
Changing the Order of Consent Entries
By default, entries sort in the sequence of their technical names, like family_name, then given_name, then sub. In some cases, a custom rendering sequence provides a more understandable consent screen. To enable that, use velocity scripting. The following example sorts consent entries in a custom sequence:
#set ($customSequence = ['sub', 'given_name', 'family_name'])#set ($sortedConsentEntries = [])#foreach ($item in $customSequence)#foreach ($entry in $_consentEntries.entrySet())#if ($entry.key.contains($item))#set ($x = $sortedConsentEntries.add($entry))#break#end#end#end<form method="post" action="$!_target" class="consent-form center"><ul>#foreach ($entry in $sortedConsentEntries)<li>...</li>#end</ul></form>
Hiding Consent Entries
In other consent use cases you may issue multiple claims within a scope but only want to render a subset of claims to the user. For example, some claims may be technical values that only make sense to APIs, like custom user identities. To enable that, use script to render some items as hidden.
#set ($hiddenItems = ['custom_user_id'])<form method="post" action="$!_target" class="consent-form center"><ul>#foreach ($entry in $_consentEntries.entrySet())#set ($hidden = false)#foreach ($item in $hiddenItems)#if ($entry.key.contains($item))#set ($hidden = true)#break#end#end#if ($hidden == true)<li hidden>#else<li>...</li>#end</ul></form>
Form Behavior
When customizing consent, take care to not change the consent data that the form posts to the server. If the client allows deselection of optional scopes and claims, avoid hiding optional fields.
Text Customization and Localization
Descriptions for consent entries support customization and localization. Assign values in the views/oauth/messages file for each language.
consent.scope-names.<scope-name>=...consent.scope-descriptions.<scope-name>=...consent.claim-names.<claim-name>=...consent.claim-descriptions.<claim-name>=...
The following example uses Dutch translations and would be deployed in a messages file at the path nl/views/oauth/messages.
consent.claim-names.sub=Gebruikersnaamconsent.claim-descriptions.sub=De naam waarmee je inlogt
A code flow can send the ui_locales standard parameter to request that login and consent screens then render in the requested language.
https://login.example.com/oauth/v2/oauth-authorize?client_id=my-client&response_type=code&redirect_uri=https://www.example.com/callback&scope=openid profile&state=CfDJ8Nxa-YhPzjpBilDQz2CBMWR7SYDKEzCoODTBw5&code_challenge=WhmRaP18B9z2zkYcIlb4uVcZzjLqcZsaBQJf5akUxsA&code_challenge_method=S256&ui_locales=nl
Layout Customizations
There are many other possible consent customizations. You can change the order of elements or add completely new HTML elements. For example, if the client configures terms of service or policy URLs you could switch the display order as the following example shows.
#if ($_client.get("termsOfServiceUrl"))<a href="$!_client.get("termsOfServiceUrl")">#message("views.oauth.consent.termsOfService")</a>#end#if ($_client.get("policyUrl"))<a href="$!_client.get("policyUrl")">#message("views.oauth.consent.policyDocument")</a>#end
Conclusion
With the Curity Identity Server you can easily implement frontend user consent customizations. The product documentation explains much more about user consent, including the use of Consentors to customize backend logic.

Join our Newsletter
Get the latest on identity management, API Security and authentication straight to your inbox.

Start Free Trial
Try the Curity Identity Server for Free. Get up and running in 10 minutes.
Start Free TrialWas this helpful?