
Configure Deployed Environments
On this page
This tutorial provides some practical examples to explain the main configuration settings you use to run the Curity Identity Server in deployed environments. The examples provide Docker Compose snippets that you can run to rehearse rollouts to deployed environments on a development computer. Once you understand the environment variables and configuration settings, you can apply them to any deployed environment.
Prerequisites
Before running the example deployments, ensure that you have a Docker engine and Docker Compose installed. You also need a license file for the Curity Identity Server, which you can download from the Curity Developer Portal.
Create the Initial Configuration
Start by creating a local folder. Copy a license file for the Curity Identity Server into the folder and also generate a configuration encryption key there:
openssl rand 32 | xxd -p -c 64 > encryption.key
Next, save the following text as a docker-compose.yml in your local folder. This copies your license file to the correct location and supplies the configuration encryption key.
services:idsvr:image: curity.azurecr.io/curity/idsvr:latestports:- 6749:6749- 8443:8443volumes:- ./license.json:/opt/idsvr/etc/init/license/license.json- ./cdb:/opt/idsvr/var/cdbenvironment:PASSWORD: 'Password1'CONFIG_ENCRYPTION_KEY: '${CONFIG_ENCRYPTION_KEY}'
Next, run the following commands to ensure that you have the latest Docker image locally and to initiate deployment. This uses your configuration encryption key to protect secure values.
docker pull curity.azurecr.io/curity/idsvrexport CONFIG_ENCRYPTION_KEY=$(cat encryption.key)rm -rf cdb && mkdir cdbdocker compose up
By default, when the PASSWORD environment variable is used, an installer program runs, which auto-generates a working configuration to provide a working system. If you omit PASSWORD, or set a SKIP_INSTALL=1 environment variable, the installer does not run.
The generated configuration is loaded into the cdb (configuration database) folder. To ensure that there is no cached configuration in the local Docker image, the example command shares the folder locally and ensures that it is empty.
Generate and Export the Configuration
The password value that you set is for a pre-shipped user for administration, called admin. Log in to the Admin UI and run the initial setup wizard by following the first configuration tutorial. Accept all default settings.
Once the setup wizard has completed, use the export and backup your configuration tutorial to save a curity-config.xml file to your local folder. This becomes your last good configuration, which you can save to source control.
The setup wizard creates profiles, each of which represents a set of HTTP endpoints. For example, your token service profile includes the OAuth authorize and token endpoints. The applications profile can provide token handler endpoints that implement cookie security for Single Page Applications.
Deploy the Latest Configuration
Whenever you redeploy the system you provide your last good configuration. The cdb folder is then reliably populated from XML files in the etc/init folder. You should no longer supply the PASSWORD environment variable, to avoid re-running the installer program. The following example instead sets the ADMIN environment variable to indicate that the Admin UI should remain available:
services:idsvr:image: curity.azurecr.io/curity/idsvr:latestports:- 6749:6749- 8443:8443volumes:- ./curity-config.xml:/opt/idsvr/etc/init/curity-config.xml- ./license.json:/opt/idsvr/etc/init/license/license.jsonenvironment:ADMIN: 'true'CONFIG_ENCRYPTION_KEY: '${CONFIG_ENCRYPTION_KEY}'
You can run the following reduced command for all subsequent deployments:
export CONFIG_ENCRYPTION_KEY=$(cat encryption.key)docker compose up
You repeat this process many times as you evolve your configuration. Every time you change your configuration settings you export them and update your last good configuration.
Configure External URLs
In a default deployment for a development computer you get started with the following external URLs. The discovery endpoint enables you to locate the URLs of other OAuth endpoints. A generated server SSL key is also installed, which can be used by both the Admin UI and OAuth endpoints:
| URL | Default Value |
|---|---|
| Admin UI | https://localhost:6749/admin |
| OpenID Connect Discovery Endpoint | http://localhost:8443/oauth/v2/oauth-anonymous/.well-known/openid-configuration |
For your deployed environments, you will want to use different URLs. For example, you might want to use the following URLs for a deployed test environment. Your teams could then log in to the Admin UI or connect to OAuth endpoints:
| URL | Customized Value |
|---|---|
| Admin UI | http://admin.curity-test.com/admin |
| OpenID Connect Discovery Endpoint | http://login.curity-test.com/oauth/v2/oauth-anonymous/.well-known/openid-configuration |
You can rehearse deploying to real environments on your local computer. To do so, add the following entries to your local computer's hosts file:
127.0.0.1 admin.curity-test.com login.curity-test.com
API Gateways Provide External URLs
Usually, the Curity Identity Server is hosted behind an API gateway, which provides its external URLs. In a real deployed system you would create DNS records for the domain names and configure SSL certificates in the gateway to enable HTTPS URLs. In this tutorial we use HTTP external URLs to reduce infrastructure, but explain how you could upgrade to HTTPS.
Set External URLs in the Admin UI
For the authorization server you must configure an external URL so that external clients receive reachable URLs for OAuth endpoints. For this tutorial, navigate to System → General in the Admin UI and set the Base URL field to http://login.curity-test.com.
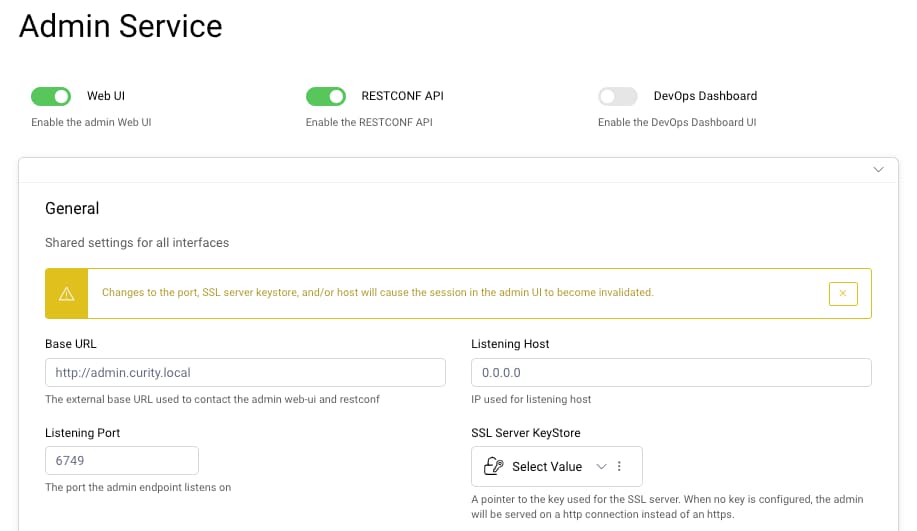
To set an external URL for the Admin UI, navigate to System → Deployment → Admin Service. Set the Base URL field to http://admin.curity-test.com and unselect the SSL Server KeyStore value. Then, navigate to Facilities → Keys and Cryptography → TLS → Server SSL Keys and remove the generated SSL server key.
Deploy Using an API Gateway
Export your updated settings and replace your last good configuration. Update your docker-compose.yml file with the following content, where an instance of the Kong API gateway exposes the endpoints of the Curity Identity Server to the local computer at port 80.
services:idsvr:image: curity.azurecr.io/curity/idsvr:latesthostname: idsvrvolumes:- ./curity-config.xml:/opt/idsvr/etc/init/curity-config.xml- ./license.json:/opt/idsvr/etc/init/license/license.jsonenvironment:ADMIN: 'true'CONFIG_ENCRYPTION_KEY: '${CONFIG_ENCRYPTION_KEY}'apigateway:image: kong/kong-gateway:3.7ports:- 80:3000volumes:- ./kong.yml:/usr/local/kong/declarative/kong.ymlenvironment:KONG_DATABASE: 'off'KONG_DECLARATIVE_CONFIG: '/usr/local/kong/declarative/kong.yml'KONG_PROXY_LISTEN: '0.0.0.0:3000'
Create a kong.yml file with the following content, to specify API gateway routes. Incoming requests are routed to endpoints of the Curity Identity Server container, based on the host name in the request URL.
_format_version: '2.1'_transform: trueservices:- name: runtimeurl: http://idsvr:8443routes:- name: runtimehosts:- login.curity-test.compaths:- /- name: adminurl: http://idsvr:6749routes:- name: adminhosts:- admin.curity-test.compaths:- /
Re-run the deployment with the following commands and you can now use the external URLs. Although this deployment runs on a local computer, the same techniques would be used for deployed systems.
export CONFIG_ENCRYPTION_KEY=$(cat encryption.key)docker compose up
Upgrade to HTTPS
In a real deployment, your API gateway would typically use SSL certificates, so you would configure HTTPS base URLs in the Admin UI. You would then need to provide an SSL certificate and key when deploying the API gateway. An updated example API gateway deployment is shown here:
apigateway:image: kong/kong-gateway:3.7ports:- 443:3000volumes:- ./kong.yml:/usr/local/kong/declarative/kong.ymlenvironment:KONG_DATABASE: 'off'KONG_DECLARATIVE_CONFIG: '/usr/local/kong/declarative/kong.yml'KONG_PROXY_LISTEN: '0.0.0.0:3000 ssl'KONG_SSL_CERT: '/usr/local/share/certs/mysslcert.pem'KONG_SSL_CERT_KEY: './usr/local/share/certs/mysslkey.pem'
Upgrade to a Cluster
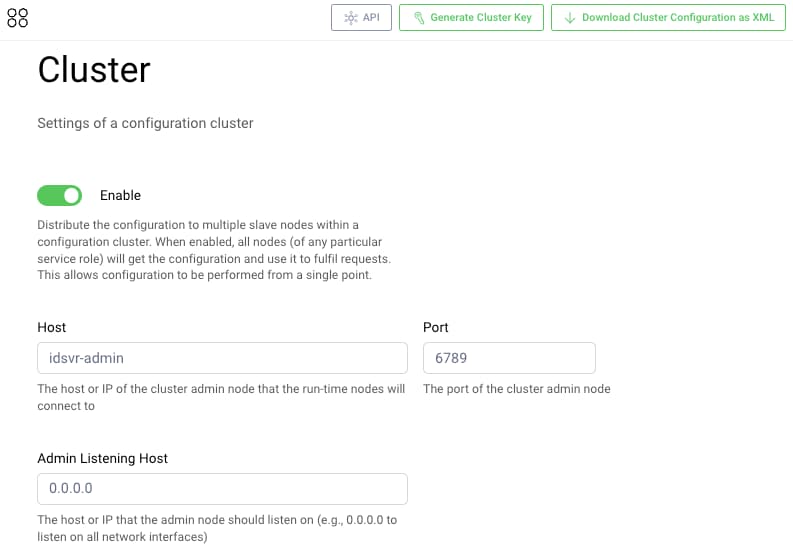
Until now we have deployed a standalone instance of the Curity Identity Server. In deployed environments you typically instead deploy a cluster. To do so, you must create a cluster configuration. In the Admin UI, navigate to System → Deployment → Cluster and use the following settings, with a host name of idsvr-admin. Then select the Generate Cluster Key option to download a cluster.xml file.
Export the changes and replace your last good configuration. You can then update the Docker Compose settings to those below. Make sure that the hostname for the admin container is also set to idsvr-admin.
services:idsvr-admin:image: curity.azurecr.io/curity/idsvr:latesthostname: idsvr-adminvolumes:- ./curity-config.xml:/opt/idsvr/etc/init/curity-config.xml- ./cluster.xml:/opt/idsvr/etc/init/cluster.xml- ./license.json:/opt/idsvr/etc/init/license/license.jsonenvironment:ADMIN: 'true'SERVICE_NAME: 'Admin'CONFIG_ENCRYPTION_KEY: '${CONFIG_ENCRYPTION_KEY}'idsvr-runtime1:image: curity.azurecr.io/curity/idsvr:latesthostname: idsvr-runtime1volumes:- ./curity-config.xml:/opt/idsvr/etc/init/curity-config.xml- ./cluster.xml:/opt/idsvr/etc/init/cluster.xml- ./license.json:/opt/idsvr/etc/init/license/license.jsonenvironment:SERVICE_NAME: 'Runtime1'CONFIG_ENCRYPTION_KEY: '${CONFIG_ENCRYPTION_KEY}'idsvr-runtime2:image: curity.azurecr.io/curity/idsvr:latesthostname: idsvr-runtime2volumes:- ./curity-config.xml:/opt/idsvr/etc/init/curity-config.xml- ./cluster.xml:/opt/idsvr/etc/init/cluster.xml- ./license.json:/opt/idsvr/etc/init/license/license.jsonenvironment:SERVICE_NAME: 'Runtime2'CONFIG_ENCRYPTION_KEY: '${CONFIG_ENCRYPTION_KEY}'apigateway:image: kong/kong-gateway:3.7ports:- 80:3000volumes:- ./kong.yml:/usr/local/kong/declarative/kong.ymlenvironment:KONG_DATABASE: 'off'KONG_DECLARATIVE_CONFIG: '/usr/local/kong/declarative/kong.yml'KONG_PROXY_LISTEN: '0.0.0.0:3000'
Update the API gateway routes in the kong.yml file with the following settings, to provide basic load balancing of OAuth requests for a Docker Compose deployment, using the features of the API gateway:
_format_version: '2.1'_transform: trueupstreams:- name: runtime-upstreamstargets:- target: idsvr-runtime1:8443- target: idsvr-runtime2:8443services:- name: runtimehost: runtime-upstreamsroutes:- name: runtimehosts:- login.curity-test.compaths:- /- name: adminurl: http://idsvr-admin:6749routes:- name: adminhosts:- admin.curity-test.compaths:- /
Once the configuration is updated, re-run the deployment with the following commands:
export CONFIG_ENCRYPTION_KEY=$(cat encryption.key)docker compose up
If you log back into the Admin UI, and navigate to System → Overview, you will see the configured instances and can check the status of each of them:

Admin UI Deployment
The Admin UI provides visibility of settings. In production systems you should deploy the admin container, but you can avoid exposing the Admin UI to the internet. Note that runtime containers can continue to run reliably with the last good configuration, even if the admin container is temporarily unavailable.
Use Service Roles
You can take closer control over deployments using Service Roles. For example, if you are using a full version of the Curity Identity Server, you might use the default service role for instances of your authorization server.
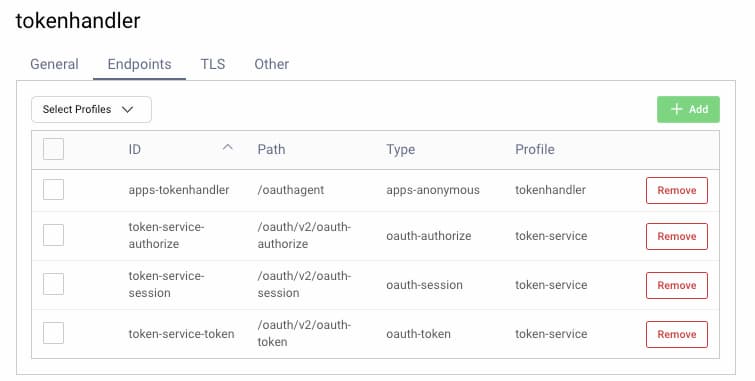
You could create an independent service role for containers that provide Token Handler Endpoints for your Single Page Applications. To do so, navigate to System → Deployment and create an additional service role, providing its required endpoints:
You would then add additional entries to the Docker Compose configuration, that use a SERVICE_ROLE environment variable matching the name of the new service role. The extra instances would process all token handler requests, to avoid any impact on the main authorization server containers:
services:oauthagent1:image: curity.azurecr.io/curity/idsvr:latesthostname: oauthagent1volumes:- ./curity-config.xml:/opt/idsvr/etc/init/curity-config.xml- ./cluster.xml:/opt/idsvr/etc/init/cluster.xml- ./license.json:/opt/idsvr/etc/init/license/license.jsonenvironment:SERVICE_ROLE: 'tokenhandler'SERVICE_NAME: 'OAuthAgent1'CONFIG_ENCRYPTION_KEY: '${CONFIG_ENCRYPTION_KEY}'oauthagent2:image: curity.azurecr.io/curity/idsvr:latesthostname: oauthagent2volumes:- ./curity-config.xml:/opt/idsvr/etc/init/curity-config.xml- ./cluster.xml:/opt/idsvr/etc/init/cluster.xml- ./license.json:/opt/idsvr/etc/init/license/license.jsonenvironment:SERVICE_ROLE: 'tokenhandler'SERVICE_NAME: 'OAuthAgent2'CONFIG_ENCRYPTION_KEY: '${CONFIG_ENCRYPTION_KEY}'
Your API gateway enables you to route to containers in a service role using a different host name to the main authorization server. The following gateway routes provide an example:
upstreams:- name: oauthagent-upstreamstargets:- target: oauthagent1:8443- target: oauthagent2:8443services:- name: example-oauthagenthost: oauthagent-upstreamspath: /oauthagent/routes:- name: example-oauthagent-routehosts:- bff.product.examplepaths:- /oauthagent
Manage Configuration Updates
Once you know how to configure and deploy instances of the Curity Identity Server, you should also understand ways in which the configuration and its security settings can be updated at runtime, without requiring redeployment. There are three mechanisms for updating configuration. In all cases, the admin container communicates changes to runtime containers.
- Using the Admin UI
- Using the RESTCONF API
- Using the Command Line Interface (CLI)
When you make configuration changes, you typically need to promote them down a deployment pipeline. This is managed using parameterized configuration, which includes secure values that you must cryptographically protect.
The Configuration as Code tutorial walks you through performing these tasks and shows how to deal with both plaintext and secret environment-specific values. You then learn how to automate configuration backups, which can trigger automated pull requests and GitOps rollouts.
Conclusion
The Curity Identity Server provides convenient options for running a fast working system. When planning your deployed systems you must take control over your configuration. Once you understand the concepts, you can manage many security settings and deploy them effectively.
Finally, when planning production rollouts, see the Go Live Checklist for some best practice recommendations to ensure that your system is security hardened.

Join our Newsletter
Get the latest on identity management, API Security and authentication straight to your inbox.

Start Free Trial
Try the Curity Identity Server for Free. Get up and running in 10 minutes.
Start Free TrialWas this helpful?