Consentors in Financial-Grade
On this page
Intro
Our article answering the question What is PSD2? discusses the regulatory requirement that users must consent to the amount of money being paid, and to which party, before payment can be taken.
This article explores how to meet this requirement for an Open Banking scenario involving the following parties:
- Banks act as Account Servicing Payment Service Providers (ASPSPs) and host API endpoints.
- Merchants and Fintechs act as Third-Party Providers (TPPs) by supplying apps that call the above APIs.
- Consumers act as Payment Service Users (PSUs) and use apps to access their bank accounts.
Types of Authorization Redirects
In OAuth-secured applications, authorization redirects are most commonly used during the login process. An app externalizes the authentication complexity to an Authorization Server, which issues a general-purpose access token to the application.
It is also possible to use authorization redirects to prompt for user consent. This is often necessary for high privilege operations, such as issuing a payment. In such cases, the unique security features of the Authorization Server can again be used to issue high privilege tokens.
What are Consentors?
The Consentors Documentation explains the role of consentors and how they are configured in the Curity Identity Server:
Consentors
Consentors perform additional processing during delegation and token issuance. This can include processing runtime data, capturing the user's consent via external signing systems, then recording consent in a verifiable manner.
Open Banking Consent
The App2App Article explains how a Merchant App can meet its Strong Customer Authentication (SCA) requirement via a Bank Login App. The same Bank App would then be used to meet the User Consent requirement via a second authorization redirect. This flow typically involves the following high-level components:
Although there are quite a few components involved, all of the difficult security work is externalized. In particular, the Merchant App only needs to open a system browser and form an OpenID Connect authorization redirect.
Starting a Payment Transaction
An Open Banking Merchant App would typically start by asking the user to select a bank. After which, it would prompt an App2App login. The workflow then continues as illustrated below:
| Step | Details |
|---|---|
| 1. User buys products | The user checks out an item and is asked to select the bank and account for payment. |
| 2. Bank transaction created | The Merchant API calls the Bank Transactions API to create a transaction in an initial state. These API to API calls use a Mutual TLS back end flow with an eIDAS client certificate. |
| 3. Transaction ID returned | An identifier is returned from the Bank API, which then becomes a data-sharing mechanism between the Merchant and the Bank. |
| 4. Merchant app opens system browser | The Merchant App opens the system browser with an OpenID Connect authentication request URL. The Transaction ID returned from the bank is appended to a 'prefix scope' to form a runtime scope value. |
| 5. Merchant Authorization Server redirect | The system browser then sends a request to the Merchant Authorization Server, which will proxy to the Bank Authorization Server. |
| 6. Redirect response returned | The Merchant Authorization Server returns a redirect response to the system browser. |
| 7. Bank Authorization Server redirect | The Merchant App's system browser follows the redirect to start the consentor flow at the Bank Authorization Server. |
Note that the Prefix Scope is registered in the Authorization Servers as a value such as transaction- and then assigned to OAuth clients. Any runtime identifier can be appended to the prefix to form the full scope name.
Consentor Workflow
When the authorization redirect reaches the Bank Authorization Server, the user will typically already be signed in, so authentication will be a Single Sign-On event. The consent process then executes and involves the following steps:
| Step | Details |
|---|---|
| 1. Consentor invoked | The consentor process executes when configured against the OAuth client in the Bank Authorization Server. |
| 2. Prefix scope processed | The consentor extracts the runtime transaction ID from the prefix scope. |
| 3. Transaction id sent to API | The consentor calls the Transactions API with the current transaction ID. |
| 4. Consent attributes retrieved | The consentor receives attributes for this transaction to use during the consent process. |
| 5. Signing request created | The consentor calls the Bank Signing Service to save data for the authenticated user, to be consented to within a short time period. |
| 6. Redirect response returned | A URL to the bank signing app is returned to the system browser running in the Merchant app. |
| 7. Deep link followed | The system browser follows the deep link to invoke the Bank Signing App. |
| 8. Signing App gets signing requests | The signing app downloads transactions waiting to be signed and presents them to the user. Most commonly, there will only be a single item. |
| 9. User signs transaction | The user formally consents by following prompts to sign the transaction. |
| 10. Proof of consent stored | The signed details are stored in the Bank Signing Service as verifiable proof of consent. |
Consent User Actions
The handover to the signing app occurs when the Merchant App's system browser renders an initial screen. This gives the user options for launching their Mobile Banking Signing App, which could be installed on a separate device.
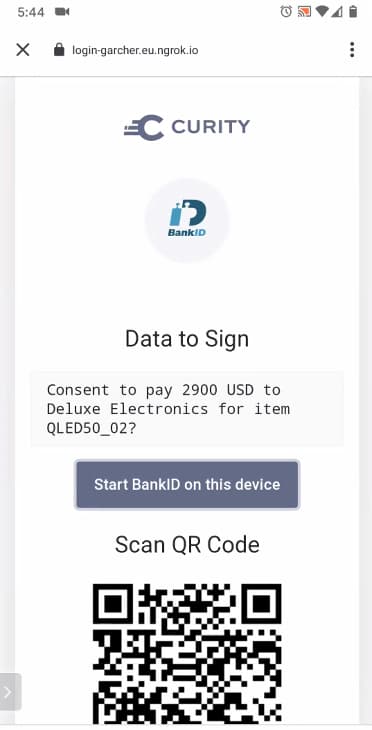
User consent then occurs in the Banking App, informing the user how much money is requested and who the Merchant is. The user will be asked to submit a signed request to record their consent in a verifiable manner:
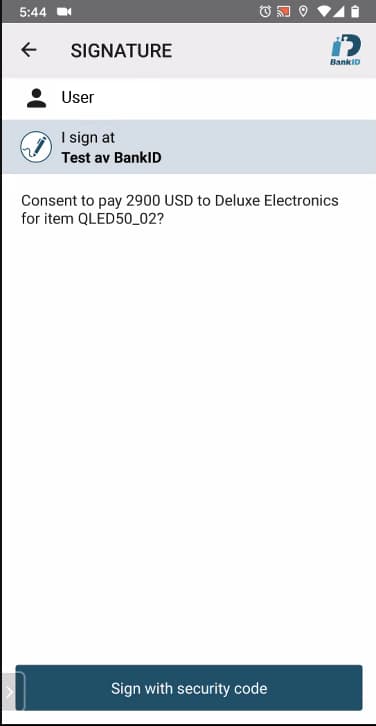
This illustrates a scenario where the bank uses BankID as their signing solution, though the implementation could be changed to any other strong signing or authentication service.
Consent Completion
The Bank Authorization Server will be notified of completion by the Signing Service. The following technical steps then occur to process the consent result and return the user to the Merchant App:
| Step | Details |
|---|---|
| 1. Bank Authorization Server notified | The Consentor polls the signing service and issues an authorization code when a successful response is received. |
| 2. Signing details stored | The Consentor receives details from the signing service, including the user's ID and name in that system. These details, along with the runtime transaction ID, are stored in the Bank Authorization Server's security state. |
| 3. Redirect response returned | The Bank Authorization code is returned to the system browser running in the Merchant App. |
| 4. System browser follows redirect | The system browser sends the Bank Authorization Code to the Merchant Authorization Server. |
| 5. Security state updated | The Merchant Authorization Server stores the Bank Authorization Code and will use it later, during token issuing. |
| 6. System browser receives result | The Merchant Authorization Server then issues its own authorization code. |
| 7. System browser closes | The system browser's work is now complete, so it closes, and the Merchant App receives the Merchant Authorization Code. |
| 8. User returned to Merchant App | Meanwhile, the Bank Signing App returns the user to the Merchant App. |
Token Issuing
The standard process of redeeming authorization codes for tokens then occurs, as illustrated below. As for the App2App flow, this is handled by returning only an opaque reference token to the Merchant App and saving the high privilege bank token in the Merchant's Authorization Server's state.
| Step | Details |
|---|---|
| 1. Merchant app requests tokens | The Merchant App completes its OpenID Connect flow by swapping the authorization code for tokens. |
| 2. Merchant Authorization Server requests tokens | The Merchant Authorization Server retrieves the Bank Authorization Code from its stored state, then sends it to the Bank Authorization Server. |
| 3. Bank Authorization Server issues claims | The Bank Authorization Server retrieves its stored state and issues an access token. The token claims include the runtime transaction ID and personal details received from the signing service. |
| 4. Bank Authorization Server returns tokens | The Bank Authorization Server then returns the token to the Merchant Authorization Server. |
| 5. Merchant Authorization Server stores state | The Merchant Authorization Server performs its own token issuing for the Merchant API and stores the high privilege bank access token in its server state. |
| 6. Merchant app receives an opaque access token | The Merchant App receives an opaque reference token which it can use to complete the transaction in the Merchant's back end. |
Completing a Payment Transaction
Finally, the Merchant App can complete the transaction by sending its reference token to its own back end. The Merchant API will then call the Bank Transactions API over Mutual TLS with the high privilege bank access token:
| Step | Details |
|---|---|
| 1. Merchant app completes the purchase | The Merchant App calls its own API to complete transaction processing, using the access token received. |
| 2. API gateway swaps tokens | The Merchant's API gateway uses the phantom token pattern to swap the reference token for a composite token. |
| 3. Merchant API receives composite token | The Merchant's API receives both its own JWT and the bank access token. |
| 4. Merchant API calls Bank API | The bank access token is used to notify the bank to release funds. |
| 5. Bank API verifies claims | The bank verifies that the transaction exists as an access token claim, since each access token is only valid for one particular transaction. |
| 6. Bank API verifies proof of consent | The bank also verifies that the signing service has recorded user proof of consent for this particular transaction. |
Authorization Server Configuration
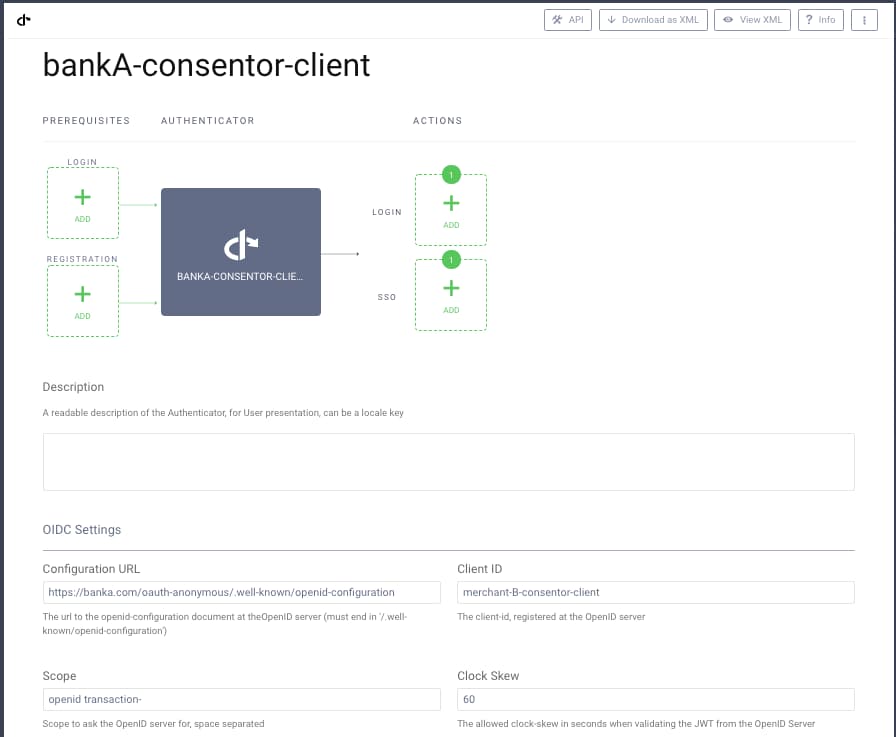
In both the Merchant and Bank Authorization Servers, two different connections will be configured; one for App2App logins and the other for Consent. In the below Curity Identity Server configuration, the Merchant configures a Bank OpenID Connect Authenticator to use for the consent redirect:
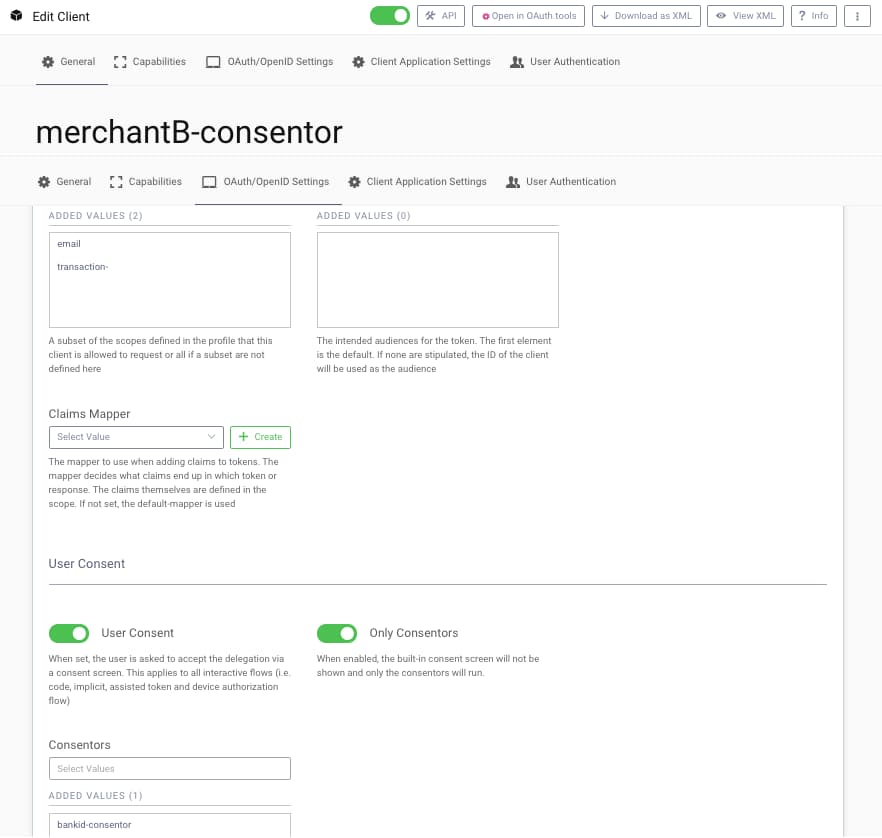
Similarly, the Bank configures an OAuth Client for a particular Merchant to use for consent. The Merchant client connections will be created via Dynamic Client Registration, as discussed in the What is Financial Grade? article.
Video Tutorial
The below video tutorial walks through using consentors in The Curity Identity Server in a step-by-step manner. The associated Curity configuration is also available in the Consentors GitHub Repository.

Conclusion
Consentors are a mechanism to manage user consent dynamically, deal with runtime money and account details, and provide digitally verifiable proof of this consent. This enables business partners to securely interoperate and receive trusted data while ensuring that the user is in control.


Gary Archer
Product Marketing Engineer at Curity
Customer Stories
Learn how organizations run identity and API security at scale.
Read customer storiesWas this helpful?