
Preregister Devices in a WebAuthn Authenticator
On this page
In the WebAuthn authenticator tutorial we've shown you how to configure WebAuthn authenticator in the Curity Identity Server, so that users can leverage this powerful way of authenticating. One scenario where WebAuthn is used is when users can only log in using WebAuthn devices, they are not allowed to register new devices. However, for this scenario to work, a way of performing an out-of-band registration of such devices is needed (hence preregistration). A registration of a WebAuthn device means that the device needs to create a new credential (a pair of private and public key), and that the public key needs to be saved in the Authorization Server, tied to an existing user account. Very often this scenario will be used in a corporate setting, where a company's employees can log in with key-fobs distributed by the company.
This tutorial shows how this scenario can be achieved in the Curity Identity Server. There is a video at the end of this article which shows how to configure this scenario in admin UI. There is also a demonstration of how it works. The video uses different authenticators and filters than the ones used in the article to present a variety of options.
Prerequisites
The WebAuthn authenticator is bundled with the Curity Identity Server since version 6.2., so make sure to use at least this version.
Overview of the Implementation
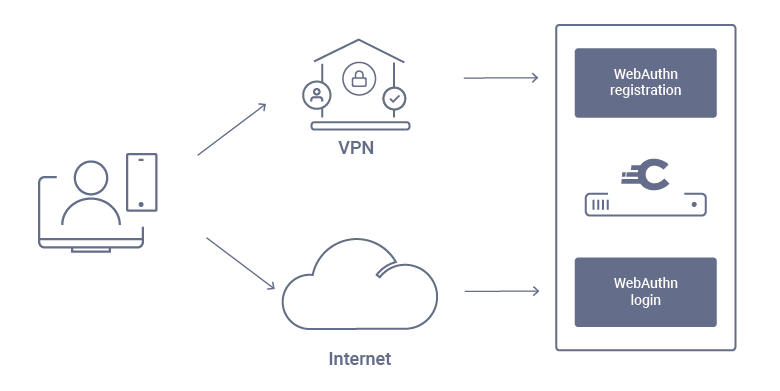
Two WebAuthn authenticators are needed for this scenario to work. One authenticator will be used to register devices, the other will be used to log in.
The registration needs to be completed in two separate places - on the WebAuthn device (like a key-fob or a Windows Hello) and in the Curity Identity Server. Once a registration ceremony is triggered on the WebAuthn device, a new credential is generated, and the public key is sent back to the Curity Identity Server. The Curity Identity Server can now save the public key in a data store and assign it to a user account - it is assigned to the currently authenticated user. In order to properly fulfill this process the registration has to be done using an authenticator.
The authenticator used for preregistration will be the only one that has a registration prerequisite. That prerequisite should be a strong authenticator, which ensures that only users which should be able to register a WebAuthn device can log in. E.g. this can be an Active Directory authenticator, which only authenticates a company's employees. Additionally, this authenticator can be limited to be only available to users on a private network. Alternatively, this can be an authenticator which only allows an admin user to log in, and then performs an On-Behalf-Of flow to impersonate another user, for whom the admin wants to register a new device.
Another WebAuthn authenticator should be enabled with the option to only log in users. This authenticator will be available publicly.
Configuring the Authenticators
Below are the steps which should be taken to configure the two authenticators needed for the preregistration scenario. If you prefer to follow video instruction, there is a demo at the end of this article.
The Registration Authenticator
In the Authentication Service, go to Authenticators and click on + New Authenticator button. Choose a suitable name for your authenticator and select the WebAuthn authenticator. Then click Create to get to the configuration of the authenticator.
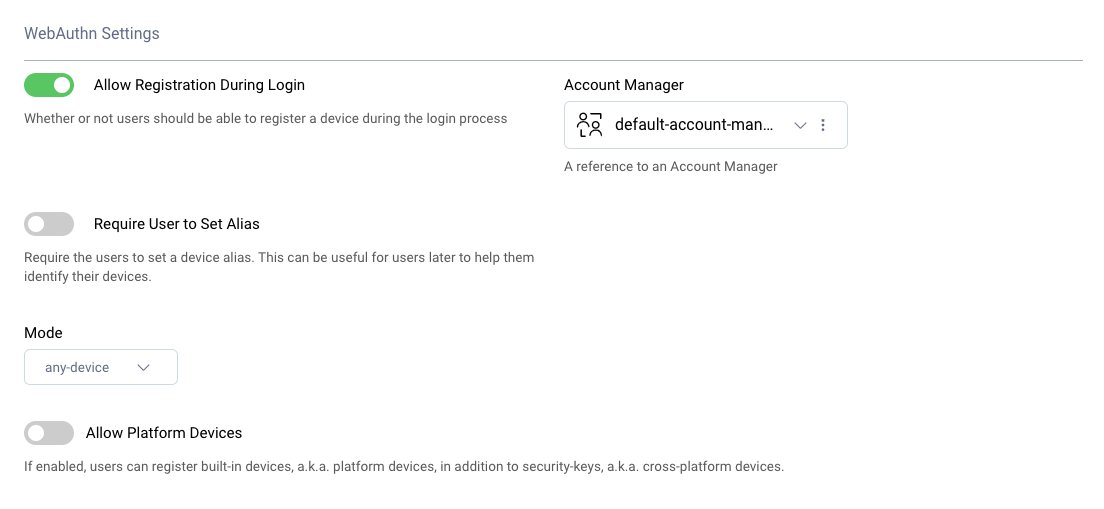
Leave the Allow Registration During Login option enabled. Choose an appropriate Account Manager, then in the dropdown menu for the Mode select any-device and disable the option Allow Platform Devices. Only cross-platform devices should be allowed to register in this step.
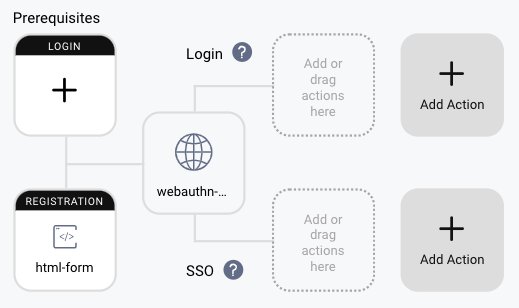
Now, create a new authenticator which will be used as a prerequisite to the WebAuthn registration. Go back to Authentication Service → Authenticators and again click on + New Authenticator button. For this tutorial, a simple HTML form will be created, and then its use limited to an IP, so it is visible only from inside the company's network. Choose HTML Form, provide a name for the authenticator and click Create. Choose the Account Manager and Credentials Manager which should be used by this authenticator.
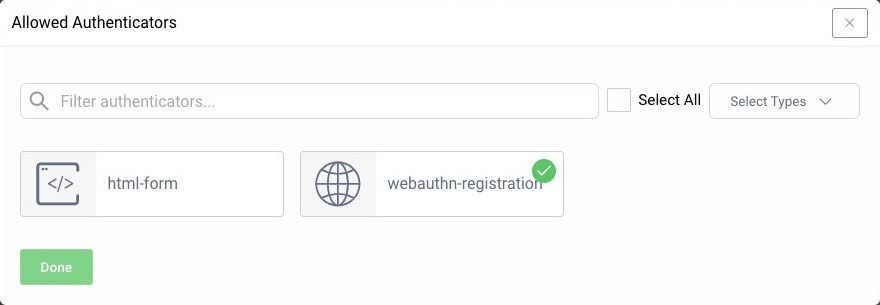
Go back to the WebAuthn authenticator, and add the HTML authenticator as a prerequisite for registration.
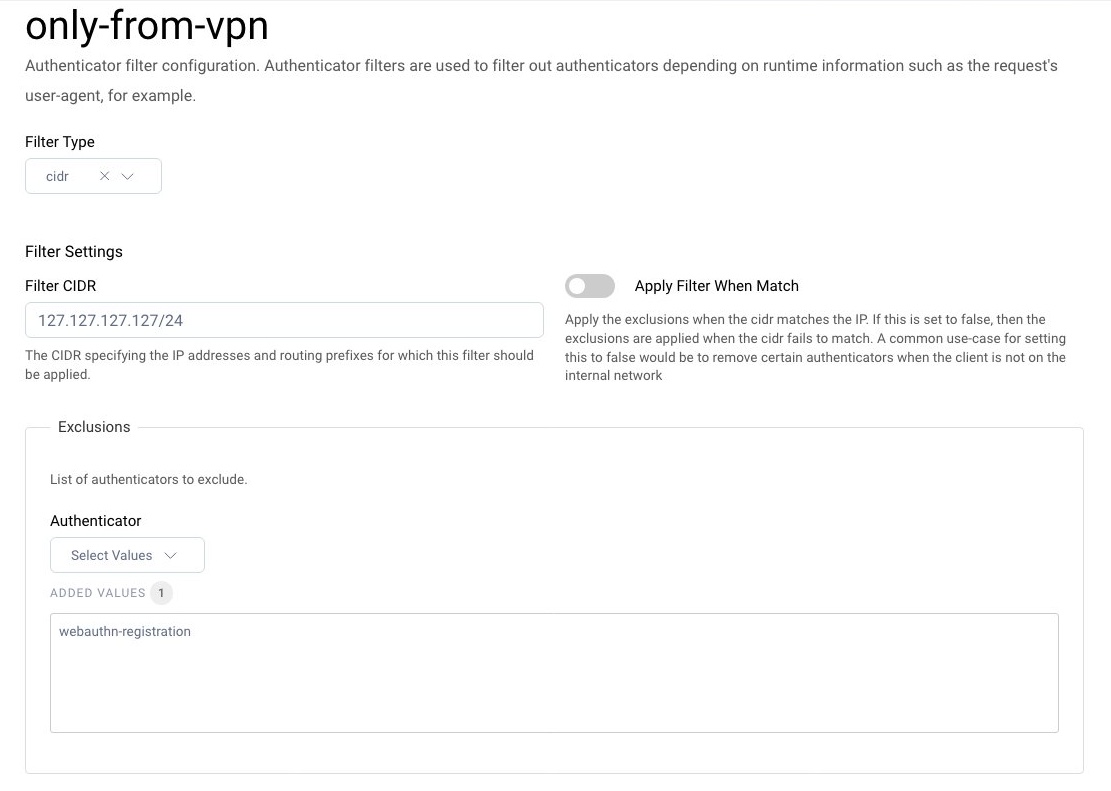
Now, create a filter, which will display this registration authenticator only when a user is in the company's network.
Remember that filters are not a security feature
Remember that a filter is only a UX helper. Users can still access the authenticator directly via a link. To disable access to an authenticator from outside your network, you can create an Authentication Action plugin, which accepts a Request object in the constructor and denies or approves the authentication attempt based on the user's IP address.
Go to Authentication Service → Filters and click on + New Filter. Provide a name for your filter and chose the type CIDR. Then click Create. Next, enter the CIDR of your VPN network, disable the option Apply Filter When Match and add the WebAuthn authenticator to the list of authenticators to exclude. Now this authenticator will not be shown if the user is outside your network.
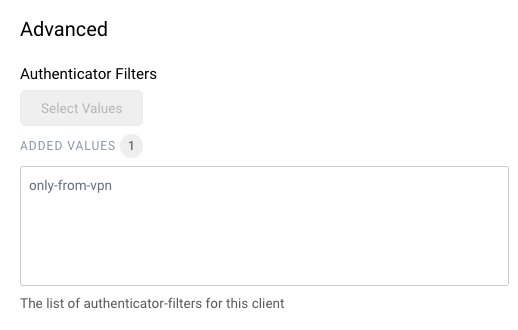
Next, go to Token Service → Clients and edit the client which will be used for registration flow. In the User Authentication box add the WebAuthn authenticator, then click on the User Authentication tab. In the Advanced section add the Authenticator filter created before.
The Login Authenticator
Again in the Authentication Service, go to Authenticators and click on + New Authenticator button. Choose a suitable name for the authenticator and select the WebAuthn authenticator. Then click Create to get to the configuration of the authenticator.
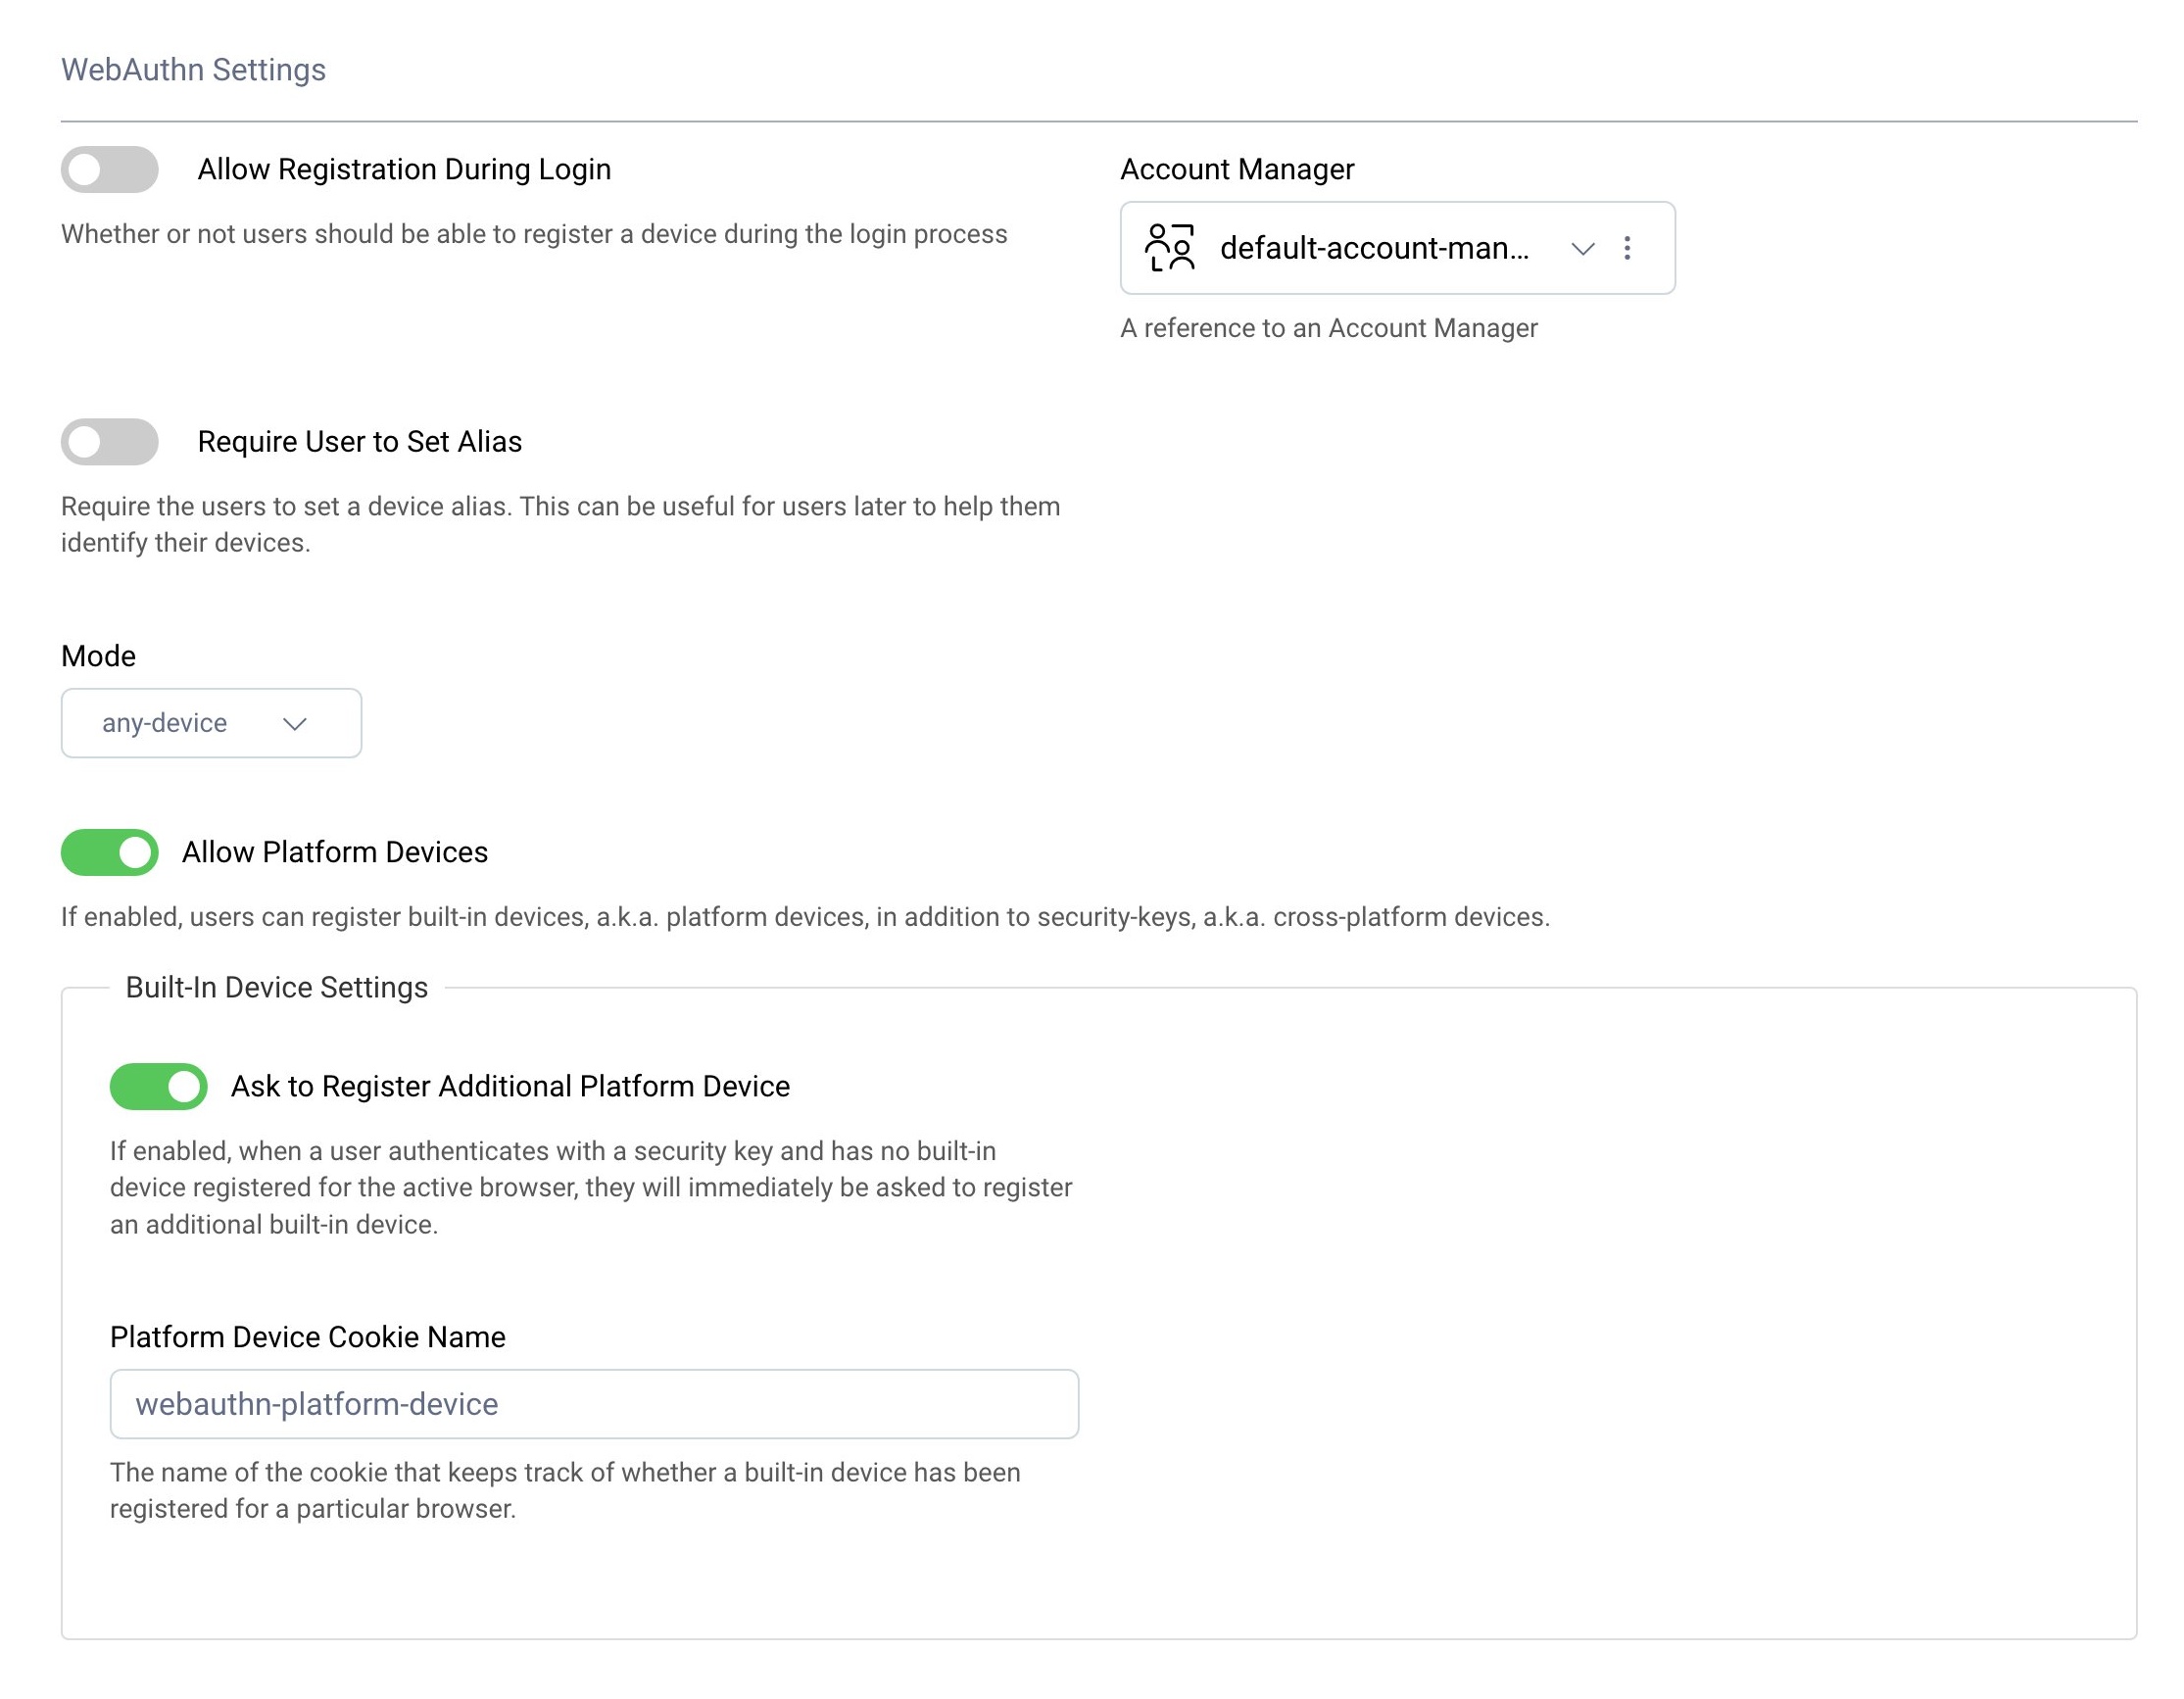
Disable the option Allow Registration During Login, then choose an appropriate Account Manager. In the dropdown menu for the Mode select any-device. If you want to improve user experience, leave enabled the options Allow Platform Devices and Ask to Register Additional Platform Device. This way, once the user logs in with their cross-platform device, the Curity Identity Server will allow them to register a platform device. From now on the user will be able to log in with the platform device, but they will not be able to register a platform device without having access to the cross-platform device registered beforehand.
Now add this authenticator to the list of authenticators allowed for the client which will be used for authentication. Very often this will be the same client as used for registration.
Register With a Direct Link
In the setup described above the registration authenticator will show up as an option whenever an employee tries to log in from a company's network. However, once they are registered, they shouldn't see that option over and over again. So, instead of showing that authenticator in some cases, you can create a filter which will hide that authenticator in all cases. A script filter can be used for that purpose. The configuration shown in the demo video at the end of this article uses this approach.
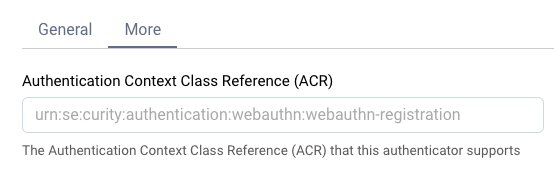
Then, an authorization request can be created, which will direct straight to the registration authenticator, by adding the acr_values parameter. You can check the current value of ACR of your registration authenticator in the More tab of the chosen authenticator. From there you can also change the default ACR value used for the given authenticator.
Demo
The demo below shows how to set up WebAuthn authenticator for preregistration using the Curity Identity Server's admin UI. In the video, BankID is used as the sample authenticator, and a script filter is used to hide the authenticator from the list of available options.
Conclusion
With this scenario you can enable preregistration of cross-platform devices in a controlled way. Once the devices are registered, they can be used freely to log in. This gives a better control of who uses WebAuthn in a system and what devices are used for registration and authentication.

Join our Newsletter
Get the latest on identity management, API Security and authentication straight to your inbox.

Start Free Trial
Try the Curity Identity Server for Free. Get up and running in 10 minutes.
Start Free Trial


