
On this page
The Install on AWS using CloudFormation tutorial explains how to deploy to AWS EC2 virtual machines, using CloudFormation templates directly. A newer and more developer-friendly option is to instead use the AWS Cloud Development Kit (CDK). This enables you to express infrastructure as code in your preferred programming language, then use type checking and intellisense features for fast feedback.
Get the Deployment Example
A TypeScript example is provided to show how to deploy a clustered installation of the Curity Identity Server using the AWS CDK. Use the GitHub link on this page to clone the repository.
CDK Application
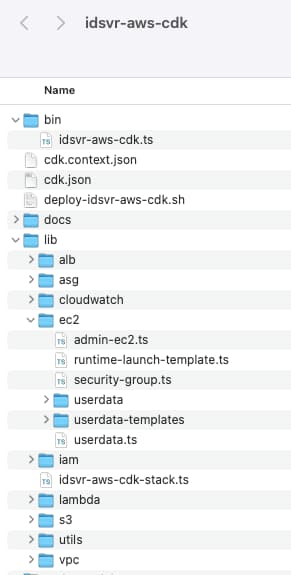
The cdk.json file tells the toolkit how to run the app. This uses the npx package runner to invoke the application entry point at bin/idsvr-aws-cdk.ts, and the ts-node engine compiles TypeScript to the JavaScript code that npx expects. The entry point loads a unit of deployment called a stack. This is represented in the lib/idsvr-aws-cdk-stack.ts module, which defines each infrastructure resource.
npx ts-node --prefer-ts-exts bin/idsvr-aws-cdk.ts
Infrastructure Objects
Each AWS infrastructure object is defined as a resource in TypeScript code. Both strong typing and intellisense can be used to find properties and fix problems early, before running a cloud deployment. The following code defines the admin node of the Curity Identity Server as an EC2 instance:
import { StackProps } from 'aws-cdk-lib';import { SubnetType, InstanceType, GenericLinuxImage, Instance } from 'aws-cdk-lib/aws-ec2';import { IdsvrAwsCdkStack } from '../idsvr-aws-cdk-stack';export class AdminNodeInstance {private _adminEC2Instance: Instance;constructor(stack: IdsvrAwsCdkStack, id: string, props?: StackProps, customOptions?: any) {this._adminEC2Instance = new Instance(stack, 'curity-admin-node', {vpc: customOptions.vpc,vpcSubnets: {subnetType: customOptions.environmentVariables.AWS_VPC_DEPLOYMENT_SUBNETS_TYPE === 'PRIVATE' ? SubnetType.PRIVATE_WITH_EGRESS : SubnetType.PUBLIC},instanceType: new InstanceType(customOptions.environmentVariables.ADMIN_INSTANCE_TYPE),machineImage: new GenericLinuxImage({[customOptions.awsRegion]: customOptions.lambdaResource.getAtt('amiId').toString()}),role: customOptions.curityAdminIAMRole,securityGroup: customOptions.adminSecurityGroup,keyName: customOptions.environmentVariables.AWS_EC2_KEY_PAIR_NAME,userData: customOptions.adminNodeUserData});}get adminNodeEC2Instance() {return this._adminEC2Instance;}}
Exporting and Importing CloudFormation
During development you can run the cdk synth command to get the CloudFormation yaml that will be generated from the TypeScript code. In the event of any properties being expressed incorrectly, this will result in fast feedback via a compile error. You can also use options to migrate CloudFormation templates to the CDK.
Run the Deployment
To get started by running this tutorial's example deployment, first ensure that the prerequisite setup is in place:
- You must have an AWS account, with the AWS CLI installed and configured
- The AWS CDK v2 must be installed
- An up to date version of Node.js must be installed
The README describes various options you can use for the deployment, and configure in the .env file. Start by installing Node.js dependencies:
npm installnpm --prefix lib/lambda install
Next, run the following bootstrap command, to prepare resources, including an S3 bucket for uploading resources:
cdk bootstrap
For a default installation, leave all options blank and run the deployment with the following command:
./deploy-idsvr-aws-cdk.sh --install
Later, when you have finished with the tutorial, run the following command to free all resources:
./deploy-idsvr-aws-cdk.sh --delete
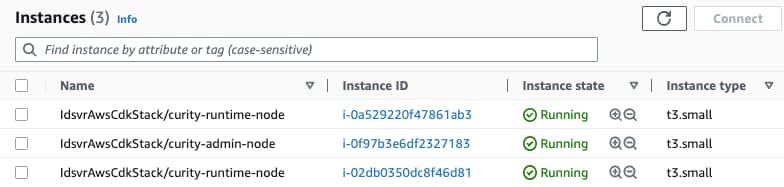
After initiating the deployment, it will take a few minutes for all cloud resources to be created. Once complete, the CDK command will output two URLs for the Curity Identity Server. The first of these is the Admin UI. The second is the load balanced base URL for the runtime nodes, which your applications will call when making OAuth requests:
https://curity-alb-1152274700.eu-west-2.elb.amazonaws.com:6749/adminhttps://curity-alb-1152274700.eu-west-2.elb.amazonaws.com/oauth/v2/oauth-anonymous/.well-known/openid-configuration
In the AWS console, you can then navigate to EC2 and view details for the deployed instances, to inspect networking and load balancing configuration:
Use the System
Login to the Admin UI as the admin user, with the ADMIN_PASSWORD credential value from the .env file of the deployment. If you used default deployment options, a self signed certificate will have been generated and you will need to accept a browser warning. When prompted, complete the initial setup wizard and accept all default options. After a couple of minutes you will then also be able to access the runtime URL, so that the overall system is in a working state.
Connect to Remote EC2 Instances
If you did not specify an EC2 keypair in the .env file, one is created for you, and the private key is downloaded to the root of the project. If you then enable internet access for an EC2 instance, you can make a remote connection to it with a command similar to this:
ssh -i ec2-cdk-key-pair-2945.pem idsvr@18.132.61.67
Curity Identity Server Infrastructure
In total the code example deploys a number of resources, needed for an end-to-end deployment to work correctly. The main components are summarized in the below table, and each CDK object can be studied to understand its properties:
| Component | Description |
|---|---|
| Lambda | A lambda function that finds the latest Amazon Machine Image (AMI) for the Curity Identity Server |
| Admin Node | The single EC2 instance is used for the admin node |
| Launch Template | A launch template used to spin up multiple runtime EC2 instances |
| Application Load Balancer | An ALB is used to expose the Curity Identity Server nodes to the internet |
| Security Settings | These enable the admin node, runtime nodes and application load balancer to communicate |
Environment Variables
The ec2/userdata.ts file provides AMI base images with custom user data, including runtime environment variables. The AMI image looks for variables called CURITY_CFN_ADMIN and S3_BUCKET_NAME. When these are set, the first run configuration generates an initial cluster configuration, for a Standalone Admin Setup, and saves it to the S3 bucket.
Customizations and Plugins
The ec2/userdata-templates file is used to integrate the Amazon Elastic File System (EFS) with EC2 instances. This enables you to share look and feel customizations or custom plugins across multiple nodes of the Curity Identity Server.
IAM Roles and Permissions
The iam/iam.ts file deals with AWS permissions, to generate policy documents. This grants permissions so that the EC2 instance can interact with S3, cloudwatch and other managed cloud resources. These permissions enable the admin node to push the initial cluster.xml document to S3, and for runtime nodes to then download it.
Productionize your Deployment
In a real-world deployment you would need to do further work, to finalize your deployment. This could include use of custom domain names via Route 53, with trusted internet certificates provided by AWS Certificate Manager. See the GitHub repository's README for further details on use of AWS certificates.
The example deployment uses only an in-memory database, and you would need to update to a database of your choice for permanent storage, such as DynamoDB. See also IAM configuration best practices, for some recommendations on managing the security configuration.
Conclusion
AWS CloudFormation provides an infrastructure as code approach for your deployments. It is best combined with modern developer tooling, to ensure that you also receive immediate feedback if you supply CloudFormation properties incorrectly. Using these tools, the Curity Identity Server can be deployed to the AWS cloud in a productive manner.
Join our Newsletter
Get the latest on identity management, API Security and authentication straight to your inbox.
Start Free Trial
Try the Curity Identity Server for Free. Get up and running in 10 minutes.
Start Free Trial


