On this page
Overview
The OAuth proxy plugin can be deployed with an NGINX LUA based reverse proxy or API gateway. Its role is to deal with secure cookies and cross origin permissions, rather than needing to complicate code within your APIs. This article will show how to run, deploy and test the plugin.
Get the Code
First download the code from the GitHub repository, via the following command. The repository files consist of the plugin's LUA code and also some helper scripts for deployment and testing on a development computer:
git clone https://github.com/curityio/nginx-lua-oauth-proxy-plugin
Prerequisites
Ensure that you have these components installed on the local computer:
The plugin is coded in the high level LUA programming language and can run in any NGINX based system with the LUA module enabled. To demonstrate this, a deployment script is included that can run the plugin in either Kong Open Source or OpenResty using Docker containers.
API Route Configuration
When using Kong, the OAuth proxy plugin is configured for an API or path using the required settings shown below. This enables it to return CORS headers for the SPA, and to decrypt received cookies:
_format_version: '2.1'_transform: trueservices:- name: business-apiurl: http://apiserver:3001routes:- name: business-api-routepaths:- /plugins:- name: oauth-proxyconfig:cookie_name_prefix: exampleencryption_key: $ENCRYPTION_KEYtrusted_web_origins:- http://www.example.comcors_enabled: true
When using OpenResty, the equivalent configuration looks like this:
location ~ ^/ {rewrite_by_lua_block {local config = {cookie_name_prefix = 'example',encryption_key = os.getenv('ENCRYPTION_KEY'),trusted_web_origins = {'http://www.example.com'},cors_enabled = true}local oauthProxy = require 'resty.oauth-proxy'oauthProxy.run(config)}proxy_pass http://apiserver:3001;}
If required, the allow_tokens optional property can be used to pass requests that already contain a bearer token directly to the API, without applying cookie logic. In some setups this enables the same API routes to be used for both web and mobile clients. If some API routes are unsecured and return public information, you can use the path features of the reverse proxy to exclude the plugin from those routes.
Cross Origin Resource Sharing (CORS)
If the reverse proxy is deployed in a different domain to the web host, then CORS request and response headers need to be managed. In this case cors_enabled must be set to true. If instead you are running a same site deployment, with the reverse proxy running in the web host's domain, use the false setting instead.
When required, the plugin can return CORS Response Headers needed for the SPA and API to interact, and it is preferred to manage this concern in the gateway rather than complicating your API code. By default the plugin will return the following headers, and a number of optional CORS settings can be used for finer control. These are described in the README file of the GitHub repository.
access-control-allow-origin: http://www.example.comaccess-control-allow-credentials: trueaccess-control-allow-methods: OPTIONS,GET,HEAD,POST,PUT,PATCH,DELETEaccess-control-allow-headers: x-example-csrfaccess-control-max-age: 86400
Managing Cookie Encryption Keys
The OAuth proxy will receive secure cookies encrypted using AES256, and needs to be able to decrypt them, so must be configured with the same 32 byte (256 bit) symmetric key that the OAuth Agent uses, and this must be represented as 64 hex characters. The encryption key can be initially generated using a command such as the following:
openssl rand 32 | xxd -p -c 64
Encryption keys should be renewed periodically as part of your deployments. Curity token handler components and the SPA Code Example handle this condition reliably. Users with existing sessions whose cookies use the old encryption key will need to sign in again, but will not experience any errors.
Deploy the Plugin
The simplest way to deploy the plugin is to use a custom Dockerfile and luarocks install, which deploys both the plugin and its dependencies. It is also possible to clone the GitHub repo and manually copy files to the locations described in this section.
Kong Deployment
The below example Dockerfile also installs the Kong Phantom Token Plugin. The luarocks command uses git to download LUA files, and it may be necessary to run git config commands first, depending on your environment.
FROM kong:3.0.0-alpineUSER rootRUN git config --global url."https://".insteadOf git:// && \git config --global advice.detachedHead false && \luarocks install kong-oauth-proxy 1.3.0 &&luarocks install kong-phantom-token 2.0.0USER kong
This deploys three files called handler.lua, schema.lua and access.lua to the docker image, inside an oauth-proxy folder within the Kong plugins location, which is a path such as /usr/local/share/lua/5.1/kong/plugins. The Docker Compose file then needs to reference the additional plugins in the KONG_PLUGINS environment variable.
version: '3.8'services:kong:image: custom_kong:3.0.0-alpinehostname: kongserverports:- 3000:3000volumes:- ./kong/kong.yml:/usr/local/kong/declarative/kong.ymlenvironment:KONG_DATABASE: 'off'KONG_DECLARATIVE_CONFIG: '/usr/local/kong/declarative/kong.yml'KONG_PROXY_LISTEN: '0.0.0.0:3000'KONG_LOG_LEVEL: 'info'KONG_PLUGINS: 'bundled,oauth-proxy,phantom-token'profiles:- kong
OpenResty Deployment
The equivalent command to build the OpenResty custom Docker image is almost the same, and this example also deploys the OpenResty Phantom Token Plugin:
FROM openresty/openresty:1.21.4.1-bionicRUN apt-get update && apt-get install git -yRUN git config --global url."https://".insteadOf git:// && \git config --global advice.detachedHead false && \luarocks install lua-resty-oauth-proxy 1.3.0 && \luarocks install lua-resty-phantom-token 2.0.0
This deploys an oauth-proxy.lua file to the docker image, inside a resty folder within the lua_package_path, at a location such as /usr/local/openresty/lualib/resty. The Docker Compose file then needs to reference an NGINX configuration:
version: '3.8'services:openresty:image: custom_openresty/openresty:1.21.4.1-bionichostname: openrestyserverports:- 3000:3000volumes:- ./openresty/nginx.conf:/usr/local/openresty/nginx/conf/nginx.confprofiles:- openresty
Test the Plugin
Some basic integration tests are provided and use the curl tool to test various success and failure scenarios. These will help you to understand the plugin's behavior, and the responses returned to your applications. First deploy a local Docker image for your preferred Lua platform:
cd docker./deploy.sh kong./deploy.sh openresty
Then run some curl based tests to act as a Single Page Application:
cd ../test./test.sh
The plugin follows OWASP Cross Site Request Forgery (CSRF) Best Practices for calls to APIs with secure cookies. This includes verifying the web origin and applying double submit cookie checks.
5. Testing CORS headers for error responses to the SPA ...5. CORS error responses to the SPA have the correct headers6. Testing GET with a valid encrypted cookie ...6. GET with a valid encrypted cookie was successfully routed to the API{"accessToken": "42665300-efe8-419d-be52-07b53e208f46"}7. Testing POST with missing CSRF cookie ...7. POST with a missing CSRF cookie was successfully rejected{"code": "unauthorized","message": "The request failed cookie authorization"}8. Testing POST with missing CSRF header ...8. POST with a missing CSRF header was successfully rejected{"code": "unauthorized","message": "The request failed cookie authorization"}9. Testing POST with incorrect CSRF header ...9. POST with an incorrect CSRF header was successfully rejected{"code": "unauthorized","message": "The request failed cookie authorization"}10. Testing POST with correct CSRF cookie and header ...10. POST with correct CSRF cookie and header was successfully routed to the API{"accessToken": "42665300-efe8-419d-be52-07b53e208f46"}
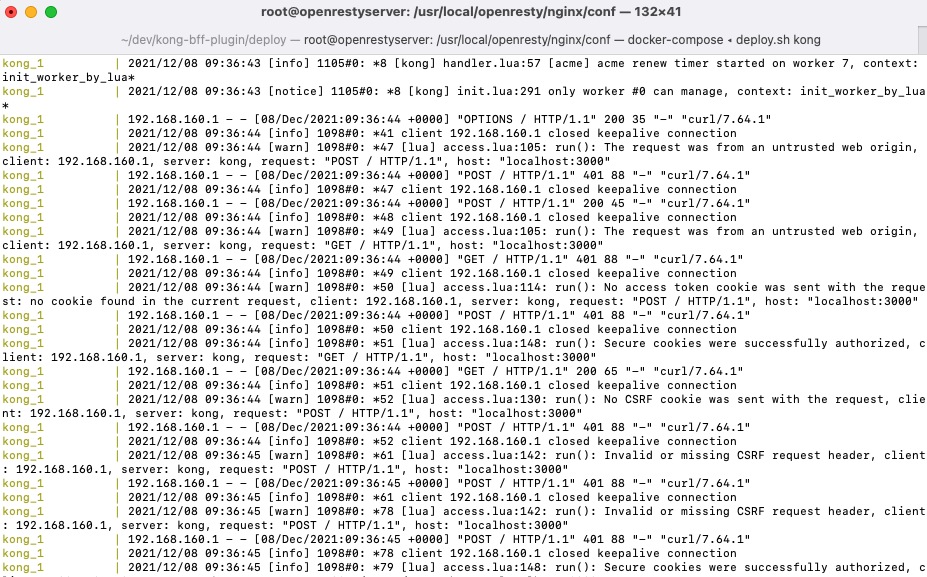
During execution you can view details of invalid and valid requests written to NGINX logs:
Access Token Types
The plugin can work with secure cookies that contain either of these access token types. The opaque option is recommended and is used by the SPA using Token Handler Pattern code example.
| Access Token Type | Behavior |
|---|---|
| Opaque | This keeps cookie sizes small, in which case a phantom token plugin is run next to get a JWT |
| JWT | This leads to large cookie sizes that can exceed default HTTP header size limits allowed by NGINX |
Browsers and HTTP servers typically have a 4KB per cookie limit, so aim to stay within that. If the overall size of the cookie header exceeds 4KB then NGINX requires you to change server properties such as proxy_buffers, proxy_buffer_size and large_client_header_buffers. See the NGINX HTTP Proxy Module documentation for further details.
Conclusion
The OAuth proxy plugin enables you to handle cookie and CORS aspects centrally in the API gateway, and the cookie decryption key is also managed there. This enables you to use the strongest browser security in your SPAs without impacting the code or deployment of your APIs.
Join our Newsletter
Get the latest on identity management, API Security and authentication straight to your inbox.
Start Free Trial
Try the Curity Identity Server for Free. Get up and running in 10 minutes.
Start Free Trial


